一、基础
1,首先是虚拟环境的配置
pip install virtualenv -i https://pypi.doubanio.com/simple # 豆瓣源安装虚拟环境
mkdir falsk-venv
cd falsk-venv
virtualenv venv  # 在当前目录下床架一个目录,表示虚拟环境的目录名为venv,包含了Python可执行文件,以及pip库的一个备份
当然如果本机存在多个版本的Python,可以选择一个Python,可以选择一个Python解释器,在指定之前,必须将flask-venv目录下整个文件夹都删掉再使用
virtualenv -p C:Python27\python.exe venv # -p 用来指定Python解释器程序的路径
那如何激活使用虚拟环境呢?
在cmd里面输入
dir
activate  # 激活虚拟环境
deactivate  # 退出虚拟环境
rmvirtualenv flask-venv  # 删除虚拟环境
2,Flask 快速上手
使用pycharm来创建
from flask import Flask

app = Flask(__name__)


@app.route('/')
def hello_world():
    return 'Hello World!'


if __name__ == '__main__':
    app.run()
有人会问啊,为什么非要加这个
if __name__ == '__main__':
其实原因是在python中,所有没有缩进的代码都会被执行,__name__是Python的内建函数,指的是当前模块的名称,,每个模块都有这个属性,但__name__是可以变化的,如果某个模块直接被运行那么__name__ = '__main__', 条件为真,但是当模块被导入的时候就为假,也就是app.run()不会被执行。
和Django不同的是flask的路由是以装饰器的形式加载所需要执行视图函数的上方
调试:
django的开启调试是在settings中的DEBUG=True,而flask简单很多,在app.run()中加入debug=True即可
from flask import Flask

app = Flask(__name__)


@app.route('/')
def hello_world():
    return 'Hello World!'


if __name__ == '__main__':
    app.run(debug=True)  # 开启调试
flask开启调试好处是什么呢?
1,遇到程序有bug,会在控制台输出具体的错误信息,否则只会报笼统的应用服务器错误。
2,自动重启
当然app.run中可以加的参数还有很多,比如设定host,port
另外说一句:默认的port就是5000
from flask import Flask

app = Flask(__name__)


@app.route('/')
def hello_world():
    return 'Hello World!'


if __name__ == '__main__':
    app.run(debug=True, host='0.0.0.0', port=8000)
二、URL传递参数
Flask传递参数的语法是'/参数/'
注意点:①参数需要放在一对<>②视图函数中需要设置与URL中相同的参数名
from flask import Flask

app = Flask(__name__)


@app.route('/user/<name>')
def hello_world(name):
    return f'Hello World!{name}'


if __name__ == '__main__':
    app.run(debug=True, host='0.0.0.0', port=8000)
像这个就是没有指定数据的类型的,那么默认的就是string
from flask import Flask

app = Flask(__name__)


@app.route('/user/<int:id>')
def hello_world(id):
    return f'Hello World!{id}'


if __name__ == '__main__':
    app.run(debug=True, host='0.0.0.0', port=8000)
像这样就是指定接收的参数类型为int类型,传递参数str或者float都是不行的
三、URL的反转
我们知道Django的URL反转模板语言中使用的是这样{% url ‘name’ %} 通过别名的方式,视图函数中是这样
from django.shortcuts import reverse
reverse('article:article_detail', kwargs={'id': article_id, 'slug': slug})
但是在flask中,URL的反转却很有意思直接使用url_for
from flask import Flask, url_for

app = Flask(__name__)


@app.route('/user')
def hello_world(id):
    reverse_path = url_for('hello_world')
    return f'Hello World!{reverse_path}'


if __name__ == '__main__':
    app.run(debug=True, host='0.0.0.0', port=8000)
使用URL的反转,使用的是
from flask import url_for
最简单的做法即使以视图函数的名称作为参数,就像上面例子得到的就是/user
三、模板引擎jinja2
因为jinja2和Django模板引擎基本一样,所以基础的就不讲了,直接开干
比方说我们随便在templates目录下新建一个html文件user.html
<!DOCTYPE html>
<html lang="en">
<head>
    <meta charset="UTF-8">
    <title>Title</title>
</head>
<body>
<div>{{ name }}</div>

</body>
</html>
app.py文件代码如下:
from flask import Flask, render_template

app = Flask(__name__)


@app.route('/user')
def hello_world():
    name = '先生'
    return render_template('user.html', name=name)


if __name__ == '__main__':
    app.run(debug=True, host='0.0.0.0', port=8000)
和Django的不同的是:Django使用render(request, '模板')来进行返回
Flask通过render_template()函数来实现模板的渲染。要使用jinjia2模板就是必须用
from flask import render_template
当然参数量过多的时候**locals()
from flask import Flask, render_template

app = Flask(__name__)


@app.route('/user')
def hello_world():
    name = '先生'
    return render_template('user.html', **locals())


if __name__ == '__main__':
    app.run(debug=True, host='0.0.0.0', port=8000)
而Django不要加**
上面的都是太简单了,整点有难度的,举个栗子,自定义过滤器(本质上过滤器就是转换函数)
我们都知道django的过滤器需要在各自的app下新建一个templatetags,然后在模板中导入缩写的py文件
那么Flask怎么做的呢?
通过调用add_template_filter方法来实现。该方法第一个参数是函数名,第二个参数是自定义过滤器的名称。
user.html
<!DOCTYPE html>
<html lang="en">
<head>
    <meta charset="UTF-8">
    <title>Title</title>
</head>
<body>
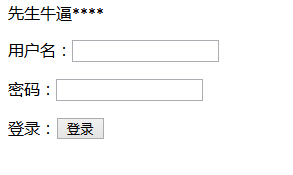
<div>{{ name | index_class }}</div>

</body>
</html>
app.py
from flask import Flask, render_template

app = Flask(__name__)


@app.route('/user', methods=['GET', 'POST'])
def hello_world():
    name = '先生'
    return render_template('user.html', **locals())


def do_index_class(index):  # 定义函数
    return index + '牛逼****'


app.add_template_filter(do_index_class, 'index_class')


if __name__ == '__main__':
    app.run(debug=True, host='0.0.0.0', port=8000)
对于如果post上传文件
就需要使用
f = request.files['filesname'] 和django类似
f.save(‘path’,‘name’)即可
宏的定义及使用:
Jinja 2中的宏功能类似Python中的函数,可以传参,但是不能有返回值。我们可以将一些经常用到的代码片段放在宏中,然后把一些不固定的值抽取出来作为一个变量。
宏的声明:
<!--定义宏-->
    {% macro input (name, type='text', value='') -%}
        <input type="{{ type }}" name="{{ name }}" value="{{ value|e }}">
    {%- endmacro  %}
上方的代码定义了一个宏,定义宏要加macro,结束要加上endmacro标志。宏的名称时input
他们有三个参数,分别是name、type、value。后两个参数有默认值。我们可以试用表达式来调用这个宏
{{ input('username') }}
{{ input('password', type='password') }}
看一个完整的实例:
<!DOCTYPE html>
<html lang="en">
<head>
    <meta charset="UTF-8">
    <title>Title</title>
</head>
<body>
<div>{{ name | index_class }}</div>
<div>
    <!--定义宏-->
    {% macro input (name, type='text', value='') -%}
        <input type="{{ type }}" name="{{ name }}" value="{{ value|e }}">
    {%- endmacro  %}

<p>用户名:{{ input('username') }}</p>
<p>密码:{{ input('password', type='password') }}</p>
<p>登录:{{ input('submit', type='submit', value='登录') }}</p>

</div>

</body>
</html>

宏的导入:
一个宏可以被不同的模板使用,因此我们想到了一个东西,抽取为公共模块,在需要使用的时候导入即可
导入的方法呢也和Python类似,import嘛
因为我们在上面已经写了一个宏了
那我们就导入
方式1:
<!DOCTYPE html>
<html lang="en">
<head>
    <meta charset="UTF-8">
    <title>Title</title>
</head>
<body>
{% import 'user.html' as user %}
<p>用户名:{{ user.input('username') }}</p>
<p>密码:{{ user.input('password', type='password') }}</p>
<p>登录:{{ user.input('submit', type='submit', value='登录') }}</p>
</body>
</html>
方式二:
<!DOCTYPE html>
<html lang="en">
<head>
    <meta charset="UTF-8">
    <title>Title</title>
</head>
<body>
{% from 'user.html' import input %}
<p>用户名:{{ input('username') }}</p>
<p>密码:{{ input('password', type='password') }}</p>
<p>登录:{{ input('submit', type='submit', value='登录') }}</p>
</body>
</html>
效果是完全一样的
include的使用:
和django的include类似:
宏文件可以引用其他宏,可以使用include语句可以把一个模板引入到另一个模板中,类似于把一个模板的代码复制到另外一个模板的指定位置。
footer.hrml
<!DOCTYPE html>
<html lang="en">
<head>
    <meta charset="UTF-8">
    <title>Title</title>
</head>
<body>
<div class="footer">这是网页尾部</div>

</body>
</html>
header.html
<!DOCTYPE html>
<html lang="en">
<head>
    <meta charset="UTF-8">
    <title>Title</title>
</head>
<body>
<div class="header">这是网页头部</div>

</body>
</html>
index.html
<!DOCTYPE html>
<html lang="en">
<head>
    <meta charset="UTF-8">
    <title>Title</title>
    <style>
        .header {
            width: 100%;
            height: 40px;
            margin: 20px 20px;
        }
        .footer {
            width: 100%;
            height: 40px;
            margin: 20px 20px;
        }
        .content {
            width: 100%;
            height: 40px;
            margin: 20px 20px;
        }
    </style>
</head>
<body>
{% from 'user.html' import input %}
<p>用户名:{{ input('username') }}</p>
<p>密码:{{ input('password', type='password') }}</p>
<p>登录:{{ input('submit', type='submit', value='登录') }}</p>
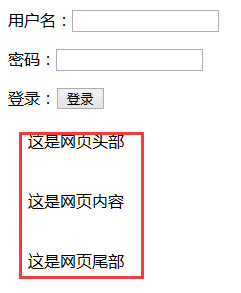
{% include "header.html" %}
<div class="content">这是网页内容</div>
{% include "footer.html" %}
</body>
</html>
页面效果:

set 和with语句的使用:
set语句是在模板中定义变量并赋予值,在整个模板范围都有效
with关键字是在定义变量并赋值的同事,限制with定义变量的作用范围
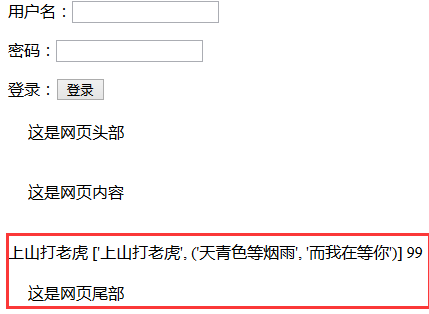
{% set a = '上山打老虎' %}
{% set b = ['上山打老虎', ('天青色等烟雨', '而我在等你')] %}
{{ a }}
{{ b }}
{% with bat = 99 %}
    {{ bat }}
{% endwith %}

静态文件的加载:
<script type="text/javascript" src="static/js/jquery-3.3.1/jquery-3.3.1.js"></script>
<script src="{{ url_for('static', filename='js/jquery-3.3.1/jquery-3.3.1.js') }}"></script>
<script src="{{ url_for('static', filename='images/dog.jpg') }}"></script>
<link rel="stylesheet" href="{{ url_for('static', filename='css/dog.css') }}">
推荐使用{{url_for}}的方法
模板的继承:
和Django一样,在需要继承的子模板中extends即可
父模板user.html
{% block baby %}
{% endblock %}
子模版
{% extends 'user.html' %}
 {% block baby %}
     {{ super() }}
{% endblock %}
注意:如果想在一个block中调用其他的block代码可以通过{{self.其他block名称()}}实现
{% self.baby() %}
四、Flask视图高级技术
在Flask框架中,默认使用@app.route装饰器:类似这样
@app.route('/user')
def hello_world():
    name = '先生'
    return render_template('user.html', **locals())
上述代码中,视图函数为hello_word是如此建立URL和视图之间的关系的
我们想要反转得到url,url_for("hello_word")反转得到URL,实际上flask可以像Django一样添加别名,那就是用endpoint参数
@app.route('/user', endpoint='hello')
def hello_world():
    name = '先生'
    return render_template('index.html', **locals())
一旦我们加上endpoint参数,在使用url_for()反转时就不能使用视图函数名了,而要使用我们定义的URL别名
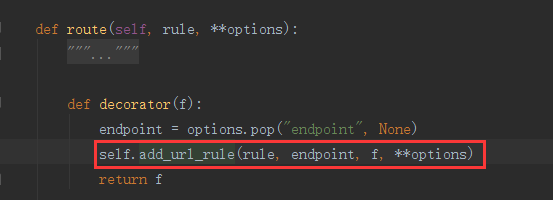
那这个app.route的装饰器本质是什么呢?
我们看一下源码

那么这个add_url_rule怎么使用呢?
换句话说,如何通过add_url_rule方法来实现和上面相同的效果呢?
# @app.route('/user', endpoint='hello')
def hello_world():
    name = '先生'
    return render_template('index.html', **locals())


app.add_url_rule('/user', endpoint='hello', view_func=hello_world)

# endpoint参数依旧可以不填,但是view_func必须是对应的函数名
类视图:
那我们可能会想,既然装饰器更加方便为什么还需要用add_url_rule方法?
因为类的视图函数需要通过其来进行注册
flask的类视图一般分为标准类视图,基于调度方法的类视图
①标准类视图:
1, 必须继承flask.views.View
2, 必须实现dispatch_request方法,请求过来之后,都会执行这个方法。这个方法的返回值相当于之前的视图函数,也必须返回Response或者子类的对象,或者是字符串、元祖
3, 必须通过app.add_rule(rule, endpoint, view_func)来做URL与视图的映射。view_func参数需要使用as_view类方法来转换、
4, 如果指定endpoint,url_for反转时必须使用别名。反之则使用as_view(视图名称)指定的视图名称来作为反转
优点:
使用类视图的好处是支持继承,可以把一些共性的东西放在父类中,其他子类可以继承,但是类视图不能和函数视图一样,需要通过app.add_url_rule来注册
例子:
网站里面需要在多个不同页面都放置一个广告,使用类视图函数如何实现?
from flask import Flask, render_template, views

app = Flask(__name__)


class Bgs(views.View):
    def __init__(self):
        super().__init__()
        self.context = {
            "bgs": "我是固定牛皮廯"
        }


class Index(Bgs):
    def dispatch_request(self):  # 使用dispatch_request()方法,定义类视图函数
        return render_template('index.html', **self.context)


class Index2(Bgs):
    def dispatch_request(self):  # 使用dispatch_request()方法,定义类视图函数
        return render_template('index.html', **self.context)


# 定义view_func必须经过as_view方法
app.add_url_rule(rule='/', endpoint='index', view_func=Index.as_view('Index'))
app.add_url_rule(rule='/index2', endpoint='index2', view_func=Index2.as_view('Index2'))
②基于方法的类视图:
利用视图函数实现不同请求不同的逻辑时比较复杂,和django的类视图方法类似。也就是flask.views.MethodView,对每一个Http方法执行不同的函数
from flask import Flask, render_template, views, request

app = Flask(__name__)


@app.route('/user', endpoint='hello')
def hello_world():
    name = '先生'
    return render_template('index.html', **locals())


class LoginView(views.MethodView):  # 定义LoginView类
    def get(self):
     name = request.args['username']
        return render_template("index.html")
    def post(self):
        username = request.form.get("username")
        password = request.form.get("password")
        if username == 'zhou' and password == '123':
            return "登陆成功"
        else:
            return "登录失败"


app.add_url_rule('/login', endpoint='hello', view_func=LoginView.as_view('loginview'))
Flask的蓝图:
flask为了降低模块之间的耦合性,设计了蓝图
优点: 可以极大的简化大型应用,并为扩展提供集中的注册入口。Blueprint对象与Flask应用对象的工作方式类似,但是不是一个真正的应用
举个栗子:
新建三个文件,分别为app.py b.py c.py
from flask import Flask, render_template
import b, c

app = Flask(__name__)


@app.route('/user', endpoint='hello')
def hello_world():
    name = '先生'
    return render_template('index.html', **locals())


app.register_blueprint(b.b_list)  # 将b模块中的b_list注册到app
app.register_blueprint(c.c_list)  # 将c模块中的c_list注册到app
b.py
# -*- coding:UTF-8 -*-
__autor__ = 'zhouli'
__date__ = '2019/11/3 18:14'

from flask import Blueprint
b_list = Blueprint("b", __name__)
"""
创建一个Blueprint对象,第一个参数可以当做改Blueprint对象的姓名
在一个app中,姓名不能与其余的Blueprint对象姓名重复
第二个参数用于初始化
"""


@b_list.route("/b")
def b():
    return "b"
蓝图的主要目的:实现各个模块的视图函数写在不同的py文件中。在主视图中导入分路视图的模块,并且注册蓝图对象。
Flask处理表单:
1,使用flask处理通用表单
①
pip install flask-wtf
# Flask-WTF 提供对所有Form表单免受跨站请求伪造(CSRF)
②在flask根目录下面新增config.py配置文件,要启用CSRF保护,需要定义两个变量
CSRF_ENABLED = True
SECRET_KEY = ‘x1x2x3x4x5x6’  # 自定义
其中SECRET_KEY用来建立加密的令牌,用于验证Form表单的提交,在自己编写对应的应用程序的时候,可以设置的较为复杂些,那这样攻击者就难以猜到密钥值
在app.py中添加


