

Scrapy是一个为了爬取网站数据,提取结构性数据而编写的应用框架。 其可以应用在数据挖掘,信息处理或存储历史数据等一系列的程序中。
其最初是为了页面抓取 (更确切来说, 网络抓取 )所设计的, 也可以应用在获取API所返回的数据(例如 Amazon Associates Web Services ) 或者通用的网络爬虫。Scrapy用途广泛,可以用于数据挖掘、监测和自动化测试。
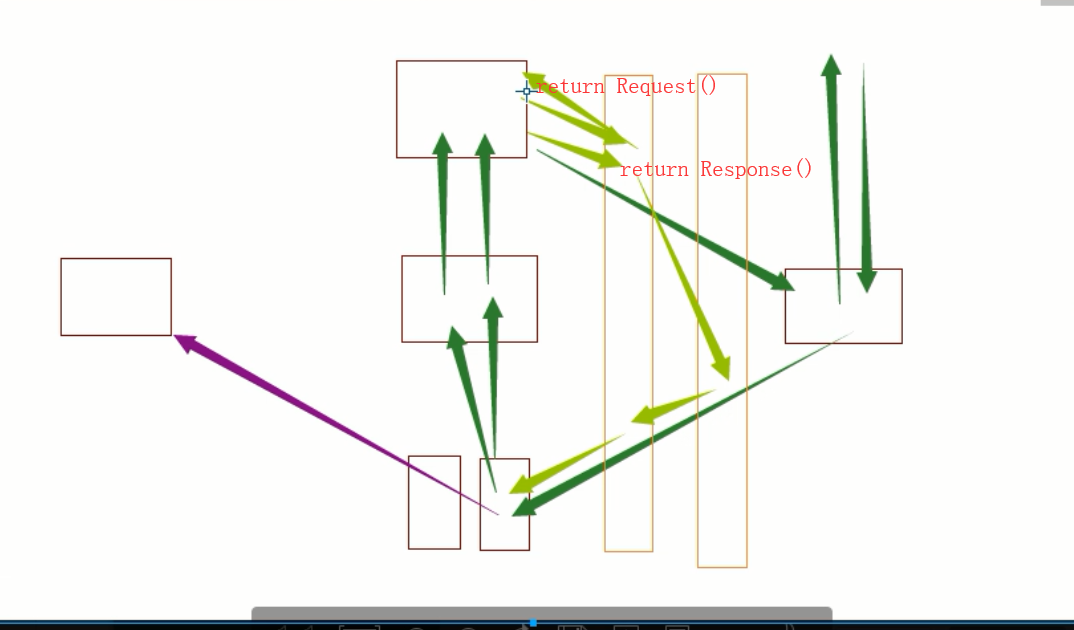
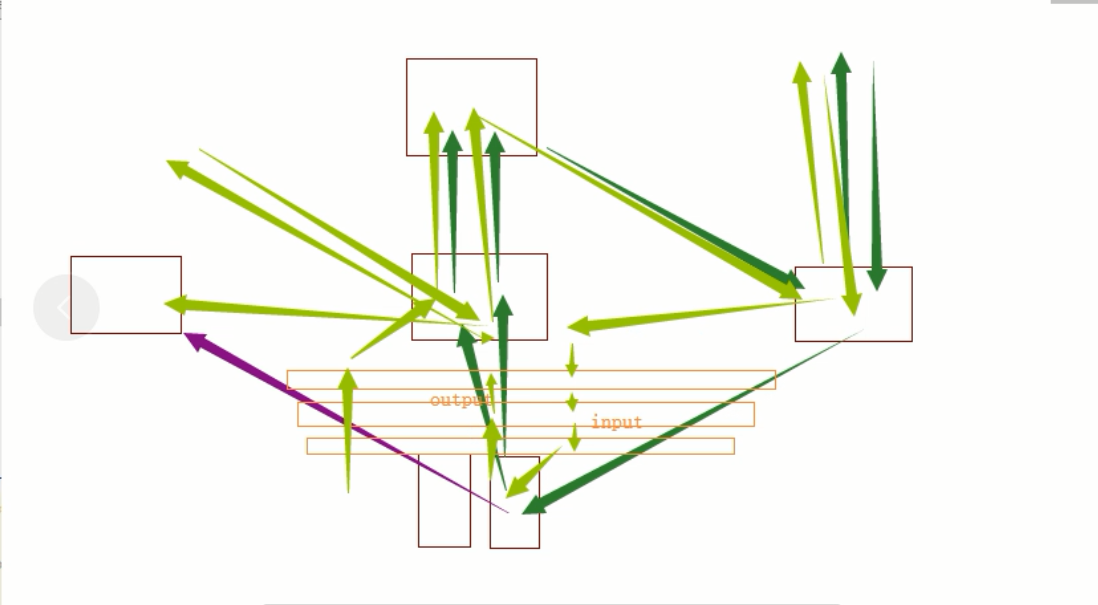
Scrapy 使用了 Twisted异步网络库来处理网络通讯。整体架构大致如下

Scrapy主要包括了以下组件:
- 引擎(Scrapy)
用来处理整个系统的数据流处理, 触发事务(框架核心) - 调度器(Scheduler)
用来接受引擎发过来的请求, 压入队列中, 并在引擎再次请求的时候返回. 可以想像成一个URL(抓取网页的网址或者说是链接)的优先队列, 由它来决定下一个要抓取的网址是什么, 同时去除重复的网址 - 下载器(Downloader)
用于下载网页内容, 并将网页内容返回给蜘蛛(Scrapy下载器是建立在twisted这个高效的异步模型上的) - 爬虫(Spiders)
爬虫是主要干活的, 用于从特定的网页中提取自己需要的信息, 即所谓的实体(Item)。用户也可以从中提取出链接,让Scrapy继续抓取下一个页面 - 项目管道(Pipeline)
负责处理爬虫从网页中抽取的实体,主要的功能是持久化实体、验证实体的有效性、清除不需要的信息。当页面被爬虫解析后,将被发送到项目管道,并经过几个特定的次序处理数据。 - 下载器中间件(Downloader Middlewares)
位于Scrapy引擎和下载器之间的框架,主要是处理Scrapy引擎与下载器之间的请求及响应。 - 爬虫中间件(Spider Middlewares)
介于Scrapy引擎和爬虫之间的框架,主要工作是处理蜘蛛的响应输入和请求输出。
现在的scrapy的中间件里面没有了调度中间件了。
Scrapy运行流程大概如下:
- 引擎从调度器中取出一个链接(URL)用于接下来的抓取
- 引擎把URL封装成一个请求(Request)传给下载器
- 下载器通过twisted从互联网中把资源下载下来,并封装成应答包(Response)
- 爬虫解析Response
- yield实体(Item),则交给实体管道进行持久化的处理。
- yield链接(URL),则把URL交给调度器等待抓取;相当于再一次的发送请求
一、安装
Linux
      pip3 install scrapy


Windows
      a. pip3 install wheel
      b. 下载twisted http://www.lfd.uci.edu/~gohlke/pythonlibs/#twisted
      c. 进入下载目录,执行 pip3 install Twisted‑17.1.0‑cp35‑cp35m‑win_amd64.whl
      d. pip3 install scrapy
      e. 下载并安装pywin32:https://sourceforge.net/projects/pywin32/files/
二、基本使用
1. 基本命令
1. scrapy startproject  项目名称
   - 在当前目录中创建中创建一个项目文件(类似于Django)

2. scrapy genspider  <name> <domain>
   - 创建爬虫应用
   如:
      scrapy gensipider oldboy oldboy.com
      scrapy gensipider autohome autohome.com.cn
   PS:
      查看所有命令:scrapy gensipider -l
      查看模板命令:scrapy gensipider -d 模板名称

3. scrapy list
   - 展示爬虫应用列表

4. scrapy crawl 爬虫应用名称<name>
   - 运行单独爬虫应用
2.项目结构以及爬虫应用简介
project_name/
   scrapy.cfg
   project_name/
       __init__.py
       items.py
       pipelines.py
       settings.py
       spiders/
           __init__.py
           爬虫1.py
           爬虫2.py
           爬虫3.py
文件说明:
- scrapy.cfg 项目的主配置信息。(真正爬虫相关的配置信息在settings.py文件中)
- items.py 设置数据存储模板,用于结构化数据,如:Django的Model
- pipelines 数据处理行为,如:一般结构化的数据持久化
- settings.py 配置文件,如:递归的层数、并发数,延迟下载等
- spiders 爬虫目录,如:创建文件,编写爬虫规则
爬虫文件
import scrapy
from scrapy.http.request import Request
from pacong.items import PacongItem
import time
import json

# from scrapy.dupefilter import RFPDupeFilter,request_fingerprint


class ChoutiSpider(scrapy.Spider):
	name = 'chouti'
	allowed_domains = ['chouti.com']
	start_urls = [
		"https://dig.chouti.com/",
	]

	# 默认scrapy遵守robot协议,所以会先请求这个文件查看自己的权限,出错是因为使用的爬虫爬取内容违背这个robot.txt。所以只要让爬虫不遵守该协议就好了,
	# 具体做法是找到settings文件里的ROBOTSTXT_OBEY设置成False。

	# 回调函数;response响应对象
	def parse(self, response):
		# response.meta   --- > response.request.meta
		from scrapy.http import Response
		# self.request.meta
		print("chouti",response)
		# item = response.xpath('//div[@class="link-con"]')
		# if not item:
		# 	#点击加载更多后的数据
		# 	ret = json.loads(response.text)
		# 	for n_news in ret["data"]:
		# 		print(n_news['title'])
		# 		print(n_news['originalUrl'])
		# #第一次
		# data_id = item.xpath('./div/@data-id').extract()
		# for id in data_id:
		# 	new = response.xpath('//div[@class="link-con"]/div[@class="link-item clearfix link-item-{}"]'.format(id))
		# 	href = new.xpath('.//a[@data-id="{}"]/@href'.format(id)).extract_first()
		# 	title = new.xpath('.//a[@data-id="{}"]/text()'.format(id)).extract_first()
		# 	print(href)
			# yield PacongItem(title=title, path=href)
			# 在spiders里面的py文件中,yield 一次 Item对象,就调用一次proces_item
			# yield Request()对象  就会再一次发起请求,把请求给调度器,
			# 然后下载器从调度器里面取任务,借助 twisted 去互联网下载网页,然后把响应返回给parse回调函数。
windows编码问题
import sys,os
sys.stdout=io.TextIOWrapper(sys.stdout.buffer,encoding='gb18030')
执行此爬虫文件,则在终端进入项目目录执行如下命令:
scrapy crawl chouti--nolog
对于上述代码重要之处在于:
- Request是一个封装用户请求的类,在回调函数中yield该对象表示继续访问
- HtmlXpathSelector用于结构化HTML代码并提供选择器功能
4. 选择器
#!/usr/bin/env python
# -*- coding:utf-8 -*-
from scrapy.selector import Selector, HtmlXPathSelector
from scrapy.http import HtmlResponse
html = """<!DOCTYPE html>
<html>
    <head lang="en">
        <meta charset="UTF-8">
        <title></title>
    </head>
    <body>
        <ul>
            <li class="item-"><a id='i1' href="link.html">first item</a></li>
            <li class="item-0"><a id='i2' href="llink.html">first item</a></li>
            <li class="item-1"><a href="llink2.html">second item<span>vv</span></a></li>
        </ul>
        <div><a href="llink2.html">second item</a></div>
    </body>
</html>
"""
response = HtmlResponse(url='http://example.com', body=html,encoding='utf-8')
# hxs = HtmlXPathSelector(response)
# print(hxs)
# hxs = Selector(response=response).xpath('//a')
# print(hxs)
# hxs = Selector(response=response).xpath('//a[2]')
# print(hxs)
# hxs = Selector(response=response).xpath('//a[@id]')
# print(hxs)
# hxs = Selector(response=response).xpath('//a[@id="i1"]')
# print(hxs)
# hxs = Selector(response=response).xpath('//a[@href="link.html"][@id="i1"]')
# print(hxs)
# hxs = Selector(response=response).xpath('//a[contains(@href, "link")]')
# print(hxs)
# hxs = Selector(response=response).xpath('//a[starts-with(@href, "link")]')
# print(hxs)
# hxs = Selector(response=response).xpath('//a[re:test(@id, "i\d+")]')
# print(hxs)
# hxs = Selector(response=response).xpath('//a[re:test(@id, "i\d+")]/text()').extract()
# print(hxs)
# hxs = Selector(response=response).xpath('//a[re:test(@id, "i\d+")]/@href').extract()
# print(hxs)
# hxs = Selector(response=response).xpath('/html/body/ul/li/a/@href').extract()
# print(hxs)
# hxs = Selector(response=response).xpath('//body/ul/li/a/@href').extract_first()
# print(hxs)

# ul_list = Selector(response=response).xpath('//body/ul/li')
# for item in ul_list:
#     v = item.xpath('./a/span')
#     # 或
#     # v = item.xpath('a/span')
#     # 或
#     # v = item.xpath('*/a/span')
#     print(v)
注意:settings.py中设置DEPTH_LIMIT = 1来指定“递归”的层数。
持久化 的步骤
pipeline/items
a. 先写pipeline类
class XXXPipeline(object):
def process_item(self, item, spider):
return item
b. 写Item类
class XdbItem(scrapy.Item):
href = scrapy.Field()
title = scrapy.Field()
c. 配置
ITEM_PIPELINES = {
'xdb.pipelines.XdbPipeline': 300,
}
d. 爬虫,yield每执行一次,process_item就调用一次。
yield Item对象
class PacongPipeline(object):

    def __init__(self,path):
        self.f = None
        self.path = path

    @classmethod
    def from_crawler(cls,crawler):
        '''
        初始化的时候,用于创建 pipeline 对象
        :param crawler:
        :return:
        '''
        # crawler.settings 可以拿到配置文件
        path = crawler.settings.get('HREF_FILE_PATH')
        # 返回这个类的对象的时候,就对应的执行这个类的__init__方法
        return cls(path)

    #开始爬虫前执行的
    def open_spider(self,spider):
        # self.f=open(self.path,'w')
        print("PacongPipeline",'open')

    #在spiders里面的py文件中,yield 一次 Item对象,就调用一次proces_item
    def process_item(self, item, spider):
        '''
        :param item:  就是  PacongItem
        :param spider: 就是 爬虫的这个类 ChoutiSpider
        :return:
        '''
        #pipeline是所有爬虫公用,
        #要想给特定的爬虫,就可以用spider.name来限制
        # if spider.name=='chouti':
        #     pass
        # print(item,type(item)) item 是一个类
        # if 'http' not in item['path'] or 'https'not in item['path']:
        #     item['path'] = 'https://dig.chouti.com' + item['path']
        #
        # self.f.write('新闻:'+item['title']+'\n'+'链接:'+item['path']+'\n')
        print('PacongPipeline',item)
        return item
        #返回的 item 是交给下一个Pipeline里面的process_item方法里面的 item
    #结束爬虫后执行的
    def close_spider(self,spider):
        # self.f.close()
        print("PacongPipeline", 'colse')
注意:pipeline是所有爬虫公用,如果想要给某个爬虫定制需要使用spider参数自己进行处理。
去重规则
a. 编写类
			from scrapy.dupefilter import BaseDupeFilter
			from scrapy.utils.request import request_fingerprint

			class XdbDupeFilter(BaseDupeFilter):

				def __init__(self):
					self.visited_fd = set()

				@classmethod
				def from_settings(cls, settings):
					return cls()

				def request_seen(self, request):
					#request_fingerprint 类似将url转换为md5值;
					#www.123.com?k=2&n=2;n=2&k=2     优点能判断条件 是一样的
					fd = request_fingerprint(request=request)
					if fd in self.visited_fd:
						return True
					self.visited_fd.add(fd)

				def open(self):  # can return deferred
					print('开始')

				def close(self, reason):  # can return a deferred
					print('结束')

				# def log(self, request, spider):  # log that a request has been filtered
				#     print('日志')

		b. 配置
			# 修改默认的去重规则
			# DUPEFILTER_CLASS = 'scrapy.dupefilter.RFPDupeFilter'
			DUPEFILTER_CLASS = 'xdb.dupefilters.XdbDupeFilter'


		c. 爬虫使用:
			class ChoutiSpider(scrapy.Spider):
				name = 'chouti'
				allowed_domains = ['chouti.com']
				start_urls = ['https://dig.chouti.com/']

				def parse(self, response):
					print(response.request.url)
					# item_list = response.xpath('//div[@id="content-list"]/div[@class="item"]')
					# for item in item_list:
					#     text = item.xpath('.//a/text()').extract_first()
					#     href = item.xpath('.//a/@href').extract_first()

					page_list = response.xpath('//div[@id="dig_lcpage"]//a/@href').extract()
					for page in page_list:
						from scrapy.http import Request
						page = "https://dig.chouti.com" + page
						yield Request(url=page,callback=self.parse,dont_filter=False)
cookie
在发送请求时cookie的操作,
meta={'cookiejar':1}表示开启cookie记录,首次请求时写在Request()里
meta={'cookiejar':response.meta['cookiejar']}表示使用上一次response的cookie,写在FormRequest.from_response()里post授权
meta={'cookiejar':True}表示使用授权后的cookie访问需要登录查看的页面
获取Scrapy框架Cookies
请求Cookie
Cookie = response.request.headers.getlist('Cookie')
响应Cookie
Cookie2 = response.headers.getlist('Set-Cookie')
# -*- coding: utf-8 -*-
import scrapy
from scrapy.http import Request,FormRequest

class PachSpider(scrapy.Spider):                            #定义爬虫类,必须继承scrapy.Spider
    name = 'pach'                                           #设置爬虫名称
    allowed_domains = ['edu.iqianyue.com']                  #爬取域名
    # start_urls = ['http://edu.iqianyue.com/index_user_login.html']     #爬取网址,只适于不需要登录的请求,因为没法设置cookie等信息

    header = {'User-Agent':'Mozilla/5.0 (Windows NT 10.0; WOW64; rv:54.0) Gecko/20100101 Firefox/54.0'}  #设置浏览器用户代理

    def start_requests(self):       #用start_requests()方法,代替start_urls
        """第一次请求一下登录页面,设置开启cookie使其得到cookie,设置回调函数"""
        return [Request('http://edu.iqianyue.com/index_user_login.html',meta={'cookiejar':1},callback=self.parse)]

    def parse(self, response):     #parse回调函数

        data = {                    #设置用户登录信息,对应抓包得到字段
            'number':'adc8868',
            'passwd':'279819',
            'submit':''
            }

        # 响应Cookie
        Cookie1 = response.headers.getlist('Set-Cookie')   #查看一下响应Cookie,也就是第一次访问注册页面时后台写入浏览器的Cookie
        print(Cookie1)

        print('登录中')
        """第二次用表单post请求,携带Cookie、浏览器代理、用户登录信息,进行登录给Cookie授权"""
        return [FormRequest.from_response(response,
                                          url='http://edu.iqianyue.com/index_user_login',   #真实post地址
                                          meta={'cookiejar':response.meta['cookiejar']},
                                          headers=self.header,
                                          formdata=data,
                                          callback=self.next,
                                          )]
    def next(self,response):
        a = response.body.decode("utf-8")   #登录后可以查看一下登录响应信息
        # print(a)
        """登录后请求需要登录才能查看的页面,如个人中心,携带授权后的Cookie请求"""
        yield Request('http://edu.iqianyue.com/index_user_index.html',meta={'cookiejar':True},callback=self.next2)
    def next2(self,response):
        # 请求Cookie
        Cookie2 = response.request.headers.getlist('Cookie')
        print(Cookie2)

        body = response.body  # 获取网页内容字节类型
        unicode_body = response.body_as_unicode()  # 获取网站内容字符串类型

        a = response.xpath('/html/head/title/text()').extract()  #得到个人中心页面
        print(a)
参考https://blog.csdn.net/hoddy355/article/details/80779498
解析cookie
cookie_jar = CookieJar()
        cookie_jar.extract_cookies(response, response.request)
        for k, v in cookie_jar._cookies.items():
      # 去对象中将cookie解析到字典
            for i, j in v.items():
                for m, n in j.items():
                    self.cookie_dict[m] = n.value
抽屉利用cookie点赞
# -*- coding: utf-8 -*-
import scrapy
from scrapy.selector import HtmlXPathSelector
from scrapy.http.request import Request
from scrapy.http.cookies import CookieJar
from scrapy import FormRequest


class ChouTiSpider(scrapy.Spider):
    # 爬虫应用的名称,通过此名称启动爬虫命令
    name = "chouti"
    # 允许的域名
    allowed_domains = ["chouti.com"]

    cookie_dict = {}
    has_request_set = {}

    def start_requests(self):
        url = 'http://dig.chouti.com/'
        # return [Request(url=url, callback=self.login)]
        yield Request(url=url, callback=self.login)

    def login(self, response):
        cookie_jar = CookieJar()
        cookie_jar.extract_cookies(response, response.request)
        for k, v in cookie_jar._cookies.items():
            for i, j in v.items():
                for m, n in j.items():
                    self.cookie_dict[m] = n.value

        req = Request(
            url='http://dig.chouti.com/login',
            method='POST',
            headers={'Content-Type': 'application/x-www-form-urlencoded; charset=UTF-8'},
            body='phone=8615131255089&password=pppppppp&oneMonth=1',
            cookies=self.cookie_dict,
            callback=self.check_login
        )
        yield req

    def check_login(self, response):
        req = Request(
            url='http://dig.chouti.com/',
            method='GET',
            callback=self.show,
            cookies=self.cookie_dict,
            dont_filter=True
        )
        yield req

    def show(self, response):
        # print(response)
        hxs = HtmlXPathSelector(response)
        news_list = hxs.select('//div[@id="content-list"]/div[@class="item"]')
        for new in news_list:
            # temp = new.xpath('div/div[@class="part2"]/@share-linkid').extract()
            link_id = new.xpath('*/div[@class="part2"]/@share-linkid').extract_first()
            yield Request(
                url='http://dig.chouti.com/link/vote?linksId=%s' %(link_id,),
                method='POST',
                cookies=self.cookie_dict,
                callback=self.do_favor
            )

        page_list = hxs.select('//div[@id="dig_lcpage"]//a[re:test(@href, "/all/hot/recent/\d+")]/@href').extract()
        for page in page_list:

            page_url = 'http://dig.chouti.com%s' % page
            import hashlib
            hash = hashlib.md5()
            hash.update(bytes(page_url,encoding='utf-8'))
            key = hash.hexdigest()
            if key in self.has_request_set:
                pass
            else:
                self.has_request_set[key] = page_url
                yield Request(
                    url=page_url,
                    method='GET',
                    callback=self.show
                )

    def do_favor(self, response):
        print(response.text)

示例:自动登陆抽屉并点赞
中间件
#爬虫中间件(对深度和优先级的操作)
#下载中间件(对请求进行加工或者是加代理)
class SpiderMiddleware(object):

    def process_spider_input(self,response, spider):
        """
        下载完成,执行,然后交给parse处理
        :param response:
        :param spider:
        :return:
        """
        pass

    def process_spider_output(self,response, result, spider):
        """
        spider处理完成,返回时调用
        :param response:
        :param result:
        :param spider:
        :return: 必须返回包含 Request 或 Item 对象的可迭代对象(iterable)
        """
        return result

    def process_spider_exception(self,response, exception, spider):
        """
        异常调用
        :param response:
        :param exception:
        :param spider:
        :return: None,继续交给后续中间件处理异常;含 Response 或 Item 的可迭代对象(iterable),交给调度器或pipeline
        """
        return None


    def process_start_requests(self,start_requests, spider):
        """
        爬虫启动时调用
        :param start_requests:
        :param spider:
        :return: 包含 Request 对象的可迭代对象
        """
        return start_requests

爬虫中间件
class DownMiddleware1(object):
    def process_request(self, request, spider):
        """
        请求需要被下载时,经过所有下载器中间件的process_request调用
        :param request:
        :param spider:
        :return:
            None,继续后续中间件去下载;
            Response对象,停止process_request的执行,开始执行process_response
            Request对象,停止中间件的执行,将Request重新调度器
            raise IgnoreRequest异常,停止process_request的执行,开始执行process_exception
        """
        pass


    def process_response(self, request, response, spider):
        """
        spider处理完成,返回时调用
        :param response:
        :param result:
        :param spider:
        :return:
            Response 对象:转交给其他中间件process_response
            Request 对象:停止中间件,request会被重新调度下载
            raise IgnoreRequest 异常:调用Request.errback
        """
        print('response1')
        return response

    def process_exception(self, request, exception, spider):
        """
        当下载处理器(download handler)或 process_request() (下载中间件)抛出异常
        :param response:
        :param exception:
        :param spider:
        :return:
            None:继续交给后续中间件处理异常;
            Response对象:停止后续process_exception方法
            Request对象:停止中间件,request将会被重新调用下载
        """
        return None

下载器中间件
下载中间件
爬虫中间件
在下载中间件加代理
下载中间件
- scrapy中设置代理
	- 内置
		在爬虫启动时,提前在os.envrion中设置代理即可。
		    class ChoutiSpider(scrapy.Spider):
				name = 'chouti'
				allowed_domains = ['chouti.com']
				start_urls = ['https://dig.chouti.com/']
				cookie_dict = {}

				def start_requests(self):
					import os
					os.environ['HTTPS_PROXY'] = "http://root:woshiniba@192.168.11.11:9999/"
					os.environ['HTTP_PROXY'] = '19.11.2.32',
					for url in self.start_urls:
						yield Request(url=url,callback=self.parse)
		meta:
			class ChoutiSpider(scrapy.Spider):
				name = 'chouti'
				allowed_domains = ['chouti.com']
				start_urls = ['https://dig.chouti.com/']
				cookie_dict = {}

				def start_requests(self):
					for url in self.start_urls:
						yield Request(url=url,callback=self.parse,meta={'proxy':'"http://root:woshiniba@192.168.11.11:9999/"'})

	- 自定义
		# by luffycity.com
		import base64
		import random
		from six.moves.urllib.parse import unquote
		try:
			from urllib2 import _parse_proxy
		except ImportError:
			from urllib.request import _parse_proxy
		from six.moves.urllib.parse import urlunparse
		from scrapy.utils.python import to_bytes

		class XdbProxyMiddleware(object):

			def _basic_auth_header(self, username, password):
				user_pass = to_bytes(
					'%s:%s' % (unquote(username), unquote(password)),
					encoding='latin-1')
				return base64.b64encode(user_pass).strip()
			#按照原码来写。
			def process_request(self, request, spider):
				PROXIES = [
					"http://root:woshiniba@192.168.11.11:9999/",
					"http://root:woshiniba@192.168.11.12:9999/",
					"http://root:woshiniba@192.168.11.13:9999/",
					"http://root:woshiniba@192.168.11.14:9999/",
					"http://root:woshiniba@192.168.11.15:9999/",
					"http://root:woshiniba@192.168.11.16:9999/",
				]
				url = random.choice(PROXIES)

				orig_type = ""
				proxy_type, user, password, hostport = _parse_proxy(url)
				proxy_url = urlunparse((proxy_type or orig_type, hostport, '', '', '', ''))

				if user:
					creds = self._basic_auth_header(user, password)
				else:
					creds = None
				request.meta['proxy'] = proxy_url
				if creds:
					request.headers['Proxy-Authorization'] = b'Basic ' + creds
自定制命令
有以下步骤:
- 在spiders同级创建任意目录,如:commands
- 在其中创建 crawlall.py 文件 (此处文件名就是自定义的命令)
-
from scrapy.commands import ScrapyCommand from scrapy.utils.project import get_project_settings class Command(ScrapyCommand): requires_project = True def syntax(self): return '[options]' def short_desc(self): return 'Runs all of the spiders' def run(self, args, opts): spider_list = self.crawler_process.spiders.list() for name in spider_list: self.crawler_process.crawl(name, **opts.__dict__) self.crawler_process.start() crawlall.py - 在settings.py 中添加配置 COMMANDS_MODULE = '项目名称.目录名称'
- 在项目目录执行命令:scrapy crawlall
import sys
from scrapy.cmdline import execute

if __name__ == '__main__':
    execute(["scrapy","github","--nolog"])
自定义扩展
自定义扩展时,利用信号在指定位置注册制定操作
用scrapy的信号,可以在爬虫前和爬虫后等定制一些操作
from scrapy import signals
#看源码可以看到所有的信号。

class MyExtension(object):
    def __init__(self, value):
        self.value = value

    @classmethod
    def from_crawler(cls, crawler):
        val = crawler.settings.getint('MMMM')
        ext = cls(val)

        crawler.signals.connect(ext.spider_opened, signal=signals.spider_opened)
        crawler.signals.connect(ext.spider_closed, signal=signals.spider_closed)

        return ext

    def spider_opened(self, spider):
        print('open')

    def spider_closed(self, spider):
        print('close')
ext = MyExtension()
配置:
EXTENSIONS = {'xdb.ext.MyExtend':666,}
更多详情 点击

 浙公网安备 33010602011771号