
1 稳定版本snap7源码下载
https://sourceforge.net/projects/snap7/
2 整合到QT项目中
2.1 解压下载的文件得到snap7-full-1.4.2,放到qt项目文件目录下

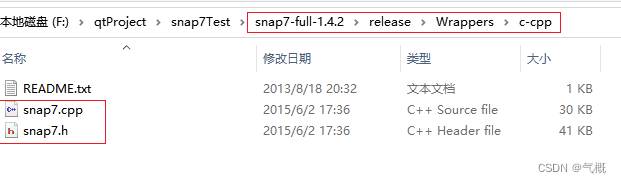
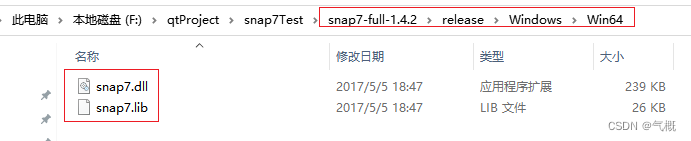
2.2 从snap7-full-1.4.2目录下找到snap7.cpp、 snap7.dll、 snap7.h、 snap7.lib四个文件并放到qt项目目录下
snap7.cpp、snap7.h所在目录:\snap7-full-1.4.2\release\Wrappers\c-cpp
snap7.dll、snap7.lib所在目录:\snap7-full-1.4.2\release\Windows\Win64
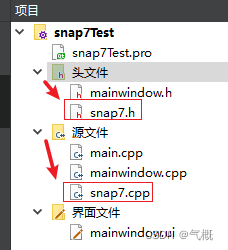
2.3 将snap7.cpp添加到qt项目的源文件下、snap7.h添加到项目头文件下
右键头文件,添加现有文件,选择snap7.h;
右键源文件,添加现有文件,选择snap7.cpp;
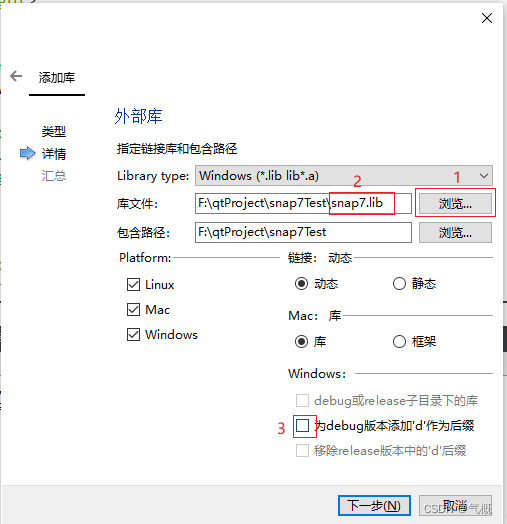
2.4 将snap7.lib添加到项目的外部链接中
右键项目名,添加库,外部库

浏览库文件,选择snap7.lib文件;
去掉为debug版本添加'd'作为后缀的勾选;
点击下一步,完成。
3 连接测试
3.1 头文件中引入snap7.h文件,并申明TS7Client客户端对象client

3.2 xxx.cpp文件中初始化client对象,使用ip、rack、slot进行连接
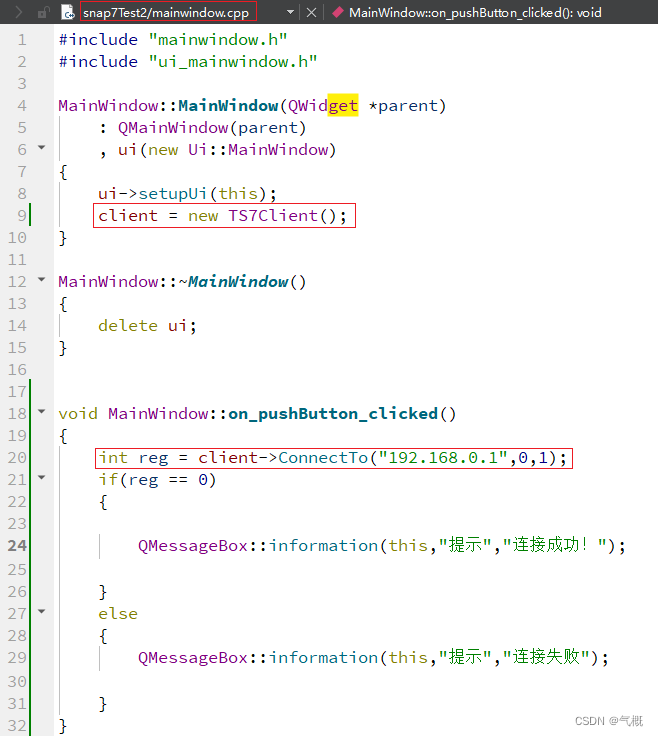
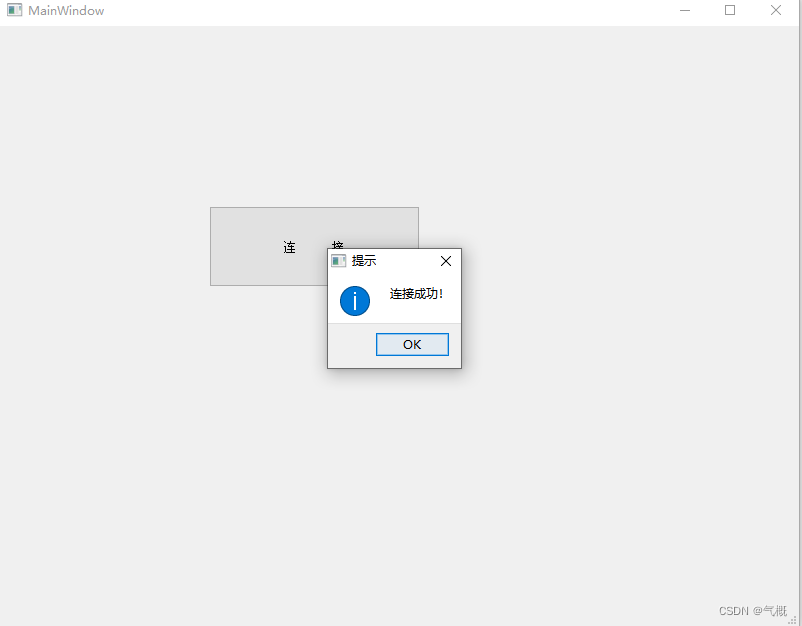
【PLC连接】
 1 void MainWindow::on_pushButton_clicked()
 2 {
 3     int reg = client->ConnectTo("192.168.0.1",0,1);
 4     if(reg == 0)
 5     {
 6         QMessageBox::information(this,"提示","连接成功!");
 7     }
 8     else
 9     {
10         QMessageBox::information(this,"提示","连接失败");
11     }
12 }
【断开连接】
 1 void MainWindow::on_pushButton_6_clicked()
 2 {
 3     if(!client->Connected()){ //未连接则不执行
 4         QMessageBox::information(this,"tips","PLC未连接!");
 5         return;
 6     }
 7     client->Disconnect();
 8     if(!client->Connected()){
 9         QMessageBox::information(this,"tips","已断开连接!");
10     }
11 }
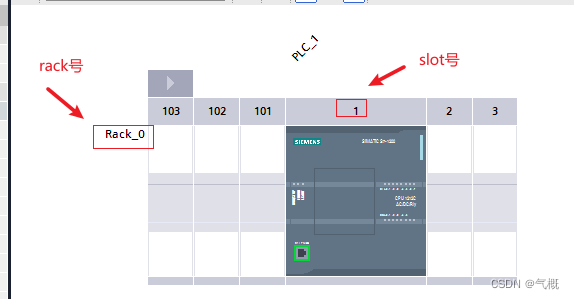
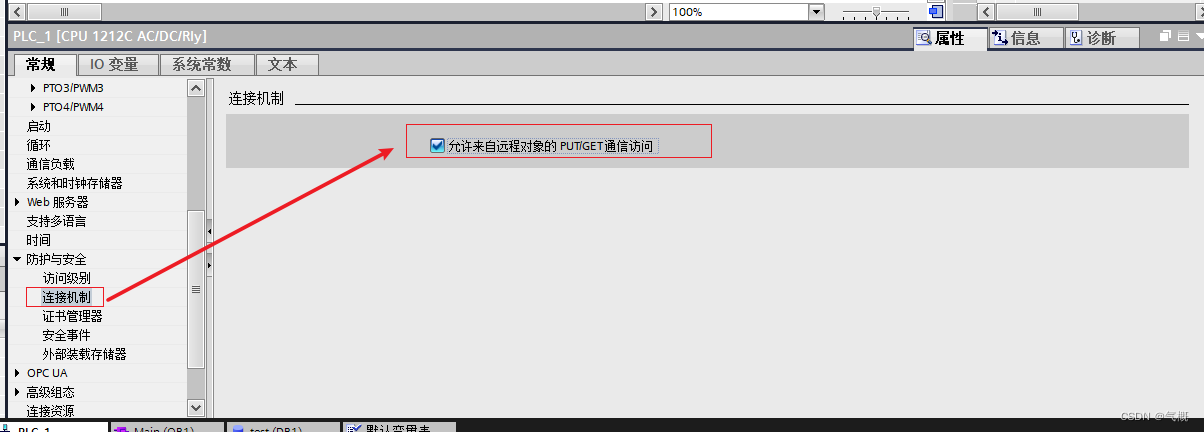
3.3 PLC设置
rack号和slot号确认
PLC的连接机制设置允许外部访问
创建需要读写的DB数据块,并取消数据块属性中的优化的块访问的勾选

3.4 上位机连接PLC,运行qt程序,连接成功
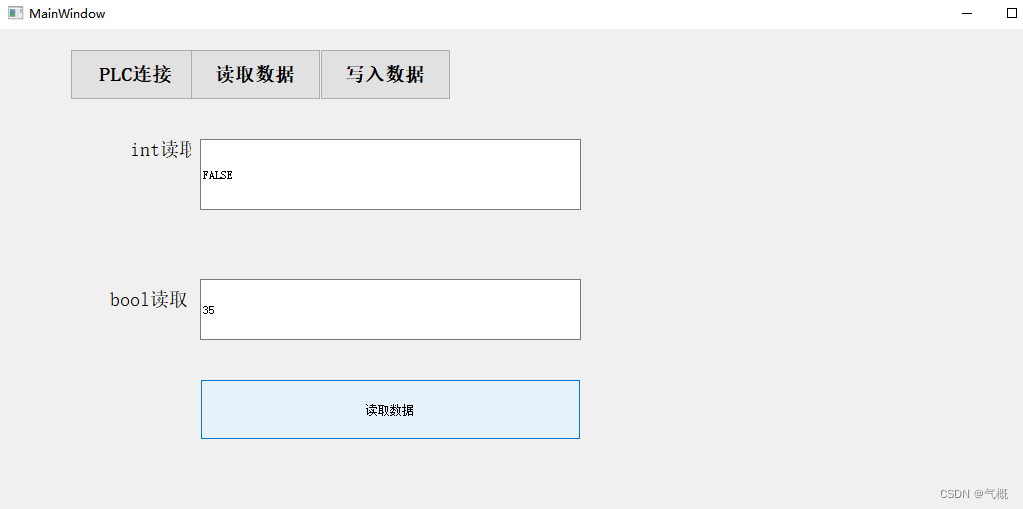
4 读取DB数据
4.1 DBRead函数介绍
DBRead(DB号, 起始地址, 字节数, 返回的字节数组);
4.2 例程参考
snap7读取的plc数据都是字节数组,且为大小端;需要根据不同的目标类型进行相应的转换;
本例程提供了 byte[]转int和byte[]转bool两种转换方式,仅供参考;
 1 void MainWindow::on_pushButton_4_clicked()
 2 {
 3     if(!client->Connected()){ //未连接则不执行
 4         QMessageBox::information(this,"tips","PLC未连接!");
 5         return;
 6     }
 7     byte res[256]= {0};
 8     client->DBRead(1,0,3,&res);
 9     //读取的数据都是字节数组,且为大小端
10     //byte[]转int
11     uint value = res[1] & 0xFF;  //PLC中int数据占2字节长度
12     value |= ((res[0] << 8) & 0xFF00);
13     //byte[]转bool
14     bool isOK = res[2] & 0xFF;
15     ui->value_3->setText(isOK?"TRUE":"FALSE");
16     ui->value_2->setText(QString::number(value));
17 }
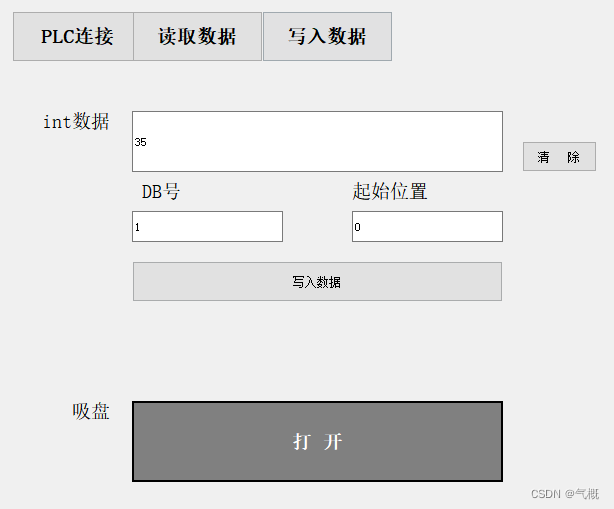
5 向DB块写数据
主要使用DBWrite()函数向DB块写入各种数据;
5.1 DBWrite函数介绍
DBWrite(DB块号,起始地址,字节大小,写入的字节数组);
5.2 例程参考
与读取数据类似,数据写入DB块之前需要先转换为字节数组;
本例程提供了 int转byte[]和bool转byte[]两种转换方式,仅供参考;
【写入int数据】
 1 void MainWindow::on_pushButton_3_clicked()
 2 {
 3     if(!client->Connected()){ //未连接则不执行
 4         QMessageBox::information(this,"tips","PLC未连接!");
 5         return;
 6     }
 7     int value     = ui->value->text().toInt();
 8     int start = ui->byteNum->text().toInt();
 9     //int 转byte数组
10     byte data[2]={0};[]
11     //大小端调换
12     data[1] = (unsigned char)(0xff & value);
13     data[0] = (unsigned char)((0xff00 & value) >> 8);
14     client->DBWrite(1,start,2,&data); //  DBWrite(int DBNumber, int Start, int Size, void *pUsrData)
15 }
【写入bool数据】
 1 void MainWindow::on_toolButton_clicked()
 2 {
 3     if(!client->Connected()){ //未连接则不执行
 4         QMessageBox::information(this,"tips","PLC未连接!");
 5         return;
 6     }
 7     byte data;
 8     if(isOK){
 9         isOK = !isOK;
10         data = 0x01;
11         client->DBWrite(1,2,1,&data);
12         ui->toolButton->setStyleSheet("QToolButton {background-color: green; border: 2px solid black; color: white;}");
13         ui->toolButton->setText("关 闭");
14     }
15     else{
16         isOK = !isOK;
17         data = 0x00;
18         client->DBWrite(1,2,1,&data);
19         ui->toolButton->setStyleSheet("QToolButton {background-color: gray; border: 2px solid black; color: white;}");
20         ui->toolButton->setText("打 开");
21     }
22 }
6 项目打包
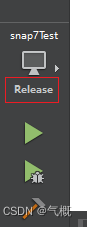
6.1 点击qt项目左侧的项目,构建的步骤,qmake,详情,将构建配置选为Release
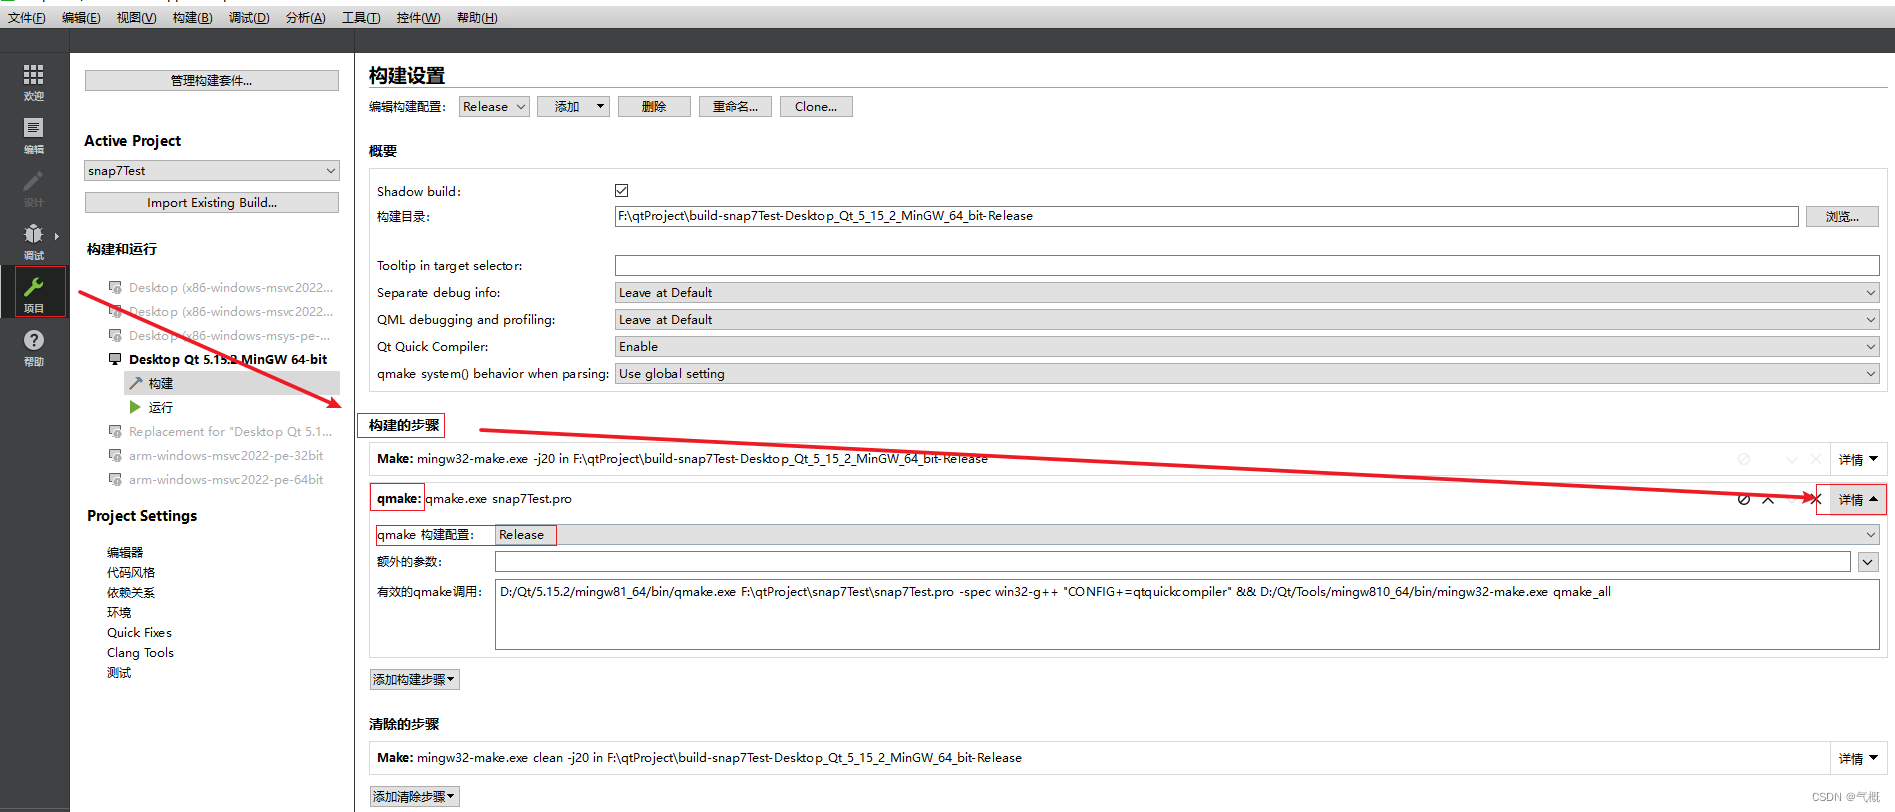
6.2 在Release版本下执行一遍程序
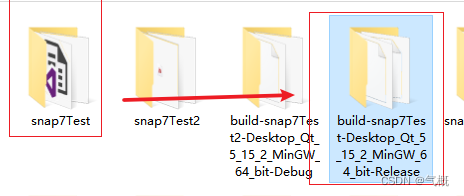
6.3 执行完毕后在项目文件同目录下,生成对应的release运行文件
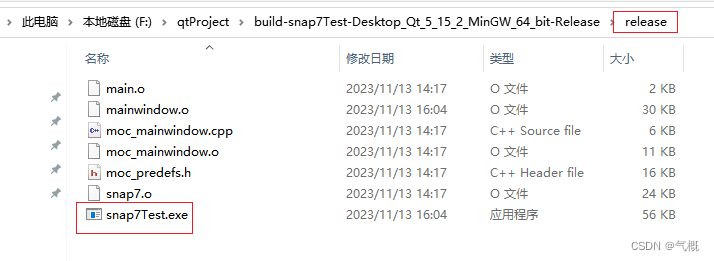
6.4 进入运行文件,选择release文件目录,复制其中的.exe可执行文件
6.5 将.exe可执行文件单独放入空文件夹下
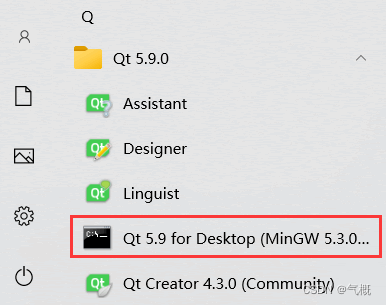
6.6 在 “开始”菜单找到Qt 命令行程序(两种形式)并打开
有的qt版本Qt 命令行程序是Qt xxx for Desktop
有的版本是Qt xxx

6.7 命令行进入含有.exe可执行文件单独放入空文件夹下,并执行windeployqt xxx.exe命令
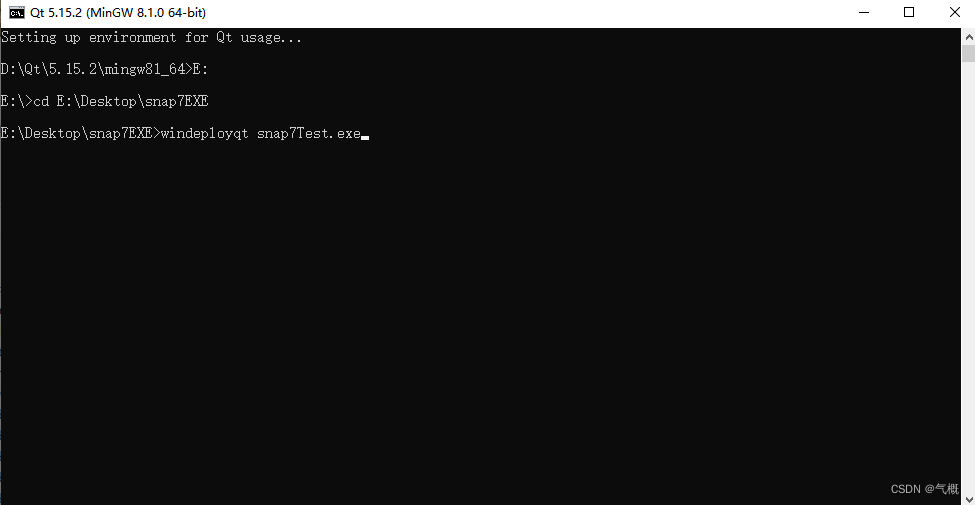
执行完毕后,打包完成
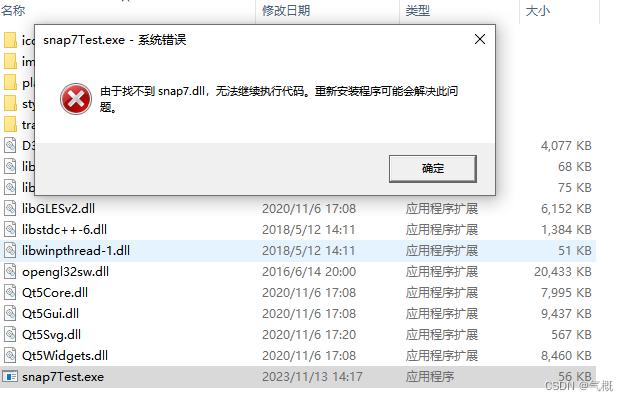
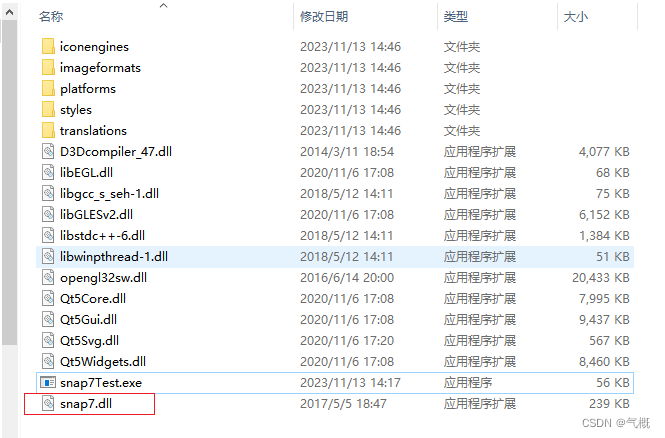
6.8 含snap7库的qt项目打包注意事项
至此,完成项目打包,打包文件可以通过微信等方式发到其他Windows电脑上直接运行。
