xhshell连接linux条件:Linux安装ssh-server服务,防火墙不阻止22端口
对于debian,默认安装了ssh服务并且已经自启动,可用ps -ef | grep ssh 查看,有sshd说明已安装启动

但是systemctl status ssh查看状态会显示未知服务,需要先systemctml start ssh ,然后就可以查看状态了
其实安装后就可以进行用xhell进行连接,不需要关闭防火墙,不需要安装防防火墙ufw
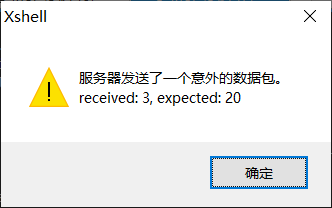
对于ubuntu,连接报错

解决方法:在/etc/ssh/sshd_config最后增加以下一行
KexAlgorithms curve25519-sha256@libssh.org,ecdh-sha2-nistp256,ecdh-sha2-nistp384,ecdh-sha2-nistp521,diffie-hellman-group14-sha1
重启后再连接即可解决
xhell连接注意问题同debian一样
对于centos,直接连接即可
Linux系统ssh和sshd配置文件不用修改
具体步骤如下:
查看openssh-server工具是否安装
yum list installed |grep openssh-server
openssh-server.x86_64 7.4p1-21.el7 @anaconda
若没有,在有网的情况下安装openssh-server工具
yum install openssh-server
查看修改sshd配置文件vim /etc/ssh/sshd_config
说明:
Port 22 //默认使用22端口,也可以自行修改为其他端口,但登录时要打上端口号
#ListenAddress //指定提供ssh服务的IP,这里我注释掉。
PermitRootLogin //禁止以root远程登录
PasswordAuthentication yes //启用口令验证方式
PermitEmptyPassword //禁止使用空密码登录
LoginGraceTime 1m //重复验证时间为1分钟
MaxAuthTimes 3 //最大重试验证次数
保存修改好的配置,退出。
可以不做修改
开启 sshd 服务
systemctl status sshd 或systemctl status ssh或/etc/init.d/ssh start
检查 sshd 服务是否已经开启
ps -ef |grep sshd 或者 ps -ef | grep ssh相同含义且输出结果相同
检查 22 号端口是否开启监听
netstat -an | grep 22
用xhell连接Linux
输入Linux用户名和密码,连接成功
ssh_config和sshd_config区别
ssh_config和sshd_config都是ssh服务器的配置文件,二者区别在于,前者是针对客户端的配置文件,后者则是针对服务端的配置文件。两个配置文件都允许你通过设置不同的选项来改变客户端程序的运行方式。下面列出来的是两个配置文件中最重要的一些关键词,每一行为“关键词&值”的形式,其中“关键词”是忽略大小写的。
一、客户端
查看 /etc/ssh/ssh_config 文件
# Site-wide defaults for various options
Host * ##"Host"只对匹配后面字串的计算机有效,“*”表示所有的计算机。从该项格式前置一些可以看出,这是一个类似于全局的选项,表示下面缩进的选项都适用 于该设置,可以 指 定某计算机替换*号使下面选项只针对该算机器生效。
ForwardAgent no ##设置连接是否经过验证代理(如果存在)转发给远程计算机。
ForwardX11 no ##设置X11连接是否被自动重定向到安全的通道和显示集(DISPLAY set)
RhostsAuthentication no ##设置是否使用基于rhosts的安全验证。
RhostsRSAAuthentication no##设置是否使用用RSA算法的基于rhosts的安全验证。
RSAAuthentication yes ##设置是否使用RSA算法进行安全验证。
PasswordAuthentication yes##设置是否使用口令验证。
FallBackToRsh no ##设置如果用ssh连接出现错误是否自动使用rsh,由于rsh并不安全,所以此选项应当设置为"no"。
UseRsh no ##设置是否在这台计算机上使用"rlogin/rsh",原因同上,设为"no"。
BatchMode no ##批处理模式,一般设为"no";如果设为"yes",交互式输入口令的提示将被禁止,这个选项对脚本文件和批处理任务十分有用。
CheckHostIP yes ##设置ssh是否查看连接到服务器的主机的IP地址以防止DNS欺骗。建议设置为"yes"。
StrictHostKeyChecking no ##"如果设为"yes",ssh将不会自动把计算机的密匙加入"$HOME/.ssh/known_hosts"文件,且一旦计算机的密匙发生了变化,就拒绝连接。
IdentityFile ~/.ssh/identity ##"IdentityFile"设置读取用户的RSA安全验证标识。
Port 22 ##设置连接到远程主机的端口,ssh默认端口为22。
Cipher blowfish ##设置加密用的密钥,blowfish可以自己随意设置。
EscapeChar ##设置escape字符。
二、服务器端
查看 /etc/ssh/sshd_config 文件:如果是修改其他主机远程到该主机的远程端口,需要修改该配置文件的Port参数;
# This is ssh server systemwide configuration file.
Port 22 ##设置sshd监听的端口号。
ListenAddress 192.168.1.1 ##设置sshd服务器绑定的IP地址。
HostKey /etc/ssh/ssh_host_key ##设置包含计算机私人密匙的文件
ServerKeyBits 1024 ##定义服务器密匙的位数
LoginGraceTime 600 ##设置如果用户不能成功登录,在切断连接之前服务器需要等待的时间(以秒为单位)。
KeyRegenerationInterval 3600 ##设置在多少秒之后自动重新生成服务器的密匙(如果使用密匙)。重新生成密匙是为了防止用盗用的密匙解密被截获的信息。
PermitRootLogin no ##设置是否允许root通过ssh登录。这个选项从安全角度来讲应设成"no"。
IgnoreRhosts yes ##设置验证的时候是否使用“rhosts”和“shosts”文件。
IgnoreUserKnownHosts yes ##设置ssh daemon是否在进行RhostsRSAAuthentication安全验证的时候忽略用户的"$HOME/.ssh/known_hosts”
StrictModes yes ##设置ssh在接收登录请求之前是否检查用户家目录和rhosts文件的权限和所有权。这通常是必要的,因为新手经常会把自己的目录和文件设成任何 人都有写权限。
X11Forwarding no ##设置是否允许X11转发
PrintMotd yes ##设置sshd是否在用户登录的时候显示“/etc/motd”中的信息。
SyslogFacility AUTH ##设置在记录来自sshd的消息的时候,是否给出“facility code”。
LogLevel INFO ##设置记录sshd日志消息的层次。INFO是一个好的选择。查看sshd的man帮助页,已获取更多的信息。
RhostsAuthentication no ##设置只用rhosts或“/etc/hosts.equiv”进行安全验证是否已经足够了。
RhostsRSAAuthentication no ##设置是否允许用rhosts或“/etc/hosts.equiv”加上RSA进行安全验证
RSAAuthentication yes ##设置是否允许只有RSA安全验证。
PasswordAuthentication yes ##设置是否允许口令验证。
PermitEmptyPasswords no ##设置是否允许用口令为空的帐号登录。
AllowUsers admin ##的后面可以跟任意的数量的用户名的匹配串,这些字符串用空格隔开。主机名可以是域名或IP地址。
通常情况下我们在连接 OpenSSH服务器的时候假如 UseDNS选项是打开的话,服务器会先根据客户端的 IP地址进行 DNS PTR反向查询出客户端的主机名,然后根据查询出的客户端主机名进行DNS正向A记录查询,并验证是否与原始 IP地址一致,通过此种措施来防止客户端欺骗。平时我们都是动态 IP不会有PTR记录,所以打开此选项也没有太多作用。我们可以通过关闭此功能来提高连接 OpenSSH 服务器的速度。
服务端步骤如下:
编辑配置文件 /etc/ssh/sshd_config
vim /etc/ssh/sshd_config
找到 UseDNS选项,如果没有注释,将其注释
#UseDNS yes
添加
UseDNS no
找到 GSSAPIAuthentication选项,如果没有注释,将其注释
#GSSAPIAuthentication yes
添加
GSSAPIAuthentication no
保存配置文件
重启 OpenSSH服务器
sudo service ssh restart;
注意: 一般远程修改sshd_config端口,建议22端口保留防止修改未成功。
port 22
port 23857
查看ssh服务监听端口:
sudo netstat -tunlp |grep ssh
如果开启防火墙记得添加端口放行!
openssh-server和openssh-client区别
-
openssh-server的功能主要是作为一个服务运行在后台,如果这个服务开启,我们就可以用一些远程连接工具来连接centos。因为minimal版本自带openssh-server,所以XShell可以连上centos
-
openssh-client的功能我觉得类似于XShell,可以作为一个客户端连接上openssh-server,但是Centos6.4的minimal版本不包括openssh-client,所以centos之前出现无法使用ssh登录的情况,centos可以使用如下命令安装客户端:
安装wget
yum -y install wget
安装openssh-client
yum install openssh-clients -
Ubuntu下可以使用如下命令openssh的服务端和客户端(好像安装openssh-server时也会自动安装openssh-clients)
sudo apt-get update
sudo apt-get install openssh-server
Linux 从源码编译安装 OpenSSH以及各问题解决
简单的说 OpenSSH 是一组安全远程的连接工具,主要包括了几个部份:ssh、sshd、scp、sftp、ssh-keygen、ssh-agent、ssh-add。OpenSSH 安装配置比较复杂,难点在配置,特别是在 VPS 中,配置不当就完全无法链接 VPS 了。
一、关于 OpenSSH
OpenSSH 是一组用于安全地访问远程计算机的连接工具。它可以作为 rlogin、 rsh rcp 以及 telnet 的直接替代品使用。更进一步, 其他任何 TCP/IP 连接都可以通过 SSH 安全地进行隧道/转发。 OpenSSH 对所有的传输进行加密, 从而有效地阻止了窃听、 连接劫持,以及其他网络级的攻击。
ssh(SSH 客户端,用于登录建立连接,是 rlogin 与 Telnet的安全替代方案)
sshd (SSH 服务端,典型的独立守护进程)
scp、sftp (文件安全传输工具,rcp、ftp 安全的替代方案)
ssh-keygen (用于产生 RSA 或 DSA 密钥)
ssh-agent、ssh-add(帮助用户不需要每次都要输入金钥密码的工具)
二、编译前的准备工作
2.1、查看 OpenSSH 版本
部分 Linux 系统已默认安装了 OpenSSH,像 Ubuntu Server 10.10 就已安装了 OpenSSH_5.5p1
1 |
ssh -v |
2.2、安装 OpenSSL 及编译环境
必须先安装依赖 OpenSSL,具体见《Linux 从源码编译安装 OpenSSL》 http://www.linuxidc.com/Linux/2011-10/45738.htm
2.3、备份 OpenSSH 旧配置文件
1 2 3 |
cp /etc/init.d/ssh /etc/init.d/ssh.old cp -r /etc/ssh /etc/ssh.old cp ~/.ssh/authorized_keys ~/.ssh/authorized_keys.old |
2.4、卸载旧版 OpenSSH
1 |
apt-get purge openssh-client openssh-server |
三、编译安装 OpenSSH
3.1、关于特权分离
所谓特权分离(Privilege Separation)实际上是一种 OpenSSH 的安全机制,该特性默认开启,可通过配置文件中的 UsePrivilegeSeparation 指令开启或关闭。
1 2 3 4 5 |
mkdir -p /var/empty #设置一个空目录 chown 0:0 /var/empty #所有者和组,0代表"root" chmod 000 /var/empty #目录权限设置为"000" groupadd sshd #建立sshd组 useradd -g sshd -c 'sshd privsep' -d /var/empty -s /bin/false sshd #用于特权分离的非特权用户"sshd" |
3.2、编译安装 OpenSSH
详细编译选项见《OpenSSH-4.7p1 安装指南》
下载在 http://www.linuxidc.com/Linux/2011-10/45740.htm
1 2 3 4 5 |
wget http://ftp.aso.ee/pub/OpenBSD/OpenSSH/portable/openssh-5.6p1.tar.gz tar -zxf openssh-5.6p1.tar.gz cd openssh-5.6p1/ ./configure --prefix=/usr/local --sysconfdir=/usr/local/ssh --with-ssl-dir=/usr/local/ssl --with-privsep-path=/var/empty --with-privsep-user=sshd --with-zlib=/usr/local/lib --with-ssl-engine --with-md5-passwords --disable-etc-default-login make && make install |
--prefix 安装目录
--sysconfdir 配置文件目录
--with-ssl-dir 指定 OpenSSL 的安装目录
--with-privsep-path 非特权用户的chroot目录
--with-privsep-user=sshd 指定非特权用户为sshd
--with-zlib 指定zlib库的安装目录
--with-md5-passwords 支持读取经过MD5加密的口令
--with-ssl-engine 启用OpenSSL的ENGINE支持
3.3、开机自启动 sshd
1 2 3 |
mv /etc/init.d/ssh.old /etc/init.d/sshd #使用原来的启动脚本 vim /etc/init.d/sshd #编辑,然后替换路径。 update-rc.d mysql defaults |
1 2 3 4 |
#将原路径"/usr/sbin替换为"/usr/local/sibn" :%s/usr\/sbin/usr\/local\/sbin/g #将原路径"/etc/ssh替换为"/usr/local/ssh" :%s/etc\/ssh/usr\/local\/ssh/g |
四、 OpenSSH 安全配置
4.1、查看 OpenSSH 配置文件
1 |
cd /usr/local/ssh |
moduli #ssh服务器的Diffie-Hellman密钥文件
ssh_config #ssh客户端配置文件
sshd_config #ssh服务器配置文件
ssh_host_dsa_key #ssh服务器dsa算法私钥
ssh_host_dsa_key.pub #ssh服务器dsa算法公钥
ssh_host_rsa_key #ssh服务器rsa算法私钥
ssh_host_rsa_key.pub #ssh服务器rsa算法公钥
4.2、生成服务器密钥对
默认 OpenSSH 安装完毕后就自动生成了,如果丢失可通过下面命令重新生成。
1 2 3 4 5 6 |
ssh-keygen -t rsa1 -f /etc/ssh/ssh_host_key -N '' #适用于ssh-1版 ssh-keygen -t rsa -f /etc/ssh/ssh_host_rsa_key -N '' ssh-keygen -t dsa -f /etc/ssh/ssh_host_dsa_key -N '' chmod 600 /etc/ssh/ssh_host_* chmod 644 /etc/ssh/ssh_host_*.pub |
特别注意:
1、系统密钥对是不能设置密码的, -N 后面 是两个 单引号 !表示密码串为空。
2、注意公钥和私钥的权限是不同的。
可自己编写使用部署脚本
sudo apt-get install ssh -y
sudo apt-get install openssh-server -y
sudo sed -i "s/PermitRootLogin prohibit-password/PermitRootLogin yes/g" `grep "PermitRootLogin prohibit-password" -rl /etc/ssh/sshd_config`
sudo sed -i "s/PermitEmptyPasswords no/PermitEmptyPasswords yes/g" `grep "PermitEmptyPasswords no" -rl /etc/ssh/sshd_config`
sudo /etc/init.d/ssh restart
CentOS和Debian通用,输入以下两条命令
sed -i ‘s/PermitRootLogin no/PermitRootLogin yes/g’ /etc/ssh/sshd_config
sed -i ‘s/PasswordAuthentication no/PasswordAuthentication yes/g’ /etc/ssh/sshd_config
Ubuntu系统,输入以下两条命令
sed -i ‘s/#PermitRootLogin prohibit-password/PermitRootLogin yes/g’ /etc/ssh/sshd_config
sed -i ‘s/PasswordAuthentication no/PasswordAuthentication yes/g’ /etc/ssh/sshd_config
#Protocol 2 或者Protocol 1
ssh协议2个版本
ssh1不安全
ssh2安全
window环境安装sshd、ssh
在线安装
1. 以管理员身份运行 PowerShell,输入以下命令
Get-WindowsCapability -Online | Where-Object Name -like 'OpenSSH*'
如果两者均未安装,则次返回以下输出

2. 根据需要安装服务器或客户端组件
# Install the OpenSSH Client
Add-WindowsCapability -Online -Name OpenSSH.Client~~~~0.0.1.0

# Install the OpenSSH Server
Add-WindowsCapability -Online -Name OpenSSH.Server~~~~0.0.1.0
3. 启动并配置OpenSSH 服务 使用ssh service 命令 启动服务
# Start the sshd service
Start-Service sshd
或
net start sshd

# OPTIONAL but recommended:
Set-Service -Name sshd -StartupType 'Automatic'

# Confirm the Firewall rule is configured. It should be created automatically by setup. Run the following to verify
if (!(Get-NetFirewallRule -Name "OpenSSH-Server-In-TCP" -ErrorAction SilentlyContinue | Select-Object Name, Enabled)) {
    Write-Output "Firewall Rule 'OpenSSH-Server-In-TCP' does not exist, creating it..."
    New-NetFirewallRule -Name 'OpenSSH-Server-In-TCP' -DisplayName 'OpenSSH Server (sshd)' -Enabled True -Direction Inbound -Protocol TCP -Action Allow -LocalPort 22
} else {
    Write-Output "Firewall rule 'OpenSSH-Server-In-TCP' has been created and exists."
}
离线安装
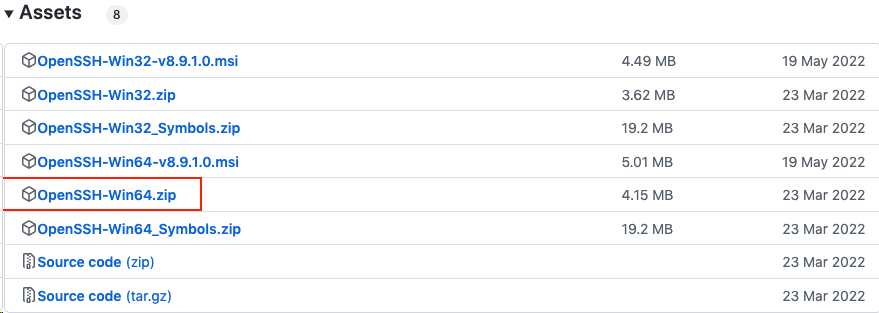
2.1 下载离线安装
https://github.com/PowerShell/Win32-OpenSSH/releases

2.2 解压后到解压目录下 进入cmd 执行
powershell.exe -ExecutionPolicy Bypass -File install-sshd.ps1

3.3 设置开启启动,启动服务
sc config sshd start= auto
net start sshd
3. ssh 登录服务
    使用   ssh 用户名@远程主机ip   命令登录
    输入密码即可
4.windows传文件到远程linux
scp C:/Desktop/test.txt root@192.168.1.1:/home/bool/test


【推荐】国内首个AI IDE,深度理解中文开发场景,立即下载体验Trae
【推荐】编程新体验,更懂你的AI,立即体验豆包MarsCode编程助手
【推荐】抖音旗下AI助手豆包,你的智能百科全书,全免费不限次数
【推荐】轻量又高性能的 SSH 工具 IShell:AI 加持,快人一步
· 无需6万激活码!GitHub神秘组织3小时极速复刻Manus,手把手教你使用OpenManus搭建本
· C#/.NET/.NET Core优秀项目和框架2025年2月简报
· Manus爆火,是硬核还是营销?
· 终于写完轮子一部分:tcp代理 了,记录一下
· 【杭电多校比赛记录】2025“钉耙编程”中国大学生算法设计春季联赛(1)