Harbor仓库安装使用cfssl工具生成证书
cfssl工具生成证书搭建Harbor仓库
概要:此处记录使用cfssl工具生成harbor私有证书,并使用证书搭建Harbor仓库,此证书使用按照kubernetes时使用的ca证书来按照。
一、下载cfssl相关工具
curl https://pkg.cfssl.org/R1.2/cfssl_linux-amd64 -o /usr/local/bin/cfssl
curl https://pkg.cfssl.org/R1.2/cfssljson_linux-amd64 -o /usr/local/bin/cfssljson
curl https://pkg.cfssl.org/R1.2/cfssl-certinfo_linux-amd64 -o /usr/local/bin/cfssl-certinfo
二、创建ca证书请求文件ca-csr.json
{
  "CN": "kubernetes",
  "key": {
    "algo": "rsa",
    "size": 2048
  },
  "names": [
    {
      "C": "CN",
      "ST": "HangZhou",
      "L": "XS",
      "O": "k8s",
      "OU": "System"
    }
  ],
  "ca": {
    "expiry": "876000h"
  }
}
1、目录结构如下:
[root@allinone tools]# tree /root/tools/
/root/tools/
├── bin
│   ├── cfssl
│   ├── cfssl-certinfo
│   └── cfssljson
└── ca-csr.json
[root@allinone tools]# ll
total 16
drwxr-xr-x. 2 root root   58 Mar 21 14:06 bin
-rw-r--r--. 1 root root  997 Mar 21 14:07 ca-csr.json
三、生成ca证书
1、生成ca证书
[root@allinone tools]# ./bin/cfssl gencert -initca ca-csr.json | ./bin/cfssljson -bare ca
2022/03/21 14:07:43 [INFO] generating a new CA key and certificate from CSR
2022/03/21 14:07:43 [INFO] generate received request
2022/03/21 14:07:43 [INFO] received CSR
2022/03/21 14:07:43 [INFO] generating key: rsa-2048
2022/03/21 14:07:44 [INFO] encoded CSR
2022/03/21 14:07:44 [INFO] signed certificate with serial number 683494463359677094895320224613031266478694844972
[root@allinone tools]# ll
total 16
drwxr-xr-x. 2 root root   58 Mar 21 14:06 bin
-rw-r--r--. 1 root root  997 Mar 21 14:07 ca.csr
-rw-r--r--. 1 root root  243 Mar 21 14:05 ca-csr.json
-rw-------. 1 root root 1675 Mar 21 14:07 ca-key.pem
-rw-r--r--. 1 root root 1350 Mar 21 14:07 ca.pem
[root@allinone tools]#
2、过期时间查看
[root@allinone tools]# openssl x509 -noout -text -in ca.pem|grep -A 5 Validity
        Validity
            Not Before: Mar 21 06:03:00 2022 GMT
            Not After : Feb 25 06:03:00 2122 GMT
        Subject: C=CN, ST=HangZhou, L=XS, O=k8s, OU=System, CN=kubernetes
        Subject Public Key Info:
            Public Key Algorithm: rsaEncryption
[root@allinone tools]#
四、创建Harbor证书
1、创建配置文件ca-config.json,告诉ca生成哪些信息的证书
[root@allinone tools]# cat ca-config.json
{
  "signing": {
    "default": {
      "expiry": "438000h"
    },
    "profiles": {
      "kubernetes": {
        "usages": [
            "signing",
            "key encipherment",
            "server auth",
            "client auth"
        ],
        "expiry": "438000h"
      }
    }
  }
}
参数解析:
ca-config.json:可以定义多个 profiles,分别指定不同的参数;后续在签名证书时使用某个profile;
signing:表示该证书可用于签名其它证书;生成的 ca.pem 证书中 CA=TRUE;
server auth:表示client可以用该 CA 对server提供的证书进行验证;
client auth:表示server可以用该CA对client提供的证书进行验证;
profiles 中的 www 是后面cfssl gencert 命令值profiles 指定的值,要相互对应。
2、创建harbor证书签名请求文件
[root@allinone tools]# cat harbor-csr.json
{
  "CN": "harbor",
  "hosts": [
    "127.0.0.1",
    "192.168.158.158",
    "harbor.myharbor.com"
  ],
  "key": {
    "algo": "rsa",
    "size": 2048
  },
  "names": [
    {
      "C": "CN",
      "ST": "HangZhou",
      "L": "XS",
      "O": "k8s",
      "OU": "System"
    }
  ]
}
3、生成harbor证书
[root@allinone tools]# ./bin/cfssl gencert \
> -ca=ca.pem \
> -ca-key=ca-key.pem \
> -config=ca-config.json \
> -profile=kubernetes harbor-csr.json | ./bin/cfssljson -bare harbor
2022/03/21 14:27:24 [INFO] generate received request
2022/03/21 14:27:24 [INFO] received CSR
2022/03/21 14:27:24 [INFO] generating key: rsa-2048
2022/03/21 14:27:24 [INFO] encoded CSR
2022/03/21 14:27:24 [INFO] signed certificate with serial number 101205033901552203007274366412176259589716406834
2022/03/21 14:27:24 [WARNING] This certificate lacks a "hosts" field. This makes it unsuitable for
websites. For more information see the Baseline Requirements for the Issuance and Management
of Publicly-Trusted Certificates, v.1.1.6, from the CA/Browser Forum (https://cabforum.org);
specifically, section 10.2.3 ("Information Requirements").

[root@allinone tools]# ll
total 36
drwxr-xr-x. 2 root root   58 Mar 21 14:06 bin
-rw-r--r--. 1 root root  295 Mar 21 14:22 ca-config.json
-rw-r--r--. 1 root root  997 Mar 21 14:07 ca.csr
-rw-r--r--. 1 root root  243 Mar 21 14:05 ca-csr.json
-rw-------. 1 root root 1675 Mar 21 14:07 ca-key.pem
-rw-r--r--. 1 root root 1350 Mar 21 14:07 ca.pem
-rw-r--r--. 1 root root 1074 Mar 21 14:27 harbor.csr
-rw-r--r--. 1 root root  287 Mar 21 14:25 harbor-csr.json
-rw-------. 1 root root 1679 Mar 21 14:27 harbor-key.pem
-rw-r--r--. 1 root root 1440 Mar 21 14:27 harbor.pem
五、安装Docker及Docker-compose
1、使用如下脚本安装docker(二进制安装)


#!/bin/bash

export DOCKER_VER=18.09.7

function install_docker() {
  # check if a container runtime is already installed
  systemctl status docker|grep Active|grep -q running && { echo "[WARN] docker is already running."; return 0; }
  systemctl status containerd|grep Active|grep -q running && { echo "[ERROR] containerd is running, unsupported."; exit 1; }

  if [[ "$REGISTRY_MIRROR" == CN ]];then
    DOCKER_URL="https://mirrors.tuna.tsinghua.edu.cn/docker-ce/linux/static/stable/x86_64/docker-${DOCKER_VER}.tgz"
  else
    DOCKER_URL="https://download.docker.com/linux/static/stable/x86_64/docker-${DOCKER_VER}.tgz"
  fi

  mkdir -p /opt/kube/bin /etc/docker /etc/ansible/down
  if [[ -f "/etc/ansible/down/docker-${DOCKER_VER}.tgz" ]];then
    echo "[INFO] docker binaries already existed"
  else
    echo -e "[INFO] \033[33mdownloading docker binaries\033[0m $DOCKER_VER"
    if [[ -e /usr/bin/curl ]];then
      curl -C- -O --retry 3 "$DOCKER_URL" || { echo "[ERROR] downloading docker failed"; exit 1; }
    else
      wget -c "$DOCKER_URL" || { echo "[ERROR] downloading docker failed"; exit 1; }
    fi
    mv ./docker-${DOCKER_VER}.tgz /etc/ansible/down
  fi

  tar zxf /etc/ansible/down/docker-${DOCKER_VER}.tgz -C /etc/ansible/down && \
  mv /etc/ansible/down/docker/* /opt/kube/bin && \
  ln -sf /opt/kube/bin/docker /bin/docker

  echo "[INFO] generate docker service file"
  cat > /etc/systemd/system/docker.service << EOF
[Unit]
Description=Docker Application Container Engine
Documentation=http://docs.docker.io
[Service]
Environment="PATH=/opt/kube/bin:/bin:/sbin:/usr/bin:/usr/sbin"
ExecStart=/opt/kube/bin/dockerd
ExecStartPost=/sbin/iptables -I FORWARD -s 0.0.0.0/0 -j ACCEPT
ExecReload=/bin/kill -s HUP \$MAINPID
Restart=on-failure
RestartSec=5
LimitNOFILE=infinity
LimitNPROC=infinity
LimitCORE=infinity
Delegate=yes
KillMode=process
[Install]
WantedBy=multi-user.target
EOF

  # configuration for dockerd
  echo "[INFO] generate docker config file"
  if [[ "$REGISTRY_MIRROR" == CN ]];then
    echo "[INFO] prepare register mirror for $REGISTRY_MIRROR"
    cat > /etc/docker/daemon.json << EOF
{
  "registry-mirrors": [
    "https://dockerhub.azk8s.cn",
    "https://docker.mirrors.ustc.edu.cn",
    "http://hub-mirror.c.163.com"
  ],
  "max-concurrent-downloads": 10,
  "log-driver": "json-file",
  "log-level": "warn",
  "log-opts": {
    "max-size": "10m",
    "max-file": "3"
    },
  "data-root": "/var/lib/docker"
}
EOF
  else
    echo "[INFO] standard config without registry mirrors"
    cat > /etc/docker/daemon.json << EOF
{
  "max-concurrent-downloads": 10,
  "log-driver": "json-file",
  "log-level": "warn",
  "log-opts": {
    "max-size": "10m",
    "max-file": "3"
    },
  "data-root": "/var/lib/docker"
}
EOF
  fi

  if [[ -e /etc/centos-release || -e /etc/redhat-release ]]; then
    echo "[INFO] turn off selinux in CentOS/Redhat"
    setenforce 0
    echo "SELINUX=disabled" > /etc/selinux/config
  fi

  echo "[INFO] enable and start docker"
  systemctl enable docker
  systemctl daemon-reload && systemctl restart docker && sleep 8
}

install_docker
2、下载docker-compose
curl -L https://get.daocloud.io/docker/compose/releases/download/1.25.5/docker-compose-`uname -s`-`uname -m` > /usr/local/bin/docker-compose
3、下载harbor,此处为1.8.6
[root@allinone ~]# tar -xf harbor-offline-installer-v1.8.6.tgz -C /data/
[root@allinone ~]# cd /data/harbor/
[root@allinone harbor]# docker load -i harbor.v1.8.6.tar.gz
[root@allinone harbor]# vim harbor.yml #部分配置,其他为默认配置
hostname: 192.168.158.158
http:
  port: 80

https:
  port: 443
  certificate: /root/tools/harbor.pem
  private_key: /root/tools/harbor-key.pem
4、安装harbor
[root@allinone harbor]# ./install.sh ##注意,此处安装步骤需在上面配置文件修改之后,安装完成之后在修改添加https访问证书路径经验证会无效。
5、登录验证
[root@allinone harbor]# docker login 192.168.158.158
Username: admin
Password:
Error response from daemon: Get https://192.168.158.158/v2/: x509: certificate signed by unknown authority
此时出现了报错,我们需要注意一下2点:
a)docker login 的地址应该为我们harbor证书签名请求文件中host字段的其中一个,不在其中会报错
b)自签证书,登录需要使用到私钥,而登录是默认回去/etc/docker/certs.d/host路径下找
1)创建证书路径
[root@allinone certs.d]# mkdir -p /etc/docker/certs.d/192.168.158.158 #同证书签名请求文件
[root@allinone certs.d]# mkdir -p /etc/docker/certs.d/harbor.myharbor.com #同证书签名请求文件
2)拷贝ca证书
[root@allinone certs.d]# cp /root/tools/ca.pem /etc/docker/certs.d/192.168.158.158/ca.crt
[root@allinone certs.d]# cp /root/tools/ca.pem /etc/docker/certs.d/harbor.myharbor.com/ca.crt
3)再次登录
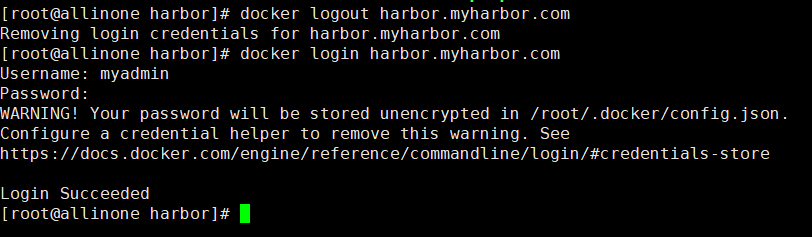
[root@allinone certs.d]# docker login 192.168.158.158
Username: admin
Password:
WARNING! Your password will be stored unencrypted in /root/.docker/config.json.
Configure a credential helper to remove this warning. See
https://docs.docker.com/engine/reference/commandline/login/#credentials-store

Login Succeeded
[root@allinone certs.d]# docker login harbor.myharbor.com   #需配置解析 /etc/hosts中即可
Username: admin
Password:
WARNING! Your password will be stored unencrypted in /root/.docker/config.json.
Configure a credential helper to remove this warning. See
https://docs.docker.com/engine/reference/commandline/login/#credentials-store

Login Succeeded
六、构建镜像,推送至harbor仓库
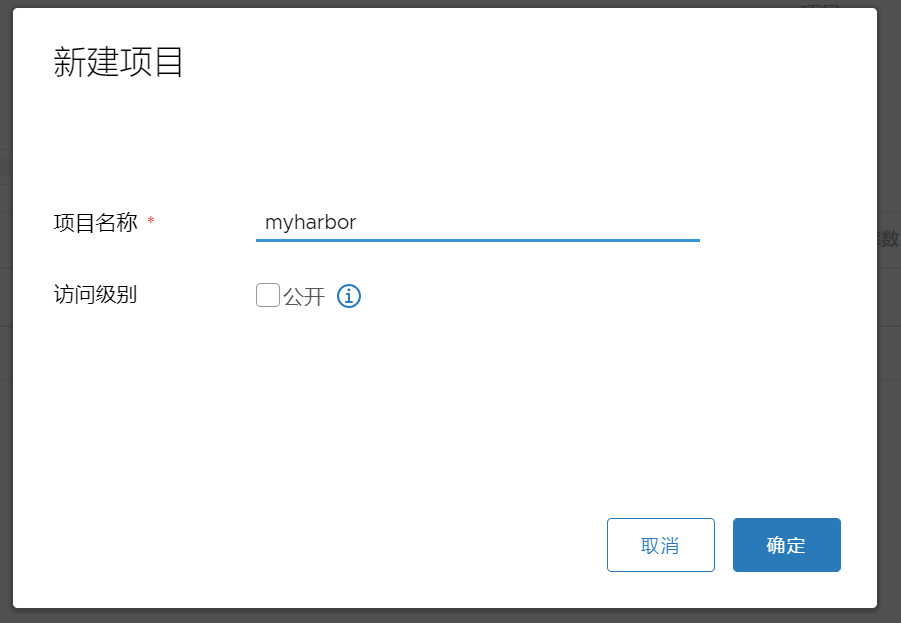
1、通常我们使用时会按照项目创建一个私有库,不公开
2、创建一个用户,并设置为项目管理员
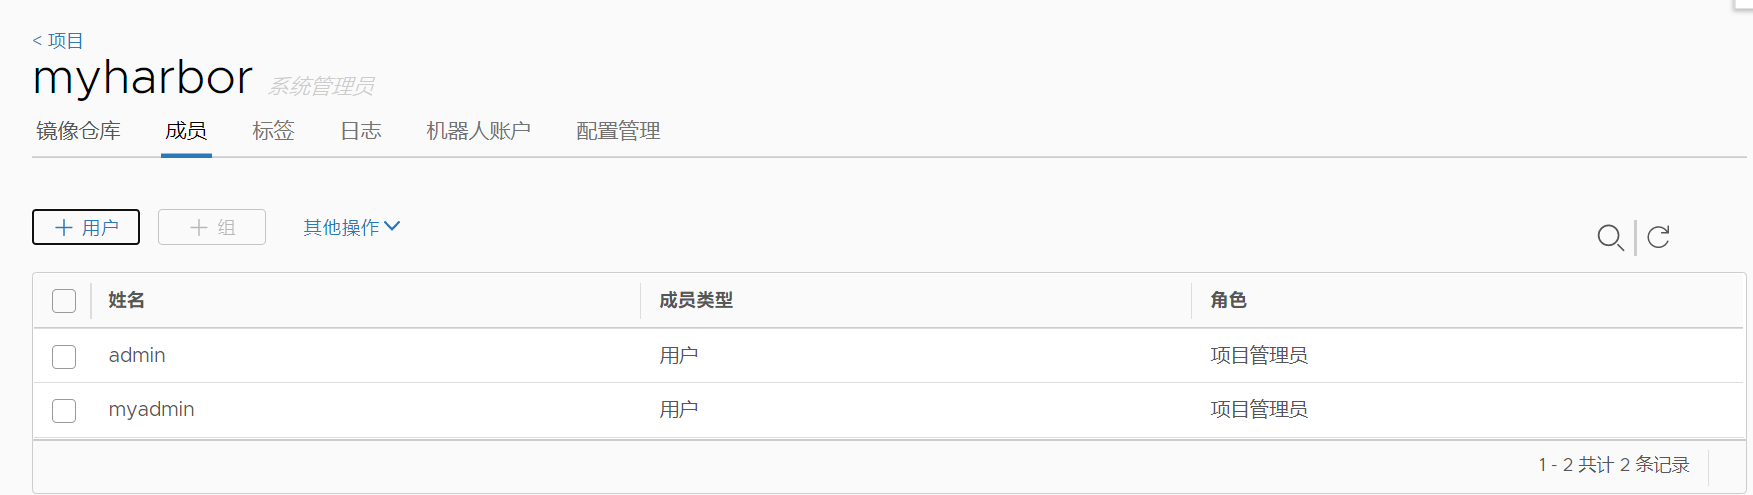
3、使用myadmin用户登录
4、k8s中创建pod拉取镜像时,私有仓库未公开的需要指定凭据secrets才可以拉取
kubectl create secret docker-registry harbor.myharbor --docker-server=harbor.myharbor.com --docker-username=myadmin --docker-password=Myadmin12345 --docker-email=myadmin@163.com
harbor.myharbor: 为拉取镜像私钥名
harbor.myharbor.com: 为登录harbor地址
--docker-username=myadimin 登录用户
--docker-password=Myadmin12345 登录密码
--docker-email=myadmin@163.com 邮箱
以上信息须与创建用户时信息一致。
