Java深入学习15:NIO详解1-基本概念、Buffer、Channel
一、Java NIO 简介
java.nio全称java non-blocking IO(实际上是 new io),是指JDK 1.4 及以上版本里提供的新api(New IO) ,为所有的原始类型(boolean类型除外)提供缓存支持的数据容器,使用它可以提供非阻塞式的高伸缩性网络。已经被越来越多地应用到大型应用服务器,是解决高并发、I/O处理问题的有效方式。
HTTP2.0使用了多路复用的技术,做到同一个连接并发处理多个请求,而且并发请求的数量比HTTP1.1大了好几个数量级。
在标准IO API中,你可以操作字节流和字符流,但在新IO中,你可以操作通道和缓冲,数据总是从通道被读取到缓冲中或者从缓冲写入到通道中。
二、Java NIO 与 IO 的主要区别
1-主要区别

2-IO是面向流的、阻塞的
java1.4以前的io模型,一连接对一个线程。原始的IO是面向流的,不存在缓存的概念。Java IO面向流意味着每次从流中读一个或多个字节,直至读取所有字节,它们没有被缓存在任何地方。此外,它不能前后移动流中的数据。如果需要前后移动从流中读取的数据,需要先将它缓存到一个缓冲区
Java IO的各种流是阻塞的,这意味着当一个线程调用read或 write方法时,该线程被阻塞,直到有一些数据被读取,或数据完全写入,该线程在此期间不能再干任何事情了。
3-NIO是面向块的、非阻塞的
NIO是面向缓冲区的。数据读取到一个它稍后处理的缓冲区,需要时可在缓冲区中前后移动,这就增加了处理过程中的灵活性。
Java NIO的非阻塞模式,使一个线程从某通道发送请求读取数据,但是它仅能得到目前可用的数据,如果目前没有数据可用时,就什么都不会获取,而不是保持线程阻塞,所以直至数据变的可以读取之前,该线程可以继续做其他的事情。 非阻塞写也是如此,一个线程请求写入一些数据到某通道,但不需要等待它完全写入,这个线程同时可以去做别的事情。
通俗理解:NIO是可以做到用一个线程来处理多个操作的。假设有10000个请求过来,根据实际情况,可以分配50或者100个线程来处理。不像之前的阻塞IO那样,非得分配10000个。
三、缓冲区(Buffer)
1- 缓冲区(Buffer):在 Java NIO 中负责数据的存取。缓冲区就是数组。用于存储不同数据类型的数据。根据数据类型不同(boolean 除外),提供了相应类型的缓冲区:
ByteBuffer
CharBuffer
ShortBuffer
IntBuffer
LongBuffer
FloatBuffer
DoubleBuffer
上述缓冲区的管理方式几乎一致,通过 allocate() 获取缓冲区
2-- 更轻松地使用内存块,使用缓冲区读取和写入数据通常遵循以下四个步骤:
1. 写数据到缓冲区;
2. 调用buffer.flip()方法;
3. 从缓冲区中读取数据;
4. 调用buffer.clear()或buffer.compat()方法;
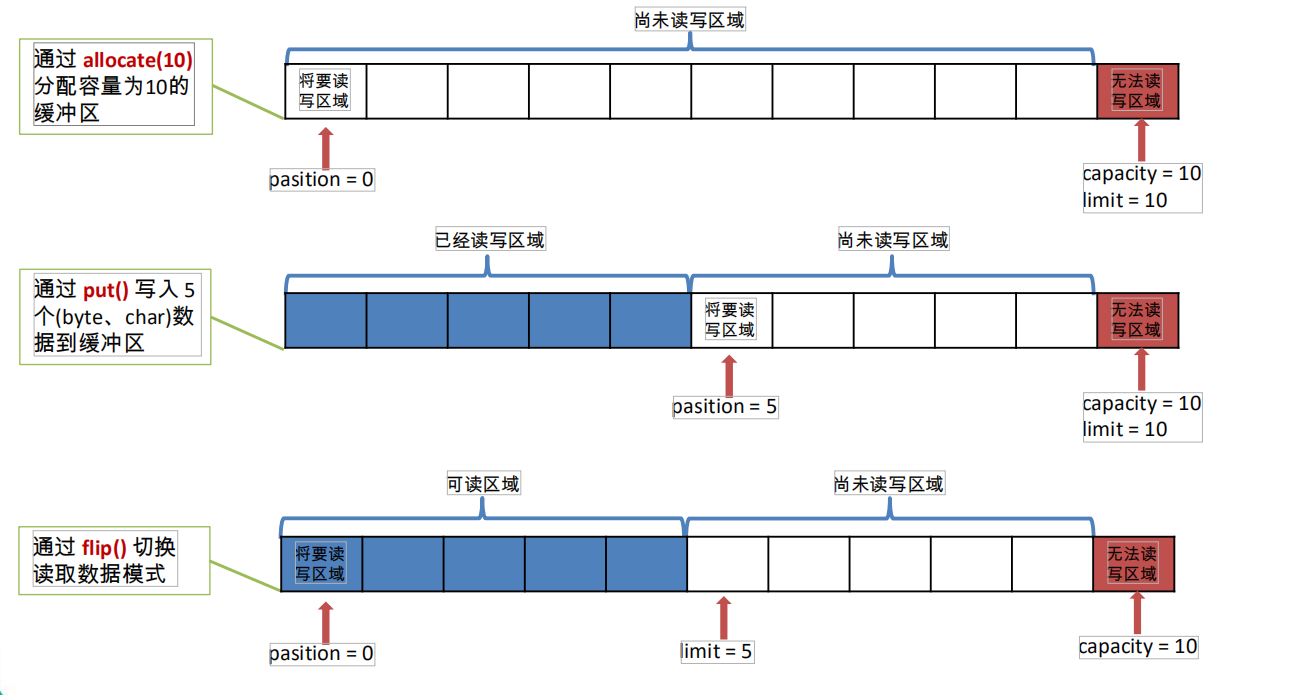
当向buffer写入数据时,buffer会记录下写了多少数据,一旦要读取数据,需要通过flip()方法将Buffer从写模式切换到读模式,在读模式下可以读取之前写入到buffer的所有数据,一旦读完了所有的数据,就需要清空缓冲区,让它可以再次被写入。
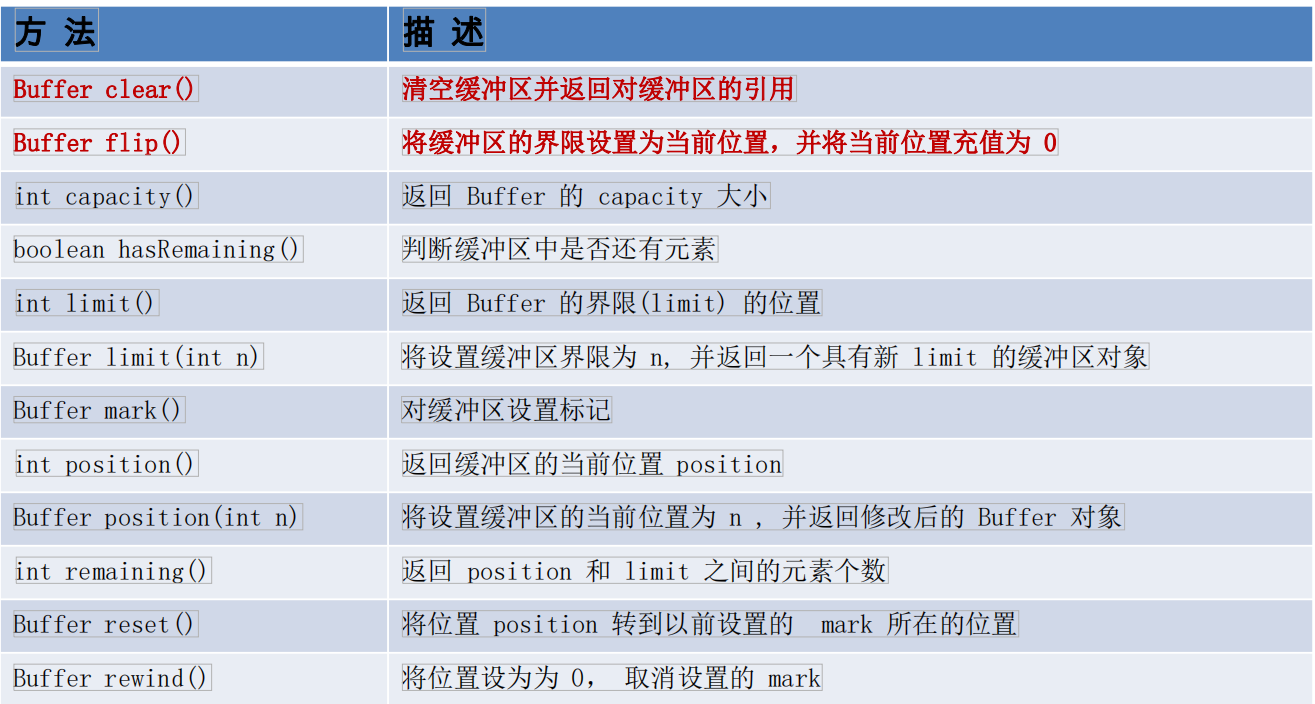
3-缓冲区存取数据的两个核心方法:
put() : 存入数据到缓冲区中
get() : 获取缓冲区中的数据
4- 缓冲区中的四个核心属性:
capacity : 容量,表示缓冲区中最大存储数据的容量。一旦声明不能改变。
limit : 界限,表示缓冲区中可以操作数据的大小。(limit 后数据不能进行读写)
position : 位置,表示缓冲区中正在操作数据的位置。
mark : 标记,表示记录当前 position 的位置。可以通过 reset() 恢复到 mark 的位置
0 <= mark <= position <= limit <= capacity
5-直接缓冲区与非直接缓冲区:
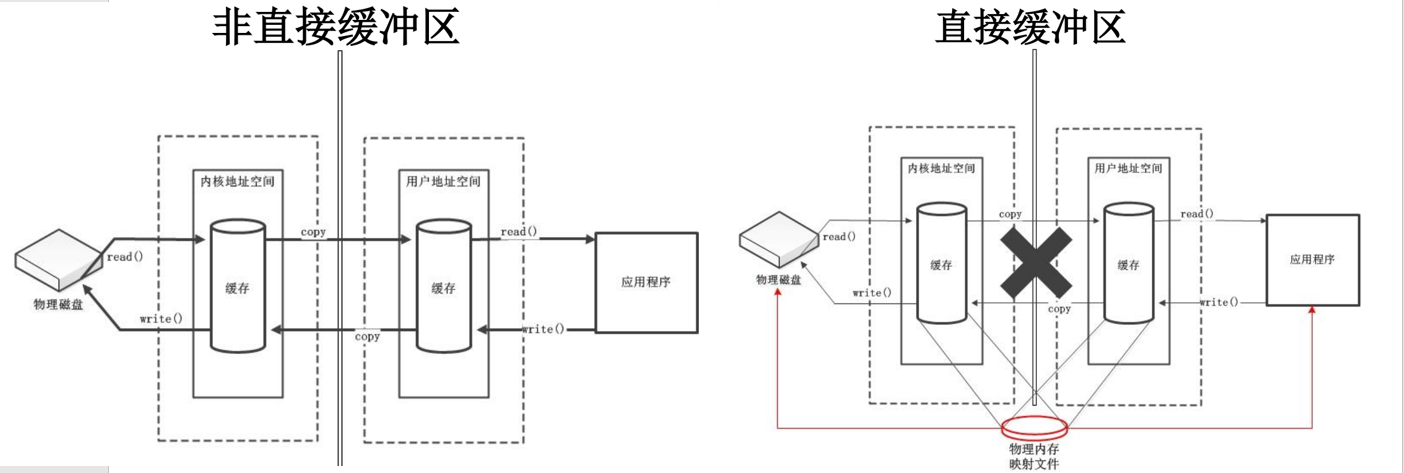
非直接缓冲区:通过 allocate() 方法分配缓冲区,将缓冲区建立在 JVM 的内存中
直接缓冲区:通过 allocateDirect() 方法分配直接缓冲区,将缓冲区建立在物理内存中。可以提高效率
字节缓冲区要么是直接的,要么是非直接的。如果为直接字节缓冲区,则Java 虚拟机会尽最大努力直接在此缓冲区上执行本机I/O 操作。也就是说,在每次调用基础操作系统的一个本机I/O 操作之前(或之后),虚拟机都会尽量避免将缓冲区的内容复制到中间缓冲区中(或从中间缓冲区中复制内容)。
直接字节缓冲区可以通过调用此类的allocateDirect() 工厂方法来创建。此方法返回的缓冲区进行分配和取消分配所需成本通常高于非直接缓冲区。直接缓冲区的内容可以驻留在常规的垃圾回收堆之外,因此,它们对应用程序的内存需求量造成的影响可能并不明显。所以,建议将直接缓冲区主要分配给那些易受基础系统的本机I/O 操作影响的大型、持久的缓冲区。一般情况下,最好仅在直接缓冲区能在程序性能方面带来明显好处时分配它们。
直接字节缓冲区还可以通过FileChannel 的map() 方法将文件区域直接映射到内存中来创建。该方法返回MappedByteBuffer。Java 平台的实现有助于通过JNI 从本机代码创建直接字节缓冲区。如果以上这些缓冲区中的某个缓冲区实例指的是不可访问的内存区域,则试图访问该区域不会更改该缓冲区的内容,并且将会在访问期间或稍后的某个时间导致抛出不确定的异常。
字节缓冲区是直接缓冲区还是非直接缓冲区可通过调用其isDirect()方法来确定。提供此方法是为了能够在性能关键型代码中执行显式缓冲区管理。
6-缓冲区的基本属性和常用方法
7-代码示例
import java.nio.ByteBuffer;

public class BufferTest {


    public static void main(String[] args) {
        //分配缓存
        //Allocates a new byte buffer.
        ByteBuffer buffer = ByteBuffer.allocate(1024);

        System.out.println("---------------initial------------------");
        System.out.println("pos="+buffer.position()+" lim="+buffer.limit()+" cap="+buffer.capacity());//pos=0 lim=1024 cap=1024

        //写数据
        System.out.println("---------------put------------------");
        String str = "12345";
        buffer.put(str.getBytes());
        System.out.println("pos="+buffer.position()+" lim="+buffer.limit()+" cap="+buffer.capacity());//pos=5 lim=1024 cap=1024

        //flip。将limit设置成当前的position,将position设置成0,如果remark被设置过,则清除
        System.out.println("---------------flip------------------");
        buffer.flip();
        System.out.println("pos="+buffer.position()+" lim="+buffer.limit()+" cap="+buffer.capacity());//pos=0 lim=5 cap=1024

        //读取数据
        System.out.println("---------------get------------------");
        byte[] bytes = new byte[buffer.limit()];
        buffer.get(bytes,0,2);
        System.out.println(new String(bytes,0,2));//12
        System.out.println("pos="+buffer.position()+" lim="+buffer.limit()+" cap="+buffer.capacity());//pos=2 lim=5 cap=1024


        //mark()方法。position重设为0,mark被清除。
        System.out.println("---------------mark------------------");
        buffer.mark();//Sets this buffer's mark at its position.
        buffer.get(bytes,2,2);
        System.out.println(new String(bytes,2,2));//12
        System.out.println("pos="+buffer.position()+" lim="+buffer.limit()+" cap="+buffer.capacity());//pos=4 lim=5 cap=1024

        //reset()方法。reset后position会会推到mark标记的位置
        // Resets this buffer's position to the previously-marked position.
        System.out.println("---------------reset------------------");
        buffer.reset();
        System.out.println("pos="+buffer.position()+" lim="+buffer.limit()+" cap="+buffer.capacity());//pos=2 lim=5 cap=1024

        //rewind()方法。position初始化为0,mark被清除
        //Rewinds this buffer.  The position is set to zero and the mark is  discarded.
        System.out.println("---------------rewind------------------");
        buffer.rewind();
        System.out.println("pos="+buffer.position()+" lim="+buffer.limit()+" cap="+buffer.capacity());//pos=0 lim=5 cap=1024

        //判断缓冲区中是否还有剩余数据
        //Tells whether there are any elements between the current position and the limit.
        System.out.println("---------------remaining------------------");
        if(buffer.hasRemaining()){
            //position和limit之间的数量
            //Returns the number of elements between the current position and the limit.
            System.out.println(buffer.remaining());//5
        }

        //clear()方法,position初始化为0,limit初始化为capacity值,mark值被清除。但是clear方法并没有实际清除数据
        System.out.println("---------------clear------------------");
        buffer.clear();
        System.out.println("pos="+buffer.position()+" lim="+buffer.limit()+" cap="+buffer.capacity());//pos=0 lim=1024 cap=1024
        System.out.println((char)buffer.get());//1。(数据并没有被清除)
    }
}
四、通道(Channel)
1- 通道(Channel)是什么
NIO的通道类似于流,但有些区别如下:
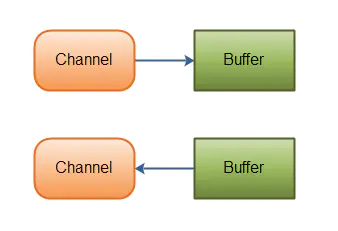
1. 通道可以同时进行读写,而流只能读或者只能写
2. 通道可以实现异步读写数据
3. 通道可以从缓冲读数据,也可以写数据到缓冲:
4. Channel 只能与Buffer 进行交互。

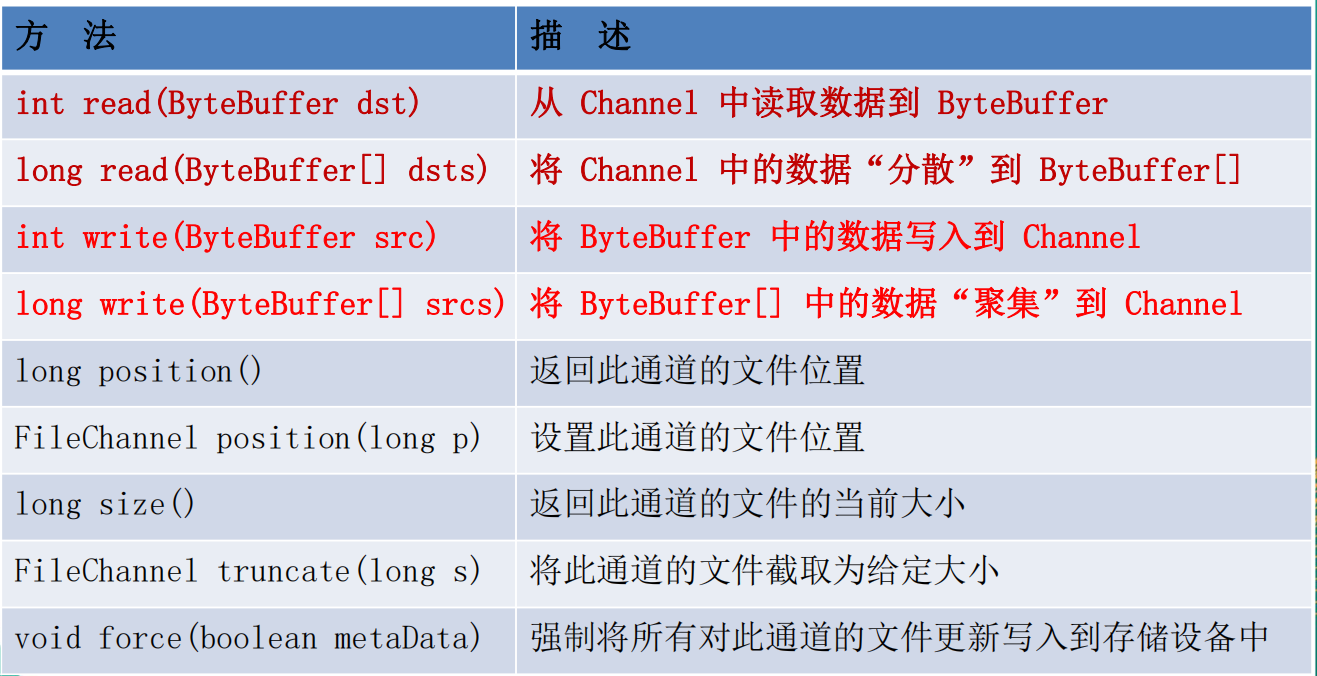
2-FileChannel 的常用方法
3-代码示例
import java.io.*;
import java.nio.ByteBuffer;
import java.nio.CharBuffer;
import java.nio.MappedByteBuffer;
import java.nio.channels.FileChannel;
import java.nio.charset.CharacterCodingException;
import java.nio.charset.Charset;
import java.nio.charset.CharsetDecoder;
import java.nio.charset.CharsetEncoder;
import java.nio.file.Path;
import java.nio.file.Paths;
import java.nio.file.StandardOpenOption;
import java.util.Map;
import java.util.Set;
import java.util.SortedMap;


/*
 * 一、通道(Channel):用于源节点与目标节点的连接。在 Java NIO 中负责缓冲区中数据的传输。Channel 本身不存储数据,因此需要配合缓冲区进行传输。
 *
 * 二、通道的主要实现类
 *     java.nio.channels.Channel 接口:
 *         |--FileChannel
 *         |--SocketChannel
 *         |--ServerSocketChannel
 *         |--DatagramChannel
 *
 * 三、获取通道
 * 1. Java 针对支持通道的类提供了 getChannel() 方法
 *         本地 IO:
 *         FileInputStream/FileOutputStream
 *         RandomAccessFile
 *
 *         网络IO:
 *         Socket
 *         ServerSocket
 *         DatagramSocket
 *
 * 2. 在 JDK 1.7 中的 NIO.2 针对各个通道提供了静态方法 open()
 * 3. 在 JDK 1.7 中的 NIO.2 的 Files 工具类的 newByteChannel()
 *
 * 四、通道之间的数据传输
 * transferFrom()
 * transferTo()
 *
 * 五、分散(Scatter)与聚集(Gather)
 * 分散读取(Scattering Reads):将通道中的数据分散到多个缓冲区中`
 * 聚集写入(Gathering Writes):将多个缓冲区中的数据聚集到通道中
 *
 * 六、字符集:Charset
 * 编码:字符串 -> 字节数组
 * 解码:字节数组  -> 字符串
 *
 */
public class ChannelTest {

    //利用通道完成文件的复制(非直接缓冲区)
    @Test
    public void test1() throws IOException {
       //1-获取通道
        FileInputStream fis = new FileInputStream("1.jpg");
        FileOutputStream fos = new FileOutputStream("2.jpg");
        //getChannel(): Returns the unique FileChannel object associated with this file input stream.
        FileChannel inChannel = fis.getChannel();
        FileChannel outChannel = fos.getChannel();

        //2-分配缓冲区
        ByteBuffer buffer = ByteBuffer.allocate(10240);

        //3-将通道的数据存入缓存中
        //FileChannel.read(): Reads a sequence of bytes from this channel into the given buffer.
        inChannel.read(buffer);
       //4-将缓存中的额数据写入通道
        int num = 0;
        while(inChannel.read(buffer) != -1){
            System.out.println(++num);
            buffer.flip();
            //FileChannel.write(): Writes a sequence of bytes to this channel from the given buffer.
            outChannel.write(buffer);
            buffer.clear();
        }
    }

    //使用直接缓冲区完成文件的复制(内存映射文件)
    @Test
    public void test2() throws IOException {
        //1-获取通道
        //open(): Opens or creates a file, returning a file channel to access the file.
        //StandardOpenOption.READ: Open for read access
        //StandardOpenOption.WRITE: Open for write access.
        //StandardOpenOption.CREATE: Create a new file if it does not exist.
        FileChannel inChannel = FileChannel.open(Paths.get("1.jpg"), StandardOpenOption.READ);
        FileChannel outChannel = FileChannel.open(Paths.get("3.jpg"), StandardOpenOption.WRITE,StandardOpenOption.READ,StandardOpenOption.CREATE);


        //2-映射文件
        //MappedByteBuffer: A direct byte buffer whose content is a memory-mapped region of a file.//直接字节缓冲区,其内容是文件的内存映射区域。
        //FileChannel.MapMode: A typesafe enumeration for file-mapping modes.
        //MapMode.READ_ONLY: Mode for a read-only mapping.
        //MapMode.READ_WRITE: Mode for a read/write mapping.
        MappedByteBuffer inMappedBuf = inChannel.map(FileChannel.MapMode.READ_ONLY, 0, inChannel.size());
        MappedByteBuffer outMappedBuf = outChannel.map(FileChannel.MapMode.READ_WRITE, 0, inChannel.size());

        //3-直接对缓冲区进行数据的读写操作
        byte[] dst = new byte[inMappedBuf.limit()];
        //ByteBuffer.get(): This method transfers bytes from this buffer into the given destination array.//将字节数据传输到目标数组
        //ByteBuffer.put(): This method transfers the entire content of the given source byte array into this buffer.//将数组中的全部数据传输到buffer缓存中
        inMappedBuf.get(dst);
        outMappedBuf.put(dst);

        inChannel.close();
        outChannel.close();
    }


    //使用直接缓冲区完成文件的复制(内存映射文件)
    @Test
    public void test3() throws IOException {
        //1-获取通道
        FileChannel inChannel = FileChannel.open(Paths.get("1.jpg"), StandardOpenOption.READ);
        FileChannel outChannel = FileChannel.open(Paths.get("4.jpg"), StandardOpenOption.WRITE, StandardOpenOption.READ, StandardOpenOption.CREATE);

        //2-复制文件
        //transferTo(): Transfers bytes from this channel's file to the given writable byte channel.//
        inChannel.transferTo(0,inChannel.size(),outChannel);
        //transferFrom(): Transfers bytes into this channel's file from the given readable byte channel.//
        outChannel.transferFrom(inChannel,0,inChannel.size());

        inChannel.close();
        outChannel.close();
    }

    //分散和聚集
    @Test
    public void test4() throws IOException {
        //1-创建随机访问文件实例
        //new RandomAccessFile(String name, String mode): Creates a random access file stream to read from, and optionally to write to, a file with the specified name. A new FileDescriptor object is created to represent the connection to the file.
        RandomAccessFile rw1 = new RandomAccessFile("1.txt", "rw");

        //2-获取通道
        //getChannel(): Returns the unique  FileChannel object associated with this file.
        FileChannel channel1 = rw1.getChannel();

        //3-创建缓存
        ByteBuffer buf1 = ByteBuffer.allocate(10);
        ByteBuffer buf2 = ByteBuffer.allocate(1024);
        ByteBuffer[] bufArray = new ByteBuffer[]{buf1,buf2};

        //4-分散读取
        channel1.read(bufArray);

        //5-聚集写入
        for(ByteBuffer buf : bufArray){
            buf.flip();
        }
        RandomAccessFile rw2 = new RandomAccessFile("2.txt", "rw");
        FileChannel channel2 = rw2.getChannel();
        channel2.write(bufArray);

        channel1.close();
        channel2.close();
    }


    //查询全部编码类型
    @Test
    public void test5(){
        //Constructs a sorted map from canonical charset names to charset objects.
        SortedMap<String, Charset> stringCharsetSortedMap = Charset.availableCharsets();

        Set<Map.Entry<String, Charset>> entries = stringCharsetSortedMap.entrySet();
        for(Map.Entry<String, Charset> entry : entries){
            System.out.println(entry.getKey() +" : "+ entry.getValue());
        }
    }

    //字符集:解码和编码
    @Test
    public void test6() throws CharacterCodingException {

        //Charset charset1 = Charset.forName("GBK");
        Charset charset1 = Charset.forName("UTF-8");

        //编码器
        CharsetEncoder charsetEncoder = charset1.newEncoder();
        //解码器
        CharsetDecoder charsetDecoder = charset1.newDecoder();


        //写入数据
        CharBuffer cBuf = CharBuffer.allocate(1024);
        cBuf.put("嘀嗒嗒嘟嘟嗒嗒");
        cBuf.flip();

        //编码
        ByteBuffer bBuf = charsetEncoder.encode(cBuf);
        for(int  i=0; i<bBuf.limit(); i++){
            System.out.println(bBuf.get());
        }
        cBuf.flip();
        System.out.println("cBuf.toString(): " + cBuf.toString());


        //解码
        bBuf.flip();
        CharBuffer cBuf2 = charsetDecoder.decode(bBuf);
        System.out.println("cBuf2.toString(): " + cBuf2.toString());

        Charset gbk = Charset.forName("UTF-8");
        //Charset gbk = Charset.forName("GBK");
        bBuf.flip();
        CharBuffer cBuf3 = gbk.decode(bBuf);
        System.out.println("cBuf3.toString(): " + cBuf3.toString());

    }


}
参考资料
1-https://www.jianshu.com/p/362b365e1bcc
2-尚硅谷视频


 浙公网安备 33010602011771号