
| 概念 |
在java NIO中,通道可以简单理解为火车铁轨,他本身不能存储传输数据,而是需要配合缓冲区(火车)来进行数据的存取,在java中,通道定义在java.nio.channels包下,此包定义了各种通道,这些通道表示到能够执行 I/O 操作的实体(如文件和套接字)的连接;定义了用于多路复用的、非阻塞 I/O 操作的选择器。此包针对不同的类型的数据定义了以下通道常见的通道实现类:
- FileChannel:用于读取、写入、映射和操作文件的通道。
- DatagramChannel:针对面向数据报套接字的可选择通道。
- SocketChannel:针对面向流的连接套接字的可选择通道。
- ServerSocketChannel:针对面向流的侦听套接字的可选择通道。
| 获取通道 |
- java针对支持通道的类提供了
getChannel()方法。
本地IO:FileInputStream、FileOutputStream、RandomAccessFile
网络IO:Socket、ServerSocket、DatagramSocket - 在JDK1.7中的NIO中提供了静态方法 open() ,通过这个方法也可以获取Channel通道;
- 在JDK1.7中的NIO中的
java.nio.file.Files工具类的newByteChannel()方法也可以获取到Channel通道;
| 案例 |
将D盘中的文件test.txt复制到E盘中去,并命名为copy.txt;
1.非直接缓冲区形式:
@Test
	void contextLoads() throws IOException {
		//1.建立本地输入输出流
		FileInputStream fileInputStream = new FileInputStream("D:" + File.separator + "test.txt");
		FileOutputStream fileOutputStream = new FileOutputStream("E:" + File.separator + "copy.txt");
		//2.获取通道
		FileChannel inputChannel = fileInputStream.getChannel();
		FileChannel outputChannel = fileOutputStream.getChannel();
		//3.创建指定大小的缓冲区
		ByteBuffer byteBuffer = ByteBuffer.allocate(1024);

		//4.将数据存取到缓冲区
		while (inputChannel.read(byteBuffer) != -1) {
			//5.反转通道
			byteBuffer.flip();
			//6.将缓冲区的数据写到本地
			outputChannel.write(byteBuffer);
			//7.清空缓冲区
			byteBuffer.clear();
		}
		//关闭流对象和通道
		fileInputStream.close();
		fileOutputStream.close();
		inputChannel.close();
		outputChannel.close();
	}
2.直接缓冲区形式(1):
@Test
	void test02() throws IOException {
		//获取管道
		FileChannel inFileChannel = FileChannel.open(Paths.get("D:" + File.separator + "test.txt"), StandardOpenOption.READ);
		FileChannel outFileChannel = FileChannel.open(Paths.get("E:" + File.separator + "copy.txt"), StandardOpenOption.WRITE, StandardOpenOption.READ, StandardOpenOption.CREATE_NEW);

		//内存映射文件
		MappedByteBuffer inMapBuf = inFileChannel.map(MapMode.READ_ONLY, 0, inFileChannel.size());
		MappedByteBuffer outMapBuf = outFileChannel.map(MapMode.READ_WRITE, 0, inFileChannel.size());

		//对缓冲区的数据进行读写
		byte[] bytes = new byte[inMapBuf.limit()];
		inMapBuf.get(bytes);
		outMapBuf.put(bytes);

		//关闭通道
		inFileChannel.close();
		outFileChannel.close();

	}
2.直接缓冲区形式(2):
通道之间的数据传输:
	@Test
	void test03() throws IOException {
		//获取管道
		FileChannel inFileChannel = FileChannel.open(Paths.get("D:" + File.separator + "test.txt"), StandardOpenOption.READ);
		FileChannel outFileChannel = FileChannel.open(Paths.get("E:" + File.separator + "copy.txt"), StandardOpenOption.WRITE, StandardOpenOption.READ, StandardOpenOption.CREATE_NEW);

		//inFileChannel.transferTo(0,inFileChannel.size(),outFileChannel);
		outFileChannel.transferFrom(inFileChannel, 0, inFileChannel.size());

		inFileChannel.close();
		outFileChannel.close();
	}
上面test03()也是属于直接缓冲区来进行数据传输,其中transferTo和transferFrom方法只要弄清数据从哪里来到哪里去就可以了。
inFileChannel.transferTo(0,inFileChannel.size(),outFileChannel);表示数据从inFileChannel中来,到outFileChannel中去。
outFileChannel.transferFrom(inFileChannel, 0, inFileChannel.size());表示outFileChannel中的数据来自于inFileChannel。
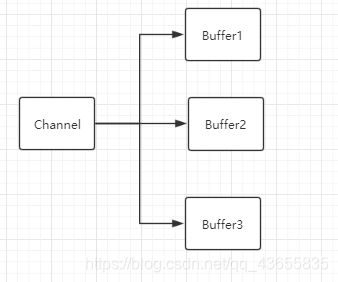
| 分散读取和聚集写入 |
分散读取(Scatter Reads):将通道中得数据分散到多个buffer缓冲区中去。
分散数据的时候,会按照buffer缓冲区的顺序依次进行填充,也就是说,分散数据是有序的。
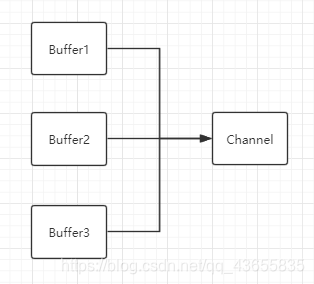
聚集写入(Gathering Writes):将多个buffer缓冲区中得数据聚集到一个通道中。
同样,聚集写入数据也是按照buffer缓冲区的顺序依次聚集到Channel通道中。
@Test
	void test04() throws IOException {
		//rw代表读写模式
		RandomAccessFile randomAccessFile = new RandomAccessFile("D:" + File.separator + "testFile.txt", "rw");

		//获取通道
		FileChannel channel = randomAccessFile.getChannel();
		//创建多个buffer
		ByteBuffer byteBuffer1 = ByteBuffer.allocate(100);
		ByteBuffer byteBuffer2 = ByteBuffer.allocate(1024);

		ByteBuffer[] byteBuffers = {byteBuffer1, byteBuffer2};
		//读取buffer数组
		channel.read(byteBuffers);
		for (ByteBuffer byteBuffer : byteBuffers) {
			//反转读写模式
			byteBuffer.flip();
		}
		//打印出两个buffer中的数据,查看是否成功将数据给分散开了。
		System.out.println(new String(byteBuffers[0].array(), 0, byteBuffers[0].limit()));
		System.out.println("------------------------");
		System.out.println(new String(byteBuffers[1].array(),0,byteBuffers[1].limit()));

		//聚集写入
		RandomAccessFile accessFile = new RandomAccessFile("E:" + File.separator + "copyFile.txt", "rw");
		FileChannel fileChannel = accessFile.getChannel();

		//写数据
		fileChannel.write(byteBuffers);

		//关闭通道
		channel.close();
		fileChannel.close();
	}

 浙公网安备 33010602011771号