项目集成背景springCloud-eureka-feign-mybatis-seata
想更清楚的理解全局事务框架SeaTa,可以参考资料 https://www.jianshu.com/p/044e95223a17,我认为介绍的很详细,下面来搭建集成并测试结果 参考:https://segmentfault.com/a/1190000020639849
一、安装部署Seata Server
Seata目前在github托管开源源代码,源码地址:https://github.com/seata/seata
1.下载Seata Server
很多博客中文章中都给出了下载地址:Seata Server最新版本下载 https://github.com/seata/seata/releases/tag/v1.2.0 两个安装包,.zip支持Windows; .tar.gz支持Linux(这里下载的是1.2.0版本)

博主的百度云盘有有存两个1.2.0版本的安装包,可以直接下载:
seata-server-1.2.0.zip
链接:https://pan.baidu.com/s/11UudlHOorckhXgNwv1GsuA
提取码:g38r
seata-server-1.2.0.tar.gz
链接:https://pan.baidu.com/s/1gh5ogjph7wP6NfCFw2Vqvw
提取码:t4ik
Linux系统下我们通过命令 tar -xvf 来解压tar.gz压缩文件:
tar -xvf seata-server-1.2.0.tar.gz

解压完成后我们得到了几个文件夹。
- bin
存放各个系统的
seata server启动脚本 - conf
存在
seata server启动时所需要的配置信息、数据库模式下所需要的建表语句 - lib
运行
seata server所需要的依赖包列表
2.配置Seata Server
seata server所有的配置都在conf文件夹内,该文件夹内有两个文件我们必须要详细介绍下。
seata server默认使用file(文件方式)进行存储事务日志、事务运行信息,我们可以通过-m db脚本参数的形式来指定,目前仅支持file、db这两种方式。
- file.conf
该文件用于配置
存储方式、透传事务信息的NIO等信息,默认对应registry.conf文件内的file方式配置。 - registry.conf
seata server核心配置文件,可以通过该文件配置服务注册方式、配置读取方式。注册方式目前支持file 、nacos 、eureka、redis、zk、consul、etcd3、sofa等方式,默认为
file,对应读取file.co读取配置信息的方式支持file、nacos 、apollo、zk、consul、etcd3等方式,默认为file,对应读取file.conf## transaction log store, only used in seata-server
file.conf

## transaction log store, only used in seata-server
store {
  ## store mode: file、db
  mode = "file"

  ## file store property
  file {
    ## store location dir
    dir = "sessionStore"
    # branch session size , if exceeded first try compress lockkey, still exceeded throws exceptions
    maxBranchSessionSize = 16384
    # globe session size , if exceeded throws exceptions
    maxGlobalSessionSize = 512
    # file buffer size , if exceeded allocate new buffer
    fileWriteBufferCacheSize = 16384
    # when recover batch read size
    sessionReloadReadSize = 100
    # async, sync
    flushDiskMode = async
  }

  ## database store property
  db {
    ## the implement of javax.sql.DataSource, such as DruidDataSource(druid)/BasicDataSource(dbcp) etc.
    datasource = "druid"
    ## mysql/oracle/postgresql/h2/oceanbase etc.
    dbType = "mysql"
    driverClassName = "com.mysql.jdbc.Driver"
    url = "jdbc:mysql://127.0.0.1:3306/seata"
    user = "mysql"
    password = "mysql"
    minConn = 5
    maxConn = 30
    globalTable = "global_table"
    branchTable = "branch_table"
    lockTable = "lock_table"
    queryLimit = 100
    maxWait = 5000
  }
}
registry.conf

registry {
  # file 、nacos 、eureka、redis、zk、consul、etcd3、sofa
  type = "file"

  nacos {
    application = "seata-server"
    serverAddr = "localhost"
    namespace = ""
    cluster = "default"
    username = ""
    password = ""
  }
  eureka {
    serviceUrl = "http://localhost:8761/eureka"
    application = "default"
    weight = "1"
  }
  redis {
    serverAddr = "localhost:6379"
    db = 0
    password = ""
    cluster = "default"
    timeout = 0
  }
  zk {
    cluster = "default"
    serverAddr = "127.0.0.1:2181"
    sessionTimeout = 6000
    connectTimeout = 2000
    username = ""
    password = ""
  }
  consul {
    cluster = "default"
    serverAddr = "127.0.0.1:8500"
  }
  etcd3 {
    cluster = "default"
    serverAddr = "http://localhost:2379"
  }
  sofa {
    serverAddr = "127.0.0.1:9603"
    application = "default"
    region = "DEFAULT_ZONE"
    datacenter = "DefaultDataCenter"
    cluster = "default"
    group = "SEATA_GROUP"
    addressWaitTime = "3000"
  }
  file {
    name = "file.conf"
  }
}

config {
  # file、nacos 、apollo、zk、consul、etcd3
  type = "file"

  nacos {
    serverAddr = "localhost"
    namespace = ""
    group = "SEATA_GROUP"
    username = ""
    password = ""
  }
  consul {
    serverAddr = "127.0.0.1:8500"
  }
  apollo {
    appId = "seata-server"
    apolloMeta = "http://192.168.1.204:8801"
    namespace = "application"
  }
  zk {
    serverAddr = "127.0.0.1:2181"
    sessionTimeout = 6000
    connectTimeout = 2000
    username = ""
    password = ""
  }
  etcd3 {
    serverAddr = "http://localhost:2379"
  }
  file {
    name = "file.conf"
  }
}
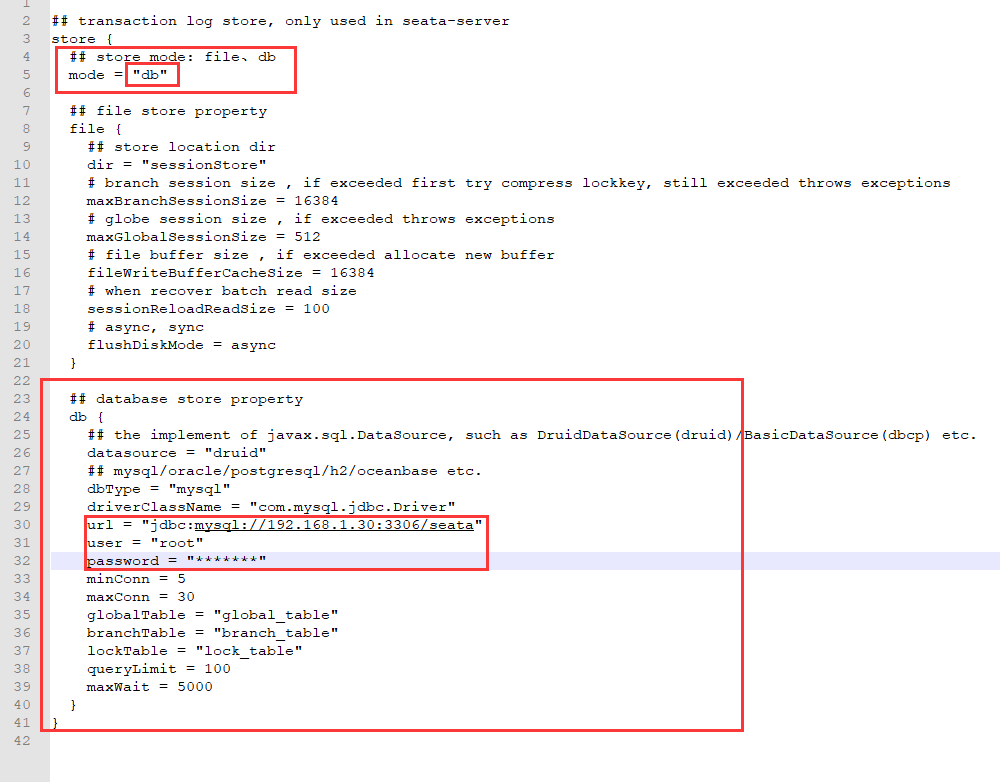
根据自己的环境进行配置:
registry.conf 我选择eureka做注册中心,其他不变如下图

file.conf 配置存储类型db,配置数据库,如下图
3.启动Seata Server
启动seata server的脚本位于bin文件内,Linux/Mac环境使用seata-server.sh脚本启动,Windows环境使用seata-server.bat脚本启动。
Linux/Mac启动方式示例如下所示:
nohup sh seata-server.sh -p 8091 -h 127.0.0.1 -m file &> seata.log &通过nohup命令让seata server在系统后台运行。
脚本参数:
- -p
指定启动
seata server的端口号。 - -h
指定
seata server所绑定的主机,这里配置要注意指定的主机IP要与业务服务内的配置文件保持一致,如:-h 192.168.1.10,业务服务配置文件内应该配置192.168.1.10,即使在同一台主机上也要保持一致。 - -m
事务日志、事务执行信息存储的方式,目前支持
file(文件方式)、db(数据库方式,建表语句请查看config/db_store.sql、config/db_undo_log.sql)
事务日志、事务执行信息存储的方式选择db 需要创建数据库seata sql如下

-- the table to store GlobalSession data
drop table if exists `global_table`;
create table `global_table` (
  `xid` varchar(128)  not null,
  `transaction_id` bigint,
  `status` tinyint not null,
  `application_id` varchar(32),
  `transaction_service_group` varchar(32),
  `transaction_name` varchar(128),
  `timeout` int,
  `begin_time` bigint,
  `application_data` varchar(2000),
  `gmt_create` datetime,
  `gmt_modified` datetime,
  primary key (`xid`),
  key `idx_gmt_modified_status` (`gmt_modified`, `status`),
  key `idx_transaction_id` (`transaction_id`)
);

-- the table to store BranchSession data
drop table if exists `branch_table`;
create table `branch_table` (
  `branch_id` bigint not null,
  `xid` varchar(128) not null,
  `transaction_id` bigint ,
  `resource_group_id` varchar(32),
  `resource_id` varchar(256) ,
  `lock_key` varchar(128) ,
  `branch_type` varchar(8) ,
  `status` tinyint,
  `client_id` varchar(64),
  `application_data` varchar(2000),
  `gmt_create` datetime,
  `gmt_modified` datetime,
  primary key (`branch_id`),
  key `idx_xid` (`xid`)
);

-- the table to store lock data
drop table if exists `lock_table`;
create table `lock_table` (
  `row_key` varchar(128) not null,
  `xid` varchar(96),
  `transaction_id` long ,
  `branch_id` long,
  `resource_id` varchar(256) ,
  `table_name` varchar(32) ,
  `pk` varchar(36) ,
  `gmt_create` datetime ,
  `gmt_modified` datetime,
  primary key(`row_key`)
);
二、项目集成
经典案例可以从GitHub上下载开源demo https://github.com/seata/seata-samples
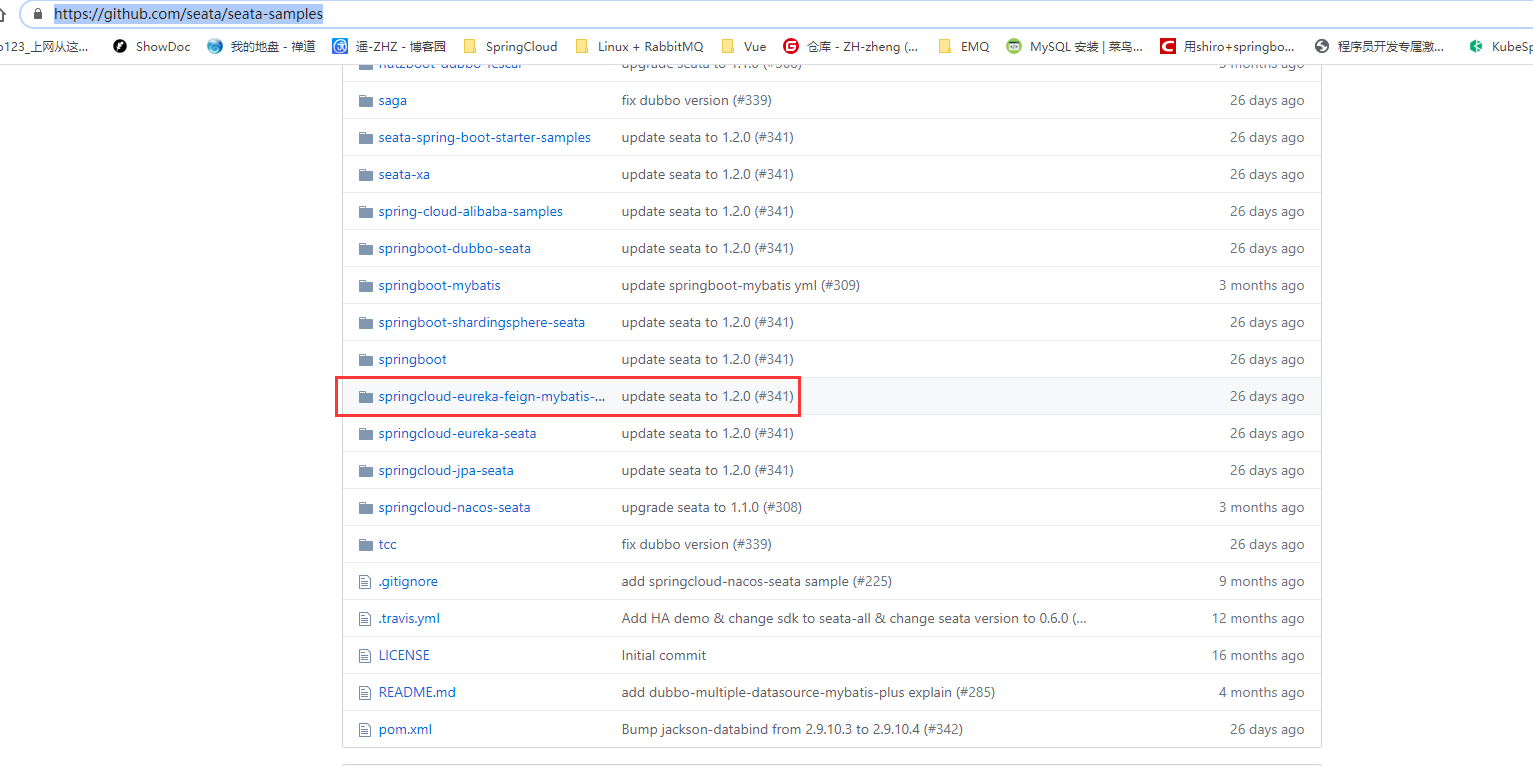
为了方便这里将案例工程springcloud-eureka-feign-mybatis-seata放在百度云盘上,可以直接提取
链接:https://pan.baidu.com/s/1bumMZV8Fd4dpQoFrd4CwiQ
提取码:dy7l
依赖的seata maven包(无法将file.conf和registry.conf两个配置文件中的配置写到 .properties配置文件中)
<dependency>
    <groupId>com.alibaba.cloud</groupId>
    <artifactId>spring-cloud-alibaba-seata</artifactId>
    <version>2.1.0.RELEASE</version>
    <exclusions>
        <exclusion>
            <artifactId>seata-all</artifactId>
            <groupId>io.seata</groupId>
        </exclusion>
    </exclusions>
</dependency>
<dependency>
    <groupId>io.seata</groupId>
    <artifactId>seata-all</artifactId>
    <version>${seata.version}</version>
</dependency>
为了方便配置(将file.conf和registry.conf两个配置文件中的配置写到 .properties配置文件中)需要依赖:
<dependency>
          <groupId>com.alibaba</groupId>
          <artifactId>druid-spring-boot-starter</artifactId>
          <version>1.1.10</version>
      </dependency>

      <dependency>
          <groupId>com.alibaba.cloud</groupId>
          <artifactId>spring-cloud-alibaba-seata</artifactId>
          <version>2.2.0.RELEASE</version>
      </dependency>

      <dependency>
          <groupId>io.seata</groupId>
          <artifactId>seata-spring-boot-starter</artifactId>
          <version>1.2.0</version>
     </dependency>
配置文件: application.properties
seata.enabled=true
seata.application-id=user-svr
seata.tx-service-group=fsp_tx_user_svr_group

# seata.client
# 事务群组(可以每个应用独立取名,也可以使用相同的名字)
seata.client.rm.report-success-enable=true
# 自动刷新缓存中的表结构(默认false)
seata.client.rm.table-meta-check-enable=false
# 一阶段结果上报TC重试次数(默认5)
seata.client.rm.report-retry-count=5
# 异步提交缓存队列长度(默认10000)
seata.client.rm.async-commit-buffer-limit=10000
# 校验或占用全局锁重试间隔(默认10ms)
seata.client.rm.lock.retry-interval=10
# 校验或占用全局锁重试次数(默认30)
seata.client.rm.lock.retry-times=30
# 分支事务与其它全局回滚事务冲突时锁策略(优先释放本地锁让回滚成功)
seata.client.rm.lock.retry-policy-branch-rollback-on-conflict=true
# 一阶段全局提交结果上报TC重试次数(默认1次,建议大于1)
seata.client.tm.commit-retry-count=3
# 一阶段全局回滚结果上报TC重试次数(默认1次,建议大于1)
seata.client.tm.rollback-retry-count=3
# 二阶段回滚镜像校验(默认true开启)
seata.client.undo.data-validation=true
# undo序列化方式(默认jackson)
seata.client.undo.log-serialization=jackson
# 自定义undo表名(默认undo_log)
seata.client.undo.log-table=undo_log
# 日志异常输出概率(默认100)
seata.client.log.exceptionRate=100

# seata.service
# TC 集群(必须与seata-server保持一致)
seata.service.vgroup-mapping.fsp_tx_user_svr_group=default
# 降级开关
seata.service.enable-degrade=false
# 禁用全局事务(默认false)
seata.service.disable-global-transaction=false
seata.service.grouplist.default=192.168.1.33:8091

# seata.transport
seata.transport.type=TCP
seata.transport.server=NIO
seata.transport.heartbeat=true
seata.transport.serialization=seata
seata.transport.compressor=none
seata.transport.shutdown.wait=3
seata.transport.thread-factory.boss-thread-prefix=NettyBoss
seata.transport.thread-factory.worker-thread-prefix=NettyServerNIOWorker
seata.transport.thread-factory.server-executor-thread-prefix=NettyServerBizHandler
seata.transport.thread-factory.share-boss-worker=false
seata.transport.thread-factory.client-selector-thread-prefix=NettyClientSelector
seata.transport.thread-factory.client-selector-thread-size=1
seata.transport.thread-factory.client-worker-thread-prefix=NettyClientWorkerThread
# 客户端事务消息请求是否批量合并发送(默认true)
seata.transport.enable-client-batch-send-request=true

#seata.registry
seata.registry.type=file
seata.config.type=file
seata.config.file.name=file.conf
在业务相关的数据库中添加 undo_log 表,用于保存需要回滚的数据
CREATE TABLE `undo_log`
(
    `id`            BIGINT(20)   NOT NULL AUTO_INCREMENT,
    `branch_id`     BIGINT(20)   NOT NULL,
    `xid`           VARCHAR(100) NOT NULL,
    `context`       VARCHAR(128) NOT NULL,
    `rollback_info` LONGBLOB     NOT NULL,
    `log_status`    INT(11)      NOT NULL,
    `log_created`   DATETIME     NOT NULL,
    `log_modified`  DATETIME     NOT NULL,
    `ext`           VARCHAR(100) DEFAULT NULL,
    PRIMARY KEY (`id`),
    UNIQUE KEY `ux_undo_log` (`xid`, `branch_id`)
) ENGINE = InnoDB
  AUTO_INCREMENT = 1
  DEFAULT CHARSET = utf8
四个服务:注册中心:eureka-server ;订单服务:order-server ;仓库服务:storage-server ;账户服务:account-server ;演示的业务是增加一个订单,账户减金额,仓库减库存,生成订单

为了调同通这个demo废了老大劲了
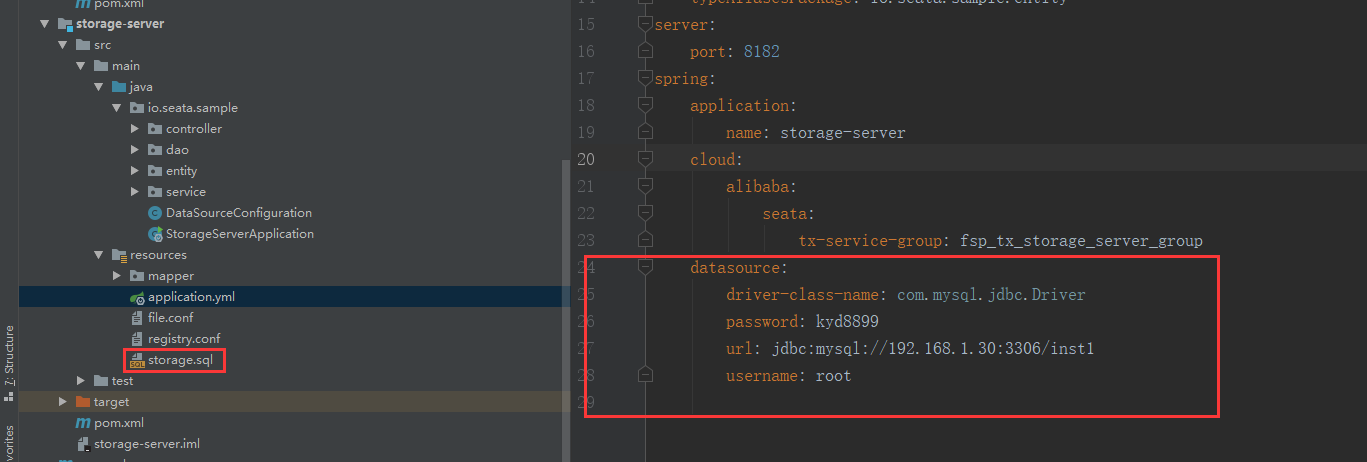
1)修改配置文件application.yml以仓库服务为例:为了方面,这里我创建了一个数据库inst1,三个工程都有sql文件,在数据库中建表,切记还要创建undo_log 表
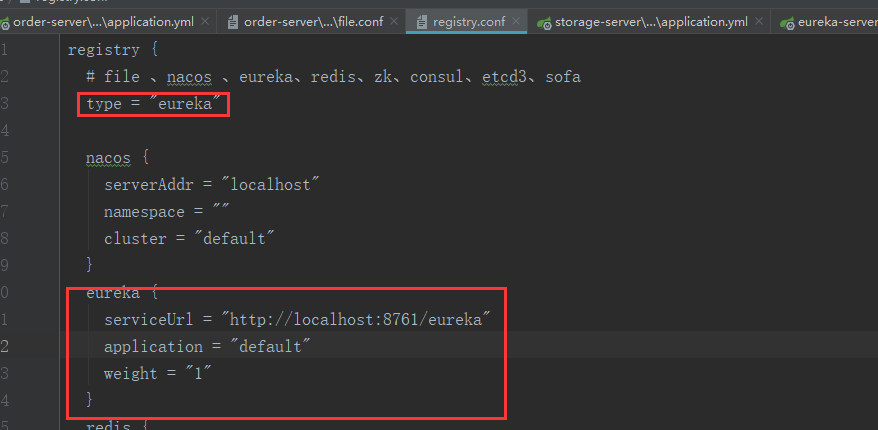
2)修改registry.conf文件,主要修改使用注册中心的类型为:Eureka,如下
3)修改file.conf 如下

注:这里需要重点说一个坑,仓库中下载下来的工程中vgroupMapping的配置存在问题,找了很久一直报错
no available service 'null' found, please make sure registry config correct
忽视掉的一个配置yml中的 spring.cloud.alibaba.seata.tx-service-group= fsp_tx_storage_server_group 必须要和 file.conf 中 vgroupMapping 的 key 值为 fsp_tx_storage_server_group :
spring:
    application:
        name: storage-server
    cloud:
        alibaba:
            seata:
                tx-service-group: fsp_tx_storage_server_group
否则就会报错!!!!
三、测试调试
为了方便验证结果,可以在订单服务中做如下修改操作,然后启动所有工程进行调试,看数据库中的数据变化,以及异常是否回滚

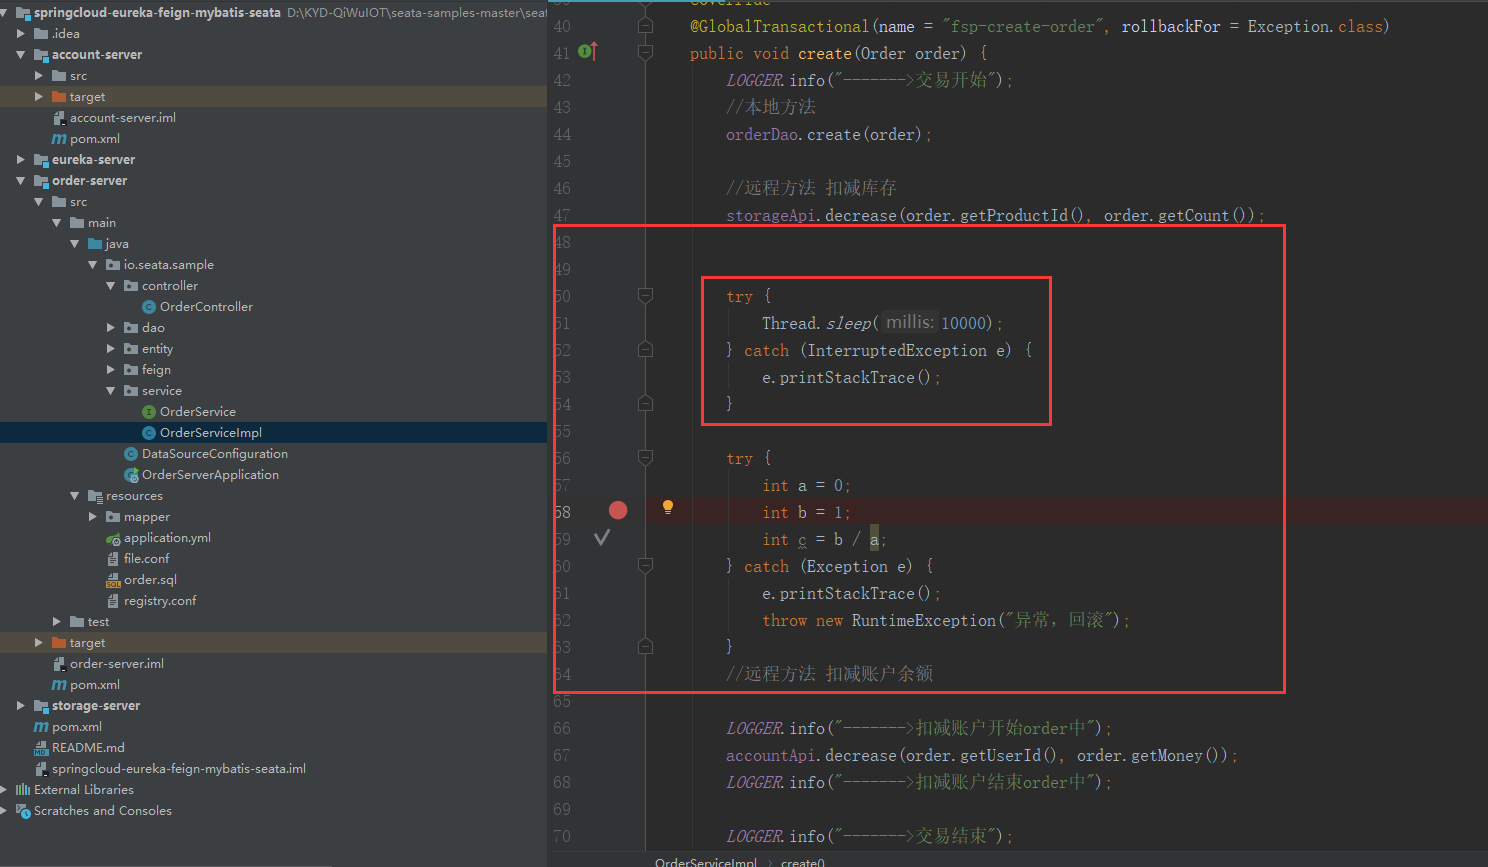
四、几个坑点
1、代理数据源的配置
import com.alibaba.druid.pool.DruidDataSource;
import io.seata.rm.datasource.DataSourceProxy;
import org.apache.ibatis.session.SqlSessionFactory;
import org.mybatis.spring.SqlSessionFactoryBean;
import org.mybatis.spring.transaction.SpringManagedTransactionFactory;
import org.springframework.boot.context.properties.ConfigurationProperties;
import org.springframework.context.annotation.Bean;
import org.springframework.context.annotation.Configuration;
import org.springframework.context.annotation.Primary;
import org.springframework.core.io.support.PathMatchingResourcePatternResolver;

import javax.sql.DataSource;

/**
 * Created by IntelliJ IDEA
 * 这是一个神奇的Class
 *
 * @author zhz
 * @date 2020/5/21 20:41
 */
@Configuration
public class DataSourceProxyConfig {

    @Bean
    @ConfigurationProperties(prefix = "spring.datasource")
    public DataSource druidDataSource(){
        DruidDataSource druidDataSource = new DruidDataSource();
        return druidDataSource;
    }

    @Primary
    @Bean("dataSource")
    public DataSourceProxy dataSource(DataSource druidDataSource){
        return new DataSourceProxy(druidDataSource);
    }


    @Bean
    public SqlSessionFactory sqlSessionFactory(DataSourceProxy dataSourceProxy)throws Exception{
        SqlSessionFactoryBean sqlSessionFactoryBean = new SqlSessionFactoryBean();
        sqlSessionFactoryBean.setDataSource(dataSourceProxy);
        sqlSessionFactoryBean.setMapperLocations(new PathMatchingResourcePatternResolver()
                .getResources("classpath*:/mapper/*.xml"));
        sqlSessionFactoryBean.setTransactionFactory(new SpringManagedTransactionFactory());
        return sqlSessionFactoryBean.getObject();
    }

}
2、启动类配置
SpringBootApplication注解需要添加 DataSourceAutoConfiguration 让代理数据源起效
@SpringBootApplication(exclude = {DataSourceAutoConfiguration.class})
3、SpringBoot和springCloud的版本问题引起的
Spring Cloud Spring Boot
Angel版本 兼容Spring Boot 1.2.x
Brixton版本 兼容Spring Boot 1.3.x,也兼容Spring Boot 1.4.x
Camden版本 兼容Spring Boot 1.4.x,也兼容Spring Boot 1.5.x
Dalston版本、Edgware版本 兼容Spring Boot 1.5.x,不兼容Spring Boot 2.0.x
Finchley版本 兼容Spring Boot 2.0.x,不兼容Spring Boot 1.5.x
Greenwich版本 兼容Spring Boot 2.1.x
SpringCloud的Finchley、Greenwich两个版本的@FeignClient 的属性value(name)略有不同,Finchley可以保持多个同名的feign,而Greenwich必须只有一个
4、在实际配置中,项目是SpringBoot+SpringCloud+Feign+Redis+Shiro+Seata,会产生目前不明的bug,博主推测是是Shiro和Seata的兼容问题,导致事务的分支事务无法回滚;
5、数据库表存在多主键的表,暂时不支持
https://www.cnblogs.com/victorbu/p/12738556.html
这只是一个简单的springCloud-eureka-feign-mybatis-seata的demo测试,如何集成到自己的项目中还是要自己摸索清楚,至少调通了这个demo就迈出了一大步


