参考:https://www.cnblogs.com/jimisun/p/8057156.html
1.安装依赖
yum -y install gcc zlib zlib-devel pcre-devel openssl openssl-devel
2.下载nginx的tar包
wget http://nginx.org/download/nginx-1.13.7.tar.gz
tar -xvf nginx-1.13.7.tar.gz
3.安装nginx
//创建一个文件夹,安装的时候会把文件安装到这里
cd /usr/local
mkdir nginx
//进入nginx-1.13.7目录 编译 安装
cd nginx-1.13.7
./configure
make
make install
4.修改配置文件,输出日志到 /var/log/nginx/error.log ,因为没有需要创建
5.检查配置文件nginx.conf的正确性命令:
/usr/local/nginx/sbin/nginx
6.启动nginx
/usr/local/nginx/sbin/nginx -c /usr/local/nginx/conf/nginx.conf
重启 /usr/local/nginx/sbin/nginx -s reload
[emerg]: getpwnam(“nginx”) failed
|
1
2
|
[root@localhost nginx-1.11.2]# /usr/local/nginx/sbin/nginxnginx: [emerg] getpwnam("nginx") failed |
没有安装nginx用户导致的无法启动
|
1
2
|
[root@localhost nginx-1.11.2]# useradd -s /sbin/nologin -M nginx[root@localhost nginx-1.11.2]# id nginx |
|
1
2
3
|
[root@localhost nginx-1.11.2]# /usr/local/nginx/sbin/nginx[root@localhost nginx-1.11.2]# netstat -tlunp | grep nginxtcp 0 0 0.0.0.0:80 0.0.0.0:* LISTEN 9709/nginx: master |
7.查看状态
ps -ef|grep nginx

停止操作
停止操作是通过向nginx进程发送信号(什么是信号请参阅linux文 章)来进行的
步骤1:查询nginx主进程号
ps -ef | grep nginx
在进程列表里 面找master进程,它的编号就是主进程号了。
步骤2:发送信号
从容停止Nginx:
kill -QUIT 主进程号
快速停止Nginx:
kill -TERM 主进程号
强制停止Nginx:
pkill -9 nginx
user root;
worker_processes 2;
error_log /var/log/nginx/error.log warn;
pid /var/run/nginx.pid;
events {
worker_connections 1024;
}
http {
default_type application/octet-stream;
log_format main '$remote_addr - $remote_user [$time_local] "$request" '
'$status $body_bytes_sent "$http_referer" '
'"$http_user_agent" "$http_x_forwarded_for"';
access_log off;
sendfile on;
#tcp_nopush on;
keepalive_timeout 65;
#gzip on;
upstream mysvr_login {
server 127.0.0.1:2018;
server 127.0.0.1:2019;
server 127.0.0.1:2020;
server 127.0.0.1:2021;
}
server {
listen 2016;
server_name loginserver;
location / {
proxy_pass http://mysvr_login;
proxy_set_header Host $host;
proxy_set_header X-Real-IP $remote_addr;
proxy_set_header X-Forwarded-For $proxy_add_x_forwarded_for;
}
}
upstream mysvr_world {
server 127.0.0.1:2025;
}
server {
listen 2017;
server_name worldserver;
location / {
proxy_pass http://mysvr_world;
proxy_set_header Host $host;
proxy_set_header X-Real-IP $remote_addr;
proxy_set_header X-Forwarded-For $proxy_add_x_forwarded_for;
}
}
}
Nginx实现静态资源服务器
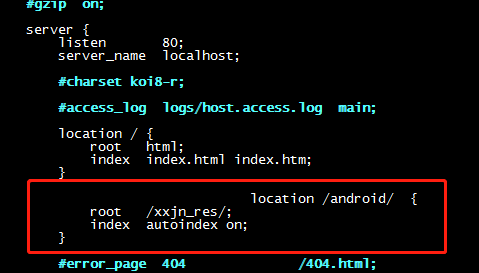
1.添加一个虚拟主机,配置

这个配置表示输入 localhost:80/android/ 会访问本机的 /xxjn_res/android/ 目录,不要把资源目录设置在root,root下的访问呗阻止
开启浏览目录权限:autoinedx on,默认是off;
重启 nginx
/usr/local/nginx/sbin/nginx -s reload
打开浏览器 输入 localhost:80/android/1.jpg 就可以访问该静态图片了
来源:https://blog.csdn.net/zzq900503/article/details/72821081
更多配置参数和匹配规则
语法规则: location [=|~|~*|^~] /uri/ { … }
= 开头表示精确匹配
^~ 开头表示uri以某个常规字符串开头,理解为匹配 url路径即可。nginx不对url做编码,因此请求为/static/20%/aa,可以被规则^~ /static/ /aa匹配到(注意是空格)。
~ 开头表示区分大小写的正则匹配
~* 开头表示不区分大小写的正则匹配
!~和!~*分别为区分大小写不匹配及不区分大小写不匹配 的正则
/ 通用匹配,任何请求都会匹配到。
多个location配置的情况下匹配顺序为:
首先匹配 =,其次匹配^~, 其次是按文件中顺序的正则匹配,最后是交给 / 通用匹配。当有匹配成功时候,停止匹配,按当前匹配规则处理请求。
例子,有如下匹配规则:
location = / {
   #规则A
}
location = /login {
   #规则B
}
location ^~ /static/ {
   #规则C
}
location ~ \.(gif|jpg|png|js|css)$ {
   #规则D
}
location ~* \.png$ {
   #规则E
}
location !~ \.xhtml$ {
   #规则F
}
location !~* \.xhtml$ {
   #规则G
}
location / {
   #规则H
}
那么产生的效果如下:
访问根目录/, 比如http://localhost/ 将匹配规则A
访问 http://localhost/login 将匹配规则B,http://localhost/register 则匹配规则H
访问 http://localhost/static/a.html 将匹配规则C
访问 http://localhost/a.gif, http://localhost/b.jpg 将匹配规则D和规则E,但是规则D顺序优先,规则E不起作用,而 http://localhost/static/c.png 则优先匹配到规则C
访问 http://localhost/a.PNG 则匹配规则E,而不会匹配规则D,因为规则E不区分大小写。
访问 http://localhost/a.xhtml 不会匹配规则F和规则G,http://localhost/a.XHTML不会匹配规则G,因为不区分大小写。规则F,规则G属于排除法,符合匹配规则但是不会匹配到,所以想想看实际应用中哪里会用到。
访问 http://localhost/category/id/1111 则最终匹配到规则H,因为以上规则都不匹配,这个时候应该是nginx转发请求给后端应用服务器,比如FastCGI(php),tomcat(jsp),nginx作为方向代理服务器存在。
所以实际使用中,个人觉得至少有两个匹配规则定义,如下:
# 第一个必选规则,处理动态请求转发到tomcat
location = / {
    proxy_pass http://localhost:8080
}
# 第二个必选规则是处理静态文件请求,这是nginx作为http服务器的强项
# 有两种配置模式,目录匹配或后缀匹配,任选其一或搭配使用
location ^~ /static/ {
    root /webroot/static/;
}
location ~* \.(html|htm|gif|jpg|jpeg|bmp|png|ico|txt|js|css)$ {
    root /webroot/res/;
}
三、ReWrite语法
last – 基本上都用这个Flag。
break – 中止Rewirte,不在继续匹配
redirect – 返回临时重定向的HTTP状态302
permanent – 返回永久重定向的HTTP状态301
1、下面是可以用来判断的表达式:
-f和!-f用来判断是否存在文件
-d和!-d用来判断是否存在目录
-e和!-e用来判断是否存在文件或目录
-x和!-x用来判断文件是否可执行
2、下面是可以用作判断的全局变量
例:http://localhost:88/test1/test2/test.php
$host:localhost
$server_port:88
$request_uri:http://localhost:88/test1/test2/test.php
$document_uri:/test1/test2/test.php
$document_root:D:\nginx/html
$request_filename:D:\nginx/html/test1/test2/test.php
四、Redirect语法
server {
    listen 80;
    server_name my.525.life;
    index index.html index.php;
    root html;
    if ($http_host !~ “^my\.525\.life$" {
        rewrite ^(.*) http://my.525.life$1 redirect;
    }
}
五、防盗链
location ~* \.(gif|jpg|swf)$ {
    valid_referers none blocked my.525.life yuemei.525.life;
    if ($invalid_referer) {
        rewrite ^/ http://$host/logo.png;
    }
}
六、根据文件类型设置过期时间
location ~* \.(js|css|jpg|jpeg|gif|png|swf)$ {
    if (-f $request_filename) {
        expires 1h;
        break;
    }
}
七、禁止访问某个目录
location ~* \.(txt|doc)${
    root /data/www/wwwroot/linuxtone/test;
    deny all;
}
一些可用的全局变量:
$args
$content_length
$content_type
$document_root
$document_uri
$host
$http_user_agent
$http_cookie
$limit_rate
$request_body_file
$request_method
$remote_addr
$remote_port
$remote_user
$request_filename
$request_uri
$query_string
$scheme
$server_protocol
$server_addr
$server_name
$server_port
$uri


