参考:https://segmentfault.com/a/1190000007345825
http://blog.csdn.net/huanle0610/article/details/41174943
1.安装一些必要的东东
yum install -y gcc zlib zlib-devel lrzsz openssl openssl-devel python-devel mysql-devel
yum install -y tcl-devel tk-devel
yum install -y readline-devel sqlite-devel bzip2-devel.i686 openssl-devel.i686 gdbm-devel.i686 libdbi-devel.i686 ncurses-libs,zlib-devel.i686
2.下载Python,自带的版本太低,有些功能有问题
wget --no-check-certificate http://python.org/ftp/python/2.7.3/Python-2.7.3.tar.bz2
3.解压文件
tar -jxvf Python-2.7.3.tar.bz2
4.这里可以先忽略,等遇到问题再修改重新安装
如果unzip不好使也可先试试 yum install -y unzip zip
修改Python-2.7.3/Modules/Setup.dist文件
找到相应的位置把一些注释去掉,可以用vim命令
修改文件也可能引起其他问题,安装好后还原,再编译安装一次就好了,不知道怎么引起的
zlib相关的////////////////////////////////////////////////////////////////////////////////////////////
zlib zlibmodule.c -I$(prefix)/include -L$(exec_prefix)/lib -lz
ssl相关的////////////////////////////////////////////////////////////////////////////////////////////
# Socket module helper for socket(2)
_socket socketmodule.c
# Socket module helper for SSL support; you must comment out the other
# socket line above, and possibly edit the SSL variable:
#SSL=/usr/local/ssl
_ssl _ssl.c \
-DUSE_SSL -I$(SSL)/include -I$(SSL)/include/openssl \
-L$(SSL)/lib -lssl -lcrypto
////////////////////////////////////////////////////////////////////////////////////////////
5.开始安装
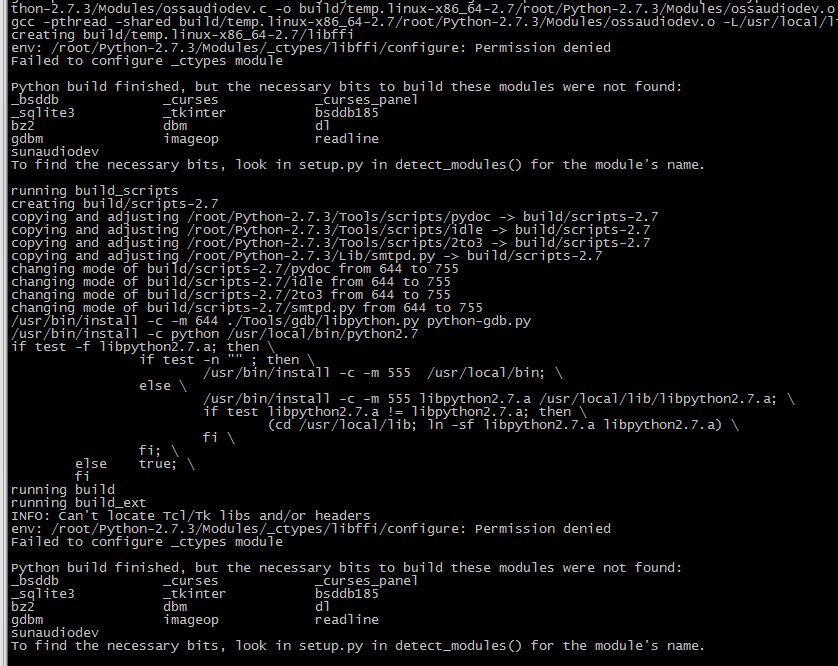
有可能出现下图没有权限的情况,需要添加权限
cd /root/Python-2.7.3/Modules/_ctypes/libffi/
chmod +x ./configure

cd ~/Python-2.7.3 进入解压路径
chmod +x ./configure 添加可执行权限,不一定需要
./configure 执行配置文件
make && make install 编译并安装
mv /usr/bin/python /usr/bin/python2.6.6 执行一次就可以了,用于备份
ln -s /usr/local/bin/python2.7 /usr/bin/python 创建软连接
6.到这里就安装完Python了,但是现在yum不好使了,需要修改一下,新安装的Python不带yum
vi /usr/bin/yum 编辑文件
a 进入修改模式
#!/usr/bin/python2.6 修改第一行为原来Python路径
ESC 退出编辑模式
:wq 保存并退出
7.搞定Python输入python看看吧

8.安装pip
wget --no-check-certificate https://bootstrap.pypa.io/get-pip.py 下载
python get-pip.py 安装

9.安装gevent,这个需要特定版本
pip install gevent==1.0.2
安装错 可以通过 pip uninstall gevent进行删除
这个也一样,太高的不行greenlet (0.4.9)
pip install greenlet==0.4.9
10.安装Firefly可能会出现一些问题,一般就是缺少某个包,如Twisted,
pip install Twisted
(以前版本,可以在网址 http://twistedmatrix.com/trac/wiki/Downloads 进行下载
tar -jxvf Twisted-16.6.0.tar.bz2 解压
cd Twisted-16.6.0 进入目录
python setup.py build 编译
python setup.py install 安装)
11.安装Firefly
下载Firefly-master.zip https://github.com/9miao
然后拖入SecureCRT就好了
unzip Firefly-master.zip 解压
cd Firefly-master 进入目录
python setup.py build 编译
python setup.py install 安装

12.你可能还需一些其他的插件也可以pip进行安装
pip install protobuf
pip install distribute
pip install Flask
pip install gtwisted
pip install msgpack-python
pip install pp
pip install pycrypto
pip install Django==1.8
13.下面开始安装memcache
memcache需要libevent,那就继续安装吧,在网上下载
http://memcached.org/
http://libevent.org/
tar -zxvf libevent-2.0.22-stable.tar.gz
cd libevent-2.0.22-stable
./configure 执行配置文件
make && make install 编译并安装
tar -zxvf memcached-1.4.34.tar.gz
cd memcached-1.4.34
./configure 执行配置文件
make && make install 编译并安装
14.安装完成启动memcache
memcached -d -m 512 -p 11211 -u root

出现了一个错,下面解决他
whereis libevent-2.0.so.5 查看安装位置
ldd /usr/local/bin/memcached
LD_DEBUG=libs ./memcached -v

没有找到,路径不对,弄一个软连接
ln -s /usr/local/lib/libevent-2.0.so.5 /usr/lib64/libevent-2.0.so.5
再启动memcache,启动成功


