
OAuth 2.0 官网
OAuth 2.0
OAuth 2.0 is the industry-standard protocol for authorization. OAuth 2.0 focuses on client developer simplicity while providing specific authorization flows for web applications, desktop applications, mobile phones, and living room devices. This specification and its extensions are being developed within the IETF OAuth Working Group.
OAuth 2.0
- OAuth 2.0 Framework - RFC 6749
- OAuth Grant Types
- Client Types - Confidential and Public Applications
- Bearer Tokens - RFC 6750
- Threat Model and Security Considerations - RFC 6819
- OAuth Security Best Current Practice
Mobile and Other Devices
- Native Apps - Recommendations for using OAuth with native apps
- Browser-Based Apps - Recommendations for using OAuth with browser-based apps (e.g. an SPA)
- Device Authorization Grant - OAuth for devices with no browser or no keyboard
Token and Token Management
- Token Introspection - RFC 7662, to determine the active state and meta-information of a token
- Token Revocation - RFC 7009, to signal that a previously obtained token is no longer needed
- JSON Web Token - RFC 7519
Discovery and Registration
- Authorization Server Metadata - RFC 8414, for clients to discover OAuth endpoints and authorization server capabilities
- Dynamic Client Registration - RFC 7591, to programmatically register OAuth clients
- Dynamic Client Registration Management - Experimental RFC 7592, for updating and managing dynamically registered OAuth clients
Experimental and Draft Specs
The specs below are either experimental or in draft status and are still active working group items. They will likely change before they are finalized as RFCs or BCPs.
- JWT Profile for Access Tokens
- Rich Authorization Requests (RAR)
- Pushed Authorization Requests (PAR)
- Demonstration of Proof of Possession (DPoP)
- Incremental Authorization
- All OAuth Working Group Documents
Related Specs and Extensions
- OAuth Extension Parameter Registry
- OAuth Assertions Framework - RFC 7521
- SAML2 Bearer Assertion - RFC 7522, for integrating with existing identity systems
- JWT Bearer Assertion - RFC 7523, for integrating with existing identity systems
- WebAuthn - Web Authentication
- Signing HTTP Messages - A generic HTTP message signing spec
Community Resources
- OAuth 2.0 Simplified
- Books about OAuth
- OAuth 2.0 Simplified by Aaron Parecki
- OAuth 2 in Action by Justin Richer and Antonio Sanso
- Mastering OAuth 2.0 by Charles Bihis
- OAuth 2.0 Cookbook by Adolfo Eloy Nascimento
- OAuth articles by Alex Bilbie
Protocols Built on OAuth 2.0
- OpenID Connect (OpenID Foundation)
- UMA 2.0 (Kantara)
- IndieAuth (W3C)
Code and Services
OAuth 2.1
- OAuth 2.1 - An in-progress update to simplify OAuth 2.0
- It's Time for OAuth 2.1 (by Aaron Parecki)
Legacy
RFC 6750: OAuth 2.0 Bearer Token Usage
Bearer Tokens are the predominant type of access token used with OAuth 2.0.
A Bearer Token is an opaque string, not intended to have any meaning to clients using it. Some servers will issue tokens that are a short string of hexadecimal characters, while others may use structured tokens such as JSON Web Tokens.
More resources
- Access Tokens (oauth.com)
- 10 Things You Should Know about Tokens (auth0.com)
Access Tokens
12Access tokens are the thing that applications use to make API requests on behalf of a user. The access token represents the authorization of a specific application to access specific parts of a user’s data.
Access tokens must be kept confidential in transit and in storage. The only parties that should ever see the access token are the application itself, the authorization server, and resource server. The application should ensure the storage of the access token is not accessible to other applications on the same device. The access token can only be used over an https connection, since passing it over a non-encrypted channel would make it trivial for third parties to intercept.
The token endpoint is where apps make a request to get an access token for a user. This section describes how to verify token requests and how to return the appropriate response and errors.
- Authorization Code
- Password Grant
- Client Credentials
- Access Token Response
- Self-Encoded Access Tokens
- Access Token Lifetime
- Refreshing Access Tokens
Successful Response
If the request for an access token is valid, the authorization server needs to generate an access token (and optional refresh token) and return these to the client, typically along with some additional properties about the authorization.
The response with an access token should contain the following properties:
access_token(required) The access token string as issued by the authorization server.token_type(required) The type of token this is, typically just the string “bearer”.expires_in(recommended) If the access token expires, the server should reply with the duration of time the access token is granted for.refresh_token(optional) If the access token will expire, then it is useful to return a refresh token which applications can use to obtain another access token. However, tokens issued with the implicit grant cannot be issued a refresh token.scope(optional) If the scope the user granted is identical to the scope the app requested, this parameter is optional. If the granted scope is different from the requested scope, such as if the user modified the scope, then this parameter is required.
When responding with an access token, the server must also include the additional Cache-Control: no-store and Pragma: no-cache HTTP headers to ensure clients do not cache this request.
For example, a successful token response may look like the following:
HTTP/1.1 200 OKContent-Type: application/jsonCache-Control: no-storePragma: no-cache{ "access_token":"MTQ0NjJkZmQ5OTM2NDE1ZTZjNGZmZjI3", "token_type":"bearer", "expires_in":3600, "refresh_token":"IwOGYzYTlmM2YxOTQ5MGE3YmNmMDFkNTVk", "scope":"create"} |
Access Tokens
The format for OAuth 2.0 Bearer tokens is actually described in a separate spec, RFC 6750. There is no defined structure for the token required by the spec, so you can generate a string and implement tokens however you want. The valid characters in a bearer token are alphanumeric, and the following punctuation characters:
-._~+/ |
Typically a service will either generate random strings and store them in a database along with the associated user and scope information, or will use Self-Encoded tokens where the token string itself contains all the necessary info.
Unsuccessful Response
If the access token request is invalid, such as the redirect URL didn’t match the one used during authorization, then the server needs to return an error response.
Error responses are returned with an HTTP 400 status code (unless specified otherwise), with error and error_description parameters. The error parameter will always be one of the values listed below.
invalid_request– The request is missing a parameter so the server can’t proceed with the request. This may also be returned if the request includes an unsupported parameter or repeats a parameter.invalid_client– Client authentication failed, such as if the request contains an invalid client ID or secret. Send an HTTP 401 response in this case.invalid_grant– The authorization code (or user’s password for the password grant type) is invalid or expired. This is also the error you would return if the redirect URL given in the authorization grant does not match the URL provided in this access token request.invalid_scope– For access token requests that include a scope (password or client_credentials grants), this error indicates an invalid scope value in the request.unauthorized_client– This client is not authorized to use the requested grant type. For example, if you restrict which applications can use the Implicit grant, you would return this error for the other apps.unsupported_grant_type– If a grant type is requested that the authorization server doesn’t recognize, use this code. Note that unknown grant types also use this specific error code rather than using theinvalid_requestabove.
There are two optional parameters when returning an error response, error_description and error_uri. These are meant to give developers more information about the error, not intended to be shown to end users. However, keep in mind that many developers will pass this error text straight on to end users no matter how much you warn them, so it is a good idea to make sure it is at least somewhat helpful to end users as well.
The error_description parameter can only include ASCII characters, and should be a sentence or two at most describing the circumstance of the error. The error_uri is a great place to link to your API documentation for information about how to correct the specific error that was encountered.
The entire error response is returned as a JSON string, similar to the successful response. Below is an example of an error response.
HTTP/1.1 400 Bad RequestContent-Type: application/json;charset=UTF-8Cache-Control: no-storePragma: no-cache{ "error": "invalid_request", "error_description": "Request was missing the 'redirect_uri' parameter.", "error_uri": "See the full API docs at https://authorization-server.com/docs/access_token"} |
Client Credentials
12.3The Client Credentials grant is used when applications request an access token to access their own resources, not on behalf of a user.
Request Parameters
grant_type (required)
The grant_type parameter must be set to client_credentials.
scope (optional)
Your service can support different scopes for the client credentials grant. In practice, not many services actually support this.
Client Authentication (required)
The client needs to authenticate themselves for this request. Typically the service will allow either additional request parameters client_id and client_secret, or accept the client ID and secret in the HTTP Basic auth header.
Example
The following is an example authorization code grant the service would receive.
POST /token HTTP/1.1Host: authorization-server.comgrant_type=client_credentials&client_id=xxxxxxxxxx&client_secret=xxxxxxxxxx |
See Access Token Response for details on the parameters to return when generating an access token or responding to errors.
Access Token Lifetime
12.6When your service issues access tokens, you’ll need to make some decisions as to how long you want the tokens to last. Unfortunately there is no blanket solution for every service. There are various tradeoffs that come with the different options, so you should choose the option (or combination of options) that best suit your application’s need.
Short-lived access tokens and long-lived refresh tokens
A common method of granting tokens is to use a combination of access tokens and refresh tokens for maximum security and flexibility. The OAuth 2.0 spec recommends this option, and several of the larger implementations have gone with this approach.
Typically services using this method will issue access tokens that last anywhere from several hours to a couple weeks. When the service issues the access token, it also generates a refresh token that never expires and returns that in the response as well. (Note that refresh tokens can’t be issued using the Implicit grant.)
When the access token expires, the application can use the refresh token to obtain a new access token. It can do this behind the scenes, and without the user’s involvement, so that it’s a seamless process to the user.
The main benefit of this approach is that the service can use self-encoded access tokens which can be verified without a database lookup. However, this means there is no way to expire those tokens directly, so instead, the tokens are issued with a short expiration time so that the application is forced to continually refresh them, giving the service a chance to revoke an application’s access if needed.
From the third-party developer’s perspective, it is often frustrating to have to deal with refresh tokens. Developers strongly prefer access tokens that don’t expire, since it’s much less code to deal with. In order to help mitigate these concerns, services will often build the token refreshing logic into their SDK, so that the process is transparent to developers.
In summary, use short-lived access tokens and long-lived refresh tokens when:
- you want to use self-encoded access tokens
- you want to limit the risk of leaked access tokens
- you will be providing SDKs that can handle the refresh logic transparently to developers
Short-lived access tokens and no refresh tokens
If you want to ensure users are aware of applications that are accessing their account, the service can issue relatively short-lived access tokens without refresh tokens. The access tokens may last anywhere from the current application session to a couple weeks. When the access token expires, the application will be forced to make the user sign in again, so that you as the service know the user is continually involved in re-authorizing the application.
Typically this option is used by services where there is a high risk of damage if a third-party application were to accidentally or maliciously leak access tokens. By requiring that users are constantly re-authorizing the application, the service can ensure that potential damage is limited if an attacker were to steal access tokens from the service.
By not issuing refresh tokens, this makes it impossible to applications to use the access token on an ongoing basis without the user in front of the screen. Applications that need access in order to continually sync data will be unable to do so under this method.
From the user’s perspective, this is the option most likely to frustrate people, since it will look like the user has to continually re-authorize the application.
In summary, use short-lived access tokens with no refresh tokens when:
- you want to the most protection against the risk of leaked access tokens
- you want to force users to be aware of third-party access they are granting
- you don’t want third-party apps to have offline access to users’ data
Non-expiring access tokens
Non-expiring access tokens are the easiest method for developers. If you choose this option, it is important to consider the trade-offs you are making.
It isn’t practical to use self-encoded tokens if you want to be able to revoke them arbitrarily. As such, you’ll need to store these tokens in some sort of database, so they can be deleted or marked as invalid as needed.
Note that even if the service intends on issuing non-expiring access tokens for normal use, you’ll still need to provide a mechanism to expire them under exceptional circumstances, such as if the user explicitly wants to revoke an application’s access, or if a user account is deleted.
Non-expiring access tokens are much easier for developers testing their own applications. You can even pre-generate one or more non-expiring access tokens for developers and show it to them on the application details screen. This way they can immediately start making API requests with the token, and not worry about setting up an OAuth flow in order to start testing your API.
In summary, use non-expiring access tokens when:
- you have a mechanism to revoke access tokens arbitrarily
- you don’t have a huge risk if tokens are leaked
- you want to provide an easy authentication mechanism to your developers
- you want third-party applications to have offline access to users’ data
Refreshing Access Tokens
12.7This section describes how to allow your developers to use refresh tokens to obtain new access tokens. If your service issues refresh tokens along with the access token, then you’ll need to implement the Refresh grant type described here.
Request Parameters
The access token request will contain the following parameters.
grant_type (required)
The grant_type parameter must be set to “refresh_token”.
refresh_token (required)
The refresh token previously issued to the client.
scope (optional)
The requested scope must not include additional scopes that were not issued in the original access token. Typically this will not be included in the request, and if omitted, the service should issue an access token with the same scope as was previously issued.
Client Authentication (required if the client was issued a secret)
Typically, refresh tokens are only used with confidential clients. However, since it is possible to use the authorization code flow without a client secret, the refresh grant may also be used by clients that don’t have a secret. If the client was issued a secret, then the client must authenticate this request. Typically the service will allow either additional request parameters client_id and client_secret, or accept the client ID and secret in the HTTP Basic auth header. If the client does not have a secret, then no client authentication will be present in this request.
Verifying the refresh token grant
After checking for all required parameters, and authenticating the client if the client was issued a secret, the authorization server can continue verifying the other parts of the request.
The server then checks whether the refresh token is valid, and has not expired. If the refresh token was issued to a confidential client, the service must ensure the refresh token in the request was issued to the authenticated client.
If everything checks out, the service can generate an access token and respond. The server may issue a new refresh token in the response, but if the response does not include a new refresh token, the client assumes the existing refresh token will still be valid.
Example
The following is an example refresh grant the service would receive.
POST /oauth/token HTTP/1.1Host: authorization-server.comgrant_type=refresh_token&refresh_token=xxxxxxxxxxx&client_id=xxxxxxxxxx&client_secret=xxxxxxxxxx |
Response
The response to the refresh token grant is the same as when issuing an access token. You can optionally issue a new refresh token in the response, or if you don’t include a new refresh token, the client assumes the current refresh token will continue to be valid.
Self-Encoded Access Tokens
12.5Self-encoded tokens provide a way to avoid storing tokens in a database by encoding all of the necessary information in the token string itself. The main benefit of this is that API servers are able to verify access tokens without doing a database lookup on every API request, making the API much more easily scalable.
The benefit of OAuth 2.0 Bearer Tokens is that applications don’t need to be aware of how you’ve decided to implement access tokens in your service. This means it’s possible to change your implementation later without affecting clients.
If you already have a distributed database system that is horizontally scalable, then you may not gain any benefits by using self-encoded tokens. In fact, using self-encoded tokens if you’ve already solved the distributed database problem will only introduce new issues, as invalidating self-encoded tokens becomes an additional hurdle.
There are many ways to self-encode tokens. The actual method you choose is only important to your implementation, since the token information is not exposed to external developers.
One way to create self-encoded tokens is to create a JSON-serialized representation of all the data you want to include in the token, and sign the resulting string with a key known only to your server.
A common technique for this is using the JSON Web Signature (JWS) standard to handle encoding, decoding and verification of tokens. The JSON Web Token (JWT) specification defines some terms you can use in the JWS, as well as defines some timestamp terms to determine whether a token is valid. We’ll use a JWT library in this example, since it provides built-in handling of expiration.
Encoding
The code below is written in PHP and uses the Firebase PHP-JWT library to encode and verify tokens. You’ll need to include that library in order to run the sample code
<?phpuse \Firebase\JWT\JWT;# Define the secret key used to create and verify the signature$jwt_key = 'secret';# Set the user ID of the user this token is for$user_id = 1000;# Set the client ID of the app that is generating this token# Provide the list of scopes this token is valid for$scope = 'read write';$token_data = array( # Subject (The user ID) 'sub' => $user_id, # Issuer (the token endpoint) # Client ID (this is a non-standard claim) 'cid' => $client_id, # Issued At 'iat' => time(), # Expires At 'exp' => time()+7200, // Valid for 2 hours # The list of OAuth scopes this token includes 'scope' => $scope);$token_string = JWT::encode($token_data, $jwt_key); |
This will result in a string such as:
eyJ0eXAiOiJKV1QiLCJhbGciOiJIUzI1NiJ9.eyJzdWIiOjEwMDAsImlzcyI6Imh0dHBzOi8vYXV0aG9yaXphdGlvbi1zZXJ2ZXIuY29tIiwiY2lkIjoiaHR0cHM6Ly9leGFtcGxlLWFwcC5jb20iLCJpYXQiOjE0NzAwMDI3MDMsImV4cCI6MTUyOTE3NDg1MSwic2NvcGUiOiJyZWFkIHdyaXRlIn0.QiIrnmaC4VrbAYAsu0YPeuJ992p20fSxrXWPLw-gkFA |
This token is made up of three components, separated by periods. The first part describes the signature method used. The second part contains the token data. The third part is the signature.
For example, this token’s first component is this JSON object:
{ "typ":"JWT", "alg":"HS256” } |
The second component contains the actual data the API endpoint needs in order to process the request, such as user identification and scope access.
{ "sub": 1000, "iat": 1470002703, "exp": 1470009903, "scope": "read write"} |
Base64-encoding the first two components results in these following two strings:
eyJhbGciOiJIUzI1NiIsInR5cCI6IkpXVCJ9 |
eyJzdWIiOjEwMDAsImlzcyI6Imh0dHBzOi8vYXV0aG9yaXphdGlvbi1zZXJ2ZXIuY29tIiwiY2lkIjoiaHR0cHM6Ly9leGFtcGxlLWFwcC5jb20iLCJpYXQiOjE0NzAwMDI3MDMsImV4cCI6MTUyOTE3NDg1MSwic2NvcGUiOiJyZWFkIHdyaXRlIn0 |
We then calculate a hash of the two strings along with a secret, resulting in another string:
QiIrnmaC4VrbAYAsu0YPeuJ992p20fSxrXWPLw-gkFA |
Finally, concatenate all three strings together separated by periods.
eyJ0eXAiOiJKV1QiLCJhbGciOiJIUzI1NiJ9.eyJzdWIiOjEwMDAsImlzcyI6Imh0dHBzOi8vYXV0aG9yaXphdGlvbi1zZXJ2ZXIuY29tIiwiY2lkIjoiaHR0cHM6Ly9leGFtcGxlLWFwcC5jb20iLCJpYXQiOjE0NzAwMDI3MDMsImV4cCI6MTUyOTE3NDg1MSwic2NvcGUiOiJyZWFkIHdyaXRlIn0.QiIrnmaC4VrbAYAsu0YPeuJ992p20fSxrXWPLw-gkFA |
Decoding
Verifying the access token can be done by using the same JWT library. The library will decode and verify the signature at the same time, and throws an exception if the signature was invalid, or if the expiration date of the token has already passed.
try { # Note: You must provide the list of supported algorithms in order to prevent # an attacker from bypassing the signature verification. See: # https://auth0.com/blog/critical-vulnerabilities-in-json-web-token-libraries/ $token = JWT::decode($token_string, $jwt_key, ['HS256']); $error = false;} catch(\Firebase\JWT\ExpiredException $e) { $token = false; $error = 'expired'; $error_description = 'The token has expired';} catch(\Firebase\JWT\SignatureInvalidException $e) { $token = false; $error = 'invalid'; $error_description = 'The token provided was malformed';} catch(Exception $e) { $token = false; $error = 'unauthorized'; $error_description = $e->getMessage();}if($error) { header('HTTP/1.1 401 Unauthorized'); echo json_encode(array( 'error'=>$error, 'error_description'=>$error_description )); die();} else { // Now $token has all the data that we encoded in it originally print_r($token);} |
At this point, the service has all the information it needs such as the user ID, scope, etc, available to it, and didn’t have to do a database lookup. Next it can check to make sure the access token hasn’t expired, can verify the scope is sufficient to perform the requested operation, and can then process the request.
Invalidating
Because the token can be verified without doing a database lookup, there is no way to invalidate a token until it expires. You’ll need to take additional steps to invalidate tokens that are self-encoded. See Refreshing Access Tokens for more information.
Refresh Tokens: When to Use Them and How They Interact with JWTs
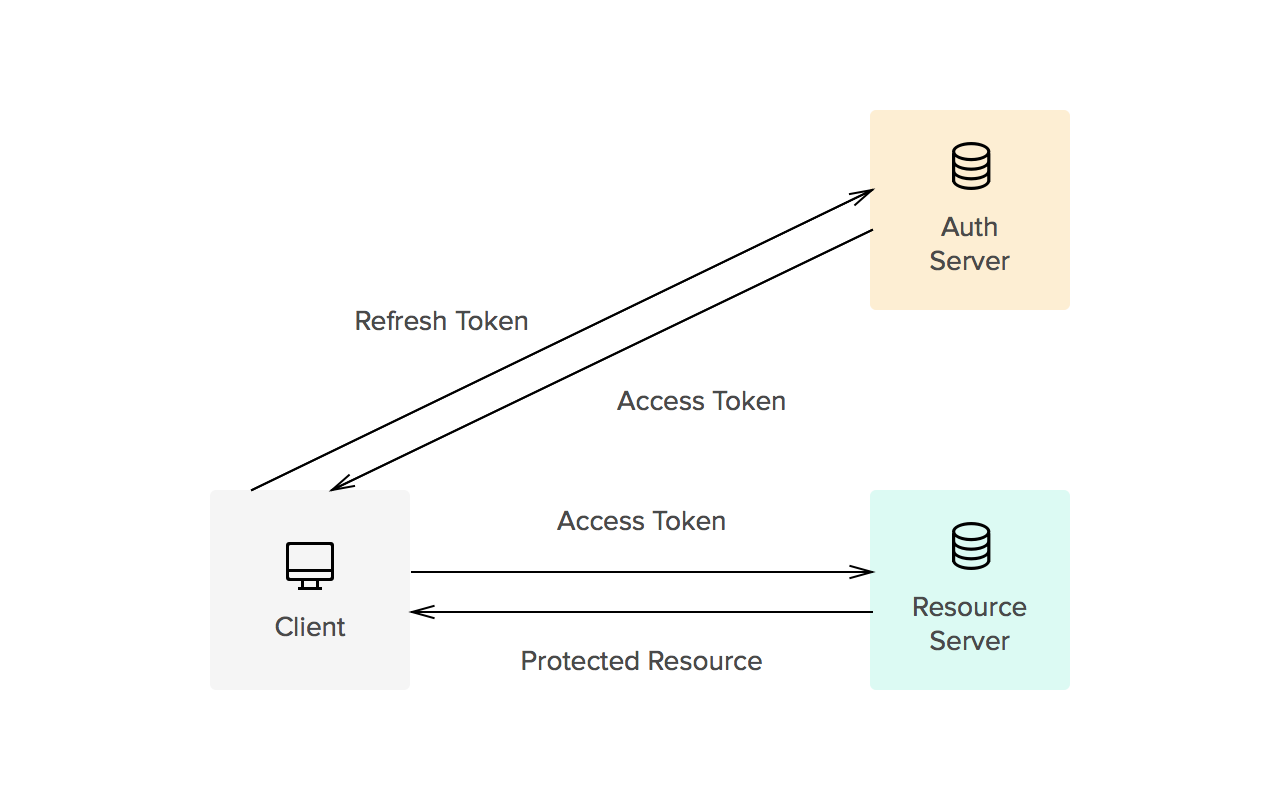
Access tokens carry the necessary information to access a resource directly. In other words, when a client passes an access token to a server managing a resource, that server can use the information contained in the token to decide whether the client is authorized or not. Access tokens usually have an expiration date and are short-lived.

- Refresh tokens carry the information necessary to get a new access token. In other words, whenever an access token is required to access a specific resource, a client may use a refresh token to get a new access token issued by the authentication server. Common use cases include getting new access tokens after old ones have expired, or getting access to a new resource for the first time. Refresh tokens can also expire but are rather long-lived. Refresh tokens are usually subject to strict storage requirements to ensure they are not leaked. They can also be blacklisted by the authorization server.
RFC 7662: Token Introspection
The Token Introspection extension defines a mechanism for resource servers to obtain information about access tokens. With this spec, resource servers can check the validity of access tokens, and find out other information such as which user and which scopes are associated with the token.
More resources
- Token Introspection Endpoint (oauth.com)
