一、kafka简介
kafka,ActiveMQ,RabbitMQ是当今最流行的分布式消息中间件,其中kafka在性能及吞吐量方面是三者中的佼佼者,不过最近查阅官网时,官方与它的定义为一个分布式流媒体平台。kafka最主要有以下几个方面作用:
-
- 发布和订阅记录流,类似于消息队列或企业消息传递系统。
- 以容错持久的方式存储记录流。
- 处理记录发生的流
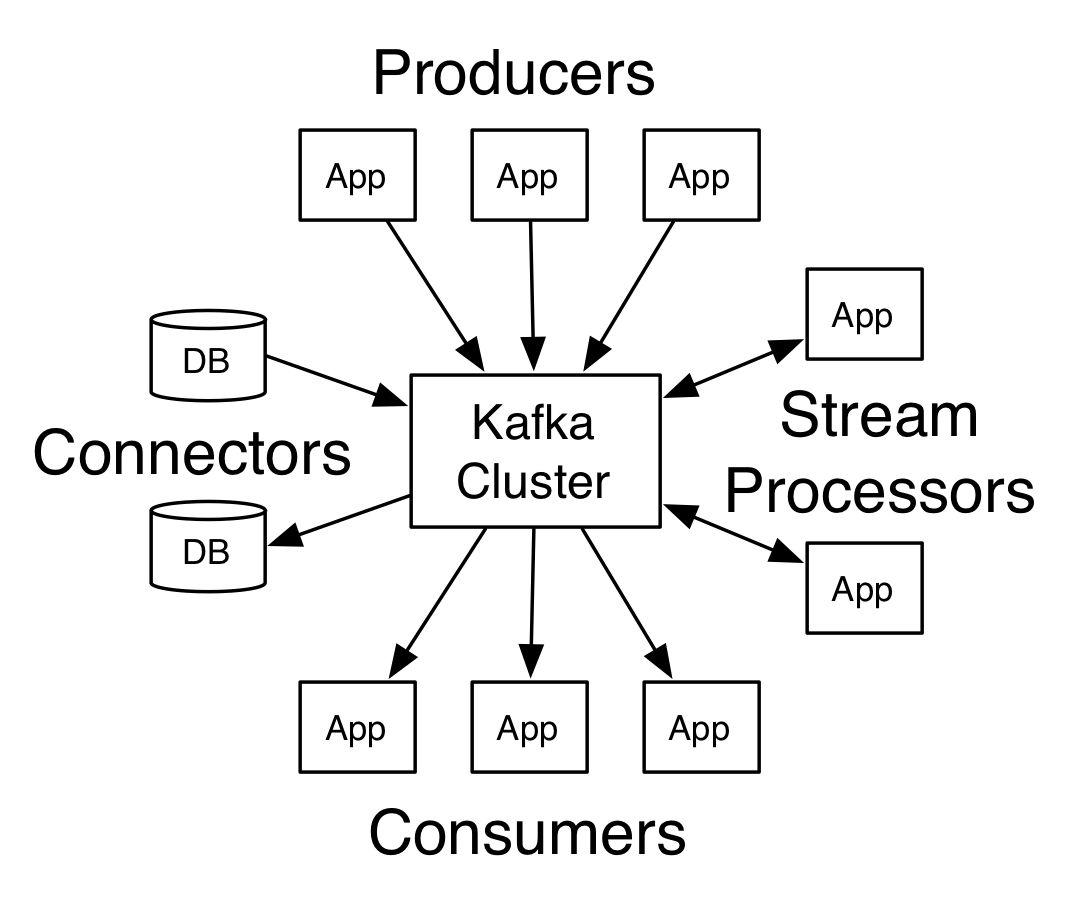
kafka有四个比较核心的API 分别为:
producer:允许应用程序发布一个消息至一个或多个kafka的topic中
consumer:允许应用程序订阅一个或多个主题,并处理所产生的对他们记录的数据流
stream-api: 允许应用程序从一个或多个主题上消费数据然后将消费的数据输出到一个或多个其他的主题当中,有效地变换所述输入流,以输出流。类似于数据中转站的作用
connector-api:允许构建或运行可重复使用的生产者或消费者,将topic链接到现有的应用程序或数据系统。官网给我们的示意图:

kafka关键名词解释:
- producer:生产者。
- consumer:消费者。
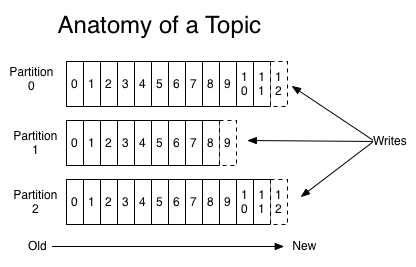
- topic: 消息以topic为类别记录,每一类的消息称之为一个主题(Topic)。为了提高吞吐量,每个消息主题又会有多个分区
- broker:以集群的方式运行,可以由一个或多个服务组成,每个服务叫做一个broker;消费者可以订阅一个或多个主题(topic),并从Broker拉数据,从而消费这些已发布的消息。
每个消息(也叫作record记录,也被称为消息)是由一个key,一个value和时间戳构成。
主题与日志:
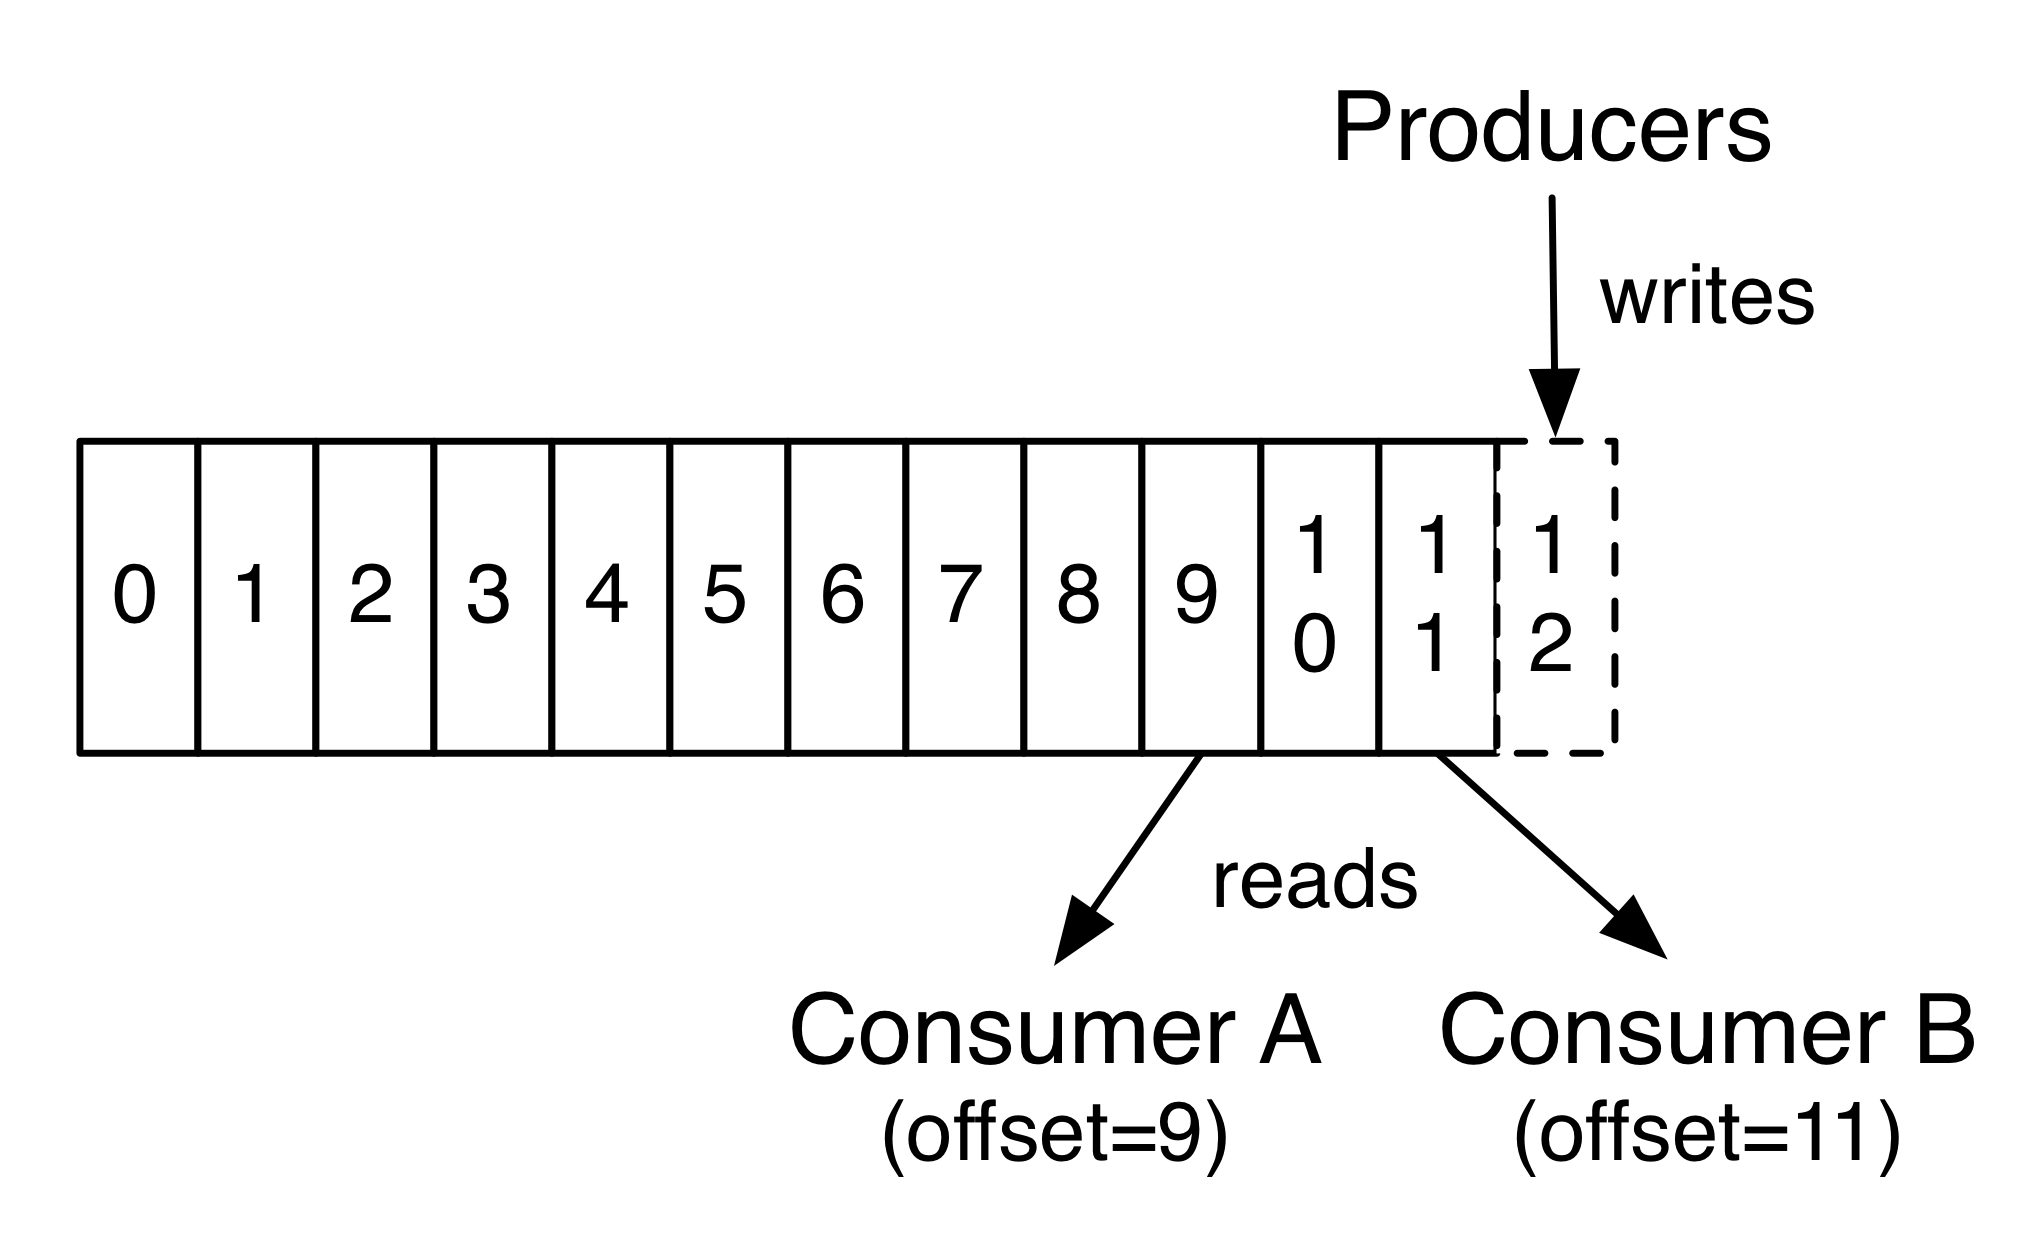
每一个分区(partition)都是一个顺序的、不可变的消息队列,并且可以持续的添加。分区中的消息都被分了一个序列号,称之为偏移量(offset),在每个分区中此偏移量都是唯一的。Kafka集群保持所有的消息,直到它们过期,无论消息是否被消费了。实际上消费者所持有的仅有的元数据就是这个偏移量,也就是消费者在这个log中的位置。 这个偏移量由消费者控制:正常情况当消费者消费消息的时候,偏移量也线性的的增加。但是实际偏移量由消费者控制,消费者可以将偏移量重置为更老的一个偏移量,重新读取消息。 可以看到这种设计对消费者来说操作自如, 一个消费者的操作不会影响其它消费者对此log的处理。 再说说分区。Kafka中采用分区可以处理更多的消息,不受单台服务器的限制。Topic拥有多个分区意味着它可以不受限的处理更多的数据。


二、kafka速成
1、下载kafka并解压
kafka下载地址,注意kafka需要zookeeper的服务,因此请确保kafka服务启动之前先运行zookeeper,请参考这篇文章。在kafka的bin目录下有 windows的文件夹 用于在windows环境下启动kafka
2、启动kafka服务
> bin/kafka-server-start.sh config/server.properties
[2013-04-22 15:01:47,028] INFO Verifying properties (kafka.utils.VerifiableProperties)
[2013-04-22 15:01:47,051] INFO Property socket.send.buffer.bytes is overridden to 1048576 (kafka.utils.VerifiableProperties)
...
3、创建一个主题
我们用一个分区和一个副本创建一个名为“test”的主题:
> bin/kafka-topics.sh --create --zookeeper localhost:2181 --replication-factor 1 --partitions 1 --topic test
然后我们可以运行如下命令查看是否已经创建成功:
> bin/kafka-topics.sh --list --zookeeper localhost:2181
test
当发送的主题不存在且想自动创建主题时,我们可以编辑config/server.properties
auto.create.topics.enable=true
default.replication.factor=3
4、发送消息
Kafka附带一个命令行客户端,它将从文件或标准输入中获取输入,并将其作为消息发送到Kafka集群。默认情况下,每行将作为单独的消息发送。
> bin/kafka-console-producer.sh --broker-list localhost:9092 --topic test
This is a message
This is another message
5、消费消息
> bin/kafka-console-consumer.sh --bootstrap-server localhost:9092 --topic test --from-beginning
This is a message
This is another message
6、集群搭建
首先我们为每个代理创建一个配置文件(在Windows上使用该copy命令):
> cp config/server.properties config/server-1.properties
> cp config/server.properties config/server-2.properties
分别编辑上述文件:
config/server-1.properties:
    broker.id=1
    listeners=PLAINTEXT://:9093
    log.dir=/tmp/kafka-logs-1

config/server-2.properties:
    broker.id=2
    listeners=PLAINTEXT://:9094
    log.dir=/tmp/kafka-logs-2
分别启动:
> bin/kafka-server-start.sh config/server-1.properties &
...
> bin/kafka-server-start.sh config/server-2.properties &
...
现在创建一个复制因子为三的新主题:
> bin/kafka-topics.sh --create --zookeeper localhost:2181 --replication-factor 3 --partitions 1 --topic my-replicated-topic
我们可以通过以下命令查看状态:
> bin/kafka-topics.sh --describe --zookeeper localhost:2181 --topic my-replicated-topic
Topic:my-replicated-topic   PartitionCount:1    ReplicationFactor:3 Configs:
    Topic: my-replicated-topic  Partition: 0    Leader: 1   Replicas: 1,2,0 Isr: 1,2,0
7、外网配置kafka注意事项
请编辑server.properties添加如下配置:
    broker.id主要做集群时区别的编号
    port 默认kafka端口号
    host.name 设置为云内网地址
    advertised.host.name 设置为云外网映射地址
三、spring中使用kafka
1、编辑gradle配置文件:

dependencies {
    // https://mvnrepository.com/artifact/org.springframework/spring-context
    compile group: 'org.springframework', name: 'spring-context', version: '5.0.4.RELEASE'
// https://mvnrepository.com/artifact/org.springframework/spring-web
    compile group: 'org.springframework', name: 'spring-web', version: '5.0.4.RELEASE'
// https://mvnrepository.com/artifact/org.springframework/spring-context-support
    compile group: 'org.springframework', name: 'spring-context-support', version: '5.0.4.RELEASE'
// https://mvnrepository.com/artifact/org.springframework/spring-webmvc
    compile group: 'org.springframework', name: 'spring-webmvc', version: '5.0.4.RELEASE'
// https://mvnrepository.com/artifact/org.springframework.kafka/spring-kafka
    compile group: 'org.springframework.kafka', name: 'spring-kafka', version: '2.1.4.RELEASE'
// https://mvnrepository.com/artifact/org.slf4j/slf4j-api
    compile group: 'org.slf4j', name: 'slf4j-api', version: '1.7.25'
// https://mvnrepository.com/artifact/ch.qos.logback/logback-core
    compile group: 'ch.qos.logback', name: 'logback-core', version: '1.2.3'
// https://mvnrepository.com/artifact/ch.qos.logback/logback-classic
    testCompile group: 'ch.qos.logback', name: 'logback-classic', version: '1.2.3'

    testCompile group: 'junit', name: 'junit', version: '4.12'
}
2、编写AppConfig配置文件类:

package com.hzgj.lyrk.spring.study.config;

import org.apache.kafka.clients.consumer.ConsumerConfig;
import org.apache.kafka.clients.producer.ProducerConfig;
import org.apache.kafka.common.serialization.StringDeserializer;
import org.apache.kafka.common.serialization.StringSerializer;
import org.springframework.context.annotation.Bean;
import org.springframework.context.annotation.ComponentScan;
import org.springframework.context.annotation.Configuration;
import org.springframework.kafka.annotation.EnableKafka;
import org.springframework.kafka.annotation.KafkaListener;
import org.springframework.kafka.config.ConcurrentKafkaListenerContainerFactory;
import org.springframework.kafka.config.KafkaListenerContainerFactory;
import org.springframework.kafka.core.*;
import org.springframework.stereotype.Component;

import java.util.HashMap;
import java.util.Map;

@Configuration
@EnableKafka
@ComponentScan
public class AppConfig {


    @Bean
    public ProducerFactory<String, String> producerFactory() {
        Map<String, Object> props = new HashMap<>(8);
        props.put(ProducerConfig.BOOTSTRAP_SERVERS_CONFIG, "localhost:9092");
        props.put(ProducerConfig.KEY_SERIALIZER_CLASS_CONFIG, StringSerializer.class);
        props.put(ProducerConfig.VALUE_SERIALIZER_CLASS_CONFIG, StringSerializer.class);
        return new DefaultKafkaProducerFactory<>(props);
    }

    @Bean
    public KafkaTemplate<String, String> kafkaTemplate() {
        return new KafkaTemplate<>(producerFactory(), true);
    }

    @Bean
    public ConsumerFactory<String, String> consumerFactory() {
        Map<String, Object> props = new HashMap<>(8);
        props.put(ConsumerConfig.BOOTSTRAP_SERVERS_CONFIG, "localhost:9092");
        props.put(ConsumerConfig.KEY_DESERIALIZER_CLASS_CONFIG, StringDeserializer.class);
        props.put(ConsumerConfig.VALUE_DESERIALIZER_CLASS_CONFIG, StringDeserializer.class);
        return new DefaultKafkaConsumerFactory<>(props);

    }

    @Bean
    public KafkaListenerContainerFactory kafkaListenerContainerFactory() {
        ConcurrentKafkaListenerContainerFactory<String, String> factory = new ConcurrentKafkaListenerContainerFactory<>();
        factory.setConcurrency(3);
        factory.setConsumerFactory(consumerFactory());
        factory.getContainerProperties().setPollTimeout(3000);
        return factory;
    }

    @Component
    static class Listener {

        @KafkaListener(id="client_one",topics = "test")
        public void receive(String message) {
            System.out.println("收到的消息为:" + message);
        }
        @KafkaListener(id="client_two",topics = "test1")
        public void receive(Integer message) {
            System.out.println("收到的的Integer消息为:" + message);
        }

    }
}
3. 编写Main方法

package com.hzgj.lyrk.spring.study;

import com.hzgj.lyrk.spring.study.config.AppConfig;
import org.springframework.context.annotation.AnnotationConfigApplicationContext;
import org.springframework.kafka.core.KafkaTemplate;
import org.springframework.kafka.support.SendResult;
import org.springframework.util.concurrent.ListenableFutureCallback;

public class Main {

    public static void main(String[] args) {
        AnnotationConfigApplicationContext applicationContext = new AnnotationConfigApplicationContext(AppConfig.class);
        KafkaTemplate<String, String> kafkaTemplate = applicationContext.getBean(KafkaTemplate.class);
        kafkaTemplate.send("test", 0,"msg","{\"id\":2}").addCallback(new ListenableFutureCallback<SendResult<String, String>>() {
            @Override
            public void onFailure(Throwable ex) {
                ex.printStackTrace();
            }

            @Override
            public void onSuccess(SendResult<String, String> result) {
                System.out.println("发送消息成功....");
            }
        });
    }
}
执行成功后得到如下结果:


 浙公网安备 33010602011771号