
suricata高性能之pf_ring抓包+hyperscan规则匹配
一、PF_RING
1、简介
pfring是一种加速处理数据包的实现方法,可以比较有效地提升网卡获取和发送数据包的速度。PF_RIN是一个Linux内核模块和用户空间框架,它允许您以高速率处理数据包,同时为数据包处理应用程序提供一致的API。
2、依赖安装
# 这里只列举了部分依赖,后续缺什么依赖就安装什么依赖
yum install -y kernel-devel kernel-headers gcc gcc-c++ make bison flex
3、检查内核
1)查看操作系统版本
[root@localhost ~]# cat /etc/redhat-release
Red Hat Enterprise Linux Server release 7.8 (Maipo)
2)查看glibc版本
[root@localhost ~]# ldd --version
ldd (GNU libc) 2.17
3)查看内核版本
[root@localhost ~]# uname -r
3.10.0-1127.el7.x86_64
# 或
[root@localhost ~]# rpm -qa kernel
kernel-3.10.0-1127.el7.x86_64
4)处理内核版本问题
[root@localhost dependence_pkg]# ls /usr/src/kernels/
空 # 如果该目录下没有系统内核源码,执行以下操作安装,否则不需执行

#安装内核头文件后
[root@localhost ~]# yum install kernel-devel

[root@localhost ~]# ls /usr/src/kernels/
3.10.0-1160.88.1.el7.x86_64
5)两个版本号不一致,进行升级并重启
# 步骤4)中发现 /usr/src/kernels 和 uname -r 内核版本不相同

[root@localhost ~]# yum -y update kernel kernel-devel
# 或者
[root@localhost ~]# rpm -ivh kernel-3.10.0-1160.88.1.el7.x86_64.rpm

[root@localhost ~]# reboot
6)再次查看内核版本
[root@localhost ~]# ls /usr/src/kernels/
3.10.0-1160.88.1.el7.x86_64

[root@localhost ~]# uname -r
3.10.0-1160.88.1.el7.x86_64
4、基础版pf_ring安装
1)下载pf_ring
[root@localhost ~]# git clone https://github.com/ntop/PF_RING.git
2)编译
[root@localhost ~]# cd PF_RING/
[root@localhost PF_RING]# make    //直接在PF_RING根目录下面make,进行全部编译

# 这里可能会报错,如果不报错忽略即可
# 说找不到……3.10.0-1127.el7.x86_64/build
# 上面已经显示过我的内核文件头为3.10.0-1160.6.1……
# 这个错是因为build是个软连接,连接的是3.10.0-1127.el7.x86_64版本的文件头,但系统没有这个文件头,需要手动更改
# 所以要更改一下kernel文件里面的软连接如下:
[root@localhost PF_RING]# ln -s /usr/src/kernels/3.10.0-1160.6.1.el7.x86_64 /lib/modules/3.10.0-1127.el7.x86_64/build -f
3) 安装pf_ring内核模块
[root@localhost PF_RING]# cd kernel
[root@localhost kernel]# make
[root@localhost kernel]# make install
4)加载pf_ring模块
# 本实验的linux_kerner_version为3.10.0-1160.53.1.el7.x86_64
[root@localhost kernel]# cd /lib/modules/<linux_kerner_version>/kernel/net/pf_ring/
[root@localhost kernel]# insmod pf_ring.ko


# 查看模块,当PF_RING激活时,会创建/proc/net/pf_ring目录,使用cat命令查看pf_ring的属性信息,如果使用rmmod停止该模块,/proc/net/pf_ring目录会自动删除
[root@localhost kernel]# modinfo pf_ring && cat /proc/net/pf_ring/info
###############################################################################################################################
#filename:       /lib/modules/3.10.0-1160.53.1.el7.x86_64/kernel/net/pf_ring/pf_ring.ko
#alias:          net-pf-27
#version:        8.5.0
#description:    Packet capture acceleration and analysis
#author:         ntop.org
#license:        GPL
#retpoline:      Y
#rhelversion:    7.9
#srcversion:     DFF2E8D5E54D78FC6A284DE
#depends:
#vermagic:       3.10.0-1160.53.1.el7.x86_64 SMP mod_unload modversions
#parm:           min_num_slots:Min number of ring slots (uint)
#parm:           perfect_rules_hash_size:Perfect rules hash size (uint)
#parm:           enable_tx_capture:Set to 1 to capture outgoing packets (uint)
#parm:           enable_frag_coherence:Set to 1 to handle fragments (flow coherence) in clusters (uint)
#parm:           enable_ip_defrag:Set to 1 to enable IP defragmentation(only rx traffic is defragmentead) (uint)
#parm:           keep_vlan_offload:Set to 1 to keep vlan stripping (do not reinsert vlan) (uint)
#parm:           quick_mode:Set to 1 to run at full speed but with upto one socket per interface (uint)
#parm:           force_ring_lock:Set to 1 to force ring locking (automatically enable with rss) (uint)
#parm:           enable_debug:Set to 1 to enable PF_RING debug tracing into the syslog, 2 for more verbosity (uint)
#parm:           transparent_mode:(deprecated) (uint)
#PF_RING Version          : 8.5.0 (dev:8e8f8591f356db877af2e57b4cf7c984181d3b47)
#Total rings              : 0

#Standard (non ZC) Options
#Ring slots               : 4096
#Slot version             : 20
#Capture TX               : Yes [RX+TX]
#IP Defragment            : No
#Socket Mode              : Standard
#Cluster Fragment Queue   : 0
#Cluster Fragment Discard : 0
###############################################################################################################################
5)Libpfring和Libpcap安装
[root@localhost kernel]# cd ../userland/lib
[root@localhost lib]# ./configure && make && make install
[root@localhost lib]# cd ../libpcap
[root@localhost libpcap]# ./configure && make && make install
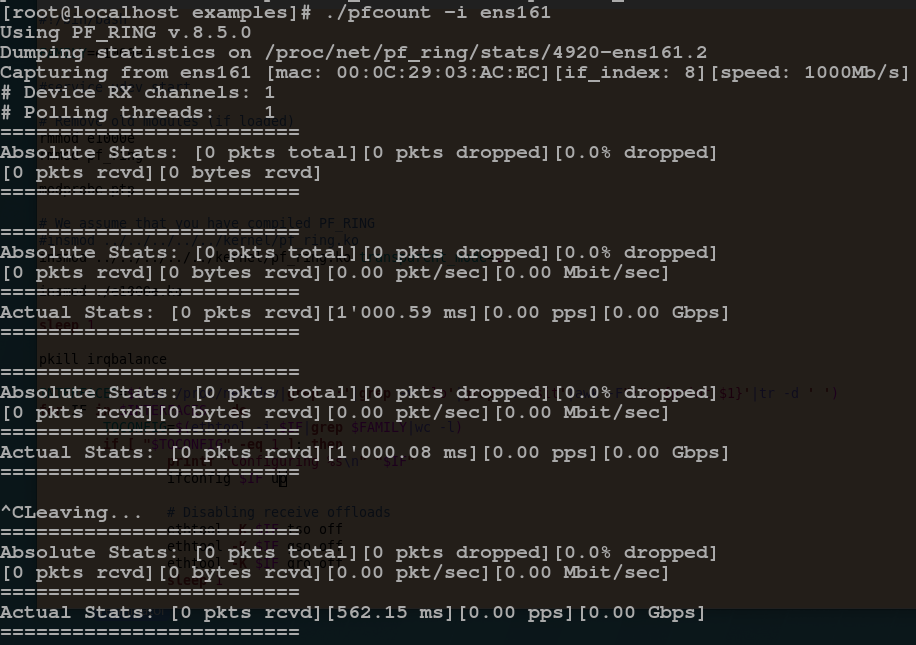
6)测试
# 运行验证是否成功
[root@localhost libpcap]# cd ../examples && make
[root@localhost examples]# ./pfcount -i ens161
###############################################################################################################################
#Using PF_RING v.8.5.0
#Dumping statistics on /proc/net/pf_ring/stats/31342-ens161.5
#Capturing from ens161 [mac: 00:0C:29:03:AC:EC][if_index: 2][speed: 1000Mb/s]
## Device RX channels: 1
## Polling threads:    1
#=========================
#Absolute Stats: [0 pkts total][0 pkts dropped][0.0% dropped]
#[0 pkts rcvd][0 bytes rcvd]
#=========================
#
#=========================
#Absolute Stats: [1 pkts total][0 pkts dropped][0.0% dropped]
#[1 pkts rcvd][241 bytes rcvd][1.00 pkt/sec][0.00 Mbit/sec]
#=========================
#Actual Stats: [1 pkts rcvd][1'000.96 ms][1.00 pps][0.00 Gbps]
#=========================
#
#=========================
#Absolute Stats: [2 pkts total][0 pkts dropped][0.0% dropped]
#[2 pkts rcvd][482 bytes rcvd][1.00 pkt/sec][0.00 Mbit/sec]
#=========================
#Actual Stats: [1 pkts rcvd][1'001.48 ms][1.00 pps][0.00 Gbps]
#=========================
###############################################################################################################################
5、优化性能——PF_RING透明模式
PF_RING是为增强数据包捕获性能而设计的。这意味着必须加速RX路径,特别是通过减少数据包从适配器到用户域的旅程来加速这一过程。这是通过允许驱动程序直接将数据包从NIC推到PF_RING来获得的,而不是通过通常的内核路径。出于这个原因,PF_RING引入了一个名为“透明模式”的选项,其目标是优化数据包如何从NIC移动到PF_RING。这个选项(可以在通过insmod插入PF_RING模块时指定)可以有三个:
1)insmod pf_ring.ko transparent_mode=0
这是默认值,这意味着数据包通过标准内核机制发送到PF_RING。即不需要安装任何驱动,利用Linux接口接受报文,任何驱动都能使用该模式
在这种设置中,数据包既被发送到PF_RING,也被发送到所有其他内核组件。所有网卡驱动均支持该模式。
2)insmod pf_ring.ko transparent_mode=1
在这种模式下,数据包直接由网卡驱动发送到PF_RING,数据包仍然传播到其他内核组件。即需要安装驱动
在这种模式下,数据包捕获加速,因为数据包被NIC驱动程序复制而不经过通常的内核路径。
- 为了启用这种模式,必须使用支持PF_RING的网卡驱动程序。可用的启用PF_RING的驱动程序可以在PF_RING的
drivers/目录中找到。
3)insmod pf_ring.ko transparent_mode=2
在这种模式下,数据包直接由网卡驱动发送到PF_RING,数据包不会传播到其他内核组件,因为这会减慢数据包捕获。即需要安装驱动, pfring以外程序抓不到数据包
-
为了启用这种模式,您必须使用支持PF_RING的网卡驱动程序。
-
数据包在被传递到PF_RING之后不会被发送到内核。这意味着您将无法从pf_ring驱动的网卡获得连接。
-
这种模式是最快的,因为数据包被快速复制到PF_RING中,处理后立即被丢弃。
6、透明模式pf_ring安装——性能优化
1)下载pf_ring
[root@localhost ~]# git clone https://github.com/ntop/PF_RING.git
2)编译
[root@localhost ~]# cd PF_RING/
[root@localhost PF_RING]# make    //直接在PF_RING根目录下面make,进行全部编译

# 这里可能会报错,如果不报错忽略即可
# 说找不到……3.10.0-1127.el7.x86_64/build
# 上面已经显示过我的内核文件头为3.10.0-1160.6.1……
# 这个错是因为build是个软连接,连接的是3.10.0-1127.el7.x86_64版本的文件头,但系统没有这个文件头,需要手动更改
# 所以要更改一下kernel文件里面的软连接如下:
[root@localhost PF_RING]# ln -s /usr/src/kernels/3.10.0-1160.6.1.el7.x86_64 /lib/modules/3.10.0-1127.el7.x86_64/build -f
3) 安装pf_ring内核模块
[root@localhost PF_RING]# cd kernel
[root@localhost kernel]# make
[root@localhost kernel]# make install
4)安装并加载pf_ring模块和透明模式驱动
- 机器重启以后,模块和驱动失效,需要进入
src目录,执行该脚本使重新加载模块和驱动
# 查看网卡型号
[root@localhost PF_RING]# ethtool -i e1000e
##################################################
#driver: e1000e
#version: 3.2.6-k
#firmware-version: 1.8-0
#expansion-rom-version:
#bus-info: 0000:0b:00.0
#supports-statistics: yes
#supports-test: yes
#supports-eeprom-access: yes
#supports-register-dump: yes
#supports-priv-flags: no
##################################################

# 安装加载驱动、模块
[root@localhost PF_RING]# cd drivers/interl/
[root@localhost interl]# ./configure
[root@localhost interl]# make
[root@localhost interl]# cd e1000e/e1000e-3.8.7-zc/src/
[root@localhost src]# ./load_driver.sh      # 该脚本会自动卸载原来的网卡驱动和pf_ring模块,重新加载pf_ring模块和网卡驱动模块
##################################################################
修改`load_driver.sh`,修改`transparent_mode`的值,然后运行脚本
##################################################################

5)Libpfring和Libpcap安装
[root@localhost src]# cd <PF_RING>/userland/lib
[root@localhost lib]# ./configure && make && make install
[root@localhost lib]# cd ../libpcap
[root@localhost libpcap]# ./configure && make && make install
6)测试
[root@localhost libpcap]# cd ../examples && make
[root@localhost examples]# ./pfcount -i ens161
二、HyperScan
1、HyperScan简介
Hyperscan作为一款高性能的正则表达式匹配库,极适用于部署在IDS/IPS等网络解决方案中。
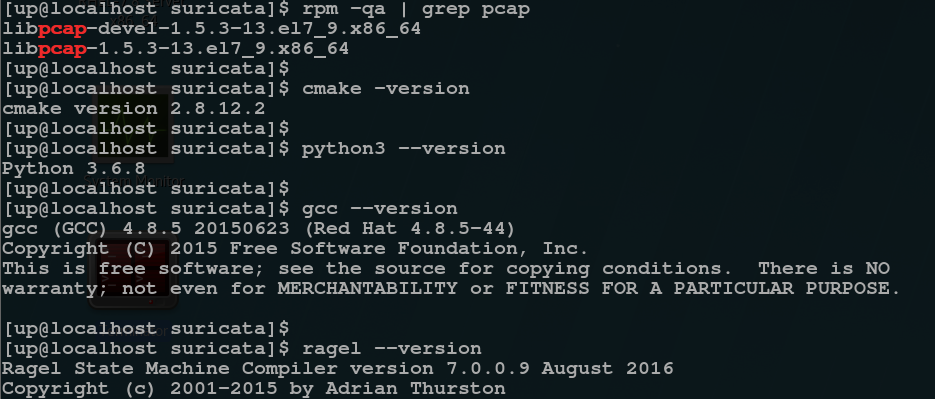
2、安装依赖包
| Dependency | Version |
|---|---|
| gcc/g++ | >=4.8.1 |
| cmake | >=2.8.11 |
| python | >=2.7 |
| pacp | >=0.8 |
| ragel | >=6.9 |
| boost | >=1.57 |
yum install cmake ragel bzip2-devel python3-devel
-
hyperscan需要boost1.57及以上,但是yum提供的是1.53版本太低,因此需要手动安装boost
# 获取boost库,无需安装,只要做软链接即可
wget https://boostorg.jfrog.io/artifactory/main/release/1.81.0/source/boost_1_81_0.tar.gz

tar -zxvf boost_1_81_0.tar.gz

ln -s boost_1_81_0/boost <hyperscan-source-path>/include/boost
3、安装hyperscan
git clone https://github.com/intel/hyperscan
cd hyperscan
mkdir build
cd build/
cmake -DBUILD_STATIC_AND_SHARED=1  ../    # 因为上面已经将boost库链接到hyperscan的源码目录下,所以这里无需指定boost路径
make -j 2 && make install

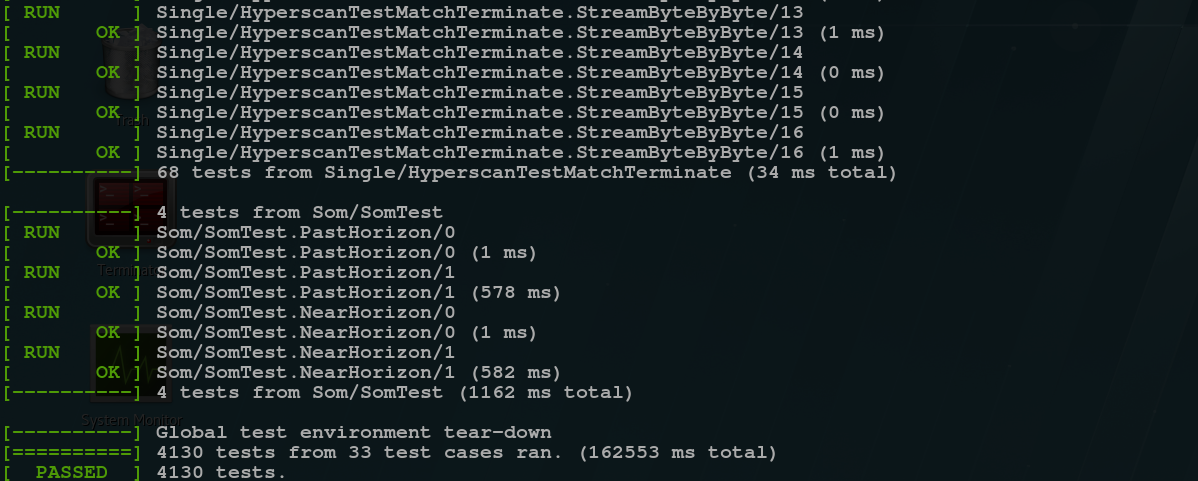
4、验证hyperscan
cd build/
./bin/unit-hyperscan
三、suricata安装
1、安装依赖
yum install -y libpcap-devel libnet-devel pcre-devel gcc-c++ automake autoconf libtool make libyaml-devel zlib-devel file-devel jansson-devel nss-devel lua-devel
yum install -y rustc cargo python3 git
2、下载suricata源码
下载链接:https://github.com/OISF/suricata/tags
3、安装suricata-6.0.0
- pfring+suricata官网文档:https://www.ntop.org/guides/pf_ring/thirdparty/suricata.html
1)解压
1 [root@localhost 16:21 /<path>]# tar -zxvf suricata-6.0.0.tar.gz
2)预编译
- 查找pf_ring和:
find / -name 'pfring.h',find / -name 'libpfring.so' - 查找hyperscan库路径:
find / -name 'hs.h',find / -name 'libhs.so.5'
[root@localhost 16:22 /<path>]# cd suricata-6.0.0/
[root@localhost 16:23 /<path>/suricata-suricata-6.0.0]# ./autogen.sh # 原生没有configure,需要该脚本来生成configure
[root@localhost 16:24 /<path>/suricata-suricata-6.0.0]# ./configure --disable-gccmarch-native \
--prefix=/usr --sysconfdir=/etc --localstatedir=/var \
--enable-pfring --with-libpfring-includes=/usr/local/include --with-libpfring-libraries=/usr/local/lib \
--with-libhs-includes=/usr/local/include/hs --with-libhs-libraries=/usr/local/lib64 \
--enable-geoip
# --localstatedir 指定日志保存位置
# --prefix 指定安装位置
# --sysconfdir 指定配置文件保存位置
# --enable-pfring, --with-libpfring-includes, --with-libpfring-libraries 表示将pf_ring编译到suricata,库路径可能不尽相同,自行修改
# --with-libhs-includes, --with-libhs-libraries 表示将hyperscan编译到suricata,库路径可能不尽相同,自行修改
# --enable-gepip 通过网络流量中的IP地址来判断其所属的国家和城市
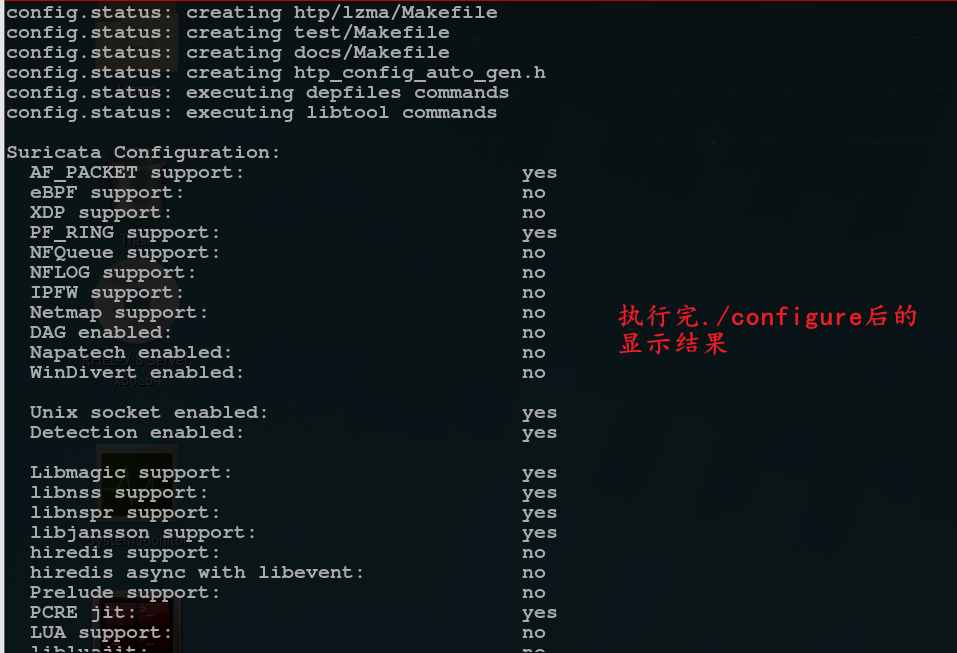
## 执行完configure之后,如果没有报错,可以看到当前预编译的suricata,支持哪些功能
-
预编译成功
- 如果没有报错,可以看到当前预编译的suricata,支持哪些功能
-
报错1
##### 如果configure时报出一下错误,根据提示,在当前目录下执行git clone https://github.com/OISF/libhtp,并重新执行./autogen.sh ########################################################################################## #ERROR: Libhtp is not bundled. Get libhtp by doing: # git clone https://github.com/OISF/libhtp #Then re-run Suricata's autogen.sh and configure script. #Or, if libhtp is installed in a different location, #pass --enable-non-bundled-htp to Suricata's configure script. #Add --with-libhtp-includes=<dir> and --with-libhtp-libraries=<dir> if #libhtp is not installed in the include and library paths. ########################################################################################## # 解决LibHtp的报错 [root@localhost 16:27 /<path>/suricata-suricata-6.0.0]# git clone https://github.com/OISF/libhtp [root@localhost 16:28 /<path>/suricata-suricata-6.0.0]# ./autogen.sh # 再次执行configure [root@localhost 16:29 /<path>/suricata-suricata-6.0.0]# ./configure --disable-............ -
报错2
##### 如果configure时报出一下错误, 在命令起始位置加上LIBS="-lrt -lnuma" ########################################################################################## ##checking for pfring_open in -lpfring... no ## ## ERROR! --enable-pfring was passed but the library was not found or version is >4, go get it ## from http://www.ntop.org/PF_RING.html ########################################################################################## [root@localhost 16:29 /<path>/suricata-suricata-6.0.0]# LIBS="-lrt -lnuma" ./configure --disabl......... -
报错3

###################### 如果抛出以下错误,根据提示安装cbindgen,并加到PATH中 ###################### ########################################################################################## #Warning: cbindgen too old or not found, it is required to # generate header files. # To install: cargo install --force cbindgen #configure: error: cbindgen required ########################################################################################## [root@localhost 16:30 /<path>/suricata-suricata-6.0.0]# cargo install --force cbindgen # 该步骤需要联网 [root@localhost 16:40 /<path>/suricata-suricata-6.0.0]# export PATH=/root/.cargo/bin:$PATH # 再次执行configure [root@localhost 16:29 /<path>/suricata-suricata-6.0.0]# ./configure --disable-............ -
报错4
# 后续报错,缺什么依赖包,根据提示安装什么依赖包
3)编译安装
[root@localhost 16:45 /<path>/suricata-suricata-6.0.0]# make -j 4 && make install
4)添加htp库到系统目录
# 拷贝htp的库到lib中
[root@localhost 17:45 /<path>/suricata-suricata-6.0.0]# cp -d libhtp/htp/.libs/libhtp.so* /lib64/

########################### 如果不执行该步骤,在执行suricata命令时会报以下错误######################################
# [root@localhost ~]# suricata
# suricata: error while loading shared libraries: libhtp.so.2: cannot open shared object file: No such file or directory
############################################################################################################
5)添加库搜索路径
# 将pf_ring库路径加入到动态库搜索路径
[root@localhost suricata-suricata-6.0.0]# echo "/usr/local/lib" | tee --append /etc/ld.so.conf.d/usrlocal.conf
############################################################################################################
# 不将路径加到库搜索路径中,会出现找不到库文件的问题:
# [root@localhost suricata-suricata-6.0.0]# suricata
#  while loading shared libraries: libpfring.so.8: cannot open shared object file: No such file or directory
############################################################################################################

# 将hyperscan库路径加入到动态库搜索路径
[root@localhost suricata-suricata-6.0.0]# echo "/usr/local/lib64" | tee --append /etc/ld.so.conf.d/usrlocal.conf
############################################################################################################
# 不将路径加到库搜索路径中,会出现找不到库文件的问题:
# [root@localhost suricata-suricata-6.0.0]# suricata
# suricata: error while loading shared libraries: libhs.so.5: cannot open shared object file: No such file or directory
############################################################################################################

# 加载库
[root@localhost 16:45 /<path>/suricata-suricata-6.0.0]# ldconfig
6)生成conf目录、log目录等目录
# 生成conf目录、log目录等目录
[root@localhost 17:47 /<path>/suricata-suricata-6.0.0]# make install-conf
#install -d "/etc/suricata/"
#install -d "/var/log/suricata/files"
#install -d "/var/log/suricata/certs"
#install -d "/var/run/"
#install -m 770 -d "/var/run/suricata"
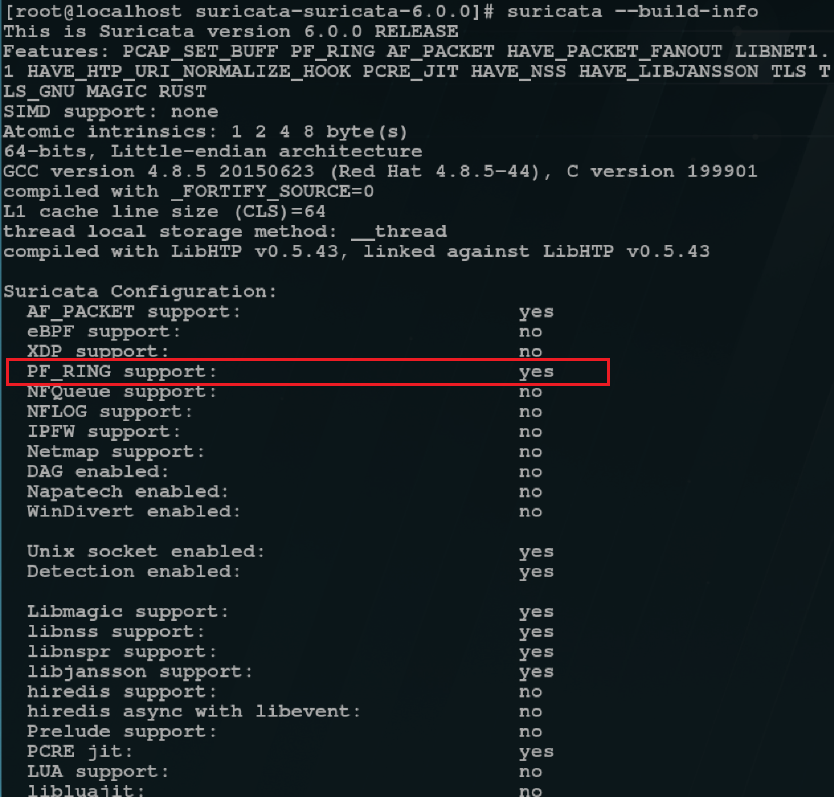
7)查看suricata信息
suricata --build-info


5、生成规则文件
- suricata-6.0.0引擎程序和规则是分开来安装的,因此需要单独安装
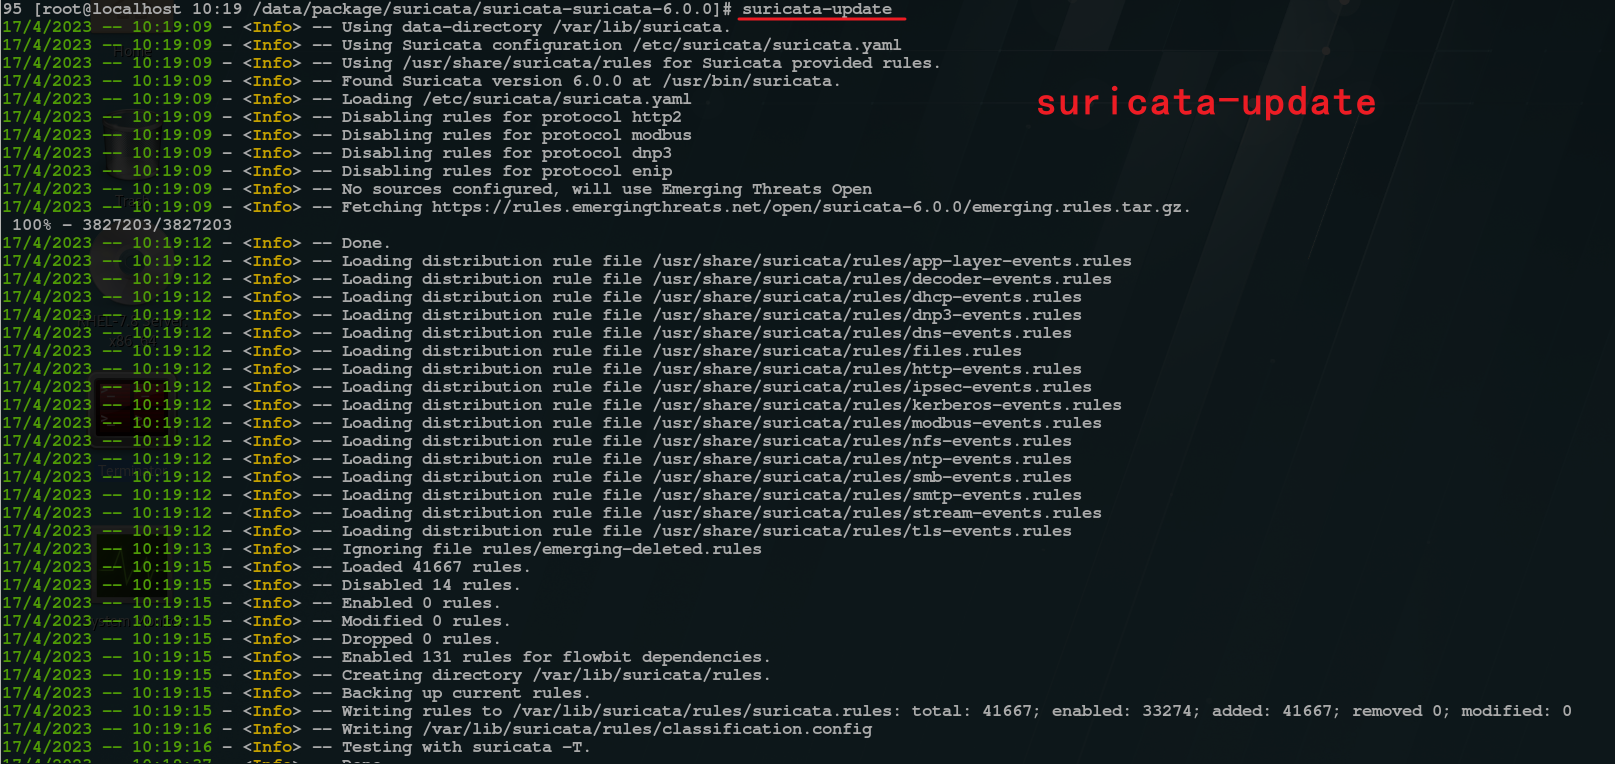
suricata-update程序进行规则的安装。由于该程序是python写的,因此linux环境最好支持python同时安装pip工具 - 安装完
suricata-update,直接运行该程序,则会到指定的网站下载rules,下载到/var/lib/suricata/rules/中
yum -y install epel-release
yum -y install python3-pip # 由于在安装依赖时已经安装python3,所以可以忽略此步
# 安装suricata-update
pip3 install --upgrade suricata-update
# 执行,下载规则文件,会自动下载到/var/lib/suricata/rules中,执行该步骤后,不需要再执行make install-rules
suricata-update
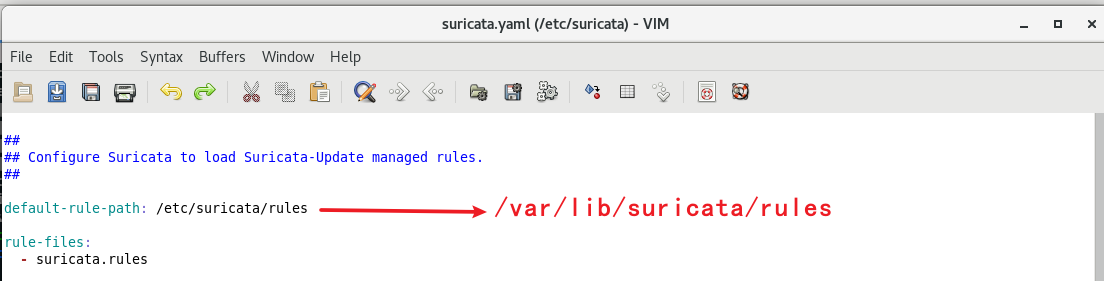
# 修改/etc/suricata/suricata.yaml文件,将default-rule-path修改为/var/lib/suricata/rules
# 一定要修改,因为默认使用/etc/suricata/rules作为规则目录, 否则使用时,会出现找不到规则文件的问题
# 简单测试suricata
suricata -T

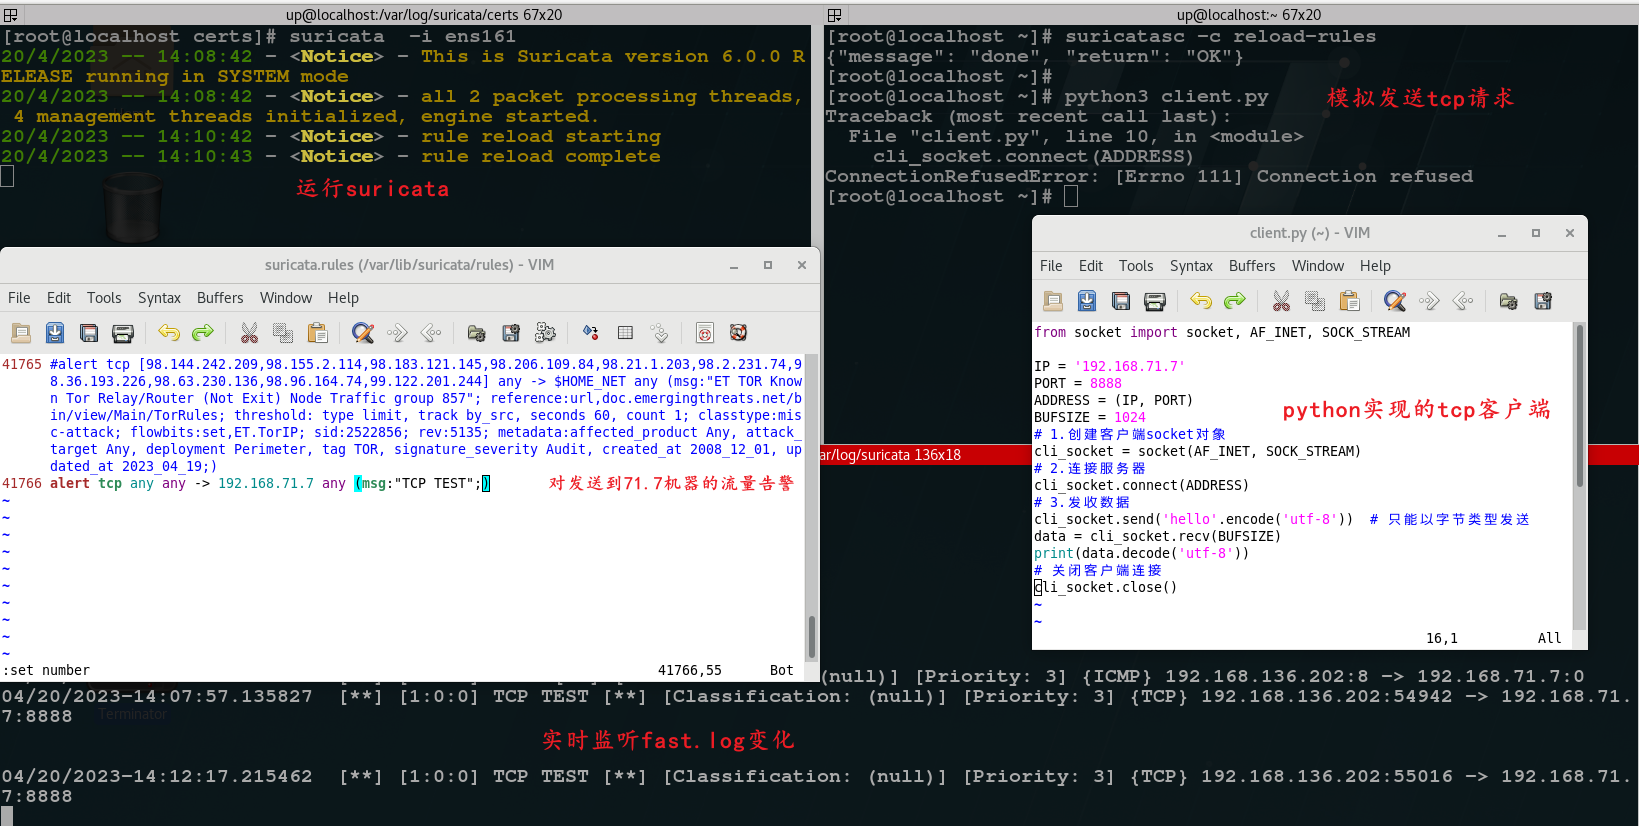
6、测试suricata
suricata -c /etc/suricata/suricata.yaml -i ens161

 浙公网安备 33010602011771号