第1步:
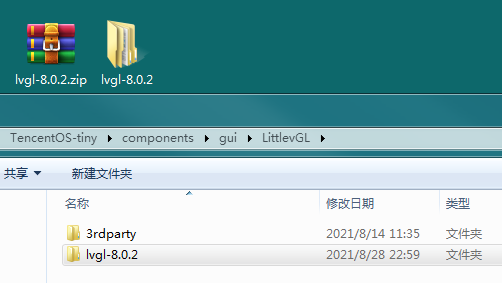
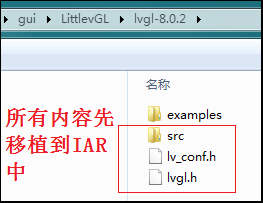
将LVGL v8.0.2下载并解压到TencentOS-tiny\components\gui\LittlevGL如下图:
第2步:
我用IAR SYSTEM 是V9.10版本,将不用的文件全部删除掉,保留必要的 .c .h .bin 这些文件夹.
这个可以参靠之前的LVGL V6或LVGL V7版本,或找一个DEMO,总之要明确保留的具体文件.
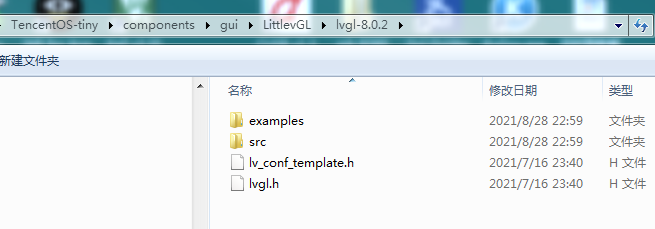
如上就这么2个文件夹了, 我们先将 lv_conf_template.h 变更为lv_conf.h,并打开改为如下:

第3步:
将TencentOS-tiny\components\gui\LittlevGL\lvgl-8.0.2\examples\porting下的所有文件名'_template'去掉,如下
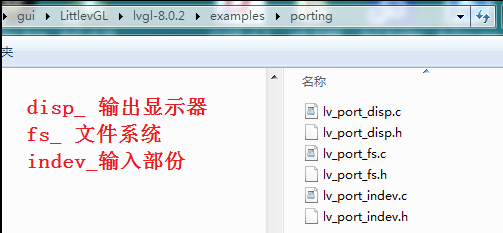
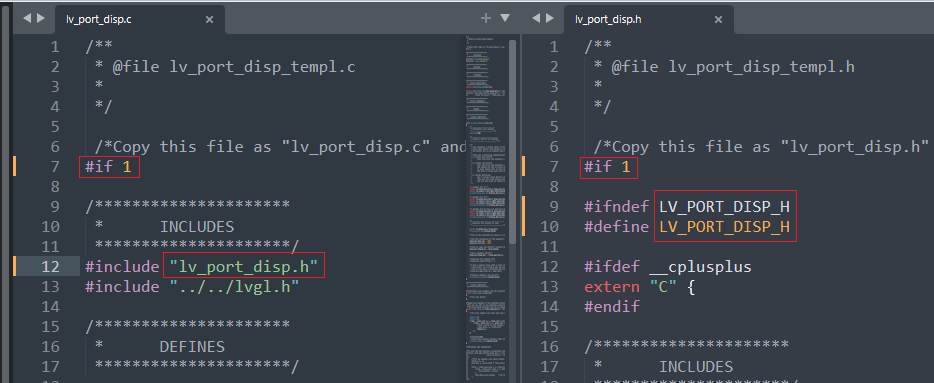
如上内容都是后期要用的, 因为是先移植UI显示的,所以先打开lv_port_disp.h,更改如下:
第4步:
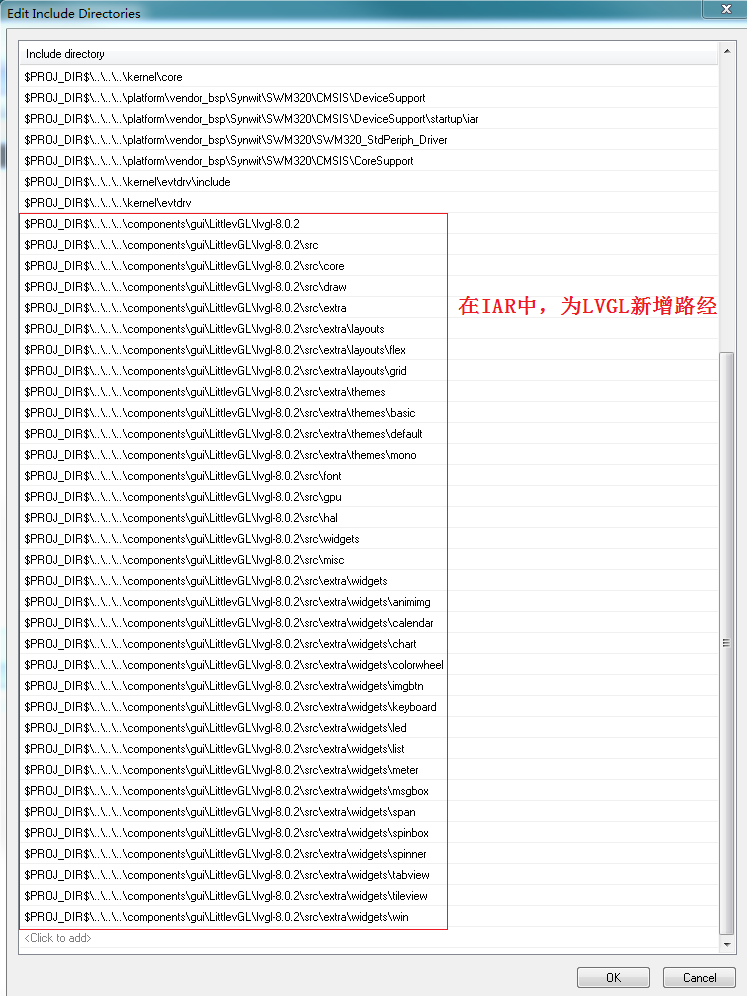
将如下内容的.H .C文件和路经,加载到IAR SYSTEM去,这个过程很无聊,要有耐心和细心。。正在进行中。。。
 另外先提示一下--->
最后在IAR的TencentOS-tiny新增LVGL文件项如下图所示:
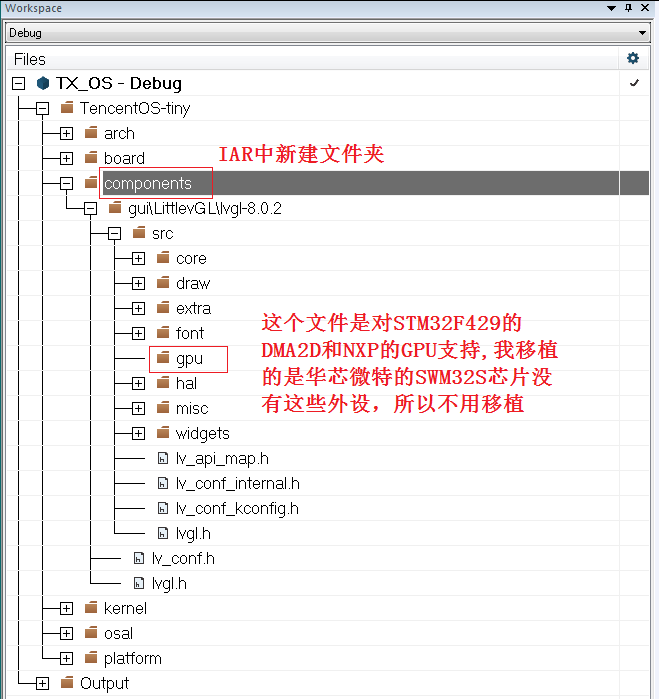
假设还不会移植TencentOS-tiny,阅读另一个随记--->腾讯开源精简操作系统TencentOS-tiny与SWM320初试
IAR新增LVGL文件路经为如下:
第5步:
为LVGL安装tick心跳,先让它活起来,如下所示:
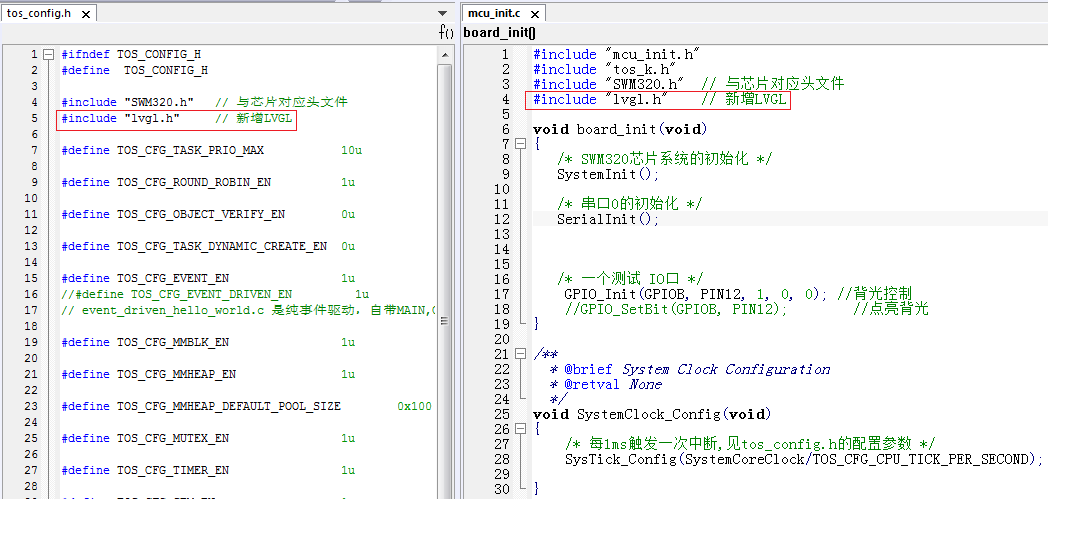
找到tos_config.h内的TOS_CFG_TIMER_AS_PROC项,将它设为如下:
#define TOS_CFG_CPU_CLOCK     (SystemCoreClock)        // 当前CPU频率
#define TOS_CFG_TIMER_AS_PROC           1u             // 时间为函数模式:1
在mcu_init.c内找到systick中断入口函数void SysTick_Handler(void),改为如下:
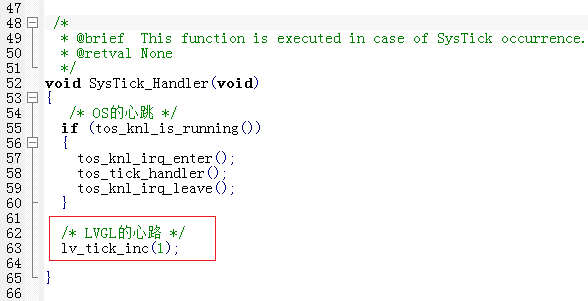
这个时候,LVGL已经拥有心跳了,上面图片打错一个字。。。
第6步:
我们先适配LVGL的lv_conf.h文件,以屏的分辨率为准,新增如下:
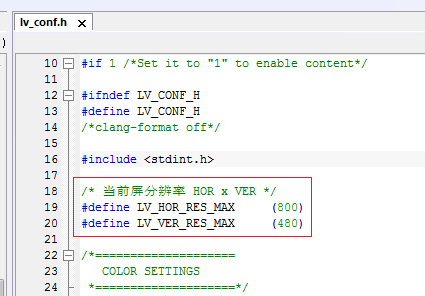
再找到LV_COLOR_DEPTH改为,当前屏为RGB565对应上
/*Color depth: 1 (1 byte per pixel), 8 (RGB332), 16 (RGB565), 32 (ARGB8888)*/
#define LV_COLOR_DEPTH     16
再找到LV_USE_PERF_MONITOR,打开FPS监视.
/*1: Show CPU usage and FPS count in the right bottom corner*/
#define LV_USE_PERF_MONITOR     1
再找到 LV_THEME_DEFAULT_DARK,配置为暗夜模式,默认是灯光模式,这个是LVGL主题,和手机主题一个意思的
/*0: Light mode; 1: Dark mode*/
# define LV_THEME_DEFAULT_DARK     1
然后保存lv_conf.h,这个文件我们已经适配完成了。
下面来适配lv_port_disp.c文件,先从裸机上找到SWM32S的SDRAM LCD驱动的例子,
将芯片LCD外设的参数单独测试好,实现正常刷图显示功能,保证和芯片都是OK的。
在TencentOS-tiny\board\SWM320_DISCOVERY\BSP\Hardware下新建文件,先完成
硬件上的.C .H文件移植,如下所示:

下面来就可以正试适配lv_port_disp.c文件了,直接给出适配好的文件吧,因为之前移植过了
V8.0.1版本,和这个V8.0.2应相差不大。。。。
把TencentOS-tiny\components\gui\LittlevGL\lvgl-8.0.2\examples\porting下的lv_port_disp.c和
lv_port_disp.h加入到IAR工程,并把它们的路经,能走这里应该比较容易了。。。
测试过的lv_port_disp.h文件如下:
/**
 * @file lv_port_disp_templ.h
 *
 */

 /*Copy this file as "lv_port_disp.h" and set this value to "1" to enable content*/
#if 1

#ifndef LV_PORT_DISP_H
#define LV_PORT_DISP_H

#ifdef __cplusplus
extern "C" {
#endif

/*********************
 *      INCLUDES
 *********************/
#include "lvgl.h"

/*********************
 *      DEFINES
 *********************/

/**********************
 *      TYPEDEFS
 **********************/

/**********************
 * GLOBAL PROTOTYPES
 **********************/
void lv_port_disp_init(void);

/**********************
 *      MACROS
 **********************/

#ifdef __cplusplus
} /*extern "C"*/
#endif

#endif /*LV_PORT_DISP_TEMPL_H*/

#endif /*Disable/Enable content*/
测试过的lv_port_disp.c文件如下:
/**
 * @file lv_port_disp_templ.c
 *
 */

 /*Copy this file as "lv_port_disp.c" and set this value to "1" to enable content*/
#if 1

/*********************
 *      INCLUDES
 *********************/
#include "lv_port_disp.h"
#include "../../lvgl.h"

#include "lv_hal_disp.h"
#include "SWM320.h"

/*********************
 *      DEFINES
 *********************/

/**********************
 *      TYPEDEFS
 **********************/

/**********************
 *  STATIC PROTOTYPES
 **********************/
static void disp_init(void);
static void disp_flush(lv_disp_drv_t * disp_drv, const lv_area_t * area, lv_color_t * color_p);

/**********************
 *  STATIC VARIABLES
 **********************/
static uint32_t *lcdbuf_show = (uint32_t *)SDRAMM_BASE;   // ok显示

/**********************
 *      MACROS
 **********************/

/**********************
 *   GLOBAL FUNCTIONS
 **********************/

void lv_port_disp_init(void)
{
    /*-------------------------
     * Initialize your display
     * -----------------------*/
    disp_init();

    /*-----------------------------
     * Create a buffer for drawing
     *----------------------------*/

    /**
     * LVGL requires a buffer where it internally draws the widgets.
     * Later this buffer will passed to your display driver's `flush_cb` to copy its content to your display.
     * The buffer has to be greater than 1 display row
     *
     * There are 3 buffering configurations:
     * 1. Create ONE buffer:
     *      LVGL will draw the display's content here and writes it to your display
     *
     * 2. Create TWO buffer:
     *      LVGL will draw the display's content to a buffer and writes it your display.
     *      You should use DMA to write the buffer's content to the display.
     *      It will enable LVGL to draw the next part of the screen to the other buffer while
     *      the data is being sent form the first buffer. It makes rendering and flushing parallel.
     *
     * 3. Double buffering
     *      Set 2 screens sized buffers and set disp_drv.full_refresh = 1.
     *      This way LVGL will always provide the whole rendered screen in `flush_cb`
     *      and you only need to change the frame buffer's address.
     */

    /* Example for 1) */
    //static lv_disp_draw_buf_t draw_buf_dsc_1;
    //static lv_color_t buf_1[MY_DISP_HOR_RES * 10];                          /*A buffer for 10 rows*/
    //lv_disp_draw_buf_init(&draw_buf_dsc_1, buf_1, NULL, MY_DISP_HOR_RES * 10);   /*Initialize the display buffer*/

    /* Example for 2) */
    static lv_disp_draw_buf_t draw_buf_dsc_2;
    static lv_color_t buf_2_1[LV_HOR_RES_MAX * 10];                        /*A buffer for 10 rows*/
    static lv_color_t buf_2_2[LV_HOR_RES_MAX * 10];                        /*An other buffer for 10 rows*/
    lv_disp_draw_buf_init(&draw_buf_dsc_2, buf_2_1, buf_2_2, LV_HOR_RES_MAX * 10);   /*Initialize the display buffer*/

    /* Example for 3) also set disp_drv.full_refresh = 1 below*/
    //static lv_disp_draw_buf_t draw_buf_dsc_3;
    //static lv_color_t buf_3_1[MY_DISP_HOR_RES * MY_DISP_VER_RES];            /*A screen sized buffer*/
    //static lv_color_t buf_3_1[MY_DISP_HOR_RES * MY_DISP_VER_RES];            /*An other screen sized buffer*/
    //lv_disp_draw_buf_init(&draw_buf_dsc_3, buf_3_1, buf_3_2, MY_DISP_VER_RES * LV_VER_RES_MAX);   /*Initialize the display buffer*/

    /*-----------------------------------
     * Register the display in LVGL
     *----------------------------------*/

    static lv_disp_drv_t disp_drv;                         /*Descriptor of a display driver*/
    lv_disp_drv_init(&disp_drv);                    /*Basic initialization*/

    /*Set up the functions to access to your display*/

    /*Set the resolution of the display*/
    disp_drv.hor_res = LV_HOR_RES_MAX;
    disp_drv.ver_res = LV_VER_RES_MAX;

    /*Used to copy the buffer's content to the display*/
    disp_drv.flush_cb = disp_flush;

    /*Set a display buffer*/
    disp_drv.draw_buf = &draw_buf_dsc_2;

    /*Required for Example 3)*/
    //disp_drv.full_refresh = 1

    /* Fill a memory array with a color if you have GPU.
     * Note that, in lv_conf.h you can enable GPUs that has built-in support in LVGL.
     * But if you have a different GPU you can use with this callback.*/
    //disp_drv.gpu_fill_cb = gpu_fill;

    /*Finally register the driver*/
    lv_disp_drv_register(&disp_drv);
}

/**********************
 *   STATIC FUNCTIONS
 **********************/

/*Initialize your display and the required peripherals.*/
#include "lcd_RGB565.h"
#include "lv_disp.h"
static void disp_init(void)///////////////////////////////////////////////////
{
    /*You code here*/
    lcd_rgb_init();
    LCD->SRCADDR = (uint32_t)lcdbuf_show; //显示
    LCD_Start(LCD);
}

/*Flush the content of the internal buffer the specific area on the display
 *You can use DMA or any hardware acceleration to do this operation in the background but
 *'lv_disp_flush_ready()' has to be called when finished.*/
static void disp_flush(lv_disp_drv_t * disp_drv, const lv_area_t * area, lv_color_t * color_p)
{
    /*The most simple case (but also the slowest) to put all pixels to the screen one-by-one*/

    uint32_t temp;
    uint32_t index;
    uint32_t pos;
    lv_coord_t x;
    lv_coord_t y;

    //y=area->y1;
    for(y=area->y1; y <= area->y2; y++) {

        //x = area->x1;
        for(x=area->x1; x <= area->x2; x++) {
            /* Put a pixel to the display. For example: */
            /* put_px(x, y, *color_p)*/
            //drawpoint(x, y, color_p->full);

            index = (y*LV_HOR_RES+x) / 2;
            pos = ((x%2) == 0 ? 0 : 16);
            temp = lcdbuf_show[index];
            temp &= ~(0xFFFF << pos);
            temp |=  (color_p->full << pos);
            lcdbuf_show[index] = temp;

            color_p++;
        }
    }

    /*IMPORTANT!!!
     *Inform the graphics library that you are ready with the flushing*/
    lv_disp_flush_ready(disp_drv);
}

/*OPTIONAL: GPU INTERFACE*/

#else /*Enable this file at the top*/

/*This dummy typedef exists purely to silence -Wpedantic.*/
typedef int keep_pedantic_happy;
#endif
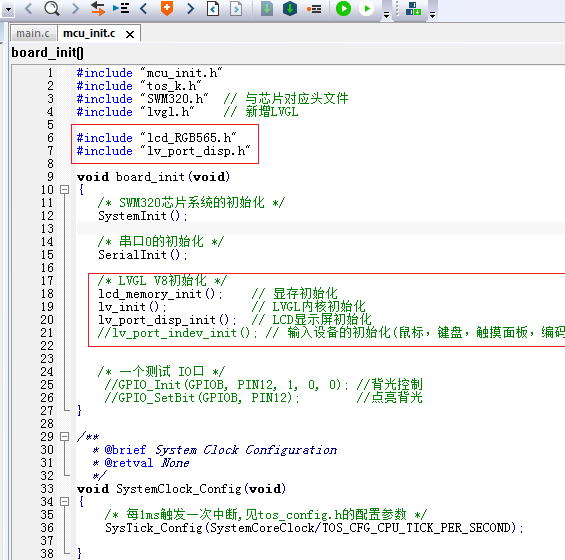
将mcu_init.c更改为如下,主要是在 board_init()对LVGL进行初始化。。
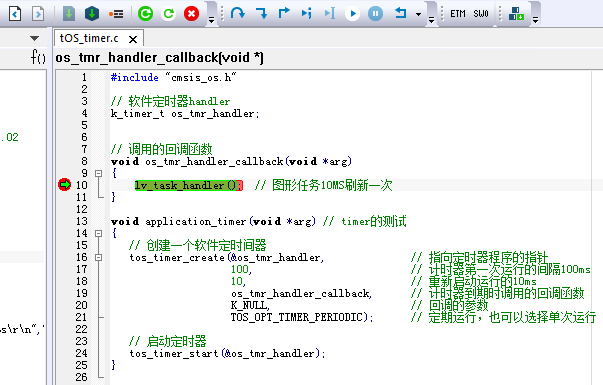
然后再对TOS之前软件定时器进行更改,main.C只开启软件定时器测试,如下:
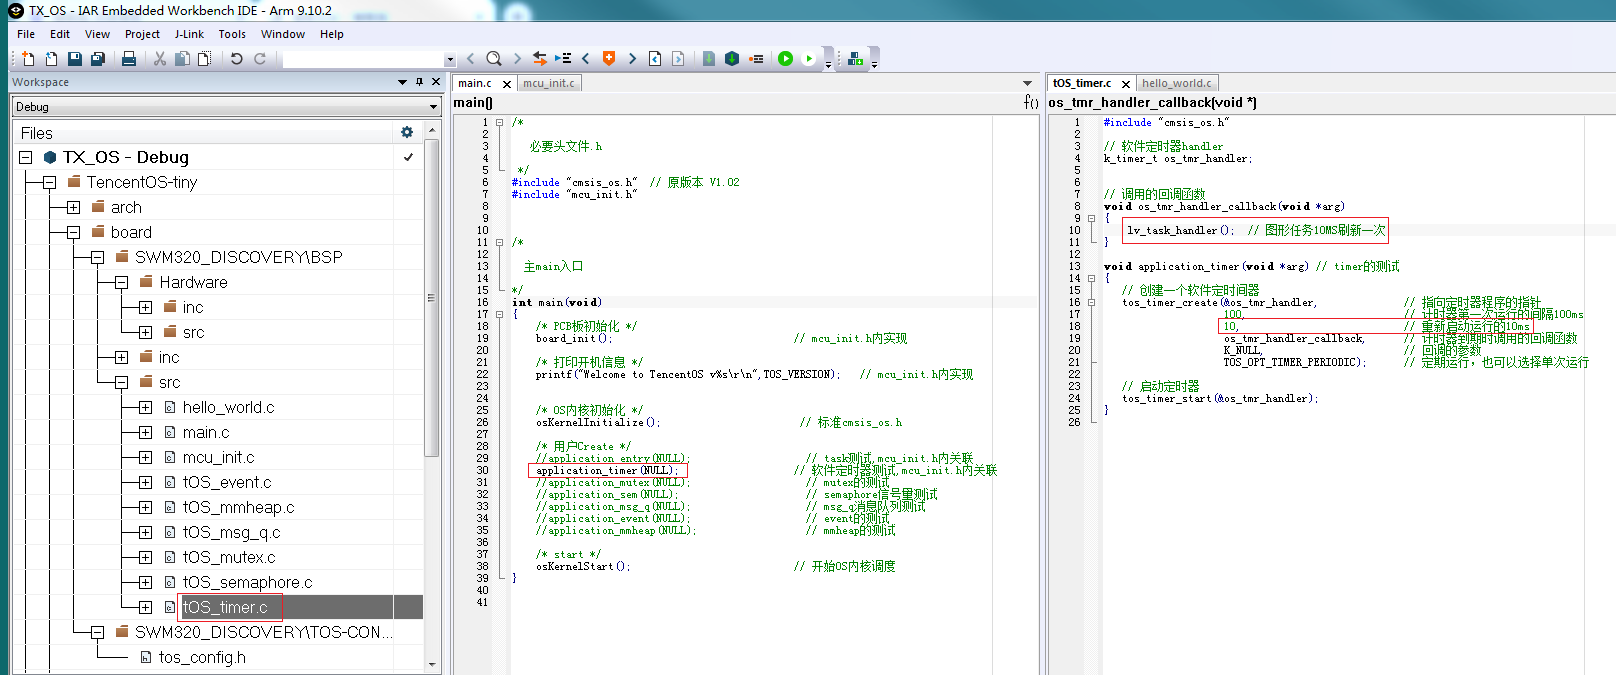
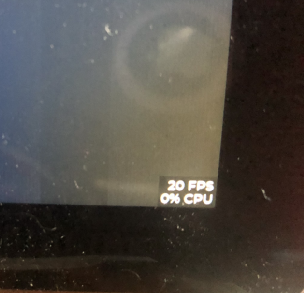
最后在线仿真看效果,可以看到显示屏有FPS了,说明TOS与LVGL移植成功。。。
如果要下载源码,请到华芯微特技术支持群492524359,已经上传QQ群里了,如下所示

接下来可以跑跑\lvgl-8.0.2\examples的DEMO,也可以自行学习LVGL的其他功能,结束了,再见!!


