
修改主机名
hostnamectl set-hostname services-ceph
cat /etc/hosts
192.168.11.21 services-ceph

reboot
关闭防火墙
# 关闭防火樯
systemctl disable firewalld
systemctl stop firewalld

# 关闭 selinux
setenforce 0
sed -i 's/^SELINUX=.*/SELINUX=disabled/' /etc/selinux/config
SSH配置免密
# 给ceph单节点配置免密,一台机器也要
ssh-keygen -t rsa -P '' -f ~/.ssh/id_rsa
cat ~/.ssh/id_rsa.pub >> ~/.ssh/authorized_keys

# 权限设置 644
chmod 644 ~/.ssh/authorized_keys
配置yum 源
# 备份现有的repo源
cp /etc/yum.repos.d/CentOS-Base.repo  /etc/yum.repos.d/CentOS-Base.repo.bak

# CentOS基础源
curl -O /etc/yum.repos.d/CentOS-Base.repo https://mirrors.aliyun.com/repo/Centos-7.repo

# 指定系统版本
cat /etc/yum.repos.d/ceph.repo

[ceph]
name=Ceph packages for$basearch
baseurl=https://mirrors.aliyun.com/ceph/rpm-nautilus/el7/$basearch
enabled=1
gpgcheck=1
priority=1
gpgkey=https://mirrors.aliyun.com/ceph/keys/release.asc

[ceph-noarch]
name=Ceph noarchpackages
baseurl=https://mirrors.aliyun.com/ceph/rpm-nautilus/el7/noarch
enabled=1
gpgcheck=1
priority=1
type=rpm-md
gpgkey=https://mirrors.aliyun.com/ceph/keys/release.asc

[ceph-source]
name=Ceph sourcepackages
baseurl=https://mirrors.aliyun.com/ceph/rpm-nautilus/el7/SRPMS
enabled=0
gpgcheck=1
type=rpm-md
gpgkey=https://mirrors.aliyun.com/ceph/keys/release.asc
priority=1


# 刷新 yum
yum clean all
yum makecache

# 安装epel源
yum install -y epel-release
安装ceph-deploy软件包
# yum方式安装
yum install -y ceph-deploy

# 检验版本
ceph-deploy --version

# 如果安装的不是2.0版本,可以直接rpm安装
yum install http://mirrors.aliyun.com/ceph/rpm-nautilus/el7/noarch/ceph-deploy-2.0.1-0.noarch.rpm
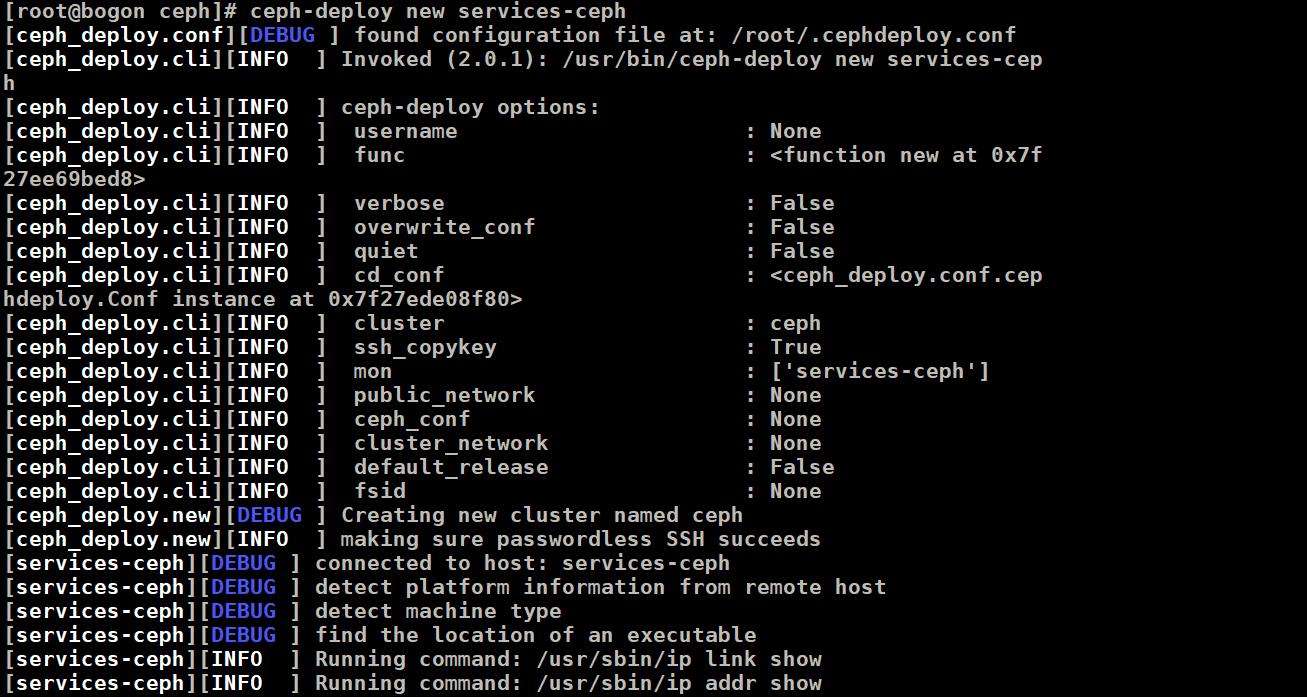
创建ceph集群
# 创建一个目录保存ceph配置及密钥
mkdir -p /data/services/ceph

# 创建ceph cluster集群
cd /data/services/ceph
ceph-deploy new services-ceph
故障问题:若遇到

wget https://pypi.python.org/packages/source/d/distribute/distribute-0.7.3.zip --no-check-certificate
unzip distribute-0.7.3.zip
cd distribute-0.7.3
python setup.py install
检查生成文件
# 检查生成的文件
[root@services-ceph ceph]# ls -l
total 12
-rw-r--r-- 1 root root  204 Apr  2 22:33 ceph.conf
-rw-r--r-- 1 root root 3021 Apr  2 22:33 ceph-deploy-ceph.log
-rw------- 1 root root   73 Apr  2 22:33 ceph.mon.keyring


# 因为是单节点部署,还需要将集群的副本数量设置为1,修改ceph.conf文件。
[root@services-ceph ceph]# echo "osd pool default size = 1" >>  ceph.conf
[root@services-ceph ceph]# echo "osd pool default min size = 1" >>  ceph.conf

# 检查文件
[root@services-ceph ceph]# cat ceph.conf
[global]
fsid = 098f5601-a1f1-4eb4-a150-8db0090bc9d7
mon_initial_members = services-ceph
mon_host = 192.168.11.21
auth_cluster_required = cephx
auth_service_required = cephx
auth_client_required = cephx

osd pool default size = 1
osd pool default min size = 1
安装 ceph 软件
# 安装L版本的软件
yum install -y ceph ceph-radosgw

# 检查安装的版本号
[root@services-ceph yum.repos.d]# rpm -qa | grep ceph
libcephfs2-14.2.22-0.el7.x86_64
ceph-radosgw-14.2.22-0.el7.x86_64
python-ceph-argparse-14.2.22-0.el7.x86_64
ceph-selinux-14.2.22-0.el7.x86_64
ceph-osd-14.2.22-0.el7.x86_64
ceph-deploy-2.0.1-0.noarch
python-cephfs-14.2.22-0.el7.x86_64
ceph-base-14.2.22-0.el7.x86_64
ceph-mgr-14.2.22-0.el7.x86_64
ceph-common-14.2.22-0.el7.x86_64
ceph-mon-14.2.22-0.el7.x86_64
ceph-14.2.22-0.el7.x86_64
ceph-mds-14.2.22-0.el7.x86_64
初始化 mon
## 初始化 monitor
ceph-deploy mon create-initial

## 把配置文件和密钥拷贝到管理节点和Ceph节点
ceph-deploy admin services-ceph

## 确保对秘钥环有权限
chmod +r /etc/ceph/ceph.client.admin.keyring

cp /data/services/ceph/ceph*  /etc/ceph/
chmod +r /etc/ceph/ceph*

# 启动monitor节点后,检查ceph集群
[root@services-ceph ceph]# ceph -s
  cluster:
    id:     098f5601-a1f1-4eb4-a150-8db0090bc9d7
    health: HEALTH_WARN
            mon is allowing insecure global_id reclaim

  services:
    mon: 1 daemons, quorum services-ceph (age 4m)
    mgr: no daemons active
    osd: 0 osds: 0 up, 0 in

  data:
    pools:   0 pools, 0 pgs
    objects: 0 objects, 0 B
    usage:   0 B used, 0 B / 0 B avail
    pgs:
部署mgr
## 部署mgr组件
ceph-deploy mgr create services-ceph

## 查看mgr状态为active
[root@services-ceph ceph]# ceph -s
  cluster:
    id:     098f5601-a1f1-4eb4-a150-8db0090bc9d7
    health: HEALTH_WARN
            OSD count 0 < osd_pool_default_size 1
            mon is allowing insecure global_id reclaim

  services:
    mon: 1 daemons, quorum services-ceph (age 10m)
    mgr: services-ceph(active, since 103s)
    osd: 0 osds: 0 up, 0 in

  data:
    pools:   0 pools, 0 pgs
    objects: 0 objects, 0 B
    usage:   0 B used, 0 B / 0 B avail
    pgs:
部署osd数据节点
## 安装lvm2
yum install -y lvm2

# 创建pv
pvcreate /dev/sdb

# 创建 vg
vgcreate ceph-pool /dev/sdb

# 创建lv,单个osd节点
lvcreate -n osd0 -l 100%FREE ceph-pool

# 使用xfs格式化
mkfs.xfs  /dev/ceph-pool/osd0

# 添加osd节点
ceph-deploy osd create --data /dev/ceph-pool/osd0 services-ceph

# 查看集群状态
[root@services-ceph ceph]# ceph -s
  cluster:
    id:     098f5601-a1f1-4eb4-a150-8db0090bc9d7
    health: HEALTH_WARN
            mon is allowing insecure global_id reclaim

  services:
    mon: 1 daemons, quorum services-ceph (age 71m)
    mgr: services-ceph(active, since 63m)
    osd: 1 osds: 1 up (since 5s), 1 in (since 5s)

  task status:

  data:
    pools:   0 pools, 0 pgs
    objects: 0 objects, 0 B
    usage:   1.0 GiB used, 199 GiB / 200 GiB avail
    pgs:

# 通过ceph osd tree 查看osd的列表情况
[root@services-ceph ceph]# ceph osd tree
ID CLASS WEIGHT  TYPE NAME              STATUS REWEIGHT PRI-AFF
-1       0.00870 root default
-3       0.00870     host services-ceph
 0   hdd 0.00290         osd.0              up  1.00000 1.00000
部署rgw实例
## 部署 rgw 组件
ceph-deploy rgw create services-ceph

##  验证rgb,浏览器访问 http://192.168.11.21:7480/,输出以下内容

This XML file does not appear to have any style information associated with it. The document tree is shown below.
<ListAllMyBucketsResult xmlns="http://s3.amazonaws.com/doc/2006-03-01/">
<Owner>
<ID>anonymous</ID>
<DisplayName/>
</Owner>
<Buckets/>
</ListAllMyBucketsResult>
部署mds实例
## 部署 mds 组件
ceph-deploy mds create services-ceph

##  查看 mds 状态
[root@services-ceph ceph]# ceph mds stat
 1 up:standby
创建ceph的账号
[root@services-ceph ceph]# radosgw-admin user create --uid=admin --display-name=admin --admin
{
    "user_id": "admin",
    "display_name": "admin",
    "email": "",
    "suspended": 0,
    "max_buckets": 1000,
    "subusers": [],
    "keys": [
        {
            "user": "admin",
            "access_key": "******",
            "secret_key": "******"
        }
    ],
    "swift_keys": [],
    "caps": [],
    "op_mask": "read, write, delete",
    "admin": "true",
    "default_placement": "",
    "default_storage_class": "",
    "placement_tags": [],
    "bucket_quota": {
        "enabled": false,
        "check_on_raw": false,
        "max_size": -1,
        "max_size_kb": 0,
        "max_objects": -1
    },
    "user_quota": {
        "enabled": false,
        "check_on_raw": false,
        "max_size": -1,
        "max_size_kb": 0,
        "max_objects": -1
    },
    "temp_url_keys": [],
    "type": "rgw",
    "mfa_ids": []
}
客户端工具
## 安装s3cmd,执行如下命令:
yum install -y s3cmd

## 配置文件,把admin的密钥配置如下
[root@services-ceph ~]# cat .s3cfg
[default]
access_key = ******
secret_key = ******
host_base = 192.168.11.21:7480
host_bucket = 192.168.11.21:7480/%(bucket)
use_https = False

## 执行创建桶操作,如下:
s3cmd mb s3://test

# 查看桶是否创建成功
[root@services-ceph ~]# s3cmd ls
2022-04-02 17:46  s3://test

 浙公网安备 33010602011771号