

1、修改虚拟机CPU
virsh list #查看列表
virsh destroy v-93 #关闭虚拟机
virsh edit v-93 #编辑虚机得xml 文件,修改cpu 配置项

virsh dumpxml v-93 | grep vcpu #查看虚拟机cpu 配置

virsh define /etc/libvirt/qemu/v-93.xml #重新定义加载xml 文件,否则重启后恢复
virsh start v-93 #开启虚拟机
virsh dominfo v-93 #查看虚机信息
2、修改内存
virsh destroy v-93 #关闭虚拟机
virsh edit v-93 #编辑虚机得xml 文件,修改 memory currentMemory配置项
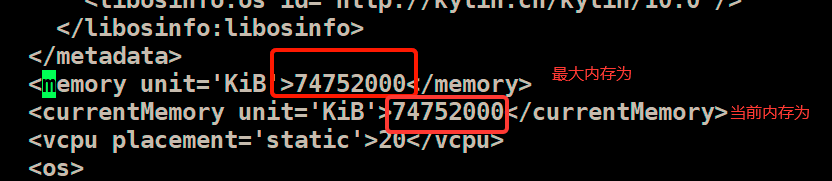
virsh dumpxml v-93 | grep memory #查看虚拟机 memory 配置
virsh define /etc/libvirt/qemu/v-93.xml #重新定义加载xml 文件,否则重启后恢复
virsh start v-93 #开启虚拟机
virsh dominfo v-93 #查看虚机信息
3、扩容磁盘
[root@reg ~]# virsh list
 Id   名称        状态
--------------------------
 1    kylin10.0   运行中
 92   v-94        运行中
 93   v-93        运行中

[root@reg ~]# virsh destroy kylin10.0
域 kylin10.0 被删除

[root@reg ~]# virsh domblklist kylin10.0    #查看磁盘信息
 目标   源
-------------------------------------------------
 vda    /var/lib/libvirt/images/kylin10.0.qcow2
 sda    -

[root@reg ~]# qemu-img info /var/lib/libvirt/images/kylin10.0.qcow2
image: /var/lib/libvirt/images/kylin10.0.qcow2
file format: qcow2
virtual size: 50 GiB (53687091200 bytes)
disk size: 52 GiB
cluster_size: 65536
Format specific information:
    compat: 1.1
    lazy refcounts: true
    refcount bits: 16
    corrupt: false
[root@reg ~]# qemu-img resize /var/lib/libvirt/images/kylin10.0.qcow2 +50G      #扩容
Image resized.
[root@reg ~]# qemu-img info /var/lib/libvirt/images/kylin10.0.qcow2
image: /var/lib/libvirt/images/kylin10.0.qcow2
file format: qcow2
virtual size: 100 GiB (107374182400 bytes)
disk size: 52 GiB
cluster_size: 65536
Format specific information:
    compat: 1.1
    lazy refcounts: true
    refcount bits: 16
    corrupt: false
[root@reg ~]# cd /etc/libvirt/qemu/
[root@reg qemu]# ls
autostart  gs-96.xml  kylin10.0.xml  networks  v-93.xml  v-94.xml
[root@reg qemu]# virsh define kylin10.0.xml         #重新加载xml
定义域 kylin10.0(从 kylin10.0.xml)

[root@reg qemu]# virsh start kylin10.0        #开启虚拟机
域 kylin10.0 已开始
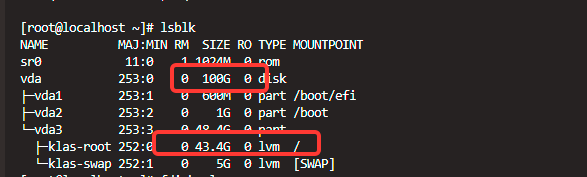
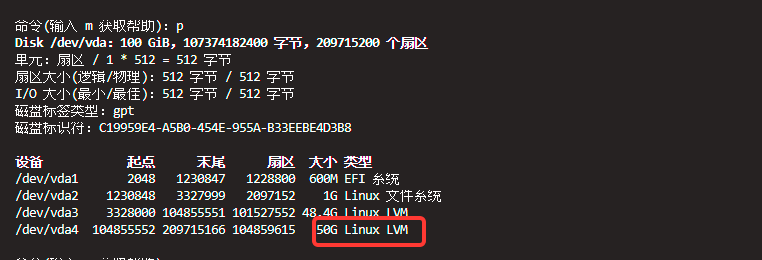
扩容之后显示磁盘大小增加,但未扩容根目录需要手动扩容根目录
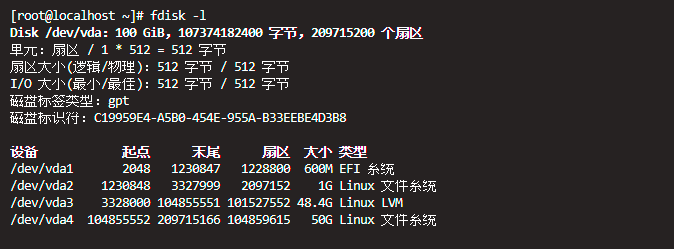
创建分区
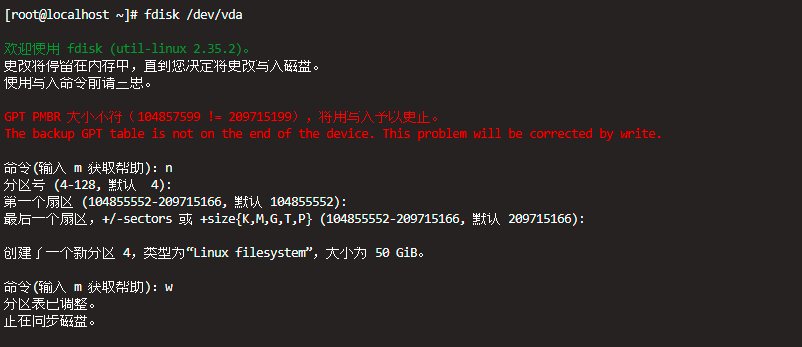
#以上步骤创建完新磁盘分区,下面进行根目录扩容
将新分区格式化为lvm
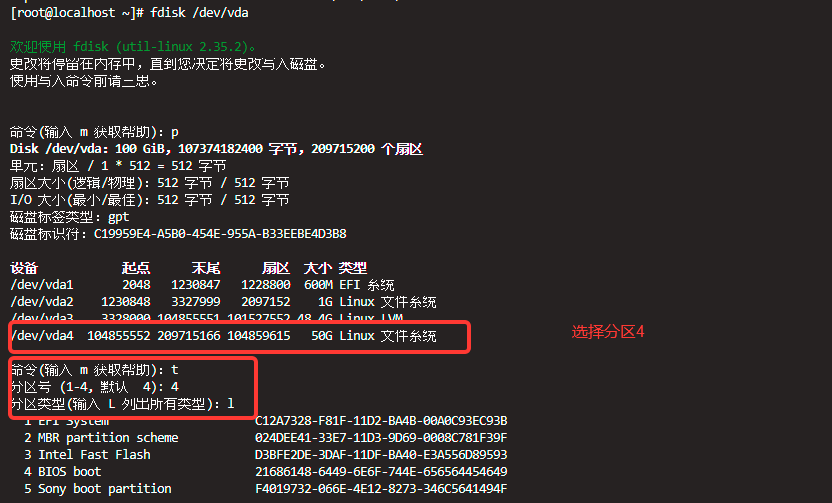
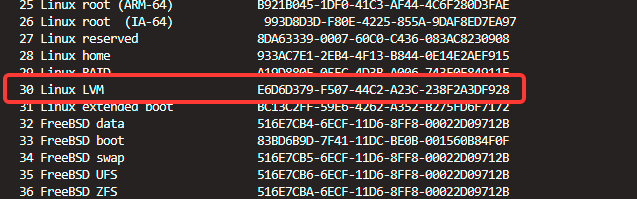
选择好格式 进行格式化

新建PV
[root@localhost ~]# pvcreate /dev/vda4
  Physical volume "/dev/vda4" successfully created.
若提示提示找不到磁盘错误,可以通过命令 partprobe解决,输入partprobe后再次新建
查看VGname
[root@localhost ~]# vgdisplay
  --- Volume group ---
  VG Name               klas
  System ID
  Format                lvm2
  Metadata Areas        1
  Metadata Sequence No  3
  VG Access             read/write
  VG Status             resizable
  MAX LV                0
  Cur LV                2
  Open LV               2
  Max PV                0
  Cur PV                1
  Act PV                1
  VG Size               48.41 GiB
  PE Size               4.00 MiB
  Total PE              12393
  Alloc PE / Size       12393 / 48.41 GiB
  Free  PE / Size       0 / 0
  VG UUID               ZflPIa-PfOo-eodE-gsea-ooki-3OSH-PENnlZ
添加至根目录卷组
[root@localhost ~]# vgextend klas /dev/vda4
  Volume group "klas" successfully extended
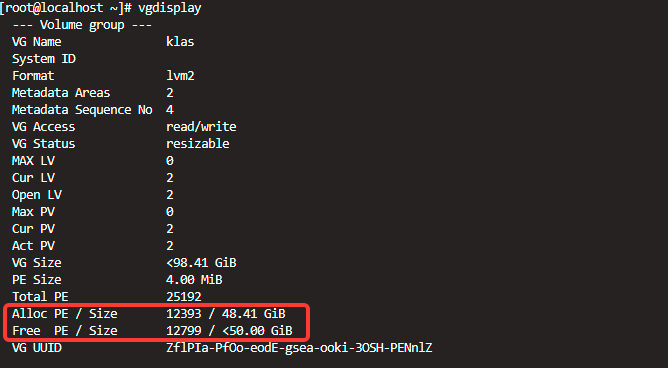
扩容及刷新文件存储
[root@localhost ~]# lvextend -L +40G /dev/mapper/klas-root      #扩容
  Size of logical volume klas/root changed from 43.41 GiB (11113 extents) to 83.41 GiB (21353 extents).
  Logical volume klas/root successfully resized.
[root@localhost ~]# xfs_growfs /dev/mapper/klas-root        #刷新
meta-data=/dev/mapper/klas-root  isize=512    agcount=4, agsize=2844928 blks
         =                       sectsz=512   attr=2, projid32bit=1
         =                       crc=1        finobt=1, sparse=1, rmapbt=0
         =                       reflink=1
data     =                       bsize=4096   blocks=11379712, imaxpct=25
         =                       sunit=0      swidth=0 blks
naming   =version 2              bsize=4096   ascii-ci=0, ftype=1
log      =internal log           bsize=4096   blocks=5556, version=2
         =                       sectsz=512   sunit=0 blks, lazy-count=1
realtime =none                   extsz=4096   blocks=0, rtextents=0
data blocks changed from 11379712 to 21865472
[root@localhost ~]# df -h
1、关闭虚拟机
virsh destroy vm_xxx
2、删除虚拟机
virsh undefine vm_xxx
3、删除该虚拟机用到的img
rm -rf /home/kvm/images/xxx.img
4、删除该虚拟机对应的xml文件
rm -rf /etc/libvirt/qemu/xxx.xml
5、重启服务
systemctl restart libvirtd.service
6、再查看虚拟机还在不在列表
virsh list --all

 浙公网安备 33010602011771号