MATLAB实例:截断坐标轴(Broken Axis)
作者:凯鲁嘎吉 - 博客园 http://www.cnblogs.com/kailugaji/
更多请看:随笔分类 - MATLAB作图
有时候,用MATLAB绘制坐标图时会出现有的曲线值都特别大,有的曲线值都很小,但是又想在同一幅图中将他们展示出来,于是需要截断坐标轴的刻度或者改变纵轴的刻度,使其不均匀。本博客写了截断横坐标纵坐标,以及横纵坐标都截断的实例(基本思路是超过截断位置的曲线通通向下或向左平移,在坐标轴上加双斜杠,最后只截取平移后位置之前的曲线,其余部分抛弃掉),并给出了mathworks上两个函数的实例,同时,纵轴刻度不均匀采用对数刻度来解决,也给出了相应的实例,一起看看效果。
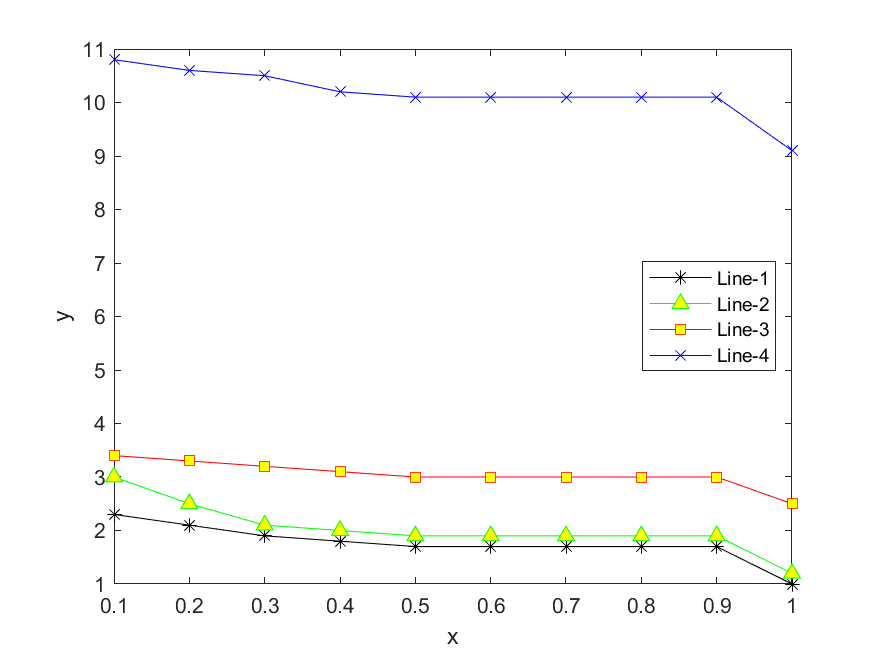
1. 原始图像
clear; clc; close all;
% 作者:凯鲁嘎吉 - 博客园 http://www.cnblogs.com/kailugaji/
% 原始图片
data=[2.3	2.1	1.9	1.8	1.7	1.7	1.7	1.7	1.7	1
3	2.5	2.1	2	1.9	1.9	1.9	1.9	1.9	1.2
3.4	3.3	3.2	3.1	3	3	3	3	3	2.5
10.8	10.6	10.5	10.2	10.1	10.1	10.1	10.1	10.1	9.1
];
x_min=0.1; %横坐标刻度最小值
x_interval=0.1; %横坐标刻度间隔距离
x_max=1; %横坐标刻度最大值

X=x_min:x_interval:x_max;
h=plot(X, data(1, :), 'k*-', X, data(2, :), 'g^-', X, data(3, :), 'r-s', X, data(4, :), 'b-x', 'MarkerFaceColor','y', 'MarkerSize',7);

set(gcf,'color','w') %后面背景变白

xlim([x_min x_max]); %横坐标范围
xlabel('x');
string='y';
ylabel(string);
legend('Line-1', 'Line-2', 'Line-3', 'Line-4', 'Location', 'east');  %图例
saveas(gcf,sprintf('Original image.jpg'),'bmp'); %保存图片
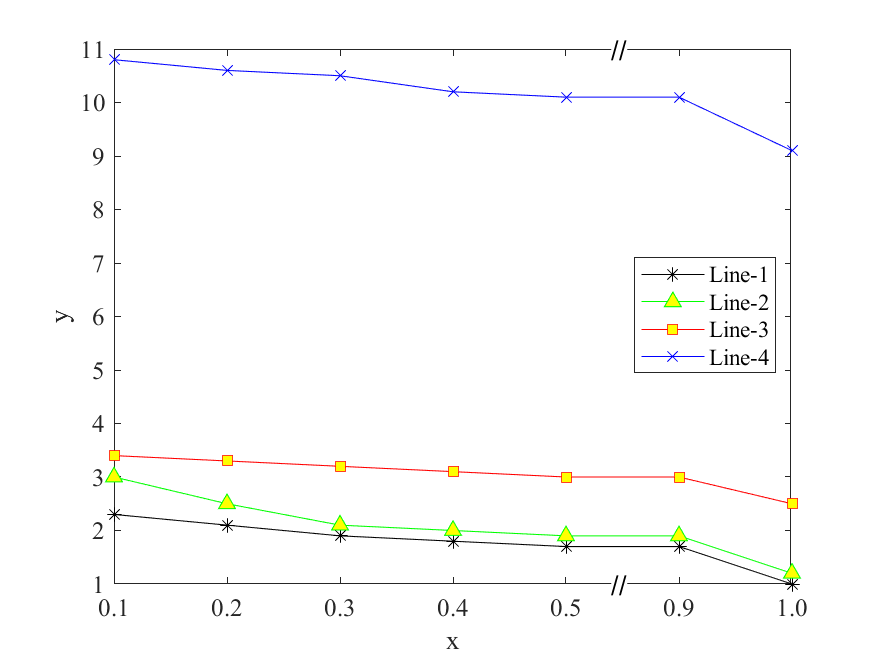
2. 截断横坐标
clear; clc; close all;
% 横轴截断后图像
% 作者:凯鲁嘎吉 - 博客园 http://www.cnblogs.com/kailugaji/
% 数据
format short g
data=[2.3	2.1	1.9	1.8	1.7	1.7	1.7	1.7	1.7	1
3	2.5	2.1	2	1.9	1.9	1.9	1.9	1.9	1.2
3.4	3.3	3.2	3.1	3	3	3	3	3	2.5
10.8	10.6	10.5	10.2	10.1	10.1	10.1	10.1	10.1	9.1
];
% 参数设置
x_min=0.1; %横轴刻度最小值
x_interval=0.1;  %横坐标两个刻度间隔距离
x_break_start=0.5; % 截断的开始值
x_break_end=0.9; % 截断的结束值

x_break_end=x_break_end-x_interval;
x_max=length(data(1, :))*x_interval+x_min-x_interval; %横轴刻度最大值
X=x_min:x_interval:x_max;
adjust_value=0.4*x_interval; %微调截断处x坐标

% 超过截断结束位置的那些曲线统统向左平移uptate_num个长度
data(:, find(abs(X-x_break_start)<eps)+1:(end-round((x_break_end-x_break_start)/x_interval)))=data(:, X>x_break_end+eps);

x_max_new=x_max-x_break_end+x_break_start;
X=x_min:x_interval:x_max_new;
new_range=round(x_max_new/x_interval);
% 根据曲线的个数进行修改,这里曲线是4条
h=plot(X, data(1, 1:new_range), 'k*-', X, data(2, 1:new_range), 'g^-', X, data(3, 1:new_range), 'r-s', X, data(4, 1:new_range), 'b-x', 'MarkerFaceColor','y', 'MarkerSize',7);

set(gcf,'color','w') %后面背景变白

xlim([x_min x_max_new]); %横坐标范围
xlabel('x');
string='y';
ylabel(string);
legend('Line-1', 'Line-2', 'Line-3', 'Line-4',  'Location', 'east');  %图例 根据曲线个数修改

% 横坐标截断设置
xlimit=get(gca,'xlim');
location_X=(x_break_start+adjust_value-xlimit(1))/diff(xlimit);
t1=text(location_X, 0,'//','sc','BackgroundColor','w','margin',eps, 'fontsize',13);
t2=text(location_X, 1,'//','sc','BackgroundColor','w','margin',eps, 'fontsize',13);

% 重新定义横坐标刻度
xtick=x_min:x_interval:x_max_new;
set(gca,'xtick',xtick);
xtick(xtick>x_break_start+eps)=xtick(xtick>x_break_start+eps)+x_break_end-x_break_start;
for i=1:length(xtick)
   xticklabel{i}=sprintf('%.1f',xtick(i));
end
set(gca,'xTickLabel', xticklabel, 'FontSize', 12, 'FontName', 'Times New Roman'); %修改坐标名称、字体
saveas(gcf,sprintf('Break_X_Axis.jpg'),'bmp'); %保存图片
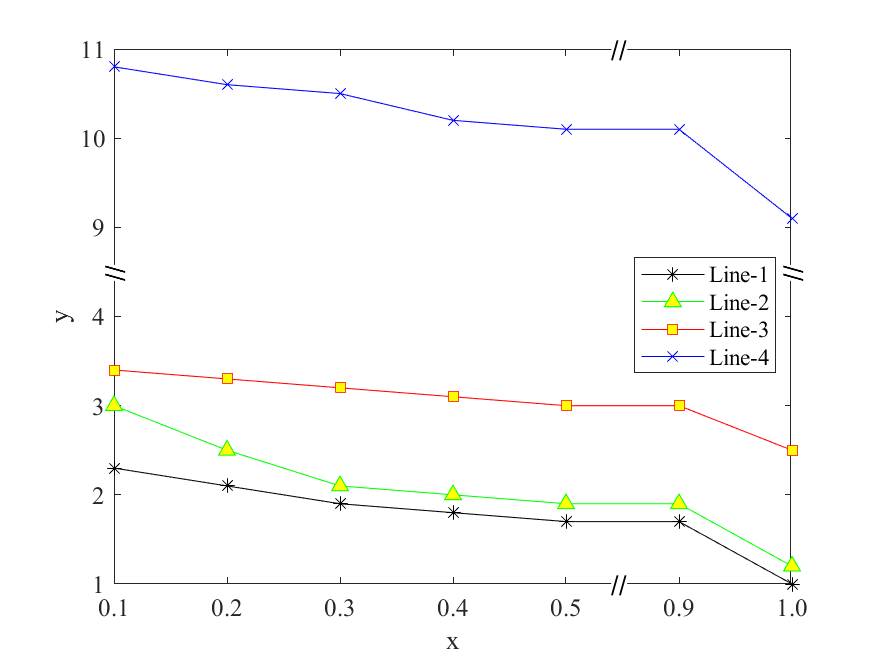
3. 截断纵坐标
clear; clc; close all;
% 纵轴截断后图像
% 作者:凯鲁嘎吉 - 博客园 http://www.cnblogs.com/kailugaji/
% 数据
data=[2.3	2.1	1.9	1.8	1.7	1.7	1.7	1.7	1.7	1
3	2.5	2.1	2	1.9	1.9	1.9	1.9	1.9	1.2
3.4	3.3	3.2	3.1	3	3	3	3	3	2.5
10.8	10.6	10.5	10.2	10.1	10.1	10.1	10.1	10.1	9.1
];
% 参数设置
x_min=0.1; %横坐标刻度最小值
x_interval=0.1; %横坐标刻度间隔距离
x_max=1; %横坐标刻度最大值
y_interval=1;  %纵坐标两个刻度间隔距离
y_max=11; %纵轴刻度最大值
y_break_start=4; % 截断的开始值
y_break_end=9; % 截断的结束值

X=x_min:x_interval:x_max;
adjust_value=0.4*y_interval; %微调截断处y坐标
uptate_num=y_break_end-y_break_start-y_interval; %最高处曲线向下平移大小

% 超过截断结束位置的那些曲线统统向下平移uptate_num个长度
for i=1:length(data(:, 1))
    if data(i, :)>y_break_end
        data(i, :)=data(i, :)-uptate_num;
    end
end

% 根据曲线的个数进行修改,这里曲线是4条
h=plot(X, data(1, :), 'k*-', X, data(2, :), 'g^-', X, data(3, :), 'r-s', X, data(4, :), 'b-x', 'MarkerFaceColor','y', 'MarkerSize',7);

set(gcf,'color','w') %后面背景变白

xlim([x_min x_max]); %横坐标范围
xlabel('x');
string='y';
ylabel(string);
legend('Line-1', 'Line-2', 'Line-3', 'Line-4',  'Location', 'east');  %图例 根据曲线个数修改

% 纵坐标截断设置
ylimit=get(gca,'ylim');
location_Y=(y_break_start+adjust_value-ylimit(1))/diff(ylimit);
t1=text(0, location_Y,'//','sc','BackgroundColor','w','margin',eps, 'fontsize',13);
set(t1,'rotation',90);
t2=text(1, location_Y,'//','sc','BackgroundColor','w','margin',eps, 'fontsize',13);
set(t2,'rotation',90);

% 重新定义纵坐标刻度
ytick=0:y_interval:y_max;
set(gca,'ytick',ytick);
ytick(ytick>y_break_start+eps)=ytick(ytick>y_break_start+eps)+uptate_num;
for i=1:length(ytick)
   yticklabel{i}=sprintf('%d',ytick(i));
end
set(gca,'yTickLabel', yticklabel, 'FontSize', 12, 'FontName', 'Times New Roman'); %修改坐标名称、字体
saveas(gcf,sprintf('Break_Y_Axis.jpg'),'bmp'); %保存图片

4. 截断横纵坐标
clear; clc; close all;
% 横轴截断后图像
% 作者:凯鲁嘎吉 - 博客园 http://www.cnblogs.com/kailugaji/
% 数据
data=[2.3	2.1	1.9	1.8	1.7	1.7	1.7	1.7	1.7	1
3	2.5	2.1	2	1.9	1.9	1.9	1.9	1.9	1.2
3.4	3.3	3.2	3.1	3	3	3	3	3	2.5
10.8	10.6	10.5	10.2	10.1	10.1	10.1	10.1	10.1	9.1
];
% 参数设置
x_min=0.1; %横轴刻度最小值
x_interval=0.1;  %横坐标两个刻度间隔距离
x_break_start=0.5; % 截断的开始值
x_break_end=0.9; % 截断的结束值
y_interval=1;  %纵坐标两个刻度间隔距离
y_max=11; %纵轴刻度最大值
y_break_start=4; % 截断的开始值
y_break_end=9; % 截断的结束值

x_break_end=x_break_end-x_interval;
x_max=length(data(1, :))*x_interval+x_min-x_interval; %横轴刻度最大值
X=x_min:x_interval:x_max;
adjust_value_x=0.4*x_interval; %微调截断处x坐标
adjust_value_y=0.4*y_interval; %微调截断处y坐标
uptate_num=y_break_end-y_break_start-y_interval; %最高处曲线向下平移大小

% 超过截断结束位置的那些曲线统统向左平移uptate_num个长度
data(:, find(abs(X-x_break_start)<eps)+1:(end-round((x_break_end-x_break_start)/x_interval)))=data(:, X>x_break_end+eps);
% 超过截断结束位置的那些曲线统统向下平移uptate_num个长度
for i=1:length(data(:, 1))
    if data(i, :)>y_break_end
        data(i, :)=data(i, :)-uptate_num;
    end
end

x_max_new=x_max-x_break_end+x_break_start;
X=x_min:x_interval:x_max_new;
new_range=round(x_max_new/x_interval);
% 根据曲线的个数进行修改,这里曲线是4条
h=plot(X, data(1, 1:new_range), 'k*-', X, data(2, 1:new_range), 'g^-', X, data(3, 1:new_range), 'r-s', X, data(4, 1:new_range), 'b-x', 'MarkerFaceColor','y', 'MarkerSize',7);

set(gcf,'color','w') %后面背景变白

xlim([x_min x_max_new]); %横坐标范围
xlabel('x');
string='y';
ylabel(string);
legend('Line-1', 'Line-2', 'Line-3', 'Line-4',  'Location', 'east');  %图例 根据曲线个数修改

% 横坐标截断设置
xlimit=get(gca,'xlim');
location_X=(x_break_start+adjust_value_x-xlimit(1))/diff(xlimit);
t1=text(location_X, 0,'//','sc','BackgroundColor','w','margin',eps, 'fontsize',13);
t2=text(location_X, 1,'//','sc','BackgroundColor','w','margin',eps, 'fontsize',13);

% 重新定义横坐标刻度
xtick=x_min:x_interval:x_max_new;
set(gca,'xtick',xtick);
xtick(xtick>x_break_start+eps)=xtick(xtick>x_break_start+eps)+x_break_end-x_break_start;
for i=1:length(xtick)
   xticklabel{i}=sprintf('%.1f',xtick(i));
end

% 纵坐标截断设置
ylimit=get(gca,'ylim');
location_Y=(y_break_start+adjust_value_y-ylimit(1))/diff(ylimit);
t1=text(0, location_Y,'//','sc','BackgroundColor','w','margin',eps, 'fontsize',13);
set(t1,'rotation',90);
t2=text(1, location_Y,'//','sc','BackgroundColor','w','margin',eps, 'fontsize',13);
set(t2,'rotation',90);

% 重新定义纵坐标刻度
ytick=0:y_interval:y_max;
set(gca,'ytick',ytick);
ytick(ytick>y_break_start+eps)=ytick(ytick>y_break_start+eps)+uptate_num;
for i=1:length(ytick)
   yticklabel{i}=sprintf('%d',ytick(i));
end

set(gca,'xTickLabel', xticklabel, 'yTickLabel', yticklabel, 'FontSize', 12, 'FontName', 'Times New Roman'); %修改坐标名称、字体
saveas(gcf,sprintf('Break_X_Y_Axis.jpg'),'bmp'); %保存图片
如果改变截断参数值导致程序运行不出来,多半是逻辑运算符出的Bug,所以我在X>x_break_end+eps这种不等判断后加了eps,等式判断符X==x_break_start出Bug改为(X-x_break_start)<eps。欢迎一起交流学习~
5. 别人家的程序
在mathworks官网找了两个程序,分别截断横坐标与纵坐标,但还没有同时截断这两个的程序。而且,使用了这两个函数之后,图例显式竟然变暗了,不知道是什么原因,一起看看效果。
代码来源:www.mathworks.com/matlabcentral/fileexchange/42905-break-x-axis,www.mathworks.com/matlabcentral/fileexchange/45760-break-y-axis
breakxaxis.m
% breakxaxes splits data in an axes so that data is in a left and right pane.
%
%   breakXAxes(splitXLim) splitXLim is a 2 element vector containing a range
%   of x values from splitXLim(1) to splitXLim(2) to remove from the axes.
%   They must be within the current xLimis of the axes.
%
%   breakXAxes(splitXLim,splitWidth) splitWidth is the distance to
%   seperate the left and right side.  Units are the same as
%   get(AX,'uints') default is 0.015
%
%   breakXAxes(splitXLim,splitWidth,yOverhang) yOverhang stretches the
%   axis split graphic to extend past the top and bottom of the plot by
%   the distance set by YOverhang.  Units are the same as get(AX,'units')
%   default value is 0.015
%
%   breakXAxes(AX, ...) performs the operation on the axis specified by AX
%
function breakInfo = breakxaxis(varargin)

    %Validate Arguements
    if nargin < 1 || nargin > 4
       error('Wrong number of arguements');
    end

    if isscalar(varargin{1}) && ishandle(varargin{1})
        mainAxes = varargin{1};
        argOffset = 1;
        argCnt = nargin - 1;
        if ~strcmp(get(mainAxes,'Type'),'axes')
           error('Handle object must be Type Axes');
        end
    else
        mainAxes = gca;
        argOffset = 0;
        argCnt = nargin;
    end

    if (strcmp(get(mainAxes,'XScale'),'log'))
        error('Log X Axes are not supported');
    end

    if (argCnt < 3)
        yOverhang = 0.015;
    else
        yOverhang = varargin{3 + argOffset};
        if  numel(yOverhang) ~= 1 || ~isreal(yOverhang) || ~isnumeric(yOverhang)
            error('YOverhang must be a scalar number');
        elseif (yOverhang < 0)
            error('YOverhang must not be negative');
        end
        yOverhang = double(yOverhang);
    end

    if (argCnt < 2)
        splitWidth = 0.015;
    else
        splitWidth = varargin{2 + argOffset};
        if  numel(yOverhang) ~= 1 || ~isreal(yOverhang) || ~isnumeric(yOverhang)
            error('splitWidth must be a scalar number');
        elseif (yOverhang < 0)
            error('splitWidth must not be negative');
        end
        splitWidth = double(splitWidth);
    end

    splitXLim = varargin{1 + argOffset};
    if numel(splitXLim) ~= 2 || ~isnumeric(splitXLim) || ~isreal(yOverhang)
       error(splitXLim,'Must be a vector length 2');
    end
    splitXLim = double(splitXLim);

    mainXLim = get(mainAxes,'XLim');
    if (any(splitXLim >= mainXLim(2)) || any(splitXLim <= mainXLim(1)))
       error('splitXLim must be in the range given by get(AX,''XLim'')');
    end

    mainPosition = get(mainAxes,'Position');
    if (splitWidth > mainPosition(3) )
       error('Split width is too large')
    end

    %We need to create 4 axes
    % leftAxes - is used for the left x axis and left pane data
    % rightAxes - is used to the right x axis and right pane data
    % annotationAxes - is used to display the y axis and title
    % breakAxes - this is an axes with the same size and position as main
    %   is it used to draw a seperator between the left and right side


    %Grab Some Parameters from the main axis (e.g the one we are spliting)
    mainXLim = get(mainAxes,'XLim');
    mainYLim = get(mainAxes,'YLim');
    mainPosition = get(mainAxes,'Position');
    mainParent = get(mainAxes,'Parent');
    mainWidth = mainPosition(3); %Positions have the format [left bottom width height]
    %mainXRange = mainXLim(2) - mainXLim(1);
    mainFigure = get(mainAxes,'Parent');
    mainYColor = get(mainAxes,'YColor');
    mainLineWidth = get(mainAxes,'LineWidth');
    figureColor = get(mainFigure,'Color');
    mainYTickLabelMode = get(mainAxes,'YTickLabelMode');
    mainXLabel = get(mainAxes,'XLabel');
    mainXDir = get(mainAxes,'XDir');
    mainLayer = get(mainAxes,'Layer');

    %Save Main Axis Z Order
    figureChildren = get(mainFigure,'Children');
    zOrder = find(figureChildren == mainAxes);

    %Calculate where axesLeft and axesRight will be layed on screen
    %And their respctive XLimits
    leftXLimTemp = [mainXLim(1) splitXLim(1)];
    rightXLimTemp = [splitXLim(2) mainXLim(2)];

    leftXRangeTemp = leftXLimTemp(2) - leftXLimTemp(1);
    rightXRangeTemp = rightXLimTemp(2) - rightXLimTemp(1);

    leftWidthTemp = leftXRangeTemp / (leftXRangeTemp + rightXRangeTemp) * (mainWidth - splitWidth);
    rightWidthTemp = rightXRangeTemp / (leftXRangeTemp + rightXRangeTemp) * (mainWidth - splitWidth);

    leftStretch = (leftWidthTemp + splitWidth/2) / leftWidthTemp;
    leftXRange = leftXRangeTemp * leftStretch;
    leftWidth = leftWidthTemp * leftStretch;

    rightStretch = (rightWidthTemp + splitWidth/2) / rightWidthTemp;
    rightXRange = rightXRangeTemp * rightStretch;
    rightWidth = rightWidthTemp * rightStretch;

    leftXLim = [mainXLim(1) mainXLim(1)+leftXRange];
    rightXLim = [mainXLim(2)-rightXRange mainXLim(2)];

    if (strcmp(mainXDir, 'normal'))
        leftPosition = mainPosition;
        leftPosition(3) = leftWidth;

        rightPosition = mainPosition;
        rightPosition(1) = mainPosition(1) + leftWidth;
        rightPosition(3) = rightWidth;
    else
        %Left Axis will actually go on the right side a vise versa
        rightPosition = mainPosition;
        rightPosition(3) = rightWidth;

        leftPosition = mainPosition;
        leftPosition(1) = mainPosition(1) + rightWidth;
        leftPosition(3) = leftWidth;
    end

    %Create the Annotations layer, if the Layer is top, draw the axes on
    %top (e.g. after) drawing the left and right pane
    if strcmp(mainLayer,'bottom')
        annotationAxes = CreateAnnotaionAxes(mainAxes,mainParent)
    end

    %Create and position the leftAxes. Remove all Y Axis Annotations, the
    %title, and a potentially offensive tick mark
    leftAxes = copyobj(mainAxes,mainParent);
    set(leftAxes,'Position', leftPosition, ...
        'XLim', leftXLim, ...
        'YLim', mainYLim, ...
        'YGrid' ,'off', ...
        'YMinorGrid', 'off', ...
        'YMinorTick','off', ...
        'YTick', [], ...
        'YTickLabel', [], ...
        'box','off');
    if strcmp(mainLayer,'bottom')
        set(leftAxes,'Color','none');
    end
    delete(get(leftAxes,'YLabel'));
    delete(get(leftAxes,'XLabel'));
    delete(get(leftAxes,'Title'));

    if strcmp(mainYTickLabelMode,'auto')
        xTick =  get(leftAxes,'XTick');
        set(leftAxes,'XTick',xTick(1:(end-1)));
    end

    %Create and position the rightAxes. Remove all Y Axis annotations, the
    %title, and a potentially offensive tick mark
    rightAxes = copyobj(mainAxes,mainParent);
    set(rightAxes,'Position', rightPosition, ...
        'XLim', rightXLim, ...
        'YLim', mainYLim, ...
        'YGrid' ,'off', ...
        'YMinorGrid', 'off', ...
        'YMinorTick','off', ...
        'YTick', [], ...
        'YTickLabel', [], ...
        'box','off');
    if strcmp(mainLayer,'bottom')
        set(rightAxes,'Color','none');
    end
    delete(get(rightAxes,'YLabel'));
    delete(get(rightAxes,'XLabel'));
    delete(get(rightAxes,'Title'));

    if strcmp(mainYTickLabelMode,'auto')
        xTick =  get(rightAxes,'XTick');
        set(rightAxes,'XTick',xTick(2:end));
    end

        %Create the Annotations layer, if the Layer is top, draw the axes on
    %top (e.g. after) drawing the left and right pane
    if strcmp(mainLayer,'top')
        annotationAxes = CreateAnnotaionAxes(mainAxes,mainParent);
        set(annotationAxes, 'Color','none');
    end

    %Create breakAxes, remove all graphics objects and hide all annotations
    breakAxes = copyobj(mainAxes,mainParent);
    children = get(breakAxes,'Children');
    for i = 1:numel(children)
       delete(children(i));
    end

    set(breakAxes,'Color','none');
    %Stretch the breakAxes vertically to cover the horzontal axes lines
    orignalUnits = get(breakAxes,'Units');
    set(breakAxes,'Units','Pixel');
    breakPosition = get(breakAxes,'Position');
    nudgeFactor = get(breakAxes,'LineWidth');
    breakPosition(4) = breakPosition(4) +  nudgeFactor;
    set(breakAxes,'Position',breakPosition);
    set(breakAxes,'Units',orignalUnits);

    %Stretch the breakAxes vertically to create an overhang for sylistic
    %effect
    breakPosition = get(breakAxes,'Position');
    breakPosition(2) = breakPosition(2) - yOverhang;
    breakPosition(4) = breakPosition(4) +  2*yOverhang;
    set(breakAxes,'Position',breakPosition);

    %Create a sine shaped patch to seperate the 2 sides
    breakXLim = [mainPosition(1) mainPosition(1)+mainPosition(3)];
    set(breakAxes,'xlim',breakXLim);
    theta = linspace(0,2*pi,100);
    yPoints = linspace(mainYLim(1),mainYLim(2),100);
    amp = splitWidth/2 * 0.9;
    xPoints1 = amp * sin(theta) + mainPosition(1) + leftWidthTemp;
    xPoints2 = amp * sin(theta) + mainPosition(1) + mainPosition(3) - rightWidthTemp;
    patchPointsX = [xPoints1 xPoints2(end:-1:1) xPoints1(1)];
    patchPointsY = [yPoints  yPoints(end:-1:1)  yPoints(1)];
    patch(patchPointsX,patchPointsY ,figureColor,'EdgeColor',figureColor,'Parent',breakAxes);

    %Create A Line To Delineate the left and right edge of the patch
    line('xData',xPoints1,'ydata',yPoints,'Parent',breakAxes,'Color',mainYColor,'LineWidth',mainLineWidth);
    line('xData',xPoints2,'ydata',yPoints,'Parent',breakAxes,'Color',mainYColor,'LineWidth',mainLineWidth);

    set(breakAxes,'Visible','off');

    %Make the old main axes invisiable
    invisibleObjects = RecursiveSetVisibleOff(mainAxes);

    %Preserve the z-order of the figure
    uistack([leftAxes rightAxes breakAxes annotationAxes],'down',zOrder-1)

    %Set the rezise mode to position so that we can dynamically change the
    %size of the figure without screwing things up
    set([leftAxes rightAxes breakAxes annotationAxes],'ActivePositionProperty','Position');

    %Playing with the titles labels etc can cause matlab to reposition
    %the axes in some cases.  Mannually force the position to be correct.
    set([breakAxes annotationAxes],'Position',mainPosition);

    %Save the axes so we can unbreak the axis easily
    breakInfo = struct();
    breakInfo.leftAxes = leftAxes;
    breakInfo.rightAxes = rightAxes;
    breakInfo.breakAxes = breakAxes;
    breakInfo.annotationAxes = annotationAxes;
    breakInfo.invisibleObjects = invisibleObjects;
end

function list = RecursiveSetVisibleOff(handle)
    list = [];
    list = SetVisibleOff(handle,list);

end

function list = SetVisibleOff(handle, list)
    if (strcmp(get(handle,'Visible'),'on'))
        set(handle,'Visible','off');
        list = [list handle];
    end

    children = get(handle,'Children');
    for i = 1:numel(children)
        list = SetVisibleOff(children(i),list);
    end
end

function annotationAxes = CreateAnnotaionAxes(mainAxes,mainParent)

    %Create Annotation Axis, Remove graphics objects, XAxis annotations
    %(except XLabel) and make background transparent
    annotationAxes = copyobj(mainAxes,mainParent);

    set(annotationAxes,'YLimMode','Manual');

    children = get(annotationAxes,'Children');
    for i = 1:numel(children)
       delete(children(i));
    end

    %Save the xLabelpostion because it will move when we delete xAxis
    %ticks
    xLabel = get(annotationAxes,'XLabel');
    xLabelPosition = get(xLabel,'Position');

    set(annotationAxes,'XGrid' ,'off', ...
        'XMinorGrid', 'off', ...
        'XMinorTick','off', ...
        'XTick', [], ...
        'XTickLabel', []);

    %Restore the pevious label postition
    set(xLabel,'Position',xLabelPosition);
end
breakyaxis.m
% breakyaxes splits data in an axes so that data is in a low and high pane.
%
%   breakYAxes(splitYLim) splitYLim is a 2 element vector containing a range
%   of y values from splitYLim(1) to splitYLim(2) to remove from the axes.
%   They must be within the current yLimis of the axes.
%
%   breakYAxes(splitYLim,splitHeight) splitHeight is the distance to
%   seperate the low and high side.  Units are the same as
%   get(AX,'uints') default is 0.015
%
%   breakYAxes(splitYLim,splitHeight,xOverhang) xOverhang stretches the
%   axis split graphic to extend past the top and bottom of the plot by
%   the distance set by XOverhang.  Units are the same as get(AX,'units')
%   default value is 0.015
%
%   breakYAxes(AX, ...) performs the operation on the axis specified by AX
%
% From: https://www.mathworks.com/matlabcentral/fileexchange/45760-break-y-axis?s_tid=srchtitle
% demo: breakyaxis([80 110]);
function breakInfo = breakyaxis(varargin)
    %Validate Arguements
    if nargin < 1 || nargin > 4
       error('Wrong number of arguements');
    end
    if isscalar(varargin{1}) && ishandle(varargin{1})
        mainAxes = varargin{1};
        argOffset = 1;
        argCnt = nargin - 1;
        if ~strcmp(get(mainAxes,'Type'),'axes')
           error('Handle object must be Type Axes');
        end
    else
        mainAxes = gca;
        argOffset = 0;
        argCnt = nargin;
    end

    if (strcmp(get(mainAxes,'XScale'),'log'))
        error('Log X Axes are not supported');
    end

    if (argCnt < 3)
        xOverhang = 0.015;
    else
        xOverhang = varargin{3 + argOffset};
        if  numel(xOverhang) ~= 1 || ~isreal(xOverhang) || ~isnumeric(xOverhang)
            error('XOverhang must be a scalar number');
        elseif (xOverhang < 0)
            error('XOverhang must not be negative');
        end
        xOverhang = double(xOverhang);
    end

    if (argCnt < 2)
        splitHeight = 0.015;
    else
        splitHeight = varargin{2 + argOffset};
        if  numel(xOverhang) ~= 1 || ~isreal(xOverhang) || ~isnumeric(xOverhang)
            error('splitHeight must be a scalar number');
        elseif (xOverhang < 0)
            error('splitHeight must not be negative');
        end
        splitHeight = double(splitHeight);
    end

    splitYLim = varargin{1 + argOffset};
    if numel(splitYLim) ~= 2 || ~isnumeric(splitYLim) || ~isreal(xOverhang)
       error(splitYLim,'Must be a vector length 2');
    end
    splitYLim = double(splitYLim);

    mainYLim = get(mainAxes,'YLim');
    if (any(splitYLim >= mainYLim(2)) || any(splitYLim <= mainYLim(1)))
       error('splitYLim must be in the range given by get(AX,''YLim'')');
    end

    mainPosition = get(mainAxes,'Position');
    if (splitHeight > mainPosition(3) )
       error('Split width is too large')
    end

    %We need to create 4 axes
    % lowAxes - is used for the low y axis and low pane data
    % highAxes - is used to the high y axis and high pane data
    % annotationAxes - is used to display the x axis and title
    % breakAxes - this is an axes with the same size and position as main
    %   is it used to draw a seperator between the low and high side

    %Grab Some Parameters from the main axis (e.g the one we are spliting)
    mainYLim = get(mainAxes,'YLim');
    mainXLim = get(mainAxes,'XLim');
    mainPosition = get(mainAxes,'Position');
    mainParent = get(mainAxes,'Parent');
    mainHeight = mainPosition(4); %Positions have the format [low bottom width height]
    %mainYRange = mainYLim(2) - mainYLim(1);
    mainFigure = get(mainAxes,'Parent');
    mainXColor = get(mainAxes,'XColor');
    mainLineWidth = get(mainAxes,'LineWidth');
    figureColor = get(mainFigure,'Color');
    mainXTickLabelMode = get(mainAxes,'XTickLabelMode');
    mainYLabel = get(mainAxes,'YLabel');
    mainYDir = get(mainAxes,'YDir');
    mainLayer = get(mainAxes,'Layer');

    %Save Main Axis Z Order
    figureChildren = get(mainFigure,'Children');
    zOrder = find(figureChildren == mainAxes);

    %Calculate where axesLow and axesHigh will be layed on screen
    %And their respctive YLimits
    lowYLimTemp = [mainYLim(1) splitYLim(1)];
    highYLimTemp = [splitYLim(2) mainYLim(2)];
    lowYRangeTemp = lowYLimTemp(2) - lowYLimTemp(1);
    highYRangeTemp = highYLimTemp(2) - highYLimTemp(1);
    lowHeightTemp = lowYRangeTemp / (lowYRangeTemp + highYRangeTemp) * (mainHeight - splitHeight);
    highHeightTemp = highYRangeTemp / (lowYRangeTemp + highYRangeTemp) * (mainHeight - splitHeight);
    lowStretch = (lowHeightTemp + splitHeight/2) / lowHeightTemp;
    lowYRange = lowYRangeTemp * lowStretch;
    lowHeight = lowHeightTemp * lowStretch;
    highStretch = (highHeightTemp + splitHeight/2) / highHeightTemp;
    highYRange = highYRangeTemp * highStretch;
    highHeight = highHeightTemp * highStretch;

    lowYLim = [mainYLim(1) mainYLim(1)+lowYRange];
    highYLim = [mainYLim(2)-highYRange mainYLim(2)];

    if (strcmp(mainYDir, 'normal'))
        lowPosition = mainPosition;
        lowPosition(4) = lowHeight;
        highPosition = mainPosition;    %(!!!) look here for position indices!
        highPosition(2) = mainPosition(2) + lowHeight;
        highPosition(4) = highHeight;
    else
        %Low Axis will actually go on the high side a vise versa
        highPosition = mainPosition;
        highPosition(4) = highHeight;
        lowPosition = mainPosition;
        lowPosition(2) = mainPosition(2) + highHeight;
        lowPosition(4) = lowHeight;
    end

    %Create the Annotations layer, if the Layer is top, draw the axes on
    %top (e.g. after) drawing the low and high pane
    if strcmp(mainLayer,'bottom')
        annotationAxes = CreateAnnotaionAxes(mainAxes,mainParent)
    end

    %Create and position the lowAxes. Remove all X Axis Annotations, the
    %title, and a potentially offensive tick mark
    lowAxes = copyobj(mainAxes,mainParent);
    set(lowAxes,'Position', lowPosition, ...
        'YLim', lowYLim, ...
        'XLim', mainXLim, ...
        'XGrid' ,'off', ...
        'XMinorGrid', 'off', ...
        'XMinorTick','off', ...
        'XTick', [], ...
        'XTickLabel', [], ...
        'box','off');
    if strcmp(mainLayer,'bottom')
        set(lowAxes,'Color','none');
    end
    delete(get(lowAxes,'XLabel'));
    delete(get(lowAxes,'YLabel'));
    delete(get(lowAxes,'Title'));

    if strcmp(mainXTickLabelMode,'auto')
        yTick =  get(lowAxes,'YTick');
        set(lowAxes,'YTick',yTick(1:(end-1)));
    end

    %Create and position the highAxes. Remove all X Axis annotations, the
    %title, and a potentially offensive tick mark
    highAxes = copyobj(mainAxes,mainParent);
    set(highAxes,'Position', highPosition, ...
        'YLim', highYLim, ...
        'XLim', mainXLim, ...
        'XGrid' ,'off', ...
        'XMinorGrid', 'off', ...
        'XMinorTick','off', ...
        'XTick', [], ...
        'XTickLabel', [], ...
        'box','off');
    if strcmp(mainLayer,'bottom') %(!!!) is it only about layers?
        set(highAxes,'Color','none');
    end
    delete(get(highAxes,'XLabel'));
    delete(get(highAxes,'YLabel'));
    delete(get(highAxes,'Title'));

    if strcmp(mainXTickLabelMode,'auto')
        yTick =  get(highAxes,'YTick');
        set(highAxes,'YTick',yTick(2:end));
    end
        %Create the Annotations layer, if the Layer is top, draw the axes on
    %top (e.g. after) drawing the low and high pane
    if strcmp(mainLayer,'top')
        annotationAxes = CreateAnnotaionAxes(mainAxes,mainParent);
        set(annotationAxes, 'Color','none');
    end

    %Create breakAxes, remove all graphics objects and hide all annotations
    breakAxes = copyobj(mainAxes,mainParent);
    children = get(breakAxes,'Children');
    for i = 1:numel(children)
       delete(children(i));
    end

    set(breakAxes,'Color','none');
    %Stretch the breakAxes horizontally to cover the vertical axes lines
    orignalUnits = get(breakAxes,'Units');
    set(breakAxes,'Units','Pixel');
    breakPosition = get(breakAxes,'Position');
    nudgeFactor = get(breakAxes,'LineWidth');
    breakPosition(3) = breakPosition(3) +  nudgeFactor;
    set(breakAxes,'Position',breakPosition);
    set(breakAxes,'Units',orignalUnits);
    %Stretch the breakAxes horizontally to create an overhang for sylistic
    %effect
    breakPosition = get(breakAxes,'Position');
    breakPosition(1) = breakPosition(1) - xOverhang;
    breakPosition(3) = breakPosition(3) +  2*xOverhang;
    set(breakAxes,'Position',breakPosition);

    %Create a sine shaped patch to seperate the 2 sides
    breakYLim = [mainPosition(2) mainPosition(2)+mainPosition(4)];
    set(breakAxes,'ylim',breakYLim);
    theta = linspace(0,2*pi,100);
    xPoints = linspace(mainXLim(1),mainXLim(2),100);
    amp = splitHeight/2 * 0.9;
    yPoints1 = amp * sin(theta) + mainPosition(2) + lowHeightTemp;
    yPoints2 = amp * sin(theta) + mainPosition(2) + mainPosition(4) - highHeightTemp;
    patchPointsY = [yPoints1 yPoints2(end:-1:1) yPoints1(1)];
    patchPointsX = [xPoints  xPoints(end:-1:1)  xPoints(1)];
    patch(patchPointsX,patchPointsY ,figureColor,'EdgeColor',figureColor,'Parent',breakAxes); %use of pathc(!!!)?
    %Create A Line To Delineate the low and high edge of the patch
    line('yData',yPoints1,'xdata',xPoints,'Parent',breakAxes,'Color',mainXColor,'LineWidth',mainLineWidth);
    line('yData',yPoints2,'xdata',xPoints,'Parent',breakAxes,'Color',mainXColor,'LineWidth',mainLineWidth);
    set(breakAxes,'Visible','off');

    %Make the old main axes invisiable
    invisibleObjects = RecursiveSetVisibleOff(mainAxes);
    %Preserve the z-order of the figure
    uistack([lowAxes highAxes breakAxes annotationAxes],'down',zOrder-1)

    %Set the rezise mode to position so that we can dynamically change the
    %size of the figure without screwing things up
    set([lowAxes highAxes breakAxes annotationAxes],'ActivePositionProperty','Position');

    %Playing with the titles labels etc can cause matlab to reposition
    %the axes in some cases.  Mannually force the position to be correct.
    set([breakAxes annotationAxes],'Position',mainPosition);

    %Save the axes so we can unbreak the axis easily
    breakInfo = struct();
    breakInfo.lowAxes = lowAxes;
    breakInfo.highAxes = highAxes;
    breakInfo.breakAxes = breakAxes;
    breakInfo.annotationAxes = annotationAxes;
    breakInfo.invisibleObjects = invisibleObjects;
end
function list = RecursiveSetVisibleOff(handle)
    list = [];
    list = SetVisibleOff(handle,list);

end
function list = SetVisibleOff(handle, list)
    if (strcmp(get(handle,'Visible'),'on'))
        set(handle,'Visible','off');
        list = [list handle];
    end

    children = get(handle,'Children');
    for i = 1:numel(children)
        list = SetVisibleOff(children(i),list);
    end
end

function annotationAxes = CreateAnnotaionAxes(mainAxes,mainParent)
    %Create Annotation Axis, Remove graphics objects, YAxis annotations
    %(except YLabel) and make background transparent
    annotationAxes = copyobj(mainAxes,mainParent);

    set(annotationAxes,'XLimMode','Manual');

    children = get(annotationAxes,'Children');
    for i = 1:numel(children)
       delete(children(i));
    end
    %Save the yLabelpostion because it will move when we delete yAxis
    %ticks
    yLabel = get(annotationAxes,'YLabel');
    yLabelPosition = get(yLabel,'Position');

    set(annotationAxes,'YGrid' ,'off', ...
        'YMinorGrid', 'off', ...
        'YMinorTick','off', ...
        'YTick', [], ...
        'YTickLabel', []);

    %Restore the pevious label postition
    set(yLabel,'Position',yLabelPosition);
end
demo.m
clear; clc; close all;
% 纵轴截断后图像
% 作者:凯鲁嘎吉 - 博客园 http://www.cnblogs.com/kailugaji/
% 数据
data=[2.3	2.1	1.9	1.8	1.7	1.7	1.7	1.7	1.7	1
3	2.5	2.1	2	1.9	1.9	1.9	1.9	1.9	1.2
3.4	3.3	3.2	3.1	3	3	3	3	3	2.5
10.8	10.6	10.5	10.2	10.1	10.1	10.1	10.1	10.1	9.1
];
% 参数设置
x_min=0.1; %横坐标刻度最小值
x_interval=0.1; %横坐标刻度间隔距离
x_max=1; %横坐标刻度最大值

X=x_min:x_interval:x_max;
h=plot(X, data(1, :), 'k*-', X, data(2, :), 'g^-', X, data(3, :), 'r-s', X, data(4, :), 'b-x', 'MarkerFaceColor','y', 'MarkerSize',7);

set(gcf,'color','w') %后面背景变白

xlim([x_min x_max]); %横坐标范围
xlabel('x');
string='y';
ylabel(string);
legend('Line-1', 'Line-2', 'Line-3', 'Line-4', 'Location','northoutside', 'NumColumns',4);  %图例
% 调用已有的代码,两个函数只能调用一个,不能同时调用,出错
breakyaxis([4 9]);  % 截断纵坐标
% breakxaxis([0.5 0.9]);  %截断横坐标
saveas(gcf,sprintf('Other_Break_Axis.jpg'),'bmp'); %保存图片


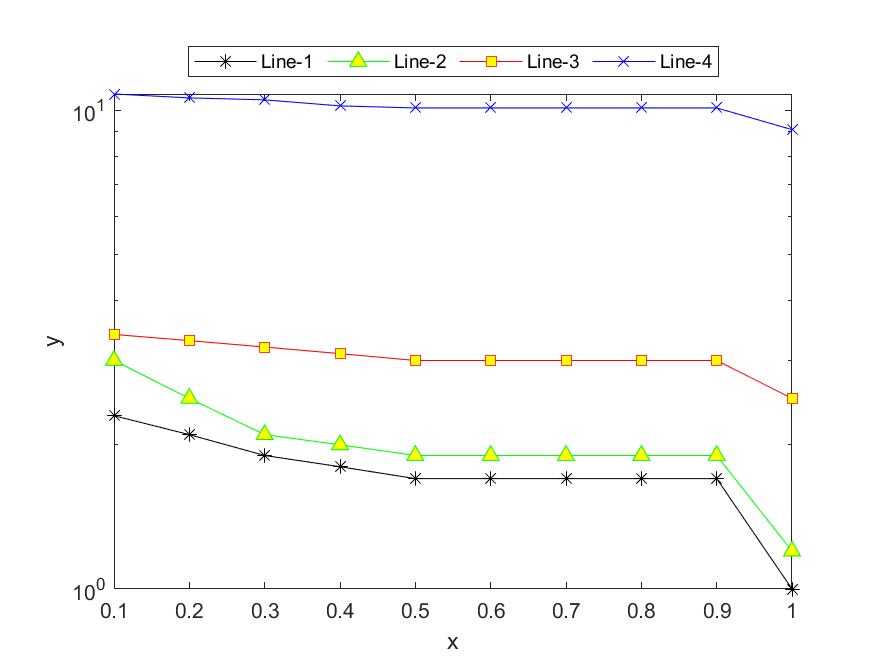
6. 纵轴刻度值不均匀
如果想要纵轴刻度值不均匀,可以在plot();后面加一句set(gca,'yscale','log')即可,但是对于不是对数取值的图像来说,效果并不是很好,如下图。
clear; clc; close all;
% 作者:凯鲁嘎吉 - 博客园 http://www.cnblogs.com/kailugaji/
% 原始图片
data=[2.3	2.1	1.9	1.8	1.7	1.7	1.7	1.7	1.7	1
3	2.5	2.1	2	1.9	1.9	1.9	1.9	1.9	1.2
3.4	3.3	3.2	3.1	3	3	3	3	3	2.5
10.8	10.6	10.5	10.2	10.1	10.1	10.1	10.1	10.1	9.1
];
x_min=0.1; %横坐标刻度最小值
x_interval=0.1; %横坐标刻度间隔距离
x_max=1; %横坐标刻度最大值

X=x_min:x_interval:x_max;
h=plot(X, data(1, :), 'k*-', X, data(2, :), 'g^-', X, data(3, :), 'r-s', X, data(4, :), 'b-x', 'MarkerFaceColor','y', 'MarkerSize',7);
set(gca,'yscale','log')
set(gcf,'color','w') %后面背景变白

xlim([x_min x_max]); %横坐标范围
xlabel('x');
string='y';
ylabel(string);
legend('Line-1', 'Line-2', 'Line-3', 'Line-4', 'Location','northoutside', 'NumColumns',4);  %图例
saveas(gcf,sprintf('Log image.jpg'),'bmp'); %保存图片