
一、什么是缓存穿透
当用户想要查询一个数据,发现redis内存数据库没有,出现缓存未命中,于是转向持久层数据库查询。发现也没有,于是本次查询失败。当用户很多的时候,缓存都没有命中,于是都去请求了持久层数据库,给持久层数据库造成很大的压力,这就是缓存穿透。
于是我们就需要有一个能实现“快速判断是否存在”的方案,在确定不存在时就不在去后台查询数据库了,避免了缓存穿透,布隆过滤器应运而生。
二、什么是布隆过滤器
Bloom Filter是一种空间效率很高的概率型数据结构,它利用位数组很简洁地表示一个集合,并能判断一个元素是否属于这个集合。Bloom Filter的这种高效是有一定代价的:在判断一个元素是否属于某个集合时,有可能会把不属于这个集合的元素误认为属于这个集合(false positive)。因此,Bloom Filter不适合那些“零错误”的应用场合。而在能容忍低错误率的应用场合下,Bloom Filter通过极少的错误换取了存储空间的极大节省。
那么它的诞生契机是什么呢?我们平常在检测集合中是否存在某元素时,都会采用比较的方法。考虑以下情况:
- 如果集合用线性表存储,查找的时间复杂度为O(n)。
- 如果用平衡BST(如AVL树、红黑树)存储,时间复杂度为O(logn)。
- 如果用哈希表存储,并用链地址法与平衡BST解决哈希冲突(参考JDK8的HashMap实现方法),时间复杂度也要有O[log(n/m)],m为哈希分桶数。
三、布隆过滤器原理
BF是由一个长度为m比特的位数组(bit array)与k个哈希函数(hash function)组成的数据结构。位数组均初始化为0,所有哈希函数都可以分别把输入数据尽量均匀地散列。
- 当要插入一个元素时,将其数据分别输入k个哈希函数,产生k个哈希值。以哈希值作为位数组中的下标,将所有k个对应的比特置为1。
- 当要查询(即判断是否存在)一个元素时,同样将其数据输入哈希函数,然后检查对应的k个比特。如果有任意一个比特为0,表明该元素一定不在集合中。如果所有比特均为1,表明该集合有(较大的)可能性在集合中。为什么不是一定在集合中呢?因为一个比特被置为1有可能会受到其他元素的影响,这就是所谓“假阳性”(false positive)。相对地,“假阴性”(false negative)在BF中是绝不会出现的。
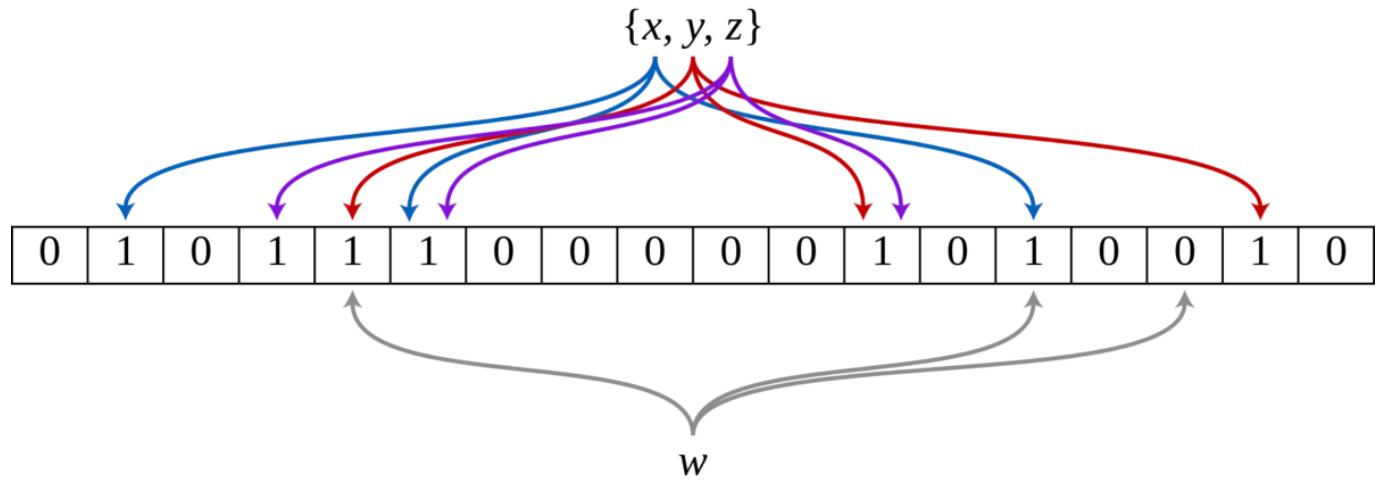
下图示出一个m=18, k=3的BF示例。集合中的x、y、z三个元素通过3个不同的哈希函数散列到位数组中。当查询元素w时,因为有一个比特为0,因此w不在该集合中。
BF的优点是显而易见的:
- 不需要存储数据本身,只用比特表示,因此空间占用相对于传统方式有巨大的优势,并且能够保密数据;
- 时间效率也较高,插入和查询的时间复杂度均为O(k);
- 哈希函数之间相互独立,可以在硬件指令层面并行计算。
但是,它的缺点也同样明显:
- 存在假阳性的概率,不适用于任何要求100%准确率的情境;
- 只能插入和查询元素,不能删除元素,这与产生假阳性的原因是相同的。我们可以简单地想到通过计数(即将一个比特扩展为计数值)来记录元素数,但仍然无法保证删除的元素一定在集合中。
- 哈希函数个数k越多,假阳性概率越低;
- 位数组长度m越大,假阳性概率越低;
- 已插入元素的个数n越大,假阳性概率越高。
四、Guava中的布隆过滤器实现
1、Bloom Filter成员变量
Guava中,布隆过滤器的实现主要涉及到2个类,BloomFilter和BloomFilterStrategies,首先来看一下BloomFilter的成员变量。需要注意的是不同Guava版本的BloomFilter实现不同。
  /** guava实现的以CAS方式设置每个bit位的bit数组 */
  private final LockFreeBitArray bits;
  /** hash函数的个数 */
  private final int numHashFunctions;
  /** guava中将对象转换为byte的通道 */
  private final Funnel<? super T> funnel;
  /**
   * 将byte转换为n个bit的策略,也是bloomfilter hash映射的具体实现
   */
  private final Strategy strategy;
这是它的4个成员变量:
- LockFreeBitArray是定义在BloomFilterStrategies中的内部类,封装了布隆过滤器底层bit数组的操作。
- numHashFunctions表示哈希函数的个数。
- Funnel,它和PrimitiveSink配套使用,能将任意类型的对象转化成Java基本数据类型,默认用java.nio.ByteBuffer实现,最终均转化为byte数组。
- Strategy是布隆过滤器的哈希策略,即数据如何映射到位数组,其具体方法在BloomFilterStrategies枚举中,主要有2个:put和mightContain。
2、Bloom Filter构造
创建布隆过滤器,BloomFilter并没有公有的构造函数,只有一个私有构造函数,而对外它提供了5个重载的create方法,在缺省情况下误判率设定为3%,采用BloomFilterStrategies.MURMUR128_MITZ_64的实现。
  @VisibleForTesting
  static <T> BloomFilter<T> create(
      Funnel<? super T> funnel, long expectedInsertions, double fpp, Strategy strategy) {
    checkNotNull(funnel);
    checkArgument(
        expectedInsertions >= 0, "Expected insertions (%s) must be >= 0", expectedInsertions);
    checkArgument(fpp > 0.0, "False positive probability (%s) must be > 0.0", fpp);
    checkArgument(fpp < 1.0, "False positive probability (%s) must be < 1.0", fpp);
    checkNotNull(strategy);

    if (expectedInsertions == 0) {
      expectedInsertions = 1;
    }
    /*
     * TODO(user): Put a warning in the javadoc about tiny fpp values, since the resulting size
     * is proportional to -log(p), but there is not much of a point after all, e.g.
     * optimalM(1000, 0.0000000000000001) = 76680 which is less than 10kb. Who cares!
     */
    long numBits = optimalNumOfBits(expectedInsertions, fpp);
    int numHashFunctions = optimalNumOfHashFunctions(expectedInsertions, numBits);
    try {
      return new BloomFilter<T>(new LockFreeBitArray(numBits), numHashFunctions, funnel, strategy);
    } catch (IllegalArgumentException e) {
      throw new IllegalArgumentException("Could not create BloomFilter of " + numBits + " bits", e);
    }
  }
该方法接受4个参数:funnel是插入数据的Funnel,expectedInsertions是期望插入的元素总个数n,fpp即期望假阳性率p,strategy即哈希策略。由上可知,位数组的长度m和哈希函数的个数k分别通过optimalNumOfBits()方法和optimalNumOfHashFunctions()方法来估计。
3、估计最优m值和k值
  @VisibleForTesting
  static long optimalNumOfBits(long n, double p) {
    if (p == 0) {
      p = Double.MIN_VALUE;
    }
    return (long) (-n * Math.log(p) / (Math.log(2) * Math.log(2)));
  }

  @VisibleForTesting
  static int optimalNumOfHashFunctions(long n, long m) {
    // (m / n) * log(2), but avoid truncation due to division!
    return Math.max(1, (int) Math.round((double) m / n * Math.log(2)));
  }
以上计算方式是基于推演得出的,此处不再详述。
4、哈希函数
enum BloomFilterStrategies implements BloomFilter.Strategy {
    MURMUR128_MITZ_32() {//....}
    MURMUR128_MITZ_64() {//....}
}
MURMUR128_MITZ_64() {
    @Override
    public <T> boolean put(
        T object, Funnel<? super T> funnel, int numHashFunctions, LockFreeBitArray bits) {
      long bitSize = bits.bitSize();
      // 先利用murmur3 hash对输入的funnel计算得到128位的哈希值,funnel现将object转换为byte数组,
      // 然后在使用哈希函数转换为long
      byte[] bytes = Hashing.murmur3_128().hashObject(object, funnel).getBytesInternal();
      // 根据hash值的高低位算出hash1和hash2
      long hash1 = lowerEight(bytes);
      long hash2 = upperEight(bytes);

      boolean bitsChanged = false;
      // 循环体内采用了2个函数模拟其他函数的思想,相当于每次累加hash2
      long combinedHash = hash1;
      for (int i = 0; i < numHashFunctions; i++) {
        // Make the combined hash positive and indexable
        // 通过基于bitSize取模的方式获取bit数组中的索引,然后调用set函数设置。
        bitsChanged |= bits.set((combinedHash & Long.MAX_VALUE) % bitSize);
        combinedHash += hash2;
      }
      return bitsChanged;
    }

    @Override
    public <T> boolean mightContain(
        T object, Funnel<? super T> funnel, int numHashFunctions, LockFreeBitArray bits) {
      long bitSize = bits.bitSize();
      byte[] bytes = Hashing.murmur3_128().hashObject(object, funnel).getBytesInternal();
      long hash1 = lowerEight(bytes);
      long hash2 = upperEight(bytes);

      long combinedHash = hash1;
      for (int i = 0; i < numHashFunctions; i++) {
        // Make the combined hash positive and indexable
        // 和put的区别就在这里,从set转换为get,来判断是否存在
        if (!bits.get((combinedHash & Long.MAX_VALUE) % bitSize)) {
          return false;
        }
        combinedHash += hash2;
      }
      return true;
    }

    private /* static */ long lowerEight(byte[] bytes) {
      return Longs.fromBytes(
          bytes[7], bytes[6], bytes[5], bytes[4], bytes[3], bytes[2], bytes[1], bytes[0]);
    }

    private /* static */ long upperEight(byte[] bytes) {
      return Longs.fromBytes(
          bytes[15], bytes[14], bytes[13], bytes[12], bytes[11], bytes[10], bytes[9], bytes[8]);
    }
  };
其中put()方法负责向布隆过滤器中插入元素,mightContain()方法负责判断元素是否存在。以put()方法为例讲解一下流程吧。
- 使用MurmurHash算法对funnel的输入数据进行散列,得到128bit(16B)的字节数组。
- 取低8字节作为第一个哈希值hash1,取高8字节作为第二个哈希值hash2。
- 进行k次循环,每次循环都用hash1与hash2的复合哈希做散列,然后对m取模,将位数组中的对应比特设为1。
这里需要注意两点:
-
在循环中实际上应用了双重哈希(double hashing)的思想,即可以用两个哈希函数来模拟k个,其中i为步长:
![]()
这种方法在开放定址的哈希表中,也经常用来减少冲突。
- 哈希值有可能为负数,而负数是不能在位数组中定位的。所以哈希值需要与Long.MAX_VALUE做bitwise AND,直接将其最高位(符号位)置为0,就变成正数了。
put方法中,先是将索引位置上的二进制置为1,然后用bitsChanged记录插入结果,如果返回true表明没有重复插入成功,而mightContain方法则是将索引位置上的数值取出,并判断是否为0,只要其中出现一个0,那么立即判断为不存在。5、位数组具体实现
Guava为了提供效率,自己实现了LockFreeBitArray来提供bit数组的无锁设置和读取,我们来看看LockFreeBitArray类的部分代码:
static final class LockFreeBitArray {
    private static final int LONG_ADDRESSABLE_BITS = 6;
    final AtomicLongArray data;
    private final LongAddable bitCount;

    LockFreeBitArray(long bits) {
      this(new long[Ints.checkedCast(LongMath.divide(bits, 64, RoundingMode.CEILING))]);
    }

    // Used by serialization
    LockFreeBitArray(long[] data) {
      checkArgument(data.length > 0, "data length is zero!");
      this.data = new AtomicLongArray(data);
      this.bitCount = LongAddables.create();
      long bitCount = 0;
      for (long value : data) {
        bitCount += Long.bitCount(value);
      }
      this.bitCount.add(bitCount);
    }

    /** Returns true if the bit changed value. */
    boolean set(long bitIndex) {
      if (get(bitIndex)) {
        return false;
      }

      int longIndex = (int) (bitIndex >>> LONG_ADDRESSABLE_BITS);
      long mask = 1L << bitIndex; // only cares about low 6 bits of bitIndex

      long oldValue;
      long newValue;
      // 经典的CAS自旋重试机制
      do {
        oldValue = data.get(longIndex);
        newValue = oldValue | mask;
        if (oldValue == newValue) {
          return false;
        }
      } while (!data.compareAndSet(longIndex, oldValue, newValue));

      // We turned the bit on, so increment bitCount.
      bitCount.increment();
      return true;
    }

    boolean get(long bitIndex) {
      return (data.get((int) (bitIndex >>> 6)) & (1L << bitIndex)) != 0;
    }
    // ....
}
它是采用原子类型AtomicLongArray作为位数组的存储的,确实不需要加锁。另外还有一个Guava中特有的LongAddable类型的计数器,用来统计置为1的比特数。
采用AtomicLongArray除了有并发上的优势之外,更主要的是它可以表示非常长的位数组。一个长整型数占用64bit,因此data[0]可以代表第0~63bit,data[1]代表64~127bit,data[2]代表128~191bit……依次类推。这样设计的话,将下标i无符号右移6位就可以获得data数组中对应的位置,再在其基础上左移i位就可以取得对应的比特了。
上面的代码中用到了Long.bitCount()方法计算long型二进制表示中1的数量:
 public static int bitCount(long i) {
    // HD, Figure 5-14
    i = i - ((i >>> 1) & 0x5555555555555555L);
    i = (i & 0x3333333333333333L) + ((i >>> 2) & 0x3333333333333333L);
    i = (i + (i >>> 4)) & 0x0f0f0f0f0f0f0f0fL;
    i = i + (i >>> 8);
    i = i + (i >>> 16);
    i = i + (i >>> 32);
    return (int)i & 0x7f;
 }
五、Redis实现布隆过滤器
上面使用guava实现布隆过滤器是把数据放在本地内存中,无法实现布隆过滤器的共享,我们还可以把数据放在redis中,用 redis来实现布隆过滤器,我们要使用的数据结构是bitmap,你可能会有疑问,redis支持五种数据结构:String,List,Hash,Set,ZSet,没有bitmap呀。没错,实际上bitmap的本质还是String。
要用redis来实现布隆过滤器,我们需要自己设计映射函数,自己度量二进制向量的长度。
public class RedisMain {
    static final int expectedInsertions = 100;//要插入多少数据
    static final double fpp = 0.01;//期望的误判率

    //bit数组长度
    private static long numBits;

    //hash函数数量
    private static int numHashFunctions;

    static {
        numBits = optimalNumOfBits(expectedInsertions, fpp);
        numHashFunctions = optimalNumOfHashFunctions(expectedInsertions, numBits);
    }

    public static void main(String[] args) {
        Jedis jedis = new Jedis("127.0.0.1", 6379);
        for (int i = 0; i < 100; i++) {
            long[] indexs = getIndexs(String.valueOf(i));
            for (long index : indexs) {
                jedis.setbit("codebear:bloom", index, true);
            }
        }
        for (int i = 0; i < 100; i++) {
            long[] indexs = getIndexs(String.valueOf(i));
            for (long index : indexs) {
                Boolean isContain = jedis.getbit("codebear:bloom", index);
                if (!isContain) {
                    System.out.println(i + "肯定没有重复");
                }
            }
            System.out.println(i + "可能重复");
        }
    }

    /**
     * 根据key获取bitmap下标
     */
    private static long[] getIndexs(String key) {
        long hash1 = hash(key);
        long hash2 = hash1 >>> 16;
        long[] result = new long[numHashFunctions];
        for (int i = 0; i < numHashFunctions; i++) {
            long combinedHash = hash1 + i * hash2;
            if (combinedHash < 0) {
                combinedHash = ~combinedHash;
            }
            result[i] = combinedHash % numBits;
        }
        return result;
    }

    private static long hash(String key) {
        Charset charset = Charset.forName("UTF-8");
        return Hashing.murmur3_128().hashObject(key, Funnels.stringFunnel(charset)).asLong();
    }

    //计算hash函数个数
    private static int optimalNumOfHashFunctions(long n, long m) {
        return Math.max(1, (int) Math.round((double) m / n * Math.log(2)));
    }

    //计算bit数组长度
    private static long optimalNumOfBits(long n, double p) {
        if (p == 0) {
            p = Double.MIN_VALUE;
        }
        return (long) (-n * Math.log(p) / (Math.log(2) * Math.log(2)));
    }
}

 浙公网安备 33010602011771号