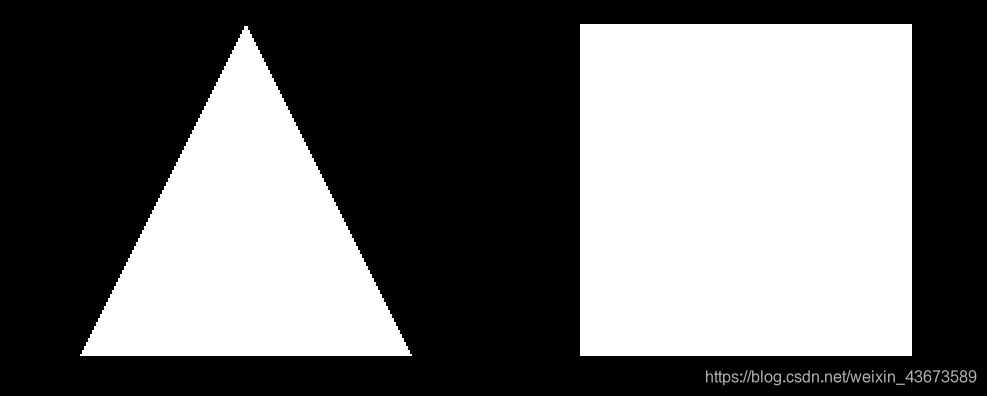
一、解释以下几个函数的作用及各参数的意义:
glVertex3f 指定顶点的值
glColor3f 设置颜色
glLineWidth 设置线段的宽度
glutInitWindowSize 设置初始窗口的大小
glutInitWindowPosition 设置初始窗口的位置
注:窗口左上角相对于桌面坐标(x,y)
若为(0,0),则窗口左上角位于桌面左上角
glLoadIdentity()坐标系的原点移动到屏幕中心
OpenGL坐标轴:
1X坐标轴从左至右,Y坐标轴从下至上,Z坐标轴从里至外。
2OpenGL屏幕中心的坐标值是X和Y轴上的0.0f点。
3中心左面的坐标值是负值,右面是正值。 移向屏幕顶端是正值,移向屏幕底端是负值。 移入屏幕深处是负值,移出屏幕则是正值。
分析以下两个函数的区别:
glVertex3f(float x, float y, float z);
glVertex2f(float x, float y);
数字表示参数的个数以及对应的维数。
字母表示参数的类型:
s表示16位整数(OpenGL中将这个类型定义为GLshort),
i表示32位整数(OpenGL中将这个类型定义为GLint和GLsizei),
f表示32位浮点数(OpenGL中将这个类型定义为GLfloat和GLclampf),
d表示64位浮点数(OpenGL中将这个类型定义为GLdouble和GLclampd)。
v表示传递的几个参数将使用指针的方式。
二、说明如何利用glut进行OpenGL应用程序的窗口及输入、输出管理:
窗口管理:
使用glut绘制图像,在main函数中需要执行这七个最基本的步骤:
1 初始化
glutInit(&argc, argv);
234 设定窗口位置、窗口大小、显示模式
glutInitWindowPosition(100, 100);
glutInitWindowSize(500,500);
glutInitDisplayMode(GLUT_SINGLE | GLUT_RGB);
5 创建窗口并设定窗口名
glutCreateWindow("窗口名");
6 调用外部函数进行绘制
glutDisplayFunc(display函数名);
7 进入主循环
glutMainLoop();
输入:
void glutMouseFunc(void(*func)(int button,int state,int x,int y));第一个参数表明哪个鼠标键被按下或松开
第二个参数表明,函数被调用发生时,鼠标键的状态,也就是被按下,或松开
键盘和鼠标的输入,可以通过下面两个函数来设置
void
glutKeyboardFunc(void (*func)(unsigned charkey, intx, inty))void
glutMouseFunc(void (*func)(intbutton, intstate, intx, inty))
key为键盘按键的ASCII码
xy都表示鼠标的位置,
button为GLUT_LEFT_BUTTON或GLUT_RIGHT_BUTTON,分别表示左右按键。
state为按键的状态,若为按下则为GLUT_DOWN当鼠标移动式我们还可以通过下面的函数来设置鼠标移动消息的处理函数
void
glutMotionFunc(void (*func)(intx, inty))X,Y仍然为鼠标的位置
输出:
鼠标事件的声明
glutMouseFunc(mouseDown);
创建窗口
glutCreateWindow(“Chuangkou”);
显示回调
glutDisplayFunc(display);
鼠标回调
glutMouseFunc(mouseDown);
三、分别展示对三个代码的修改,以及执行结果,对比与原来代码执行结果的不同,并说明原因(展示2-3个即可):
代码1 aim
display函数中用到的各函数功能解析:
glClear把窗口清除为黑色
glColor3f(R, G, B)设定RGB颜色
glColor4f(R, G, B, A)设定RGBA颜色
glEnalbe(GL_CULL_FACE)启用功能:剔除操作效果
glLoadIdentity()坐标系的原点移动到屏幕中心
glTranslatef相对于当前屏幕位置移动(将绘点坐标的原点在当前原点的基础上平移一个(x,y,z)向量)
glBegin(GL_TRIANGLES)开始绘制:三角形
glVertex3f(x,y,z)依次设定待绘制图像各点的坐标:三角形,就调用三次
glEnd();结束绘制(begin与end配对使用)
glFrontFace(方向)设定正面方向GL_CCW为逆时针GL_CW为顺时针
CCW即CounterClockWise,逆时针
CW即ClockWise,顺时针
glFlush()强制刷新缓冲,保证绘图命令将被执行
aim的展示代码
void display(void)
{
    glClear(GL_COLOR_BUFFER_BIT);
    glColor3f (1.0, 1.0, 1.0);
	//about front and back facing facets and facet cullig
//  	glCullFace(GL_BACK);
// 	glCullFace(GL_FRONT);
  	glEnable(GL_CULL_FACE);
    glLoadIdentity ();
/*	glTranslatef() as viewing transformation	*/
    glTranslatef(-1.5f,0.0f,-15.0f);
	glBegin(GL_TRIANGLES); // Drawing Using Triangles
	glVertex3f( 0.0f, 1.0f, 0.0f); // Top
	glVertex3f(-1.0f,-1.0f, 0.0f); // Bottom Left
	glVertex3f( 1.0f,-1.0f, 0.0f); // Bottom Right
	glEnd();
	//definition of front facing polygon
 	glFrontFace(GL_CW);
    glTranslatef(3.0f,0.0f,0.0f);
	glBegin(GL_QUADS); // Draw A Quad
	glVertex3f(-1.0f, 1.0f, 0.0f); // Top Left
	glVertex3f( 1.0f, 1.0f, 0.0f); // Top Right
	glVertex3f( 1.0f,-1.0f, 0.0f); // Bottom Right
	glVertex3f(-1.0f,-1.0f, 0.0f); // Bottom Left
	glEnd(); // Done Drawing The Quad

    glFlush();
}
aim的初始效果

更改参数(控制变量,一次只改一个参数)
glVertex3f( 0.0f, 2.0f, 0.0f); // Top

glFrontFace(GL_CCW);
顶点标识顺序不一致,则会看到背面,无法显示图形。

glVertex3f( 2.0f, 1.0f, 0.0f); // Top Right

代码2 cube
display函数中用到的各函数功能解析:
glScalef(x,y,z)将图像按x,y,z方向分别拉伸对应的倍数
glutWireCube(尺寸)生成一个线框立方体
glutSolidCube(尺寸)生成一个实体立方体
//先清屏
    glClear(GL_COLOR_BUFFER_BIT);
    glColor3f (1.0, 1.0, 1.0);
	//把栈顶矩阵变成单位矩阵
    glLoadIdentity ();	/*  clear the matrix	*/
//--------------- you can define your own transformation-----------
    glTranslatef (0.0, 0.0, -5.0);
    glScalef (1.0, 2.0, 1.0);

//---------------- you can draw something else here-----------
	//画一个立方体 、
    glutWireCube (1.0);  /*  draw the cube	*/
    glFlush();
cube原效果

glutSolidCube (1.0)

代码3 cube
display函数中用到的各函数功能解析:
glLineStipple()设置直线的点画模式
glEnable()开启直线的点画功能
drawOneLine (x1,y1,x2,y2)绘制一条直线
例如:
glLineStipple(1, 0x3F07);
glEnable(GL_LINE_STIPPLE);
此时模式为Ox3F07(二进制形式为0011111100000111),它所画出来的直线是这样的:先连续绘制3个像素,然后连续5个像素留空,再连续绘制6个像素,最后两个像素留空(注意,首先是从低位开始的)。如果factor是2,那么这个模式便被扩展为:先连续绘制6个像素,然后连续10个像素留空,再连续绘制12个像素,最后4个像素留空。
如果没有启用点画线功能,OpenGL会自动把pattern当做为OxFFFF,把factor当成1。
运用到的绘制模式:
GL_LINE_STIPPLE
GL_LINE_STRIP
    int i;

    glClear (GL_COLOR_BUFFER_BIT);
/*  draw all lines in white	*/
    glColor3f (1.0, 1.0, 1.0);

/*  in 1st row, 3 lines drawn, each with a different stipple	*/
    glEnable (GL_LINE_STIPPLE);
    glLineStipple (1, 0x0101);	/*  dotted	*/
    drawOneLine (50.0, 125.0, 150.0, 125.0);
    glLineStipple (1, 0x00FF);	/*  dashed	*/
    drawOneLine (150.0, 125.0, 250.0, 125.0);
    glLineStipple (1, 0x1C47);	/*  dash/dot/dash	*/
    drawOneLine (250.0, 125.0, 350.0, 125.0);

/*  in 2nd row, 3 wide lines drawn, each with different stipple	*/
    glLineWidth (5.0);
    glLineStipple (1, 0x0101);
    drawOneLine (50.0, 100.0, 150.0, 100.0);
    glLineStipple (1, 0x00FF);
    drawOneLine (150.0, 100.0, 250.0, 100.0);
    glLineStipple (1, 0x1C47);
    drawOneLine (250.0, 100.0, 350.0, 100.0);
    glLineWidth (1.0);

/*  in 3rd row, 6 lines drawn, with dash/dot/dash stipple,	*/
/*  as part of a single connect line strip			*/
    glLineStipple (1, 0x1C47);
    glBegin (GL_LINE_STRIP);
    for (i = 0; i < 7; i++)
	glVertex2f (50.0 + ((GLfloat) i * 50.0), 75.0);
    glEnd ();

/*  in 4th row, 6 independent lines drawn,	*/
/*  with dash/dot/dash stipple			*/
    for (i = 0; i < 6; i++) {
	drawOneLine (50.0 + ((GLfloat) i * 50.0),
	    50.0, 50.0 + ((GLfloat)(i+1) * 50.0), 50.0);
    }

/*  in 5th row, 1 line drawn, with dash/dot/dash stipple	*/
/*  and repeat factor of 5			*/
    glLineStipple (5, 0x1C47);
    drawOneLine (50.0, 25.0, 350.0, 25.0);
    glFlush ();

第一行

/*  in 1st row, 3 lines drawn, each with a different stipple	*/
    glEnable (GL_LINE_STIPPLE);
    glLineStipple (1, 0x0101);	/*  dotted	*/
    drawOneLine (50.0, 125.0, 150.0, 125.0);
    glLineStipple (1, 0x00FF);	/*  dashed	*/
    drawOneLine (150.0, 125.0, 250.0, 125.0);
    glLineStipple (1, 0x1C47);	/*  dash/dot/dash	*/
    drawOneLine (250.0, 125.0, 350.0, 125.0);
glLineStipple (3, 0x0101)

第二行

/*  in 2nd row, 3 wide lines drawn, each with different stipple	*/
    glLineWidth (5.0);
    glLineStipple (1, 0x0101);
    drawOneLine (50.0, 100.0, 150.0, 100.0);
    glLineStipple (1, 0x00FF);
    drawOneLine (150.0, 100.0, 250.0, 100.0);
    glLineStipple (1, 0x1C47);
    drawOneLine (250.0, 100.0, 350.0, 100.0);
    glLineWidth (1.0);
glLineWidth (10.0)

第三行

/*  in 3rd row, 6 lines drawn, with dash/dot/dash stipple,	*/
/*  as part of a single connect line strip			*/
    glLineStipple (1, 0x1C47);
    glBegin (GL_LINE_STRIP);
    for (i = 0; i < 7; i++)
	glVertex2f (50.0 + ((GLfloat) i * 50.0), 75.0);
    glEnd ();
glVertex2f (50.0 + ((GLfloat) i * 25.0), 75.0)

第四行

/*  in 4th row, 6 independent lines drawn,	*/
/*  with dash/dot/dash stipple			*/
    for (i = 0; i < 6; i++) {
	drawOneLine (50.0 + ((GLfloat) i * 50.0),
	    50.0, 50.0 + ((GLfloat)(i+1) * 50.0), 50.0);
    }
drawOneLine (50.0 + ((GLfloat) i * 1.0), 50.0, 50.0 + ((GLfloat)(i+1) * 50), 50.0)

第五行

/*  in 5th row, 1 line drawn, with dash/dot/dash stipple	*/
/*  and repeat factor of 5			*/
    glLineStipple (5, 0x1C47);
    drawOneLine (50.0, 25.0, 350.0, 25.0);
glLineStipple (20, 0x1C47);


