1.原生去除右边的滚动条
::-webkit-scrollbar{width:0;height:1px}
    ::-webkit-scrollbar-thumb{border-radius:5px;-webkit-box-shadow:inset 0 0 5px rgba(0,0,0,.2);background:rgba(0,0,0,.2)}
2.vue阻止事件冒泡,比如只要父元素有点击效果(或者子让子元素执行自己的方法)
<div class="activity"       v-on:click.self="switchoverOnn">
       点击三号
     <div v-show="showOnnn">cccc</div>
   </div>
给子元素阻止冒泡
<span @click.stop="funcSon">删除</span>
3.文字中间加一条线
text-decoration:line-through
6.url里面得参数用this.$route.query + 参数名字
7.移动端消除300毫秒的方法

路由的简单配置方法

10.文字超出省略号
overflow: hidden;text-overflow:ellipsis;white-space: nowrap;
多行省略号
display: -webkit-box;
                    -webkit-box-orient: vertical;
                    -webkit-line-clamp: 5;  //第几行
                    overflow: hidden;
11.四个角的border-radius
 border-top-left-radius:20px;border-top-right-radius:20px;
 border-bottom-right-radius:20px;border-bottom-left-radius:20px;
12封装全局使用方法的方式 ,闯将utils文件夹 里面创建index文件,还有根据自己想要的功能创建其他js文件, index.js就是把方法其他公共方法文件引入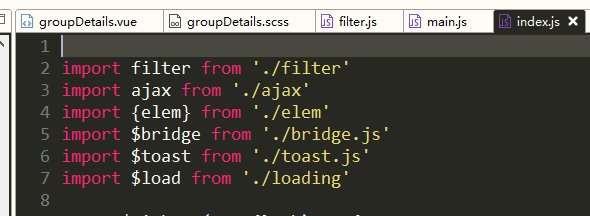
再导出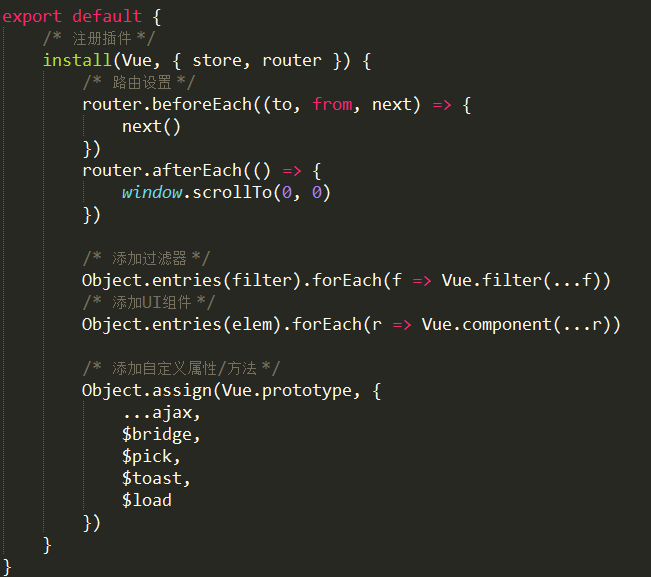 ,再min。js
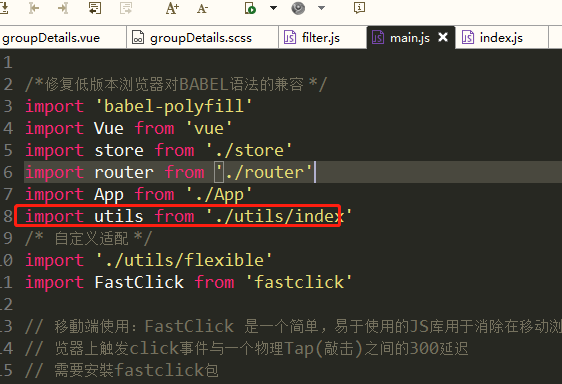 使用就变成全局公共方法了
13.封装一个过滤器(公共方法)
再utils文件里面创建一个filter.js然后 在导出
在导出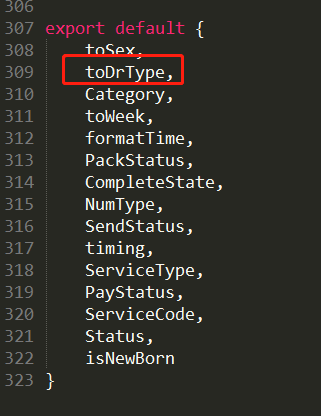 之后就和上面的差不多, 使用方法
14.在标签内容里卖用三元运算符 和绑定img的src地址
{{i.IsCaptain == 0? '团队长' : '团员'}}

15实现地址引入封装

16.拨打电话 ,发送短信

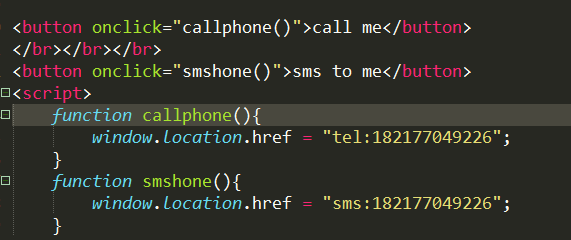 点击按钮实现拨号
17.本地使用node起一个服务器
首先安装node然后安装镜像文件
npm install http-server -g(windows下)
sudo npm install http-server -g(linux和mac下)
cd 文件夹名字
http-server   //起服务指令
18.vue子传父
this.$emit('searchValue',value) //子级通过发送
父级通过
@searchValue="searchValue" //然后再methods里面定义searchValue方法
searchValue:function(value){   //搜索请求
			this.searchValueo = value;
			this.$post('PlatFormAPI/NetHospital/GetNetHospitals',{SortType:this.searchValueo}).then( o =>{
				//console.log(o.ReturnData)
				this.hospitalList = o.ReturnData
			})
		},
19,vue滚动条事件(下拉加载更多)
getMore(){ //下拉加载分页
window.onscroll =() =>{
let hei = document.documentElement.clientHeight || document.body.clientHeight;
let top = document.documentElement.scrollTop || document.body.scrollTop;
let all = document.documentElement.scrollHeight || document.body.scrollHeight;
if(hei+top == all){
this.PageIndex = this.PageIndex + 1;
this.getPageData();
}
}
},
然后
跳转其他页面让改方法失效
beforeDestroy(){
        window.onscroll = null
      },
    created(){
		this.getMore()
    },
20 往一个数组添加数据方法
		addPage(){
			this.$post('PlatFormAPI/NetHospital/GetNetHospitals',{PageIndex:this.page}).then( o =>{
				this.hospitalList = [   //原有数据对象
						...this.hospitalList,  //展开原有对象
						...o.ReturnData   //把新的数据对象添加到原有对象
				]
			})
		}
21回到顶部直接使用方法
goTop () {
	      this.timer = setInterval(() => {
	        let osTop = document.documentElement.scrollTop || document.body.scrollTop
	        let ispeed = Math.floor(-osTop / 5)
	        document.documentElement.scrollTop = document.body.scrollTop = osTop + ispeed
	        this.isTop = true
	        if (osTop === 0) {
	          clearInterval(this.timer)
	        }
	      }, 30)
	    }
22 vue实现跳转路由返回前一个页面不刷新状态,(比如进入详情后返回主页还是在那个位置)
1在APP.vue里面设置
	<div id="app">
	<keep-alive>  //设置这个
		<router-view  v-if="$route.meta.keepAlive"></router-view>
	</keep-alive>
		<router-view v-if="!$route.meta.keepAlive"></router-view>
	</div>
2在主页路由配置
		{
			path: '/hospital', //互联网医院
			name: 'hospital',
			component: pick('hospital/index'),
			meta:{   //加这个对象就好了 ,scollTopPosition是用来记录离开的滚动条距离上边的距离
				keepAlive:true,
				scollTopPosition:0
			}
		},
3设置路由守卫信息
 beforeRouteEnter(to, from, next) {  //进入前
	    next(vm => {
            vm.getMore()  //这里执行你的滚动条方法,不执行你反回的时候,滚动条事件会不生效
	          if (from.path === "/hospital/home"){
	          		setTimeout(()=>{
	          			console.log(2)
	          			document.documentElement.scrollTop = document.body.scrollTop = to.meta.scollTopPosition;   //这边是进入前提取我们保存的滚动条距离上面的距离,使用延时器是因为生命周期没了
	          		},100)
	          }
	    });
	},
   beforeRouteLeave(to, from, next) {   //离开前
	    if(from.meta.keepAlive) {
	         from.meta.scollTopPosition = this.scrollTopDistance; //因为我这边已经有下拉加载更多获取了滚动条距离上面的距离 所以我直接把距离保存在data里面 然后这边直接保存
	    }
	    next();
	}
因为我这边已经有下拉加载更多获取了滚动条距离上面的距离 所以我直接把距离保存在data里面
		getMore(){ //判断滚动条到达底部
			window.onscroll = () =>{
				let hei = document.documentElement.clientHeight || document.body.clientHeight;
				let top = document.documentElement.scrollTop || document.body.scrollTop;
				let all = document.documentElement.scrollHeight || document.body.scrollHeight;
				this.scrollTopDistance = top;   //这里就是保存在data的top距离
				if(hei + top == all){
					this.page = this.page + 1;
					this.addPage();
				}
				top > 500?this.returnTop = true:this.returnTop = false;
			}
		},
有一个小bug就是当你返回的时候你的生命周期不生效 ,方法不会被调用 ,所以这时候我们应该在进入路由守卫里面使用回调函数来执行你需要的方法 vm.xxx
下拉刷新原生实现
reload(){  //下拉刷新
            const el2 = this.$refs.el3   //在要刷新的最大容器里面定义一个ref, ref="el3"
            let startX = null
            let startY = null
            let endX = null
            let endY = null
            el2.addEventListener('touchstart', e => {
                startX = e.changedTouches[0].pageX
                startY = e.changedTouches[0].pageY
            })
            el2.addEventListener('touchmove', e => {
                endX = e.changedTouches[0].pageX
                endY = e.changedTouches[0].pageY
                if(Math.abs(startX - endX)<Math.abs(startY-endY) && (startY-endY)<0){
                    const top = document.documentElement.scrollTop
                                || window.pageYOffset
                                || document.body.scrollTop
                    if(top == 0){
                        this.show3 = true   //请求完的方法里面把show3设置成false // 在data里面设置show
                    }
                }
            })
             el2.addEventListener('touchend',() => {
                if(this.show3){
                    this.page2 = 1
                    this.haveMore2 = true
                    this.getHospitalList()   //执行的刷新后的方法
                }
            })
        }
23.css实现开关按钮了,需要事件直接元素绑定事件(一共两段 元素+css)
<span class='tg-list-item' @click="showFun">
                <input class='tgl tgl-light' id='cb1' type='checkbox'>
                <label class='tgl-btn' for='cb1'></label>
        </span>
.tgl{display:none}
.tgl,.tgl *,.tgl :after,.tgl :before,.tgl+.tgl-btn,.tgl:after,.tgl:before{-webkit-box-sizing:border-box;-moz-box-sizing:border-box;box-sizing:border-box}
.tgl ::-moz-selection,.tgl :after::-moz-selection,.tgl :before::-moz-selection,.tgl+.tgl-btn::-moz-selection,.tgl::-moz-selection,.tgl:after::-moz-selection,.tgl:before::-moz-selection{background:0 0}
.tgl ::selection,.tgl :after::selection,.tgl :before::selection,.tgl+.tgl-btn::selection,.tgl::selection,.tgl:after::selection,.tgl:before::selection{background:0 0}
.tgl+.tgl-btn{outline:0;display:block;width:rem(90);height:rem(45);position:relative;cursor:pointer}
.tgl+.tgl-btn:after,.tgl+.tgl-btn:before{position:relative;display:block;content:"";width:50%;height:100%}
.tgl+.tgl-btn:after{left:0}
.tgl+.tgl-btn:before{display:none}
.tgl:checked+.tgl-btn:after{left:50%}

.tgl-light+.tgl-btn{background:#f0f0f0;border-radius:rem(30);padding:rem(2);-webkit-transition:all .4s ease;transition:all .4s ease}
.tgl-light+.tgl-btn:after{border-radius:50%;background:#fff;-webkit-transition:all .2s ease;transition:all .2s ease}
.tgl-light:checked+.tgl-btn{background:rgb(48,105,207)}
24,h5调用手机拍照功能和显示(vue)
<template>
    <div class="com-upload-img">
        <div class="img_group">
            <div class="img_box" v-if="allowAddImg">
                <input type="file" accept="image/*" multiple="multiple" @change="changeImg($event)">
                <div class="filter"></div>
            </div>
        <div class="img_box" >
             <div class="img_show_box">
                <img :src="imgArr" alt="">
                <i class="img_delete" @click="deleteImg(index)"></i>
                <!-- <i class="img_delete" @click="imgArr.splice(index,1)"></i> -->
            </div>
        </div>
        </div>
    </div>
</template>

<script>
export default {
    name:'ComUpLoad',
    data () {
        return {
            imgArr:'',
            allowAddImg:true,
        }
    },
    created(){

    },
methods: {
    changeImg: function(e) {
        var _this = this;
        var imgLimit = 1024;
        var files = e.target.files;
        var image = new Image();
        if(files.length>0){
            var dd = 0;
            var timer = setInterval(function(){
                if(files.item(dd).type != 'image/png'&&files.item(dd).type != 'image/jpeg'&&files.item(dd).type != 'image/gif'){
                    return false;
                }

            if(files.item(dd).size>imgLimit*102400){
                //to do sth
            }else{
                image.src = window.URL.createObjectURL(files.item(dd));
                image.onload = function(){
                // 默认按比例压缩
                var w = image.width,
                h = image.height,
                scale = w / h;
                w = 200;
                h = w / scale;
                // 默认图片质量为0.7,quality值越小,所绘制出的图像越模糊
                var quality = 1;
                //生成canvas
                var canvas = document.createElement('canvas');
                var ctx = canvas.getContext('2d');
                // 创建属性节点
                var anw = document.createAttribute("width");
                anw.nodeValue = w;
                var anh = document.createAttribute("height");
                anh.nodeValue = h;
                canvas.setAttributeNode(anw);
                canvas.setAttributeNode(anh);
                ctx.drawImage(image, 0, 0, w, h);
                var ext = image.src.substring(image.src.lastIndexOf(".")+1).toLowerCase();//图片格式
                var base64 = canvas.toDataURL("image/"+ ext, quality );
                // 回调函数返回base64的值
                if(_this.imgArr.length<=4){
                    _this.imgArr.unshift('');
                    console.log(base64)
                    _this.imgArr = base64;//替换数组数据的方法,此处不能使用:this.imgArr[index] = url;
                if(_this.imgArr.length>=5){
                    _this.allowAddImg = false;
                }
            }
        }
    }

        if(dd<files.length-1){
            dd++;
        }else{
            clearInterval(timer);
        }
        },1000)
    }
    console.log(this.imgArr)
},


deleteImg: function(index){
        this.imgArr.splice(index,1);
            if(this.imgArr.length<5){
            this.allowAddImg = true;
        }
    },
    },
}
</script>
25.把数据保存到本地,关闭页面就销毁 sessionStorage(下面代码是永久保存 sessionStorage才是关闭页面销毁)
let servicePackage = JSON.stringify(this.servicepackageData)
localStorage.setItem("servicePackage",servicePackage);

//先转把数组或者对象转字符串保存在本地
 this.servicePackage = JSON.parse(localStorage.getItem("servicePackage"));

//然后在需要用的页面上使用parse转换对象
26、获取当前时间(年月日时分秒)
 var date = new Date();
                var year = date.getFullYear();
                var month = date.getMonth()+1;//js中是从0开始所以要加1
                var day = date.getDate();
                var hour = date.getHours();
                var minute = date.getMinutes();
                var second = date.getSeconds();
                //console.log(year+"-"+month+"-"+day +"   "+ hour+':'+minute+':'+second)
27.创建一个对象的键和值
let obj = { }
 obj[" xxx "] = xxx ;
向数组里面push这个obj对象
28.用淘宝镜像安装依赖 https://www.jianshu.com/p/481197064aa2
npm install chromedriver --chromedriver_cdnurl=http://cdn.npm.taobao.org/dist/chromedriver
29.vue里面使用v-html图片设置不了大小问题
给v-html标签添加一个idv_htmlCont然后
updated() {
		const ele = document.getElementById('v_htmlCont').getElementsByTagName('img')
		const arr = [ ...ele ]
		arr.forEach(v => {
			v.style.cssText = "width: 100%;"
		})
	},
30.单行居中和多行居中
 单行居中:line-height
多行居中:vertical-align: middle;
31父子通信
父组件
<amend v-show="modification" :modificationData="modificationData"/>
子组件
props:{
        modificationData :{
            type:Object
        }
    },
要监听,不然没数据
 watch: {
        modificationData(curInfo, oldInfo) {
            if (curInfo) {
                this.modificatiData= curInfo;
                 console.log(this.modificationData)
            }
        }

      },
32点击弹出蒙层不能滑动
 var bodyEl = document.body
            var top1 = 0
                if (this.search == true) {
                    top1 = window.scrollY
                    bodyEl.style.position = 'fixed'
                    bodyEl.style.top = -top1 + 'px'
                } else {
                    bodyEl.style.position = ''
                    bodyEl.style.top = ''
                    window.scrollTo(0, top1) // 回到原先的top
                }
33改变inputplaceholder的样式
::-webkit-input-placeholder{}    /* 使用webkit内核的浏览器 */
:-moz-placeholder{}                  /* Firefox版本4-18 */
::-moz-placeholder{}                  /* Firefox版本19+ */
:-ms-input-placeholder{}           /* IE浏览器 */
34.短信倒计时功能
<span v-show="show" @click="getCode">获取验证码</span>
<span v-show="!show" class="count">{{count}} s</span>
data(){
  return {
   show: true,
   count: '',
   timer: null,
  }
 },
 methods:{
   getCode(){
     const TIME_COUNT = 60;
     if (!this.timer) {
       this.count = TIME_COUNT;
       this.show = false;
       this.timer = setInterval(() => {
       if (this.count > 0 && this.count <= TIME_COUNT) {
         this.count--;
        } else {
         this.show = true;
         clearInterval(this.timer);
         this.timer = null;
        }
       }, 1000)
      }
   }
 }
35内边框外边框
//外边框
    box-sizing: content-box;
//内边框
    box-sizing: border-box;
36 input当输入框和展示框
 <div class="datum_list">
                <p>公司名称</p>
                <input type="text"
                 :class="amend == true?'inputBorder':''"
                 value="深圳市好策划有限公司"
                 :readonly="amend == true?fasle:true">
            </div>
37满足条件前进,不满足后退
this.$router.go(-1) 和 this.$router.go(1)

这两个编程式导航的意思是后退和前进,功能跟我们浏览器上的后退和前进按钮一样,这在业务逻辑中经常用到。比如条件不满足时,我们需要后退。
38vue嵌入第三方页面
<template>
  <div>
    <iframe src="http://0.0.0.0:8080" id="mobsf" scrolling="no" frameborder="0" style="position:absolute;top:80px;left: 120px;"></iframe>
  </div>
</template>


<script>
  export default {
    data () {
      return {
      }
    },
    mounted(){
      /**
      * iframe-宽高自适应显示
      */
      function changeMobsfIframe(){
        const mobsf = document.getElementById('mobsf');
        const deviceWidth = document.body.clientWidth;
        const deviceHeight = document.body.clientHeight;
        mobsf.style.width = (Number(deviceWidth)-120) + 'px'; //数字是页面布局宽度差值
        mobsf.style.height = (Number(deviceHeight)-80) + 'px'; //数字是页面布局高度差
      }

      changeMobsfIframe()

      window.onresize = function(){
        changeMobsfIframe()
      }
    },
  }
</script>
39把本地的图片放到js里面的写法
imgUrl1: require('../../assets/activity/形状46.png'),
<img :src="i.imgUrl1"> //动态引入js地址
40跨组件监听当前路由watch
 $route: {
            handler: function(val, oldVal){
                console.log(val)
                if(val.fullPath == '/home/sample'){sessionStorage.setItem("titleIndex",2); this.titleIndex = 2}
                if(val.fullPath == '/home/engineer'){sessionStorage.setItem("titleIndex",1);this.titleIndex = 1}
            },
        }
41vue的获取input焦点事件
 @blur="getsearch"  //失去

@focus="absentsearch"  //获得
42vue监听按键的方法
@keyup.enter='' //回车键,下面自己换其他的
.delete	delete(删除)/BackSpace(退格)
.tab	Tab
.enter	Enter(回车)
.esc	Esc(退出)
.space	Space(空格键)
.left	Left(左箭头)
.up	Up(上箭头)
.right	Right(右箭头)
.down	Down(下箭头)
.ctrl	Ctrl
.alt	Alt
.shift	Shift
.meta	(window系统下是window键,mac下是command键)
43vue使用富文本框
npm 安装 vue-quill-editor

//在main.js里面引入

import  VueQuillEditor from 'vue-quill-editor'
// require styles 引入样式
import 'quill/dist/quill.core.css'
import 'quill/dist/quill.snow.css'
import 'quill/dist/quill.bubble.css'

Vue.use(VueQuillEditor)

然后组件使用
<template>
     <quill-editor
      v-model="content"
      ref="myQuillEditor"
      :options="editorOption"
      @blur="onEditorBlur($event)" @focus="onEditorFocus($event)"
      @change="onEditorChange($event)">
    </quill-editor>
</template>
<script>
    import { quillEditor } from 'vue-quill-editor'
    export default{
        data(){
            return {
                content:null,
                editorOption:{}
            }
        },
        methods:{
            onEditorBlur(){//失去焦点事件
            },
            onEditorFocus(){//获得焦点事件
            },
            onEditorChange(){//内容改变事件
            }
        }
    }
</script>
44筛选fine
            this.options.find((item)=>{//这里的userList就是上面遍历的数据源
                    this.value5.find( (i) =>{
                        if(item.typecode == i){
                            return obj.push(item.typename)
                        }
                    })
            });
45vue里面通过for循环出来的input获取每一个值的方法

46饿了么获取树状已经勾选的id
this.$refs.tree.getCheckedKeys().concat(this.$refs.tree.getHalfCheckedKeys())
47vue子组件调用父组件方法
48.让video视频铺满大小的css样式:object-fit:fill;
49获取用户设备信息
getUserData(){  //获取登录设备信息
            var sUserAgent = navigator.userAgent.toLowerCase();
            var bIsIpad = sUserAgent.match(/ipad/i) == "ipad";
            var bIsIphoneOs = sUserAgent.match(/iphone os/i) == "iphone os";
            var bIsMidp = sUserAgent.match(/midp/i) == "midp";
            var bIsUc7 = sUserAgent.match(/rv:1.2.3.4/i) == "rv:1.2.3.4";
            var bIsUc = sUserAgent.match(/ucweb/i) == "ucweb";
            var bIsAndroid = sUserAgent.match(/android/i) == "android";
            var bIsCE = sUserAgent.match(/windows ce/i) == "windows ce";
            var bIsWM = sUserAgent.match(/windows mobile/i) == "windows mobile";
            if (bIsIpad || bIsIphoneOs || bIsMidp || bIsUc7 || bIsUc || bIsAndroid || bIsCE || bIsWM) {
                console.log("我是移动设备")
            } else {
                console.log("我是pc端")
            }
        },
50实现多个input输入完跳转到下一个input
<!DOCTYPE html>
<html>
  <head>
        <meta http-equiv="Content-Type" content="text/html; charset=UTF-8">
        <title>
            RunJS 演示代码
        </title>
        <style>
            *{
                margin:0;
                padding:0;
            }
            #wrap {
                margin:auto;
                width: 300px;
            }
            #wrap input[type=text]{
                width:30px;
                height:20px;
                float:left;
                text-align:center;
            }
        </style>
        <script>
            onload = function(){
                var txts = wrap.getElementsByTagName("input");
                for(var i = 0; i<txts.length;i++){
                    var t = txts[i];
                    t.index = i;
                    t.setAttribute("readonly", true);
                    t.onkeyup=function(){
                        this.value=this.value.replace(/^(.).*$/,'$1');
                        var next = this.index + 1;
                        if(next > txts.length - 1) return;
                        txts[next].removeAttribute("readonly");
                        txts[next].focus();
                    }
                }
                txts[0].removeAttribute("readonly");
            }
        </script>
  </head>
    <body>
    <div id="wrap">
            <input type="text" />
            <input type="text" />
            <input type="text" />
            <input type="text" />
            <input type="text" />
            <input type="text" />
        </div>
  </body>
</html>
50. 改变data里面的数据对象但是页面render函数不触发需要手动触发一些this.$forceUpdate();
51谷歌字体缩放切文字居中方法
52 v-html的样式修改问题
.html /deep/ span{line-height:40px;}
//奇数行
<ul>
 <li class="list-item" v-for="(item,index) in data" :class="{'active':index%2 != 1}">{{data[index].name}}</li>
</ul>
左右滑动插件vue-touch
让一个容器滚动条一直在底部,类似qq聊天那样
scrollToBottom() {   //每次让内容至于底部
            this.$nextTick(() => {
                var container = this.$el.querySelector(".content");
                container.scrollTop = container.scrollHeight;
            })
        }
//每次页面渲染完之后滚动条在最底部
    updated:function(){
        this.scrollToBottom();
    },
mounted () {
   this.scrollToBottom();
},
pc端调取摄像头拍照上传
<template>
    <div>
        <!--开启摄像头-->
        <img @click="callCamera" class="img" :src="headImgSrc" alt="摄像头">
        <!--canvas截取流-->
        <canvas ref="canvas" width="200" height="200"></canvas>
        <!--图片展示-->
        <video ref="video" width="200" height="200" autoplay></video>
        <!--确认-->
        <el-button size="mini" type="primary" @click="photograph"></el-button>
    </div>
</template>
<script>
export default {
  data () {
    return {
      headImgSrc: require('@/assets/img/sidebar/微信图片_20190717140407.jpg'),
    }
  },
  methods: {
    // 调用摄像头
    callCamera () {
      // H5调用电脑摄像头API
      navigator.mediaDevices.getUserMedia({
        video: true
      }).then(success => {
        // 摄像头开启成功
        this.$refs['video'].srcObject = success
        // 实时拍照效果
        this.$refs['video'].play()
      }).catch(error => {
        console.error('摄像头开启失败,请检查摄像头是否可用!')
      })
    },
    // 拍照
    photograph () {
      let ctx = this.$refs['canvas'].getContext('2d')
      console.log(ctx)
      // 把当前视频帧内容渲染到canvas上
      ctx.drawImage(this.$refs['video'], 0, 0, 200, 200)
      // 转base64格式、图片格式转换、图片质量压缩
      let imgBase64 = this.$refs['canvas'].toDataURL('image/jpeg', 0.7)

      let data = this.dataURLtoFile(imgBase64)
       console.log(data)
    // 由字节转换为KB 判断大小
      let str = imgBase64.replace('data:image/jpeg;base64,', '')
      let strLength = str.length
      let fileLength = parseInt(strLength - (strLength / 8) * 2)
    // 图片尺寸  用于判断
      let size = (fileLength / 1024).toFixed(2)
      console.log(size)
     // 上传拍照信息  调用接口上传图片 .........

      // 保存到本地
    //   let ADOM = document.createElement('a')
    //   ADOM.href = this.headImgSrc
    //   ADOM.download = new Date().getTime() + '.jpeg'
    //   ADOM.click()
    },
    dataURLtoFile(dataurl, filename = 'file') {  //base转图片格式
        let arr = dataurl.split(',')
        let mime = arr[0].match(/:(.*?);/)[1]
        let suffix = mime.split('/')[1]
        let bstr = atob(arr[1])
        let n = bstr.length
        let u8arr = new Uint8Array(n)
        while (n--) {
            u8arr[n] = bstr.charCodeAt(n)
        }
        return new File([u8arr], `${filename}.${suffix}`, {
            type: mime
        })
    },
    // 关闭摄像头
    closeCamera () {
      if (!this.$refs['video'].srcObject) return
      let stream = this.$refs['video'].srcObject
      let tracks = stream.getTracks()
      tracks.forEach(track => {
        track.stop()
      })
      this.$refs['video'].srcObject = null
    },
  }
}
</script>

<style scoped>
    .img{width: 100px;height: 100px;;}
</style>
监听页面无操作跳转到指定页面
startTimer() {  // 有操作直接执行该方法,使得重新计算
            let that = this;
            clearInterval(that.timeOut);
            that.timeOut = setInterval(function () {
                that.$router.push({path: '/'})
            },1000*60)
        },
        isTimeOut() {   //监听事件
            let that = this;
            if(that.$route.path == "/") {
                that.startTimer();
            }
            document.body.onmouseup = that.startTimer;
            document.body.onmousemove = that.startTimer;
            document.body.onkeyup  = that.startTimer;
            document.body.onclick  = that.startTimer;
            document.body.ontouchend  = that.startTimer;
        },
数组对象的判断
<script>
let arr = [{name:'haung'},{name:'guang'},{name:'fa'}]
let arr1 = [{name:'guang'},{name:'haung'}]

let bb = []
arr.find( (item) =>{
    if(JSON.stringify(arr1).indexOf(JSON.stringify(item.name)) == -1){
        bb.push(item)
    }
})
console.log(bb)
</script>
修改只能读的对象
<script>
    var a = {
        address: "192.168.0.9",
        candidate: "candidate:3281809336 1 tcp 1518280447 192.168.0.9 9 typ host tcptype active generation 0 ufrag vllH network-id 1 network-cost 10",
        component: "rtp",
        foundation: "3281809336",
        port: 9,
        priority: 1518280447,
        protocol: "tcp",
        relatedAddress: null,
        relatedPort: null,
        sdpMLineIndex: 1,
        sdpMid: "1",
        tcpType: "active",
        type: "host",
        usernameFragment: "vllH",
    }

    Object.defineProperty(a, 'address', {
        configurable: true,
        get: function () {
            return 33;
        },
        set: function () {
            console.error('属性只读哦')
        }
    })
    console.log(a.address)
    a.address = 999

    const oldDefine = Object.getOwnPropertyDescriptor(a, 'address');
    const config = {
        ...oldDefine,
        ...{
            configurable: true,
            get: function () {
                return 11111
            },
            set: function (value) {
                return this['_address'] = value
            }
        }
    }
    Object.defineProperty(a, 'address', config)

    console.log(a.address)

    // a.address = 6666

    console.log(a)  //我只想改变这个address有别的方法吗 ,_address这个新的对象不能被我拿去用 , 我用的原生的api调用的原生默认address
</script>
53判断一个数组对象里面是否包含某个值
let arr = [{name:'张三',age:13},{name:'李四',age:11}]
let str = JSON.stringify(arr)
console.log(str.includes('张三')) //true
54创建一个时刻表
mounted(){
            // 页面加载完后显示当前时间
            this.time = this.dealWithTime(new Date())
            // 定时刷新时间
            let _this = this
            // 定时器
            this.setIntervalObj = setInterval(function () {
                _this.time = _this.dealWithTime(new Date()) // 修改数据date
            }, 1000)
       },

methods:{
            dealWithTime (data) {
                let formatDateTime
                let Y = data.getFullYear()
                let M = data.getMonth() + 1
                let D = data.getDate()
                let H = data.getHours()
                let Min = data.getMinutes()
                let S = data.getSeconds()
                let W = data.getDay()
                H = H < 10 ? ('0' + H) : H
                Min = Min < 10 ? ('0' + Min) : Min
                S = S < 10 ? ('0' + S) : S
                switch (W) {
                    case 0:
                    W = '天'
                    break
                    case 1:
                    W = '一'
                    break
                    case 2:
                    W = '二'
                    break
                    case 3:
                    W = '三'
                    break
                    case 4:
                    W = '四'
                    break
                    case 5:
                    W = '五'
                    break
                    case 6:
                    W = '六'
                    break
                    default:
                    break
                }
                // formatDateTime = Y + '年' + M + '月' + D + '日 ' + H + ':' + Min + ':' + S + ' 星期' + W
                formatDateTime = H + ':' + Min + ':' + S + ' 星期' + W
                return formatDateTime
            }
        }

destroyed () {
            if (this.setIntervalObj) {
                clearInterval(this.setIntervalObj)
            }
        }
vue从左边往右边滑动效果
 <template>
      <div id="app">
        <!-- 需用transition标签包裹起来 -->
        <transition>
          <router-view/>
        </transition>
        <Footer></Footer>
      </div>
    </template>

    <style lang="scss">

      html{
        font-size: calc( 100vw / 7.5 )
      }
      // 页面从右侧滑出左侧消失特效
      #app{
        width: 100%;
        // padding-top: 46px;
        padding-bottom: 50px;
        overflow-x: hidden;
        font-size: 14px;
      }
      .v-enter{
        opacity: 0;
        transform: translateX(100%);
      }
      .v-leave-to{
        opacity: 0;
        transform: translateX(-100%);
        // 解决页面从上往下位移问题
        position: absolute;
      }
      .v-enter-active,.v-leave-active{
        transition: all 0.35s ease;
      }
    </style>
最新手机正则校验
/^(13[0-9]|14[5-9]|15[012356789]|166|17[0-8]|18[0-9]|19[8-9])[0-9]{8}$/
身份证正则校验支持最后一位带X
/^\d{6}(18|19|20)?\d{2}(0[1-9]|1[0-2])(0[1-9]|[12]\d|3[01])\d{3}[\dX]$/


 浙公网安备 33010602011771号