一、部署准备
1.三台节点准备
192.168.145.172
192.168.145.173
192.168.145.174
2.官网地址:社区版传送门
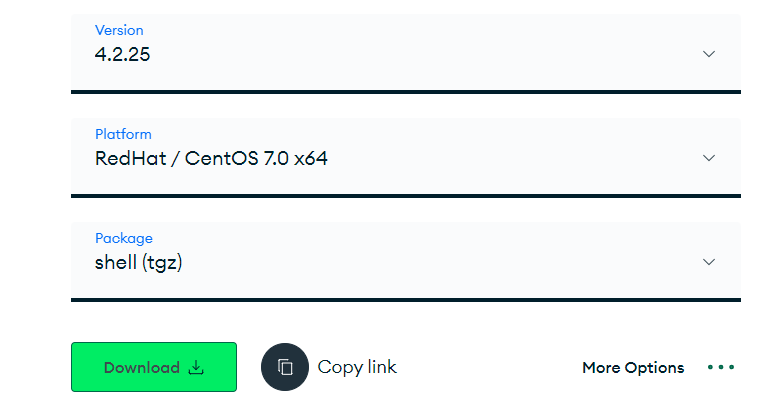
3.选择对应的版本并下载

4.创建用于存放数据、日志文件和配置文件的文件夹
mkdir -p /data/mongodb
mkdir /var/log/mongodb
mkdir /etc/mongodb
5.解压安装包,配置环境变量
tar -zxvf mongodb-linux-x86_64-rhel70-4.0.28.tgz -C /usr/local

#配置环境变量
vim  /etc/profile.d/mongodb.sh

#加入如下内容
export MONGODB_HOME=/usr/local/mongodb
export PATH=$PATH:$MONGODB_HOME/bin

#重启系统配置
source /etc/profile.d/mongodb.sh
6.添加配置文件 三个节点保持一致
systemLog:
    destination: file
    path: "/var/log/mongodb/mongod.log"
    logAppend: true
storage:
    dbPath: "/data/mongodb/"
    journal:
        enabled: true
processManagement:
    fork: true
    pidFilePath: "/data/mongodb/mongod.pid"
net:
    bindIpAll: true
    port: 27017
#security:
    #keyFile: "/etc/mongodb/mongodb-keyfile
    #authorization: "enabled"
#setParameter:
#    authenticationMechanisms: SCRAM-SHA-1
replication:
    oplogSizeMB: 500
    replSetName: mongodb_rs
二、mongodb服务
1.启动三个节点
[root@mongo2 mongodb]# mongod -f /etc/mongodb/mongod.conf
about to fork child process, waiting until server is ready for connections.
forked process: 1812
child process started successfully, parent exiting
2.任选一个节点配置集群
进入mongodb
#进入mongodb
[root@mongo1 mongodb]# mongo 192.168.145.172:27017
MongoDB shell version v4.0.28
connecting to: mongodb://192.168.145.172:27017/test?gssapiServiceName=mongodb
Implicit session: session { "id" : UUID("2d98d09b-1ea6-4a3e-85bf-bea736e2b6e3") }
MongoDB server version: 4.0.28
Server has startup warnings:
2024-03-20T13:28:08.543+0800 I CONTROL  [initandlisten]
2024-03-20T13:28:08.543+0800 I CONTROL  [initandlisten] ** WARNING: Access control is not enabled for the database.
2024-03-20T13:28:08.543+0800 I CONTROL  [initandlisten] **          Read and write access to data and configuration is unrestricted.
2024-03-20T13:28:08.543+0800 I CONTROL  [initandlisten] ** WARNING: You are running this process as the root user, which is not recommended.
2024-03-20T13:28:08.543+0800 I CONTROL  [initandlisten]
2024-03-20T13:28:08.543+0800 I CONTROL  [initandlisten]
2024-03-20T13:28:08.543+0800 I CONTROL  [initandlisten] ** WARNING: /sys/kernel/mm/transparent_hugepage/enabled is 'always'.
2024-03-20T13:28:08.543+0800 I CONTROL  [initandlisten] **        We suggest setting it to 'never'
2024-03-20T13:28:08.543+0800 I CONTROL  [initandlisten]
2024-03-20T13:28:08.543+0800 I CONTROL  [initandlisten] ** WARNING: /sys/kernel/mm/transparent_hugepage/defrag is 'always'.
2024-03-20T13:28:08.543+0800 I CONTROL  [initandlisten] **        We suggest setting it to 'never'
2024-03-20T13:28:08.543+0800 I CONTROL  [initandlisten]
---
Enable MongoDB's free cloud-based monitoring service, which will then receive and display
metrics about your deployment (disk utilization, CPU, operation statistics, etc).

The monitoring data will be available on a MongoDB website with a unique URL accessible to you
and anyone you share the URL with. MongoDB may use this information to make product
improvements and to suggest MongoDB products and deployment options to you.

To enable free monitoring, run the following command: db.enableFreeMonitoring()
To permanently disable this reminder, run the following command: db.disableFreeMonitoring()
---
执行节点配置命令
> cfg={ _id:"mongodb_rs", members:[ {_id:1,host:'192.168.145.172:27017',priority:2}, {_id:2,host:'192.168.145.173:27017',priority:1}, {_id:3,host:'192.168.145.174:27017',arbiterOnly:true}] };
{
	"_id" : "mongodb_rs",
	"members" : [
		{
			"_id" : 1,
			"host" : "192.168.145.172:27017",
			"priority" : 2
		},
		{
			"_id" : 2,
			"host" : "192.168.145.173:27017",
			"priority" : 1
		},
		{
			"_id" : 3,
			"host" : "192.168.145.174:27017",
			"arbiterOnly" : true
		}
	]
}
> rs.initiate(cfg)
{ "ok" : 1 }
查看节点状态
mongodb_rs:PRIMARY> rs.status()
{
	"set" : "mongodb_rs",
	"date" : ISODate("2024-03-20T07:38:28.806Z"),
	"myState" : 1,
	"term" : NumberLong(1),
	"syncingTo" : "",
	"syncSourceHost" : "",
	"syncSourceId" : -1,
	"heartbeatIntervalMillis" : NumberLong(2000),
	"optimes" : {
		"lastCommittedOpTime" : {
			"ts" : Timestamp(1710920301, 1),
			"t" : NumberLong(1)
		},
		"readConcernMajorityOpTime" : {
			"ts" : Timestamp(1710920301, 1),
			"t" : NumberLong(1)
		},
		"appliedOpTime" : {
			"ts" : Timestamp(1710920301, 1),
			"t" : NumberLong(1)
		},
		"durableOpTime" : {
			"ts" : Timestamp(1710920301, 1),
			"t" : NumberLong(1)
		}
	},
	"lastStableCheckpointTimestamp" : Timestamp(1710920291, 1),
	"electionCandidateMetrics" : {
		"lastElectionReason" : "electionTimeout",
		"lastElectionDate" : ISODate("2024-03-20T05:43:20.422Z"),
		"electionTerm" : NumberLong(1),
		"lastCommittedOpTimeAtElection" : {
			"ts" : Timestamp(0, 0),
			"t" : NumberLong(-1)
		},
		"lastSeenOpTimeAtElection" : {
			"ts" : Timestamp(1710913389, 1),
			"t" : NumberLong(-1)
		},
		"numVotesNeeded" : 2,
		"priorityAtElection" : 2,
		"electionTimeoutMillis" : NumberLong(10000),
		"numCatchUpOps" : NumberLong(0),
		"newTermStartDate" : ISODate("2024-03-20T05:43:20.425Z"),
		"wMajorityWriteAvailabilityDate" : ISODate("2024-03-20T05:43:21.005Z")
	},
	"members" : [
		{
			"_id" : 1,
			"name" : "192.168.145.172:27017",
			"health" : 1,
			"state" : 1,
			"stateStr" : "PRIMARY",
			"uptime" : 7820,
			"optime" : {
				"ts" : Timestamp(1710920301, 1),
				"t" : NumberLong(1)
			},
			"optimeDate" : ISODate("2024-03-20T07:38:21Z"),
			"syncingTo" : "",
			"syncSourceHost" : "",
			"syncSourceId" : -1,
			"infoMessage" : "",
			"electionTime" : Timestamp(1710913400, 1),
			"electionDate" : ISODate("2024-03-20T05:43:20Z"),
			"configVersion" : 1,
			"self" : true,
			"lastHeartbeatMessage" : ""
		},
		{
			"_id" : 2,
			"name" : "192.168.145.173:27017",
			"health" : 1,
			"state" : 2,
			"stateStr" : "SECONDARY",
			"uptime" : 6918,
			"optime" : {
				"ts" : Timestamp(1710920301, 1),
				"t" : NumberLong(1)
			},
			"optimeDurable" : {
				"ts" : Timestamp(1710920301, 1),
				"t" : NumberLong(1)
			},
			"optimeDate" : ISODate("2024-03-20T07:38:21Z"),
			"optimeDurableDate" : ISODate("2024-03-20T07:38:21Z"),
			"lastHeartbeat" : ISODate("2024-03-20T07:38:28.653Z"),
			"lastHeartbeatRecv" : ISODate("2024-03-20T07:38:27.407Z"),
			"pingMs" : NumberLong(0),
			"lastHeartbeatMessage" : "",
			"syncingTo" : "192.168.145.172:27017",
			"syncSourceHost" : "192.168.145.172:27017",
			"syncSourceId" : 1,
			"infoMessage" : "",
			"configVersion" : 1
		},
		{
			"_id" : 3,
			"name" : "192.168.145.174:27017",
			"health" : 1,
			"state" : 7,
			"stateStr" : "ARBITER",
			"uptime" : 6918,
			"lastHeartbeat" : ISODate("2024-03-20T07:38:28.653Z"),
			"lastHeartbeatRecv" : ISODate("2024-03-20T07:38:28.064Z"),
			"pingMs" : NumberLong(0),
			"lastHeartbeatMessage" : "",
			"syncingTo" : "",
			"syncSourceHost" : "",
			"syncSourceId" : -1,
			"infoMessage" : "",
			"configVersion" : 1
		}
	],
	"ok" : 1,
	"operationTime" : Timestamp(1710920301, 1),
	"$clusterTime" : {
		"clusterTime" : Timestamp(1710920301, 1),
		"signature" : {
			"hash" : BinData(0,"AAAAAAAAAAAAAAAAAAAAAAAAAAA="),
			"keyId" : NumberLong(0)
		}
	}
}
三、用户管理
1.创建admin管理用户
#进入数据库 创建root用户
mongodb_rs:PRIMARY> use admin
switched to db admin
mongodb_rs:PRIMARY> db.createUser({
... user:"root",
... pwd:"qwer123123",
... roles:[ { role: "userAdminAnyDatabase", db: "admin" }, "readWriteAnyDatabase" ]
... })
#输出结果
Successfully added user: {
	"user" : "root",
	"roles" : [
		{
			"role" : "userAdminAnyDatabase",
			"db" : "admin"
		},
		"readWriteAnyDatabase"
	]
}
2.新建数据库并创建相应的管理用户
#先切换到新的数据库
mongodb_rs:PRIMARY> use testdb
switched to db testdb

#创建对应的管理用户
mongodb_rs:PRIMARY> db.createUser({
... user: "test01",
... pwd: "123456",
... roles:[{role: "readWrite",db: "testdb"}]
... })
Successfully added user: {
	"user" : "test01",
	"roles" : [
		{
			"role" : "readWrite",
			"db" : "testdb"
		}
	]
}
3.修改用户密码
#修改密码是修改的对应数据库用户的密码,所以要先切换到对应的数据库
mongodb_rs:PRIMARY> use testdb
switched to db testdb
mongodb_rs:PRIMARY> db.updateUser("test01",
... {pwd:"123456"}
... )
4.删除用户
#删除用户也到切换到对应的数据库,删除对应的用户
mongodb_rs:PRIMARY> use testdb
switched to db testdb
mongodb_rs:PRIMARY> db.dropUser("test01")
true
四、安全方面( 给mongodb集群配置登录认证)
1、创建一个keyfile文件
#生成102位base64加密字符串
#数字102最好是3的倍数,不然生成的字符串可能含有非法字符,认证失败
[root@mongo1 opt] openssl rand -base64 102 >mongodb-keyfile
[root@mongo1 opt] ls
 mongodb-keyfile
#修改keyfile权限
chmod 600 mongodb-keyfile
2.将keyfile文件放到另外两台节点
scp mongodb-keyfile 192.168.145.173:/etc/mongodb/
scp mongodb-keyfile 192.168.145.174:/etc/mongodb/
3.修改配置文件(3个节点都要修改)
#添加如下内容
security:
    keyFile: "/etc/mongodb/mongodb-keyfile
    authorization: "enabled"

#keyfile路径要正确
4.重启三台节点,登录验证就完成了。
5.登录
[root@mongo1 bin]# mongo admin -u root -p qwer123123
MongoDB shell version v4.0.28
connecting to: mongodb://127.0.0.1:27017/admin?gssapiServiceName=mongodb
Implicit session: session { "id" : UUID("a5277f2a-e3d6-4809-9f54-3ffe36026d9c") }
MongoDB server version: 4.0.28

#admin是指定登录的数据库,root是用户名  -p 后面是密码


