目录
1. 使用概述
此程序可以注册一个Windows服务(Windows Service),并通过启动参数可以制定需要杀掉的进程名称和执行间隔。
注意:
此程序主要用来演示使用.NET创建Windows服务,自定义EventLog,以及托管应用程序集的安装部署。涉及到System.ServiceBase, System.Diagnostics, System.Configuration.Install命名空间内的类型使用。至于程序所带来的功能,仅供娱乐呵呵。
此程序在Windows 7下测试可以正常运行,但未在其他Windows系统上测试
服务的运行需要用户制定参数:(否则服务无法启动,并将错误报到自定义事件目录下)
第一个参数是需要干掉的进程名称,不需要加exe,多个名称用分号隔开。
第二个参数是每次执行的间隔,参数为整数,单位秒,如果是2秒,就直接用2。默认是5秒。
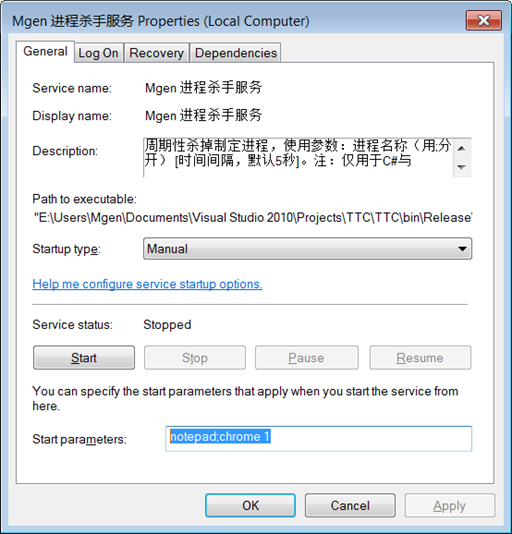
比如每隔一秒终止系统内所有的记事本进程和Chrome浏览器进程,那么参数这样写:
notepad;chrome 1
下面是对服务设置参数的截图:
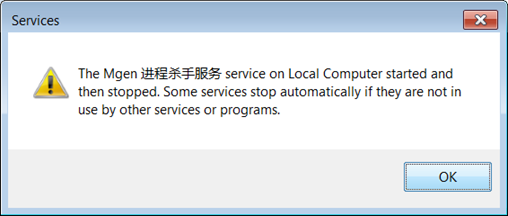
当然,如果有错误发生的话,比如参数错误,服务会立即停止:
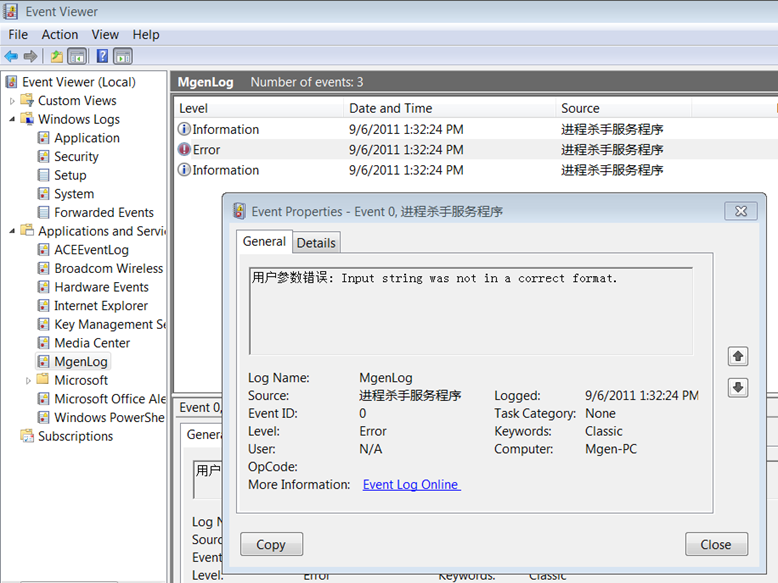
然后用户可以在自定义事件目录中查看错误信息,当然时间目录中还包含着其他服务运行状态的信息。
2. 创建Windows服务
在.NET的里,Windows服务被包装在System.ServiceProcess命名空间内,因此首先需要给工程添加引用System.ServiceProcess程序集。System.ServiceProcess.ServiceBase类代表着一个Windows服务,这个类继承于Component类,Component类常用在类型对IDE设计模式中的支持。
注意Windows服务是控制台程序,但它随Windows启动而启动,可以跟随用户账户控制,也可以不(一般是以本地系统权限运行),也不存在用户交互界面的概念。
ServiceBase的ServiceName属性代表着服务名称,ServiceHandle是Windows内部句柄。ExitCode是退出时的返回代码。EventLog可以设置Windows事件目录,默认EventLog.Log是应用程序事件目录,EventLog.Source默认是服务名称(ServiceBase.ServiceName)。同时使用AutoLog可以自动记录服务状态的改变,如继续,暂停,停止,开始等……
ServiceBase的Canxxx属性可以设置服务是否可以或者接受某些功能,如可以暂停重新开始(CanPauseAndContinue),是否接收Windows登陆状态改变事件(CanHandleSessionChangedEvent),是否接收电源状态事件(CanHandlePowerEvent)等等……。接着就是一系列protected virtual方法对应上述功能。
下面是一个最基本的Windows服务的派生类:
class Program : ServiceBase
{
public const string SERVICE_NAME = "服务名称";
public Program()
{
base.ServiceName = SERVICE_NAME;
}
protected override void OnStart(string[] args)
{
base.OnStart(args);
}
protected override void OnStop()
{
base.OnStop();
}
protected override void OnContinue()
{
base.OnContinue();
}
protected override void OnPause()
{
base.OnPause();
}
protected override void Dispose(bool disposing)
{
base.Dispose(disposing);
}
static void Main(string[] args)
{
ServiceBase.Run(new Program());
}
}
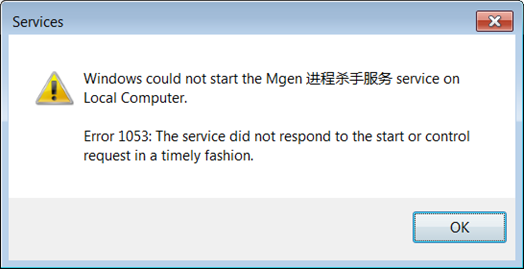
注意在Main函数中要通过ServiceBase.Run来运行定义好的Windows服务示例,ServiceBase.Run还可以运行一个ServiceBase数组。如果没有运行的话,当使用Windows服务管理器运行服务时会有如下错误信息:Windows无法运行服务,错误1053:服务没有及时响应启动或控制请求。
3. 自定义事件目录并使用EventLogInstaller
前面提到过,ServiceBase的EventLog属性的事件源默认是ServiceBase的服务名称,事件目录是应用程序。当然完全可以自定义Windows服务所需的事件记录目录。
注册事件源可以使用EventLog.CreateEventSource方法,当然更推荐使用EventLogInstaller去部署,这样连同服务本身的部署安装程序,整个过程可以一体化安装,卸载,出了错误也可以撤销。这得益于.NET中System.Configuration.Install命名空间内对安装部署的支持。
虽然EventLogInstaller在System.Diagnostics命名空间内,但必须先引用System.Configuration.Install.dll才可以使用。
使用EventLogInstaller的Source和Log属性来配置数据源名称和事件目录,当然还有更高级的属性如CategoryCount等,这里就不讨论了。
EventLogInstaller ei = new EventLogInstaller();
ei.Source = Program.CUSTOMSRC_NAME;
ei.Log = Program.LOG_NAME;
接着在服务中使用事件源名称进行时间写入就可以了:
EventLog.WriteEntry(Program.CUSTOMSRC_NAME, "测试消息");
4. 使用ServiceProcessInstaller和ServiceInstaller
Windows服务是一个进程,托管下的Windows进程是可以搭载多个Windows服务的,进程和服务是一对多的关系,但一般情况下一对一就可以了。而ServiceProcessInstaller和ServiceInstaller就是对应处理上述两个概念的System.Configuration.Install.Installer类,它们都继承于ComponentInstaller,用于组建的安装部署。
ServiceProcessInstaller用于控制整个进程的角色。Account属性(类型是ServiceAccount枚举)可以设置进程运行的权限。一般情况下用高权限LocalSystem,当然也可以跟随用户权限,这个需要设置用户名称和密码,通过设置ServiceProcessInstaller的Username和Password属性可以完成这个要求。
ServiceInstaller用于定义单个服务的部署信息,比如名称(ServiceName属性),这个要和定义的ServiceBase.ServiceName一致。其次还有服务描述(Description属性),显示名称(DisplayName属性),依赖的服务(ServicesDependedOn属性),和启动类型(StartType属性:自动,手动,禁用),延时自动启动(DelayedAutoStart)。
最后连同上面讲的ServiceBase用到的自定义事件目录,我们可以创建一个完整的System.Configuration.Install.Installer类,并将所有安装部署类型对象加入到子安装包内。
using System;
using System.Collections.Generic;
using System.Linq;
using System.Text;
using System.Diagnostics;
using System.Configuration.Install;
using System.ServiceProcess;
using System.ComponentModel;
[RunInstaller(true)]
public class MyInstaller : Installer
{
public MyInstaller()
{
ServiceProcessInstaller spi = new ServiceProcessInstaller();
ServiceInstaller si = new ServiceInstaller();
EventLogInstaller ei = new EventLogInstaller();
spi.Account = ServiceAccount.LocalSystem;
si.ServiceName = Program.SERVICE_NAME;
si.StartType = ServiceStartMode.Manual;
si.Description = "周期性杀掉制定进程,使用参数:进程名称(用;分开) [时间间隔,默认5秒]。注:仅用于C#与Windows服务的编程示例。";
si.DisplayName = Program.SERVICE_NAME;
ei.Source = Program.CUSTOMSRC_NAME;
ei.Log = Program.LOG_NAME;
Installers.Add(spi);
Installers.Add(si);
Installers.Add(ei);
if (EventLog.SourceExists(Program.CUSTOMSRC_NAME))
EventLog.DeleteEventSource(Program.CUSTOMSRC_NAME);
}
}
5. 加入全部功能
好了,万事俱备,这里就差实际功能实现了,具体有如下内容:
- 使用System.Threading.Timer做计时器
- 根据制定名称结束系统内所有该名称的进程
- 用自定义事件目录进行必要的状态和错误的记录
- 对参数进行解析
- 暂停,继续和停止后资源的处理
由于贴进来会使文章太长,请在下面下载源代码并做参考。
6. 使用installutil.exe部署程序
整个服务构建好了,可是是无法直接运行的。因为定义好的安装类型没有被真正安装。
使用.NET Framework中提供的installutil.exe可以对制定应用程序集进行安装部署或卸载。
虽然System.Configuration.Install中的Installer类没有提供错误后的撤消操作(Rollback方法的调用)(System.Configuration.Install.TransactedInstaller可以),但installutil可以保证应用程序集在安装和卸载时达到理想的效果。
installutil.exe最普通的两种使用方法就是
installutil [程序集路径] //用于安装
installutil /u [程序集路径] //用于卸载
更多installutil.exe的使用可以参考MSDN:http://msdn.microsoft.com/zh-cn/library/50614e95.aspx
下面是程序进行安装时的运行摘要:
E:\Users\Mgen\Documents\Visual Studio 2010\Projects\TTC\TTC\bin\Release>
installutil mgen.exe
Microsoft (R) .NET Framework Installation utility Version 4.0.30319.1
Copyright (c) Microsoft Corporation. All rights reserved.
Running a transacted installation.
Beginning the Install phase of the installation.
Installing service Mgen 进程杀手服务...
Service Mgen 进程杀手服务 has been successfully installed.
Creating EventLog source Mgen 进程杀手服务 in log Application...
Creating EventLog source 进程杀手服务程序 in log MgenLog...
The Install phase completed successfully, and the Commit phase is beginning.
The Commit phase completed successfully.
The transacted install has completed.
7. 使用AssemblyInstaller部署程序
除了installutil,另一种安装方法就是在代码中用AssemblyInstaller来安装部署,只不过需要自己写更多代码:
结合网上的代码,我把它写成这样一个类:
using System;
using System.Collections.Generic;
using System.Linq;
using System.Text;
using System.Reflection;
using System.Collections;
using System.Configuration.Install;
namespace Mgen.TTC
{
/// <summary>
/// 代码,稍作修改自:
/// https://groups.google.com/group/microsoft.public.dotnet.languages.csharp/browse_thread/thread/4d45e9ea5471cba4/4519371a77ed4a74?hl=en
/// </summary>
class InstallHelper
{
public static void Install(bool uninstall, Assembly ass, string[] args)
{
try
{
Console.WriteLine(uninstall ? "uninstalling" : "installing");
using (AssemblyInstaller inst = new AssemblyInstaller(ass, args))
{
IDictionary state = new Hashtable();
inst.UseNewContext = true;
try
{
if (uninstall)
{
inst.Uninstall(state);
}
else
{
inst.Install(state);
inst.Commit(state);
}
}
catch
{
try
{
inst.Rollback(state);
}
catch { }
throw;
}
}
}
catch (Exception ex)
{
Console.Error.WriteLine(ex.Message);
}
}
}
}
使用InstallHelper.Install第一个参数为false会安装制定程序集,为true会卸载制定程序集。
8. 使用批处理文件快速安装应用程序集
安装应用程序集的方式多种多样,比如上述两种方法,再结合一些安装制作软件可以很好的部署应用程序集的安装。不过使用installutil.exe + 批处理是其中一种简单而快速的方法。
由于此程序为Windows服务,服务的安装卸载操作都需要与Windows Service Manager打交道,因此需要以管理员身份运行批处理。
但是Windows 7中以管理员运行的批处理(bat文件)的当前目录会被强制调整到系统目录中去。用一个dir /p指令就可以测试,不以管理员运行结果是显示批处理当前目录,而如果以管理员身份运行,显示结果竟然是:C:\Windows\System32。
在网上查了半天,发现这个方法比较好:http://www.codeproject.com/Tips/119828/Running-a-bat-file-as-administrator-Correcting-cur
即在批处理前加如下指令:
@setlocal enableextensions
@cd /d "%~dp0"
这样的话,把installutil所在的目录地址设置成系统PATH环境变量,或者更简单的直接把installutil拷贝到程序集目录下,然后就可以以管理员身份正确的安装或卸载程序集文件了。
比如用于安装的批处理这样定义:
@setlocal enableextensions
@cd /d "%~dp0"
@echo off
echo 开始执行安装
installutil.exe mgen.exe
echo 完成
pause
9. 启动Windows服务
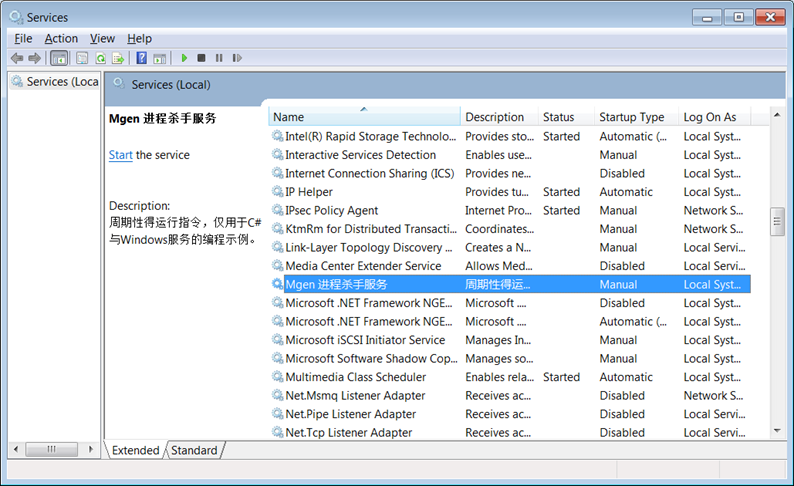
最后就是启动相关服务了。这个就简单多了,可以在控制面板中的服务中对Windows服务进行指定操作。在运行中键入services.msc也可以启动服务管理器。可以参考:“1. 使用概述”的截图。
10. 程序和源代码下载
程序下载(包含用于安装和卸载的批处理)
(此为微软SkyDrive存档,请用浏览器直接下载,用某些下载工具可能无法下载)
环境:.NET Framework 4.0 Client Profile



 浙公网安备 33010602011771号