
一、ElasticSearch 单点部署
1、下载指定的ES版本(7.17.3)
https://www.elastic.co/downloads/past-releases/elasticsearch-7-17-3
2、单点部署elasticsearh
1、安装服务
[root@elk01 ~]# yum localinstall elasticsearch-7.17.3-x86_64.rpm -y
2、修改配置文件
[root@elk01 ~]# vim /etc/elasticsearch/elasticsearch.yml
cluster.name: cm-elk #修改集群名称
node.name: elk01 #修改节点名称
network.host: 0.0.0.0            #网络地址
http.port: 9200                #访问端口
discovery.seed_hosts: ["0.0.0.0"]     #自动发现集群节点
cluster.initial_master_nodes: ["elk01"]   #节点名称
3、修改权限
[root@elk01 ~]# chown -R elasticsearch:elasticsearch /etc/elasticsearch
4、启动elasticsearch 服务
[root@elk01 etc]# systemctl start elasticsearch.service
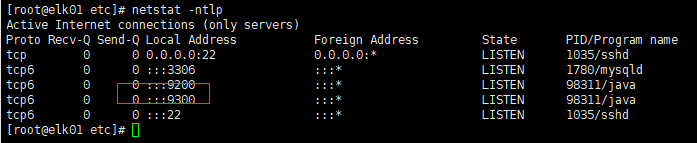
9200:用于外部http通信(http协议)
9300:用于集群内部各个节点之间的通信(tcp协议)
[root@elk01 etc]# curl 127.0.0.1:9200
{
  "name" : "elk01",
  "cluster_name" : "cm-elk",
  "cluster_uuid" : "EIOjAbZoSB2GMB5Ksh4w5g",
  "version" : {
    "number" : "7.17.3",
    "build_flavor" : "default",
    "build_type" : "rpm",
    "build_hash" : "5ad023604c8d7416c9eb6c0eadb62b14e766caff",
    "build_date" : "2022-04-19T08:11:19.070913226Z",
    "build_snapshot" : false,
    "lucene_version" : "8.11.1",
    "minimum_wire_compatibility_version" : "6.8.0",
    "minimum_index_compatibility_version" : "6.0.0-beta1"
  },
  "tagline" : "You Know, for Search"
}
如果"cluster_uuid" : "_na_", 怎是配置文件没有配置/etc/elasticsearch/elasticsearch.yaml
node.name: elk01
cluster.initial_master_nodes: ["elk01"]
二、集群部署
1、在节点elk02和elk03上部署Elasticserarch
[root@elk01.cm.cn ~]# scp elasticsearch-7.17.3-x86_64.rpm elk02.cm.cn:~
[root@elk01.cm.cn ~]# scp elasticsearch-7.17.3-x86_64.rpm elk03.cm.cn:~
安装Elasticserarch,同上
2、修改配置文件
在elk01节点
vim /etc/elasticsearch/elasticsearch.yml
# ---------------------------------- Cluster -----------------------------------
#
# Use a descriptive name for your cluster:
#
#cluster.name: my-application 集群名称
cluster.name: cm-elk


# ------------------------------------ Node ------------------------------------
#
# Use a descriptive name for the node:
#
#node.name: node-1
node.name: elk01


# ---------------------------------- Network -----------------------------------
#
# Set the bind address to a specific IP (IPv4 or IPv6):
#
#network.host: 192.168.0.1 网络地址
network.host: 0.0.0.0
#
# Set a custom port for HTTP:
#
#http.port: 9200 外部访问端口
http.port: 9200
#


# --------------------------------- Discovery ----------------------------------
#
# Pass an initial list of hosts to perform discovery when this node is started:
# The default list of hosts is ["127.0.0.1", "[::1]"]
#
#discovery.seed_hosts: ["host1", "host2"] 自动发现集群节点
discovery.seed_hosts: ["0.0.0.0"]
#
# Bootstrap the cluster using an initial set of master-eligible nodes:
#
#cluster.initial_master_nodes: ["node-1", "node-2"] 节点名称
cluster.initial_master_nodes: ["elk01","elk02","elk03"]
#
把elk01下 /etc/elasticsearch/elasticsearch.yml 同步到elk02,elk03节点上
修改elk02,elk03节点中的,节点名称
# ------------------------------------ Node ------------------------------------
#
# Use a descriptive name for the node:
#
#node.name: node-1
node.name: elk02
3、所有节点删除之前临时日志
rm -rf /var/{log,lib}/elasticsearch/*
4、启动所有节点服务
systemctl start elasticsearch
[root@elk01.cm.cn ~]# curl 127.0.0.1:9200
{
  "name" : "elk01",
  "cluster_name" : "cm-elk",
  "cluster_uuid" : "I0XI11awTjykjF4OWXH4Uw",
  "version" : {
    "number" : "7.9.1",
    "build_flavor" : "default",
    "build_type" : "rpm",
    "build_hash" : "083627f112ba94dffc1232e8b42b73492789ef91",
    "build_date" : "2020-09-01T21:22:21.964974Z",
    "build_snapshot" : false,
    "lucene_version" : "8.6.2",
    "minimum_wire_compatibility_version" : "6.8.0",
    "minimum_index_compatibility_version" : "6.0.0-beta1"
  },
  "tagline" : "You Know, for Search"
5、验证

草根-920

 浙公网安备 33010602011771号