前面花一周时间学习了servlet+jsp+mysql, 并且简单实现了登录注册等操作。对Servlet应用有了基础了解!
关于Struct2这个经常听说,但是自己没有用过。今天在这学习总结下,目的是学完后知道Struct2是怎么回事,后面怎么可以简单应用。
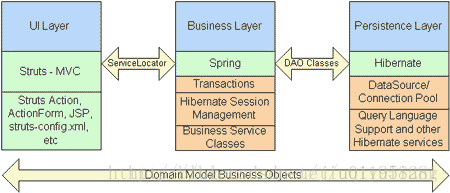
著名的SSH三大框架分别为:表现层(Struts)、业务逻辑层(Spring),持久化层(Hibernate).
SSH框架系统从职责上分为四层:表示层、业务逻辑层、数据持久层和域模块层(实体层)。
![]()
Struts2作为表现层的框架设计存在,hibernate处于数据持久层。Spring处于业务逻辑层,担任连接Struts2和Hibernate桥梁的角色。
一:sturts.xml文件解析
 1 <?xml version="1.0" encoding="UTF-8" ?>
 2 <!DOCTYPE struts PUBLIC
 3     "-//Apache Software Foundation//DTD Struts Configuration 2.3//EN"
 4     "http://struts.apache.org/dtds/struts-2.3.dtd">
 5
 6 <struts>
 7
 8     <constant name="struts.enable.DynamicMethodInvocation" value="false" />
 9     <constant name="struts.devMode" value="true" />
10
11     <package name="zxl" namespace="/" extends="struts-default">
12
13         <action name="Demo01Action" class="action.Demo01Action" method="execute">
14             <result name="success">/index.jsp</result>
15         </action>
16         <action name="HelloAction" class="action.HelloAction" method="execute">
17             <result name="success">/HelloWorld.jsp</result>
18         </action>
19
20         <action name="LoginAction" class="action.LoginAction" method="execute">
21             <result name="success">/welcome.jsp</result>
22         </action>
23     </package>
24
25     <include file="example.xml"/>
26     <include file="struts-constant.xml"/>
27     <include file="struts-dynamic.xml"/>
28     <include file="struts-actionsupport.xml"/>
29     <!-- Add packages here -->
30 </struts>
package:将Action配置封装,就是可以在package中配置很多action,用来管理action的,一般情况下package是针对模块划分的,
name属性:给包起个名字,起到标识作用,随便起。不能与其他包名重复
namespace属性:给 action 的访问路径中定义一个命名空间(action的前缀)
1、namespace与URL有关
2、如果namespace=”/”; 那么在url中项目名称后面紧接着跟action中name的名称
http://localhost:8080/struts/helloworldAction
3、如果namespace为”/base”; 那么就应该在项目名称后面加上base
http://localhost:8080/struts/base/helloworldAction 可以请求到页面
http://localhost:8080/struts/base/a/helloworldAction 也可以请求到
但是这个会先找 base/a 下的 helloworldAction,其次是寻找 base 下的 helloworldAction
4、在url中加了几层命名空间,则在转向到jsp页面时,jsp的路径也会加几个命名空间的名字的路径
5、如果采用上述的命名空间的形式,命名空间有什么的名称,在webroot下就应该建立什么样的文件夹
extends属性:继承一个指定包 struts-default 在core核心包最下面 struts-deffault.xml168行 必选
abstract属性:包是否为抽象的;标识性属性,该包不能独立运行专门被继承。和name一样给开发看的
二、简单例子
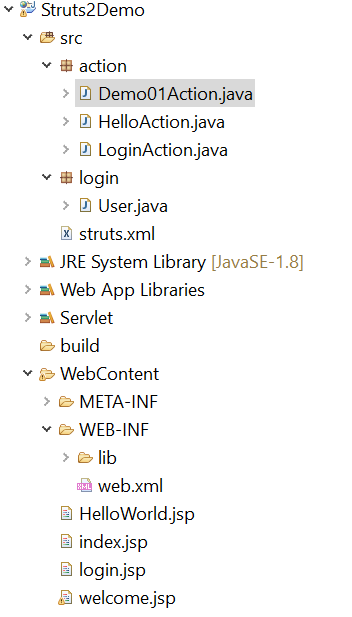
一共写了三个action, 下面给出具体例子:1 package action; 2 3 public class Demo01Action { 4 5 public String execute(){ 6 System.out.println("访问到了。。。。。。"); 7 return "success"; 8 } 9 }
 1 package action;
 2
 3 public class HelloAction {
 4
 5     public String execute(){
 6
 7         System.out.println("hello, world");
 8         return "success";
 9     }
10
11 }
下面看一下我们配置的struts.xml, 这个文件直接放在src路径下,
 1 <?xml version="1.0" encoding="UTF-8" ?>
 2 <!DOCTYPE struts PUBLIC
 3     "-//Apache Software Foundation//DTD Struts Configuration 2.3//EN"
 4     "http://struts.apache.org/dtds/struts-2.3.dtd">
 5
 6 <struts>
 7
 8     <constant name="struts.enable.DynamicMethodInvocation" value="false" />
 9     <constant name="struts.devMode" value="true" />
10
11     <package name="zxl" namespace="/" extends="struts-default">
12
13         <action name="Demo01Action" class="action.Demo01Action" method="execute">
14             <result name="success">/index.jsp</result>
15         </action>
16         <action name="HelloAction" class="action.HelloAction" method="execute">
17             <result name="success">/HelloWorld.jsp</result>
18         </action>
19
20         <action name="LoginAction" class="action.LoginAction" method="execute">
21             <result name="success">/welcome.jsp</result>
22         </action>
23     </package>
24
25     <include file="example.xml"/>
26     <include file="struts-constant.xml"/>
27     <include file="struts-dynamic.xml"/>
28     <include file="struts-actionsupport.xml"/>
29     <!-- Add packages here -->
30 </struts>
看看我们配置的action,执行相应的class和其函数,然后返回String,若是“success”,则会跳转到对应的jsp页面。
看一下对应的jsp配置:
index.jsp
 1 <%@ page language="java" contentType="text/html; charset=ISO-8859-1"
 2     pageEncoding="ISO-8859-1"%>
 3 <!DOCTYPE html PUBLIC "-//W3C//DTD HTML 4.01 Transitional//EN" "http://www.w3.org/TR/html4/loose.dtd">
 4 <html>
 5 <head>
 6 <meta http-equiv="Content-Type" content="text/html; charset=ISO-8859-1">
 7 <title>Insert title here</title>
 8 </head>
 9 <body>
10 Hi, Struts2!!!
11
12 </body>
13 </html>
HelloWord.jsp
 1 <%@ page language="java" contentType="text/html; charset=ISO-8859-1"
 2     pageEncoding="ISO-8859-1"%>
 3 <!DOCTYPE html PUBLIC "-//W3C//DTD HTML 4.01 Transitional//EN" "http://www.w3.org/TR/html4/loose.dtd">
 4
 5 <%
 6 String path = request.getContextPath();
 7 int i=0;
 8 String basePath = request.getScheme()+"://"+request.getServerName()+":"+request.getServerPort()+path+"/";
 9 %>
10
11 <html>
12 <head>
13 <meta http-equiv="Content-Type" content="text/html; charset=ISO-8859-1">
14 <title>Insert title here</title>
15 </head>
16 <body>
17  <a href="HelloAction">hello</a> <br>
18  i:<%=i%><br>
19 </body>
20 </html>
然后我们看一下web.xml配置
<?xml version="1.0" encoding="UTF-8"?>
<web-app id="WebApp_9" version="2.4" xmlns="http://java.sun.com/xml/ns/j2ee"
         xmlns:xsi="http://www.w3.org/2001/XMLSchema-instance"
         xsi:schemaLocation="http://java.sun.com/xml/ns/j2ee http://java.sun.com/xml/ns/j2ee/web-app_2_4.xsd">

    <display-name>Struts2Demo</display-name>

    <filter>
        <filter-name>struts2</filter-name>
        <filter-class>org.apache.struts2.dispatcher.ng.filter.StrutsPrepareAndExecuteFilter</filter-class>
    </filter>

    <filter-mapping>
        <filter-name>struts2</filter-name>
        <url-pattern>/*</url-pattern>
    </filter-mapping>

    <welcome-file-list>
        <welcome-file>login.jsp</welcome-file>
    </welcome-file-list>
</web-app>
主要看清楚上面filter配置,下面一节会给出一般filter的介绍,后面一节会给出struts2这个filter StatusPrepareAndExecuteFilter源码分析
现在我们可以通过浏览器访问一下action:


我们可以看到通过浏览器访问,最后显示出来jsp页面。只是在Struts.xml中配置了一下action。 而我们定义的action中只定义了一个execute函数。看桑去很简单,也没有传参数HttpServletRequest和HttpServletResponse等。可以在此比较下Servlet和Struts2, 这个简单例子体现不出Struts2的优势。
我们再看第三个action例子,一个简单登录场景:
LoginAction.java
 1 package action;
 2 import login.User;
 3 public class LoginAction {
 4
 5     User user;
 6
 7     /**
 8      * @return the user
 9      */
10     public User getUser() {
11         return user;
12     }
13
14     /**
15      * @param user the user to set
16      */
17     public void setUser(User user) {
18         this.user = user;
19     }
20
21     public String execute(){
22
23         return "success";
24     }
25 }
User.java
 1 package login;
 2
 3 public class User {
 4
 5     private String name;
 6     private String password;
 7     /**
 8      * @return the name
 9      */
10     public String getName() {
11         return name;
12     }
13     /**
14      * @param name the name to set
15      */
16     public void setName(String name) {
17         this.name = name;
18     }
19     /**
20      * @return the password
21      */
22     public String getPassword() {
23         return password;
24     }
25     /**
26      * @param password the password to set
27      */
28     public void setPassword(String password) {
29         this.password = password;
30     }
31 }
下面看一下登录的jsp,
login.jsp, 在web.xml中配置了,可以直接通过项目工程名访问。
 1 <%@ page language="java" contentType="text/html; charset=UTF-8"
 2     pageEncoding="UTF-8"%>
 3 <!DOCTYPE html PUBLIC "-//W3C//DTD HTML 4.01 Transitional//EN" "http://www.w3.org/TR/html4/loose.dtd">
 4 <html>
 5 <head>
 6 <meta http-equiv="Content-Type" content="text/html; charset=UTF-8">
 7 <title>登录实例</title>
 8 </head>
 9 <body>
10 <form action = "LoginAction.action" method="post">
11     <p>用户名 <input type = "text" name="user.name"/>
12     </p>
13     <p>密码 <input type = "text" name="user.password"/>
14     </p>
15     <input type = "submit" value = "登录"/>
16 </form>
17 </body>
18 </html>
欢迎登录界面welcome.jsp
 1 <%@ page language="java" contentType="text/html; charset=UTF-8"
 2     pageEncoding="UTF-8"%>
 3 <%@ taglib prefix="s" uri="/struts-tags" %>
 4 <!DOCTYPE html PUBLIC "-//W3C//DTD HTML 4.01 Transitional//EN" "http://www.w3.org/TR/html4/loose.dtd">
 5 <html>
 6 <head>
 7 <meta http-equiv="Content-Type" content="text/html; charset=ISO-8859-1">
 8 <title>登陆成功</title>
 9 </head>
10 <body>
11     <p>您的用户名是:<s:property value="user.name"/>
12     </p>
13     <p>您的密码是:<s:property value="user.password"/>
14     </p>
15 </body>
16 </html>
然后看一下运行效果:

到此三个例子也没看出Struts2的优势在哪,并且通过Servlet都可以完成!
三、Struts2原理
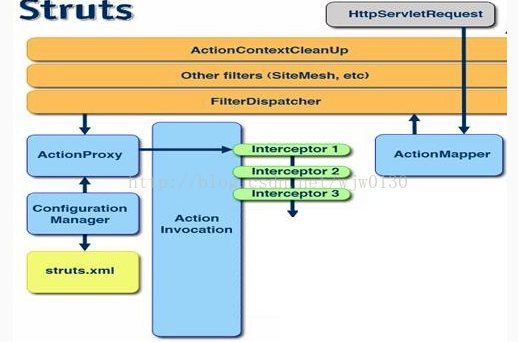
提到Struts2原理,一般都是Struts2官方文档中的那张图,下面贴一张类似的图,从一个博客中贴过来的,基本一样。
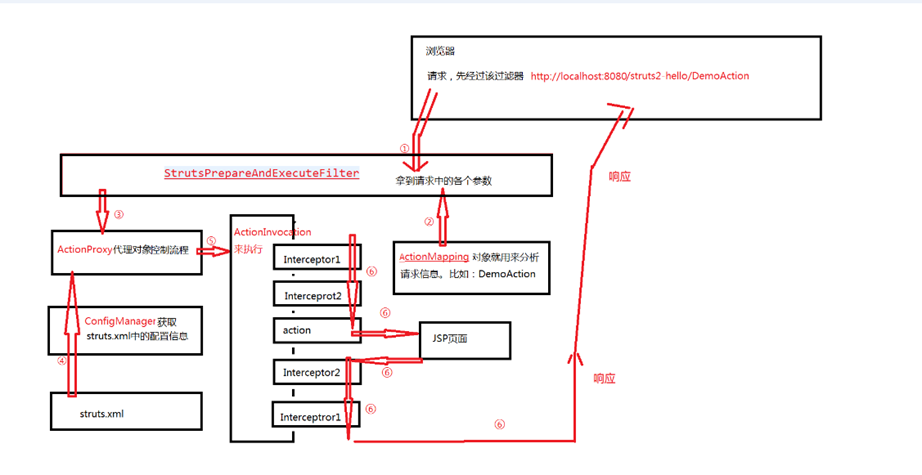
第一步:请求action,那么就会经过StrutsPrePareAndExecuteFilter, 这里会做两件事情,就是下面的两步,
第二步:通过ActionMapping将请求中的各种数据封装起来,拿到请求中的各种参数数据。
第三步:给自己找一个代理对象ActionProxy,来帮助我们处理事情。注意,这个ActionProxy实际上不做任何事情,而是指挥别人做。
第四步:ActionProxy叫ConfigManager获取struts.xml中的各种配置信息,其中struts.xml就有action的类权限定类名等信息,这样就可以通过action的名字找到其位置了。
第五步:有了ActionMapping获取的请求数据和ConfigManager获取的struts.xml中的数据,就叫ActionInvacation来查找对应的action
第六步:在找到action之前会经历一系列的拦截器,struts内部默认实现的。找到action后就相当于我们的servlet,在其中执行一些业务代码,然后跳转到目标页面,响应回去。struts的整个过程就结束了。
此时再回头看我们前面的例子:
我们需要做的就是:配置struts.xml, web.xml,编写action.java ,跳转页面jsp等。
action类实现的三种方式
1、普通类,上面写helloworld就是使用的普通类
2、实现Action接口,重写excute方法,接口中就声明这一个方法。
3、继承ActionSupport类,可以不必重写execute方法,只需要写自己想要的方法即可,一般开发中就使用这种方法,为什么呢?因为方便,ActionSupport类提供了一些我们所需要的常量,比如success字符串常量,内部还实现了execute方法,我们就不必自己写了。那么很多人就问,这不是多此一举吗?继承它跟不继承它的区别不大呀?哈哈,这样举个例子吧,你想追一个女孩子,有一天哪个女孩子哭了,擦泪的纸巾在女孩子的旁边,那个女孩子完全可以自己拿纸巾,但是你为了追她,体现自己好的一面,肯定是自己去拿纸巾出来递给她,虽然可能你拿比她自己拿更麻烦一点,但是这样让她对你更有好感呀, 那么这个继承actionSupport提供的一些常量等,也就是这个道理。并且它还不止止这点功能,它自己内部帮我实现了很多接口,后面会有讲解到,现在就晓得,以后写的话就通过这种方式去写action类。
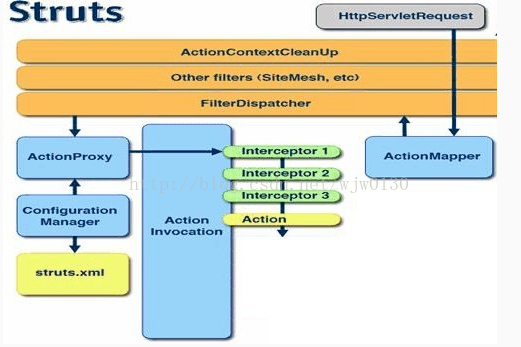
下面我们看一下官方struts文档介绍:Struts2的官方文档附带了Struts2的架构图。从这张图可以很好的去理解Struts2
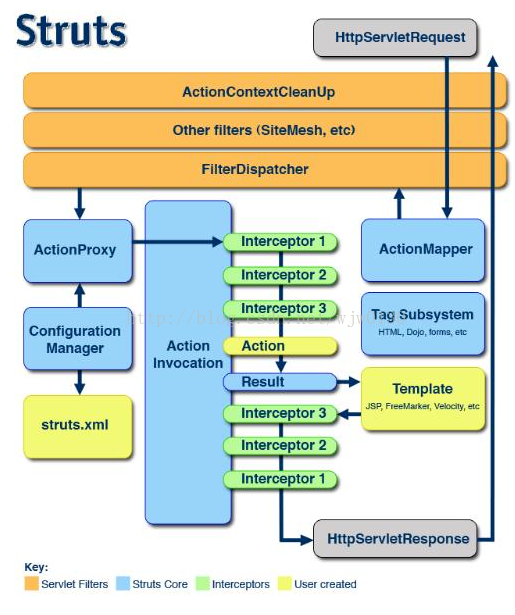
从这个上面也可以看出,我们用户需要修改哪几部分:struts.xml, action, jsp等。
关于图中的Key:
Servlet Filters:过滤器链,客户端的所有请求都要经过Filter链的处理。
Struts Core:Struts2的核心部分,但是Struts2已经帮我们做好了,我们不需要去做这个
Interceptors,Struts2的拦截器。Struts2提供了很多默认的拦截器,可以完成日常开发的绝大部分工作;而我们自定义的拦截器,用来实现实际的客户业务需要的功能。
User Created,由开发人员创建的,包括struts.xml、Action、Template,这些是每个使用Struts2来进行开发的人员都必须会的。
1.FilterDispatcher是整个Struts2的调度中心,也就是MVC中的C(控制中心),根据ActionMapper的结果来决定是否处理请求,如果ActionMapper指出该URL应该被Struts2处理,那么它将会执行Action处理,并停止过滤器链上还没有执行的过滤器。
2.ActionMapper 会判断这个请求是否应该被Struts2处理,如果需要Struts2处理,ActionMapper会返回一个对象来描述请求对应的ActionInvocation的信息。
3.ActionProxy,它会创建一个ActionInvocation实例,位于Action和xwork之间,使得我们在将来有机会引入更多的实现方式,比如通过WebService来实现等。
4.ConfigurationManager是xwork配置的管理中心,可以把它看做struts.xml这个配置文件在内存中的对应。
5.struts.xml,是开发人员必须光顾的地方。是Stuts2的应用配置文件,负责诸如URL与Action之间映射关系的配置、以及执行后页面跳转的Result配置等。
6.ActionInvocation:真正调用并执行Action,它拥有一个Action实例和这个Action所依赖的拦截器实例。ActionInvocation会按照指定的顺序去执行这些拦截器、Action以及相应的Result。
Interceptor(拦截器):是Struts2的基石,类似于JavaWeb的Filter,拦截器是一些无状态的类,拦截器可以自动拦截Action,它们给开发者提供了在Action运行之前或Result运行之后来执行一些功能代码的机会。
7.Action:用来处理请求,封装数据
详细运行流程
1.当用户的发出请求,比如http:localhost:8080/Struts2Demo/HelloAction.action,请求会被Tomcat接收到,Tomcat服务器来选择处理这个请求的Web应用,那就是由helloworld这个web工程来处理这个请求。
2.web容器会去读取Struts2Demo这个工程的web.xml,在web.xml中进行匹配,但发现,由struts2这个过滤器来进行处理(也就是StrutsPrepareAndExecuteFilter),根据Filter的配置,找到FilterDispatch(Struts2的调度中心)
3.然后会获取FilterDispatcher实例,然后回调doFilter方法,进行真正的处理
PS:FilterDispatcher是任何一个Struts2应用都需要配置的,通常情况下,web.xml文件中还有其他过滤器时,FilterDispatcher是放在滤器链的最后;如果在FilterDispatcher前出现了如SiteMesh这种特殊的过滤器,还必须在SiteMesh前引用Struts2的ActionContextCleanUp过滤器

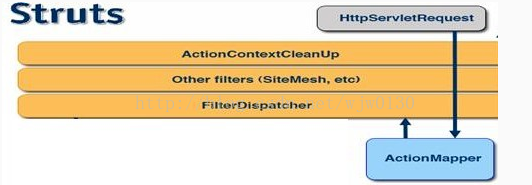
5.如果需要Struts2处理,ActionMapper会通知FilterDispatcher,需要处理这个请求,FilterDispatcher会停止过滤器链以后的部分,(这也就是为什么,FilterDispatcher应该出现在过滤器链的最后的原因)。然后建立一个ActionProxy实例,这个对象作为Action与xwork之间的中间层,会代理Action的运行过程。
6.ActionProxy对象在被创建出来的时候,并不知道要运行哪个Action,它手里只有从FilterDispatcher中拿到的请求的URL。
而真正知道要运行哪个Action的是ConfigurationManager。因为只有它才能读取我们的strtus.xml。(在服务器启动的时候,ConfigurationManager就会把struts.xml中的所有信息读到内存里,并缓存,当ActionProxy带着URL向他询问要运行哪个Action的时候,就可以直接匹配、查找并回答了)
7.ActionProxy知道自己该干什么事之后(运行哪个Action、相关的拦截器以及所有可能使用的result信息),然后马上建立ActionInvocation对象了,ActionInvocation对象描述了Action运行的整个过程。注意:Action完整的调用过程都是由ActionInvocation对象负责
8.在execute方法之前,好像URL请求中的参数已经赋值到了Action的属性上,这就是我们的"雷锋"—拦截器。
拦截器的运行被分成两部分,一部分在Action之前运行,一部分在Result之后运行,而且顺序是刚好反过来的。也就是在Action执行前的顺序,比如是拦截器1、拦截器2、拦截器3,那么运行Result之后,再次运行拦截器的时候,顺序就变成拦截器3、拦截器2、拦截器1了。
这就好比,你要去奶奶家,需要通过 水泊梁山->盘丝洞 -> 索马里,到了奶奶家,看奶奶回来的时候,就必须要通过 索马里 -> 盘丝洞 -> 水泊梁山。
所以ActionInvocation对象执行的时候需要通过很多复杂的过程,按照指定拦截器的顺序依次执行。
9.到了奶奶家,然后执行Action的execute方法
10.然后根据execute方法返回的结果(Result),去struts.xml中匹配选择下一个页面

11.根据结果(Result)找到页面后,在页面上(有很多Struts2提供的模板),可以通过Struts2自带的标签库来访问需要的数据,并生成最终页面.注意:这时还没有给客户端应答,只是生成了页面.

12.最后,ActionInvocation对象倒序执行拦截器,从奶奶家回来

13.ActionInvocation对象执行完毕后,已经得到响应对象(HttpServletResponse)了,最后按与过滤器(Filter)配置定义相反的顺序依次经过过滤器,向客户端展示出响应的结果
经过上面详细解释,到这一步应该对Struts的大致结构和运行顺序有了一定的了解!
下面一部讲解struts源码分析!
https://blog.csdn.net/yonggeit/article/details/82686363-------Servlet的优缺点
https://blog.csdn.net/u011958281/article/details/74685659-----struts2原理
https://www.cnblogs.com/konrad/p/6426790.html-----介绍的比较深入,知识点
https://www.cnblogs.com/whgk/p/6542505.html----讲解的非常好
https://blog.csdn.net/wjw0130/article/details/46371847----对官方struts讲解非常清楚!



 浙公网安备 33010602011771号