

@@Spring回顾
核心概念
- 关于数据源
- JNDI 数据源
- 在$TOMCAT_HOME/conf/context.xml配置数据源 Resource
- dbcp数据源的配置
- 在Spring配置文件中 ----》读取外部文件
- JNDI 数据源
- 控制反转 依赖注入理解!
- 控制反转:Ioc-->Inversion Of Control
- 所谓控制反转,就是将组件的创建由代码本身转移到外部容器,
- 依赖注入:DI --> Dependency Injection
- 运行时在由容器负责依赖关系的注入。
- 什么是AOP
- “全称Aspect Oriented Programming,
- 面向切面编程,
- 通过预编译方式和运行期动态代理实现程序功能的统一维护的一种技术。”
- 控制反转:Ioc-->Inversion Of Control
- Spring Ioc的使用步骤!
- 下载并且导入一组Jar包
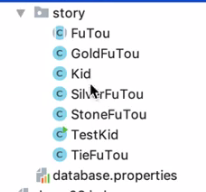
- 定义组件:赵子龙 斧头
- 在容器中配置组件以及依赖关系
- 实例化容器,取出使用
- 代理机制理解!
- Aop基于Java的代理机制(Proxy)实现,目标在不改变程序的基础上,动态添加新功能。
- Spring Aop使用步骤!
- 下载并且导入一组Jar包
- 定义组件:业务组件 通知组件
- 在容器中配置组件以及依赖关系,使用Aop织入通知
- 实例化容器,取出使用
- 代码及配置回顾!
- 赵子龙--$配置文件
<?xml version="1.0" encoding="UTF-8"?>
<beans xmlns="http://www.springframework.org/schema/beans"
xmlns:xsi="http://www.w3.org/2001/XMLSchema-instance"
xsi:schemaLocation="http://www.springframework.org/schema/beans http://www.springframework.org/schema/beans/spring-beans.xsd
http://www.springframework.org/schema/context http://www.springframework.org/schema/context/spring-context-4.1.xsd">
<!--赵子龙-->
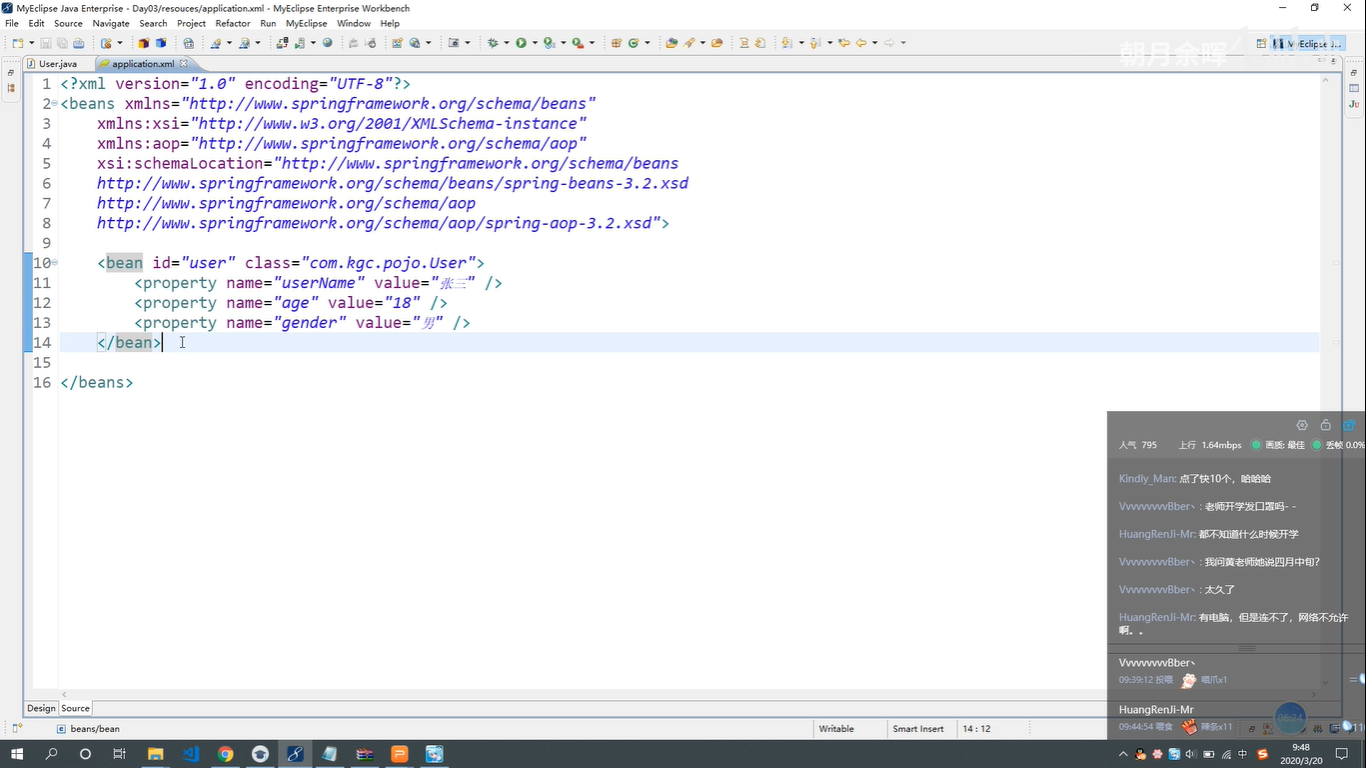
<bean id="kid" class="story.Kid">
<!--id最好跟类名保持一致,class紧跟路径,ref代表引用,value代表普通赋值-->
<property name="fuTou" ref="tie"></property>
<property name="name" value="赵子龙"></property>
</bean>
<!--斧头-->
<bean id="gold" class="story.GoldFuTou"></bean>
<bean id="silver" class="story.SilverFuTou"></bean>
<bean id="tie" class="story.TieFuTou"></bean>
<bean id="stone" class="story.StoneFuTou"></bean>
<!--打印机 墨盒--$配置文件-->
<bean id="printer" class="printer.Printer">
<property name="inkBox" ref="color"></property>
<property name="paper" ref="b5"></property>
</bean>
<!--墨盒-->
<bean id="color" class="printer.inkfactory.ColorInkBox"></bean>
<bean id="gray" class="printer.inkfactory.GrayInkBox"></bean>
<!--纸张-->
<bean id="a4" class="printer.paperfactory.A4Paper"></bean>
<bean id="b5" class="printer.paperfactory.B5Paper"></bean>
</beans>
Aop通知【Aop通知--$配置文件】
- 前置通知
	package advice;

	import org.springframework.aop.MethodBeforeAdvice;

	import java.lang.reflect.Method;
	import java.util.Date;

	public class LogBeforeAdvice implements MethodBeforeAdvice {
		/**
		 * 前置通知
		 * @param method 正在调用的方法
		 * @param objects 正在调用的方法的参数列表
		 * @param o 目标对象
		 * @throws Throwable
		 */
		@Override
		public void before(Method method, Object[] objects, Object o) throws Throwable {
			String classname = o.getClass().getSimpleName();
			String methodName = method.getName();

			System.out.println("双11,所有商品5折销售");
			double money = (Double) objects[1];
			objects[1] = money * 0.5;

			System.out.println(new Date() + "调用了"+classname+"的方法"+methodName);
		}
	}
- 增强类型使用方法
- 后置通知
    public class LogAfterAdvice implements AfterReturningAdvice {
        @Override
        public void afterReturning(Object o, Method method, Object[] objects, Object o1) throws Throwable {
            System.out.println(new Date() + "调用"+o1.getClass().getSimpleName()+"类的"+method.getName()+"方法完成!");
        }
    }
- 环绕通知,老大哥(优先级比前置通知和后置通知都高)
	public class ArroundAdvice implements MethodInterceptor {
		@Override
		public Object invoke(MethodInvocation invocation) throws Throwable {
			System.out.println("我是环绕通知,我是所有通知里最🐂的");
			Object result= null;
			try{
				result = invocation.proceed();
			}catch(Exception e){
				System.out.println("想不想异常通知");
			} finally {
				System.out.println("我想不想最终增强");
			}
			System.out.println("我想不想后置通知");
			return result;
		}
	}
- 定义组件, 织入通知
- 切入点参数详解


- 切入点参数详解
    <!--业务组件-->
    <bean id="biz" class="biz.impl.CustomerBizImpl"></bean>
    <!--通知组件-前置通知(before)-->
    <bean id="before" class="advice.LogBeforeAdvice"></bean>
    <!--织入通知-->
    <aop:config>
        <!--定义切入点    execution【埃克斯Q申】-->
        <aop:pointcut id="p" expression="execution(* biz..*.*(..))"></aop:pointcut>
        <aop:pointcut id="p2" expression="execution(* story.Kid.*(..))"></aop:pointcut>
        <!--织入通知-->
        <!--<aop:advisor advice-ref="before" pointcut-ref="p"></aop:advisor>-->
        <aop:advisor advice-ref="before" pointcut-ref="p2"></aop:advisor>
    </aop:config>
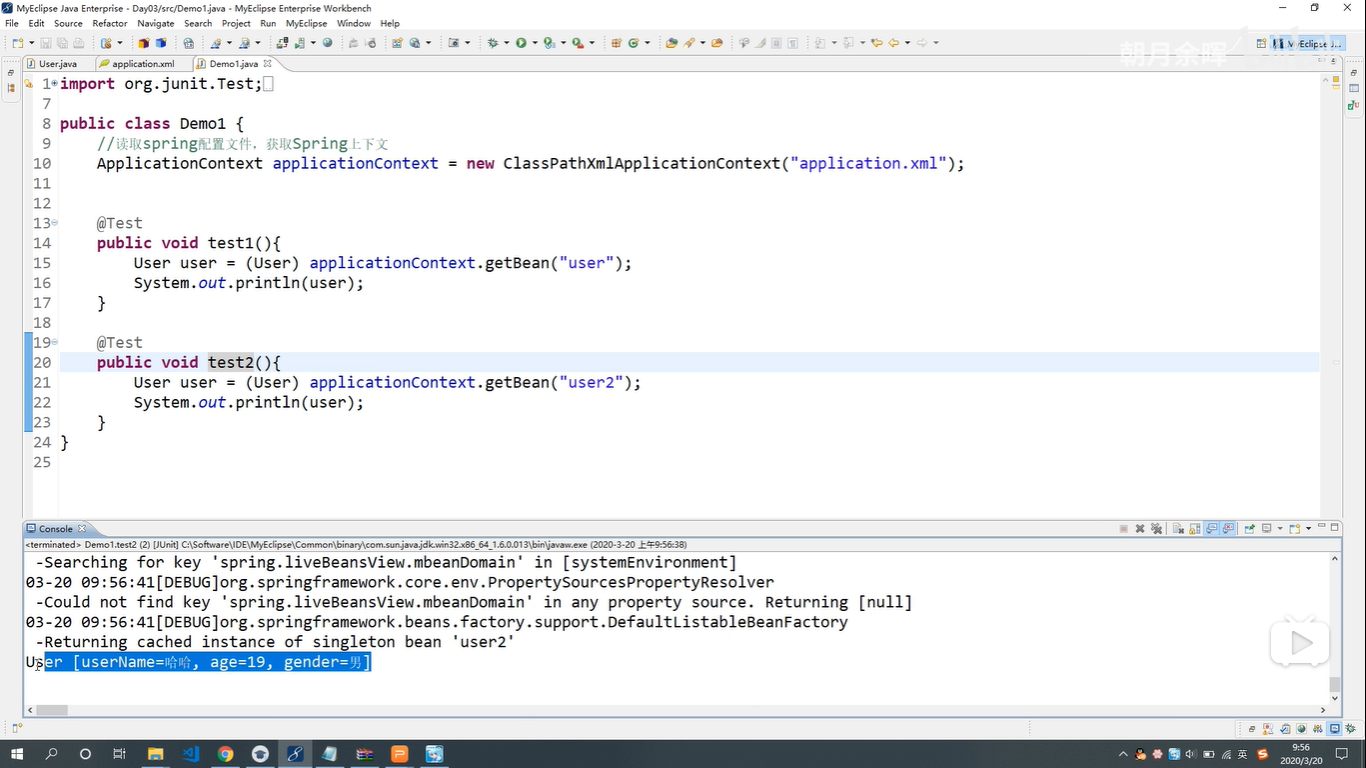
三种注入方式总结
- 设值注入
- bean ----》property 调用类中的 set 注入
- 构造注入【注意:一个类中有了带参构造,无参构造则会被覆盖】必须全部传递
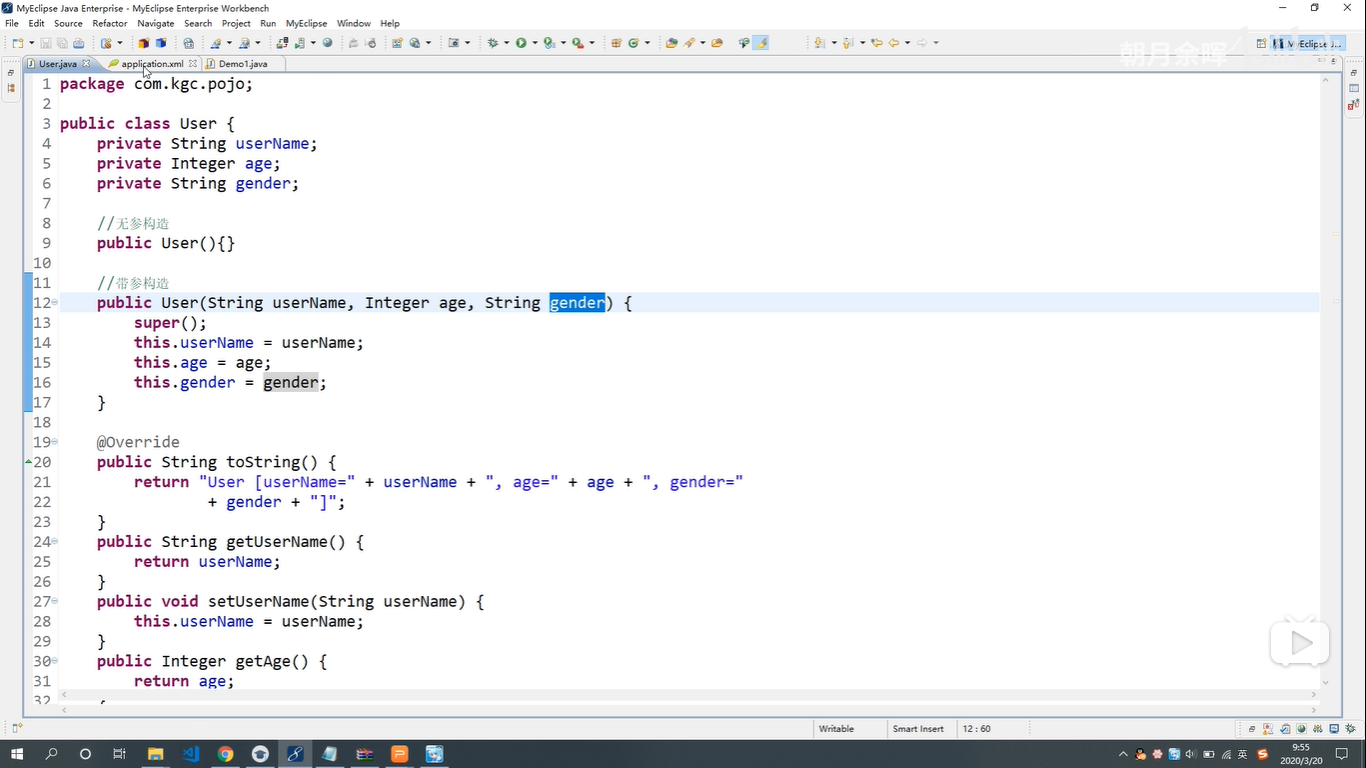
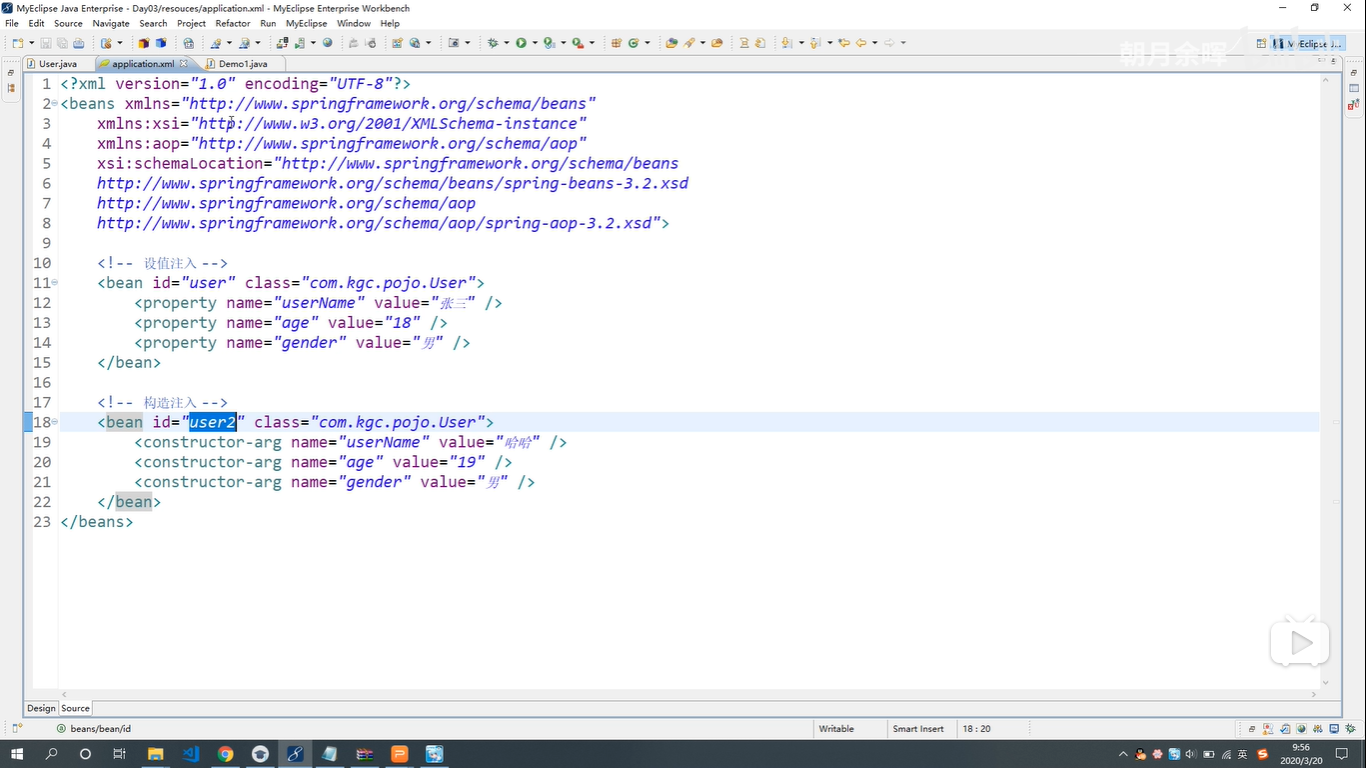
- 用到代餐构造方法 不区分顺序,还可以使用index下标
- bean ----》 constructor-arg 调用带参构造
- p命名空间注入
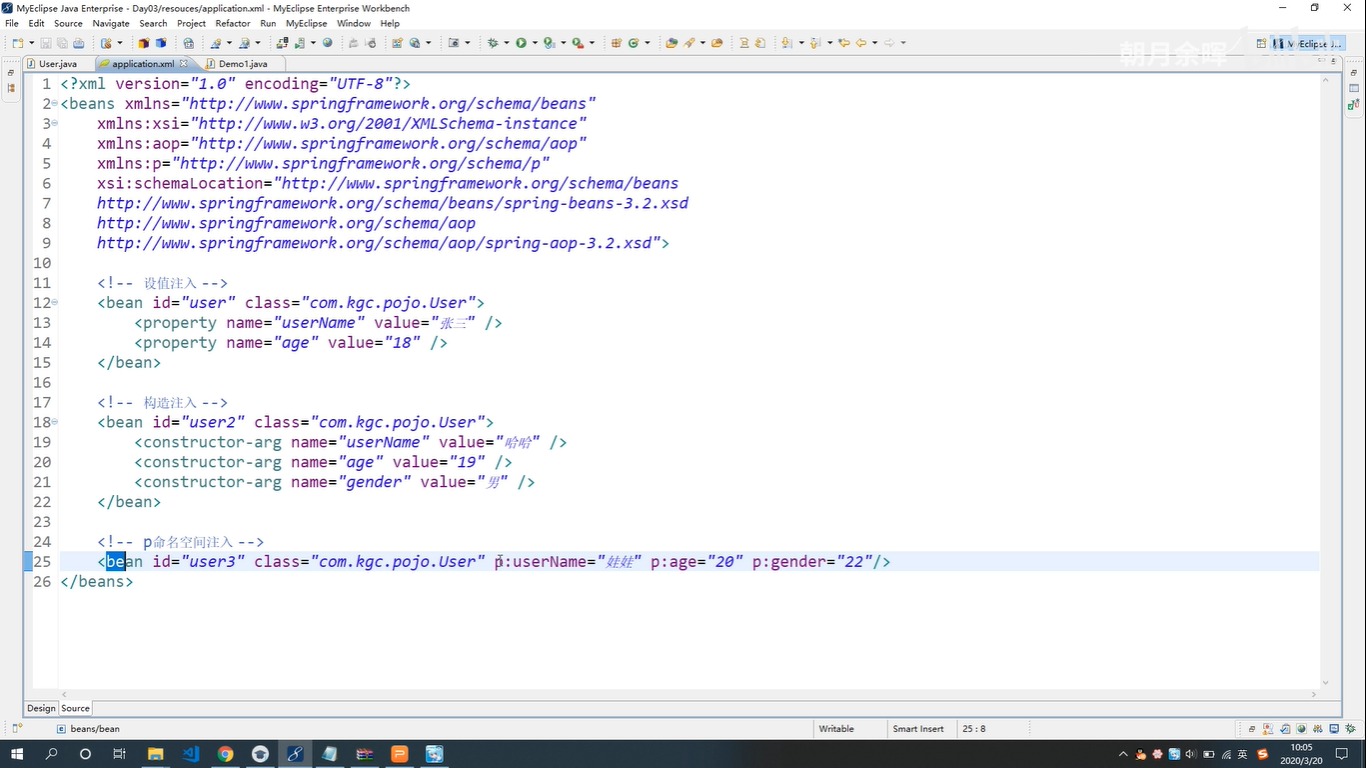
- bean ----》p:userName="娃娃"
- 依赖注入的多种方式对比
- 设置注入
- 需提供无参构造方法 调用setter方法注入
- 优缺点
通过setter访问器实现
灵活性好,单setter方法数量较多
时效性差
通过无参构造实例化 - 设置注入的两种方式
- 构造注入
- 需提供带参构造 指定index下标给参数赋值
- 优缺点
通过构造方法实现
灵活性差,紧靠重载限制太多
时效性好
通过匹配的构造方法实现化,但建议表刘无参构造
- p命名空间注入
- 其实就是setter(设值)注入
- 不支持复杂类型(数组)
- 设置注入
注解实现IOC方法
- 展示

多个逗号隔开-
Repository(数据访问层) Dao层使用
-
Component(逻辑层):("sxt") : 比如说写个小的工具类,也要受到Spring管理-则加上Component()
-
Service(服务层)
-
Controller(控制层)
- 配置普通组件_此注解在.xml中配置一个Bean_ID一样
-
@Autowired:按照类型注入
-
Qualifier("stu"):如果统一类型找到多个Bean,则指定使用那个
-
Resurce:按照名称注入,在按照类型查找
- private Student student; student:名称 Student:类型
- 代码大纲(注解实现_需要在配置文件中配置扫描组件)
-
- <context:component-scan base-package="story"></context:component-scan> - 在小屁孩(Kid)加入注解_Component("Kid")
- 小屁孩需要斧头,配置金斧头_Component("gold")
- 在小屁孩实体类中加入_private FuTou fuTou; 上加入@Autowired
- 如果说在(银铁)斧头中都加入了compone注解,那就使用Qualifier("")注解标明使用那个
- 如果说按照名字查找
- 在铁斧头中加入Component("fuTou") private FuTou fuTou;Resurce_fuTou跟component中对应上则找到,如果对应不上则使用Qualifier("")
-
-
- 不同类型注入
    <!--不同类型注入铺垫Java代码-->
    private String name;
    private Integer age;
    private String[] hobbies;
    private List<String> fruits;
    private Set<String> sports;
    private Map<String,String> friends;
    private Properties database;
    private Grade grade;
- 演示不同类型注入 And 三种Aop实现方式
    //公用外部Bean
    <bean id="s1" class="demo06.Grade" p:name="S1" p:id="1"></bean>

	<!--设值注入的两种方式 提供空的构造方法-->
	 <bean id="stu" class="demo06.Student">
		<property name="name">
			<value>张三</value> //可以指定type类型
		</property>
		<property name="age" value="18"></property>
	 </bean>
	 <property name="grade" ref="s1"></property> //引用公共Bean
		//创建内部Bean
		<property name="grade">
				<bean id="s1" class="demo06.Grade" p:name="S1" p:id="1"></bean> //意思是只能stu用,其它的不可以用
			</property>

	 <!--构造注入代码示例 相当于New 对象 必须提供实体类的带参构造-->
	 <bean id="stu02" class="demo06.Student">
			//构造器参数 index指定参数的下标
			<constructor-arg index="0" value="李四"></constructor-arg>
			<constructor-arg index="1" value="16"></constructor-arg>
			//构造注入和设值注入可以一起使用
	</bean>

	<!--p命名空间注入代码示例-->
	<!--第一步 声明待注入Bean-->
		<bean id="name01" class="java.lang.String">
		<constructor-arg value="Rose"></constructor-arg>
		/bean>
	<!--第二步 使用待注入Bean-->
	<bean id="stu02" class="demo06.Student" p:name-ref="name01"> //先走setger注入 p:name="hello"
		<constructor-arg value="Rose"></constructor-arg>
	</bean>

	<!--不同数据类型的注入方式-->
	<property name="hobbies">  //数组
		<array>
			<value>吃饭</value>
			<value>睡觉</value>
			<value>打代码</value>
		</array>
	</property>
	<property name="fruits">  //List集合
		<list>
			<value>苹果</value>
			<value>香蕉</value>
		</list>
	</property>
	<property name="sports">  //Set集合
		<set>
			<value>登山</value>
			<value>打羽毛球</value>
			<value>登山</value>
			<value>拳击</value>
		</set>
	</property>
	<property name="friends"> //Map集合
		<map>
			<entry key="小黑" value="123"></entry>
			<entry key="小强" value="蟑螂"></entry>
		</map>
	</property>
	<property name="database"> //属性文件_键值对
		<props>
			<prop key="url">${url}</prop> //通过prop进行注入 请参考下面加载外部文件代码
		</props>
	</property>

	<!--加载外部属性文件的两种方式(读取外部文件)-->
	<!--001-->
	<bean id="haha" class="org.springframework.beans.factory.config.PropertyPlaceholderConfigurer">
			<property name="location" value="classpath:database.properties"></property>
	</bean>
	<!--002-->
	<context:property-placeholder location="classpath:database.properties"></context:property-placeholder>

	<!--AOP的三种实现方式-->
	<!--01.aop-config的方式-->
		<aop:config>
			<aop:pointcut id="p" expression="execution(* biz..*.*(..))"></aop:pointcut>
			<aop:advisor advice-ref="arround" pointcut-ref="p"></aop:advisor>
		</aop:config>
	<!--02.aspectJ注解的方式:可以在一个切面类中配置所有的通知类型
		1. 定义一个类,添加@Aspect
		2. 定义多个方法:@Before @AfterReturnning
		3. 在配置文件中配置切面
		4. <!--配置自定义的切面-->
			<bean id="aspect" class="advice.MyAspect02"></bean>
		5. 启动配置的切面类(引用类的注解)
			<aop:aspectj-autoproxy></aop:aspectj-autoproxy>
	-->
	<!--03.chema的方式    【死给马】
		1. 定义一个类,不写任何的注解
		2. 配置文件中配置

	<bean id="aspect" class="advice.MyAspect02"></bean>
	<aop:config>
		<aop:pointcut id="p" expression="execution(* biz..*.*(..))"></aop:pointcut>
		<aop:aspect ref="aspect">
			<aop:before method="qianzhi" pointcut-ref="p"></aop:before>  //调用前置通知(类里面的名称-qianzhi)
			<aop:after-returning method="houzhi" pointcut-ref="p"></aop:after-returning>
		</aop:aspect></aop:config>
	-->
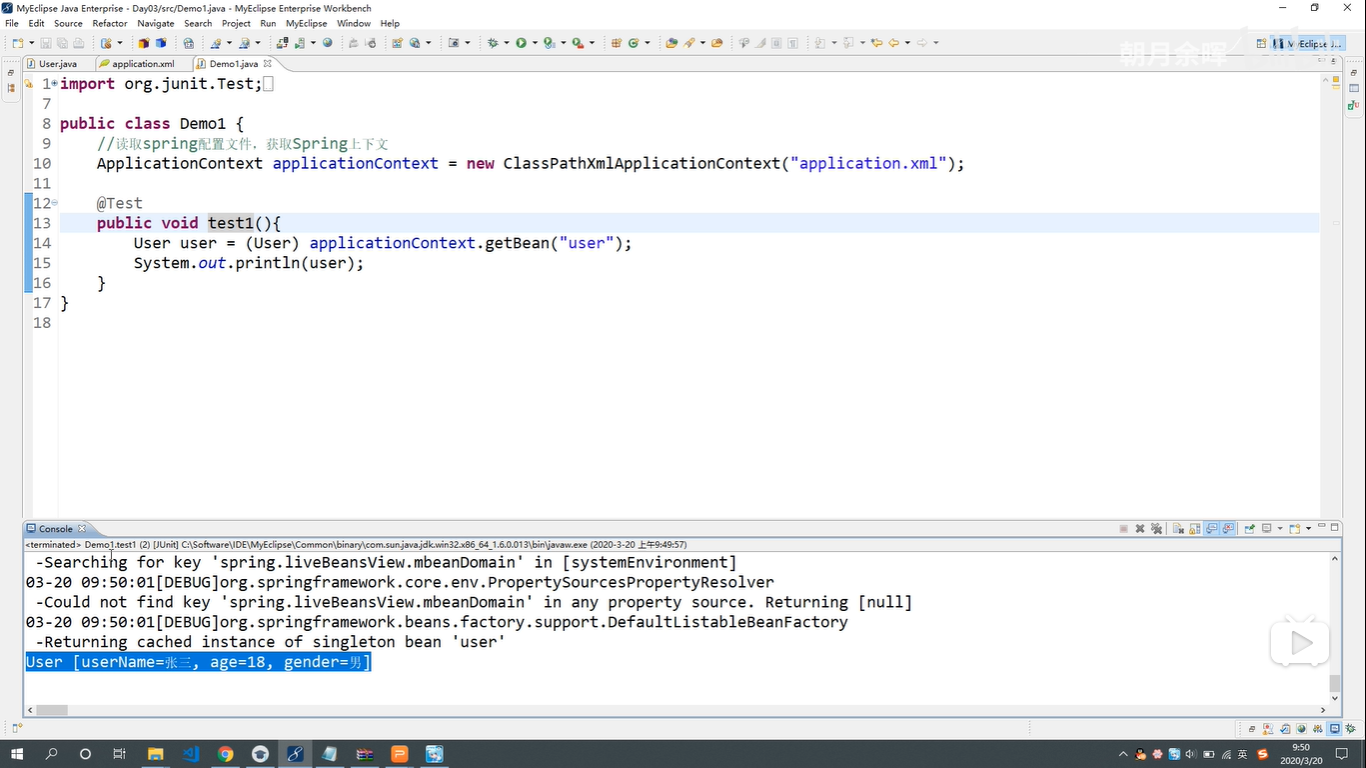
- 测试读取Spring配置文件
        //第一种测试方法_SpringJUnit4ClassRunner
        package demo06;
        import biz.CustomerBiz;
        import org.junit.runner.RunWith;
        import org.springframework.beans.factory.annotation.Autowired;
        import org.springframework.beans.factory.annotation.Qualifier;
        import org.springframework.test.context.ContextConfiguration;
        import org.springframework.test.context.junit4.SpringJUnit4ClassRunner;

        import java.util.ArrayList;

        @RunWith(SpringJUnit4ClassRunner.class)
        @ContextConfiguration({"classpath:demo06/applicationContext.xml"}) //classpath:必须加上类路径
        public class Test {
            @Autowired
            @Qualifier("stu") //此注解和@Autowired配合使用,找到多个_指定名称即可_名字来源于Spring配置文件中的bean_ID
            private Student student;
            @Autowired
            private CustomerBiz biz;

            @org.junit.Test
            public void test(){
                String str = "hello world";
                String str02 = new String("world");

                System.out.println(student);
                System.out.println(student.getHobbies());
                System.out.println(student.getGrade().getName());
            }
        }

        //第二种测试方法_普通的main方法测试
        import org.springframework.context.ApplicationContext;
        import org.springframework.context.support.ClassPathXmlApplicationContext;
        import story.Kid;

        public class TestAnnotation {
            public static void main(String[] args) {
                ApplicationContext context = new ClassPathXmlApplicationContext("demo06/applicationContext.xml");
                Kid kid = (Kid) context.getBean("kid");

                System.out.println(kid);
                kid.kan("柴火");
            }
        }
Spring配置补充
-
JNDI 数据源
JNDI : Java Naming And Directory Interface
Java命名和目录访问接口,是Java中提供用于从其他容器中查找资源的一门技术,比如Tomcat容器、JBoss容器、EJB容器,资源可以是字符串、数据源、JavaBean。
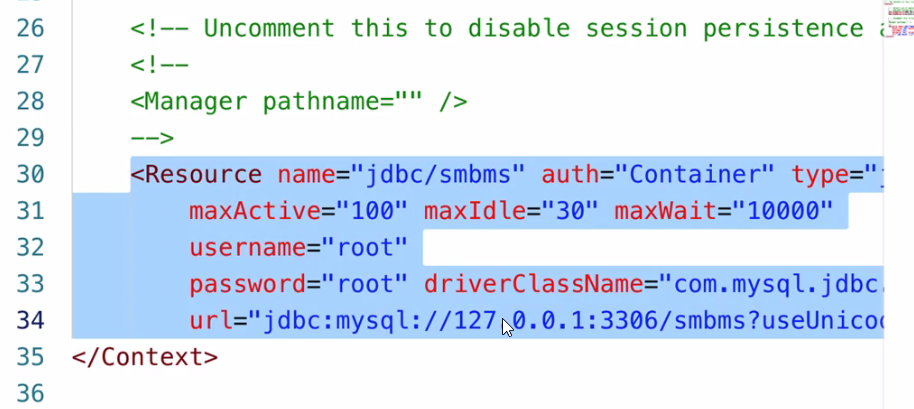
这里使用的是另外一种数据源 需要在Tomcat-config中配置- context_ resource(一般在最后) -
JNDI数据源的使用步骤
- 在Tomcat中配置数据源
- 将数据库的驱动包放入tomcat的lib目录
- 在$TOMCAT_HOME/conf/context.xml配置数据源 Resource
- 在spring中通过 JNDIObjectFactoryBean 查找数据源
- 在Tomcat中配置数据源
-
测试运行:不能使用main或者junit进行测试,只能通过jsp或者servlet进行测试
-
JNDI Tomcat代码配置
<Resource name="jdbc/smbms" auth="Container" type="javax.sql.DataSource"
maxActive="100" maxIdle="30" maxWait="10000"
username="root"
password="root" driverClassName="com.mysql.jdbc.Driver"
url="jdbc:mysql://127.0.0.1:3306/smbms?useUnicode=true&characterEncoding=utf-8"/> & 转义字符 相当于 AND
+ name : 数据源名称
+ auth : 权限
+ type : 提供的数据源的类型
- dbcp数据源的配置
	<bean id="dataSource" class="org.springframework.jndi.JndiObjectFactoryBean">
		<property name="jndiName" value="java:comp/env/jdbc/smbms"></property>
	</bean>
spring 常用的注解有哪些?
-
标识为组件 : bean: id class
- @Component :
- @Repository : dao
- @Service : 业务层
- @Controller : 控制器
-
依赖注入: property constructor-arg
- @Autowired : byType
- @Quarlifer
- @Resource : byName
-
其他
- @RunWith
- @ContextConfiguration
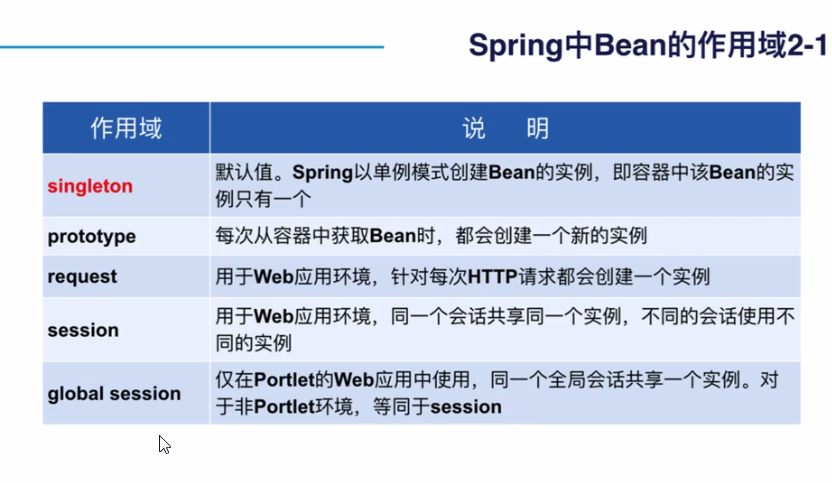
- @Scope("singleton|prototype") : 指定bean的作用域
-
spring自动装配
- 基于注解
- @Autowired : byType
- @Resource : byName
- 基于xml
- 通过autowire 属性: byType byName
- 注意事项
- 自动装配只负责自定义的类型,复杂数据类型
- 注意事项
- 基于注解
-
spring配置文件拆分
实际开发:注解🦑xml配置:1. 编写方便 2. 便于修改维护
项目开发中哪些组件使用注解:Dao组件 + Service组件 + controller组件 + 普通组件
spring集成发邮件服务、发短信服务、任务调度服务
拆分策略:
公共配置(集成代码) + 每个集成服务一个单独的配置文件 -
如何一次读取多个配置文件
- 测试类
ApplicationContext context = new ClassPathXmlApplicationContext("applicationContext.xml","story/beans.xml");
2. 使用的spring-test + junit
    @RunWith(SpringJUnit4ClassRunner.class)
    @ContextConfiguration({"classpath:story/beans.xml","classpath:app.xml"}) 多个配置文件加上大括号
    public class TestKid {}
3. web.xml 上下文参数
<context-param>
        <param-name>contextConfigLocation</param-name>
        <param-value>classpath:applicationContext.xml,classpath:story/beans.xml</param-value> 多个配置文件则逗号隔开
</context-param>
- web.xml 使用通配符
spring.xml spring-email.xml(邮件) spring-sms.xml(短信)
<context-param>
        <param-name>contextConfigLocation</param-name>
        <param-value>classpath:spring*.xml</param-value>    spring*.xml:代表以spring开头的所有配置文件  classpath:从src开始扫描      classpath*:代表包括jar包中的配置文件
</context-param>
<context-param>
        <param-name>contextConfigLocation</param-name>
        <param-value>classpath:spring/*.xml</param-value>  spring/*.xml:放到一个spring文件夹中,然后读取配置文件
</context-param>
5. 可以通过 import 标签引入其他的配置文件
<import resource="classpath:spring-email.xml"></import>
- outer
- Tomcat中JNDI数据源的配置预览
- JNDI数据源的Spring配置预览(value中java:comp/env固定 + /jdbc/smbms-指的是Tomcat中配置的名称)

- Spring作用域
- 代码演练
<?xml version="1.0" encoding="UTF-8"?>
<beans xmlns="http://www.springframework.org/schema/beans"
       xmlns:xsi="http://www.w3.org/2001/XMLSchema-instance"
       xmlns:context="http://www.springframework.org/schema/context" xmlns:tx="http://www.springframework.org/schema/tx"
       xmlns:aop="http://www.springframework.org/schema/aop"
       xsi:schemaLocation="http://www.springframework.org/schema/beans http://www.springframework.org/schema/beans/spring-beans.xsd
		http://www.springframework.org/schema/context http://www.springframework.org/schema/context/spring-context-4.1.xsd http://www.springframework.org/schema/tx http://www.springframework.org/schema/tx/spring-tx.xsd http://www.springframework.org/schema/aop http://www.springframework.org/schema/aop/spring-aop.xsd">

    <!--导入其他的配置文件-->
    <import resource="classpath:spring-email.xml"></import>    web/中监听器启动调用spring配置文件,此句代码代表引入其他的配置文件,比如(电子邮件配置文件)

    <context:property-placeholder location="classpath:database.properties"></context:property-placeholder>

    <!--数据源:dbcp-->
    <bean id="dataSource" scope="singleton" class="org.apache.commons.dbcp.BasicDataSource">   scope="singleton"(作用域 每次都会创建一个新的 单例)
        <property name="driverClassName" value="${driver}"></property>
        <property name="url" value="${url}"></property>
        <property name="username" value="${jdbc.username}"></property>
        <property name="password" value="${password}"></property>

        <property name="maxActive" value="${maxActive}"></property>
        <property name="maxIdle" value="${maxIdle}"></property>
        <property name="maxWait" value="${maxWait}"></property>
    </bean>
    <!--sqlSessionFactory-->
    <bean id="sqlSessionFactory" class="org.mybatis.spring.SqlSessionFactoryBean">
        <!--数据源-->
        <property name="dataSource" ref="dataSource"></property>
        <!--sql映射文件的路径-->
        <property name="mapperLocations" value="classpath:org/aptech/hdax/mappers/*.xml"></property>
        <!--类型别名-->
        <property name="typeAliasesPackage" value="org.aptech.hdax.pojo"></property>
        <!--配置mybatis配置文件-->
        <property name="configLocation" value="classpath:mybatis-config.xml"></property>
        <!--插件:分页插件-->
        <property name="plugins">
            <array>
                <bean class="com.github.pagehelper.PageInterceptor">
                    <property name="properties">
                        <props>
                            <prop key="helperDialect">mysql</prop>
                        </props>
                    </property>
                </bean>
            </array>
        </property>
    </bean>

    <!--dao接口的实现类:批量生成,name默认是接口首字母小写-->
    <bean id="world" class="org.mybatis.spring.mapper.MapperScannerConfigurer">
        <property name="sqlSessionFactoryBeanName" value="sqlSessionFactory"></property>
        <property name="basePackage" value="org.aptech.hdax.dao"></property>
    </bean>

    <!--aop织入事务通知-->
    <bean id="transactionManager" class="org.springframework.jdbc.datasource.DataSourceTransactionManager">
        <property name="dataSource" ref="dataSource"></property>
    </bean>
    <tx:advice id="txAdvice" transaction-manager="transactionManager">
        <!--事务属性-->
        <tx:attributes>
            <tx:method name="*" propagation="REQUIRED"/>
            <tx:method name="get*" propagation="SUPPORTS" read-only="true"></tx:method>
        </tx:attributes>
    </tx:advice>

    <aop:config>
        <aop:pointcut id="p" expression="execution(* org.aptech.hdax.dao..*.*(..))"></aop:pointcut>
        <aop:advisor advice-ref="txAdvice" pointcut-ref="p"></aop:advisor>
    </aop:config>
</beans>
- 小屁孩配置文件
    <?xml version="1.0" encoding="UTF-8"?>
    <beans xmlns="http://www.springframework.org/schema/beans"
           xmlns:xsi="http://www.w3.org/2001/XMLSchema-instance"
           xsi:schemaLocation="http://www.springframework.org/schema/beans http://www.springframework.org/schema/beans/spring-beans.xsd
            http://www.springframework.org/schema/context http://www.springframework.org/schema/context/spring-context-4.1.xsd"
        default-autowire="byName"  所有的Bean都会按照名字注入      如果单独制定,则在下列单独使用autowire注入即可
    >
        <bean id="kid" class="story.Kid"></bean> autowire="byType" 自动按照类型注入,发现spring配置文件中有则注入  autowire="byName" 按照名字注入,会找到银斧头

        <bean id="name01" class="java.lang.String">
            <constructor-arg value="王雄伟"></constructor-arg>
        </bean>

        <bean id="gold" class="story.GoldFuTou"></bean>
        <bean id="fuTou" class="story.SilverFuTou"></bean>
    </beans>

 浙公网安备 33010602011771号