基于Ubuntu20.04+OpenCV4+ROS+ORB SLAM3调试Realsense D455
编译中会遇到数不胜数的奇怪问题,更多没有提及的问题需要自行查阅解决,记录的可能欢迎纠正与补充
本文编译环境基于此前文章进行,重复部分下文不再赘述,如想了解环境编译细节,可以速览以下链接
虚拟机 VMware16 + Ubuntu20.04 配置 LOAM-LIVOX
https://www.cnblogs.com/Pyrokine/p/16292786.html
Ubuntu 20.04打RT实时内核补丁
https://www.cnblogs.com/Pyrokine/p/16695196.html
编译环境
Ubuntu      5.15.79-rt54 (非虚拟机)
OpenCV      4.2.0 (由 ros-noetic 携带)
ceres       release 2.1.0
Pangolin    commit 5f78f502117b2ff9238ed63768fd859a8fa78ffd - Tue Oct 18 10:29:50 2022 -0700
ORB SLAM3   commit 4452a3c4ab75b1cde34e5505a36ec3f9edcdc4c4 - Thu Feb 10 09:26:50 2022 +0100
ROS         noetic
以下环境,如无特殊说明均在同一级文件夹下创建,无相互包含关系,为了兼容性,后续所有的库都使用 C++17 标准编译,OpenCV 使用 ROS 自带的库,笔者为 4.2.0,查看版本的方法如下,如果使用其他版本编译,则可能会出现版本不兼容的问题;如果不使用 ROS 相关功能,可以自行安装 >=4.4.0 版本的 OpenCV
pkg-config opencv4 --modversion如不确定 OpenCV 是不是 ROS 引入的,可以通过以下命令查看
apt list --installed | grep opencv
Pagolin
安装依赖
sudo apt install pkg-config libglew-dev libgl1-mesa-dev libegl1-mesa-dev libwayland-dev libxkbcommon-dev wayland-protocols doxygen编译及安装,因为已经设置为 C++17 标准,所以直接编译即可
git clone https://github.com/stevenlovegrove/Pangolin.git
cd Pangolin
mkdir build && cd build
cmake ..
make -j`nproc`
sudo make install
OpenCV
如果已经安装了 ROS ,不建议再单独安装 OpenCV ,版本可以根据实际需要更改,因为路径为/usr/local/opencv460而非直接安装在/usr/local目录下,因此后续调用时需要指定路径
sudo apt install build-essential cmake git pkg-config libgtk-3-dev libavcodec-dev libavformat-dev libswscale-dev libv4l-dev \
     libxvidcore-dev libx264-dev libjpeg-dev libpng-dev libtiff-dev gfortran openexr libatlas-base-dev python3-dev python3-numpy \
     libtbb2 libtbb-dev libdc1394-22-dev libopenexr-dev libgstreamer-plugins-base1.0-dev libgstreamer1.0-dev
mkdir opencv4_build && cd opencv4_build

git clone https://github.com/opencv/opencv_contrib.git opencv_contrib
git -C opencv_contrib checkout 4.6.0

git clone https://github.com/opencv/opencv.git opencv
git -C opencv checkout 4.6.0

cd opencv
mkdir build && cd build
cmake .. \
    -D CMAKE_BUILD_TYPE=RELEASE \
    -D CMAKE_INSTALL_PREFIX=/usr/local/opencv460 \
    -D OPENCV_GENERATE_PKGCONFIG=ON \
    -D OPENCV_EXTRA_MODULES_PATH=../../opencv_contrib/modules
make -j`nproc`
sudo make install
pkg-config opencv4 --modversion
RealSense SDK
直接安装
sudo apt-key adv --keyserver keyserver.ubuntu.com --recv-key F6E65AC044F831AC80A06380C8B3A55A6F3EFCDE || sudo apt-key adv --keyserver hkp://keyserver.ubuntu.com:80 --recv-key F6E65AC044F831AC80A06380C8B3A55A6F3EFCDE
sudo add-apt-repository "deb https://librealsense.intel.com/Debian/apt-repo $(lsb_release -cs) main" -u
sudo apt-get install librealsense2-dkms librealsense2-utils librealsense2-dev librealsense2-dbg
笔者在直接安装时提示不支持当前内核,不确定是因为内核太新(但文档写着支持 5.15 内核)还是因为是实时内核,于是选择手动编译同时添加参数 DFORCE_RSUSB_BACKEND=true,强制使用 USB 通信平台兼容性更强
git clone https://github.com/IntelRealSense/librealsense.git
sudo apt-get install git libssl-dev libusb-1.0-0-dev libudev-dev pkg-config libgtk-3-dev libglfw3-dev libgl1-mesa-dev libglu1-mesa-dev at libudev-dev
cd librealsense
chmod 777 scripts/setup_udev_rules.sh
scripts/setup_udev_rules.sh
chmod 777 scripts/patch-realsense-ubuntu-lts-hwe.sh
scripts/patch-realsense-ubuntu-lts-hwe.sh

mkdir build && cd build
cmake .. \
    -DCMAKE_BUILD_TYPE=release \
    -DBUILD_EXAMPLES=true \
    -DBUILD_GRAPHICAL_EXAMPLES=true \
    -DFORCE_RSUSB_BACKEND=true
make -n`proc`
sudo make install
安装完可以连接设备测试下是否能正常工作,需要通过 USB3.0(3.1 3.2) 连接,否则可能无法正常工作或功能缺失
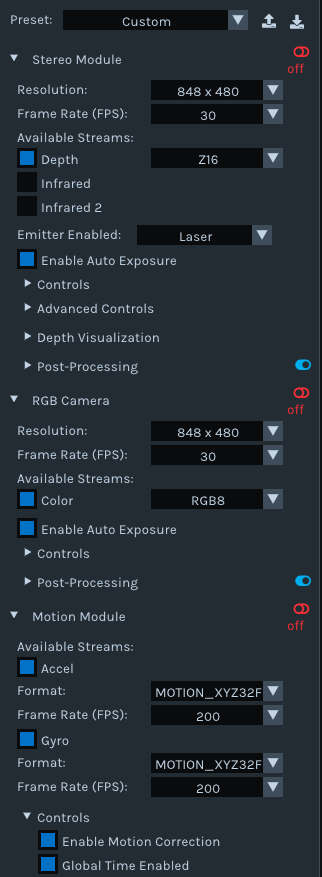
realsense-viewer调整分辨率和帧数后在 2D 模式下把三个开关都打开看是否能正常工作
ORB SLAM3
ROS 安装流程可以阅览前文,先安装与 ROS 相关的包,如果没有初始化可能会报错
sudo rosdep init
rosdep update
sudo rosdep fix-permissions
sudo apt-get install ros-noetic-realsense2-camera ros-noetic-rgbd-launch
克隆代码,笔者对 C++17 和 OpenCV4 作了适配,链接在下方,如果想用新版库可以一试(不再兼容老版本)
git clone https://github.com/UZ-SLAMLab/ORB_SLAM3.git
cd ORB_SLAM3
chmod 777 build.sh
chmod 777 build_ros.shhttps://github.com/Pyrokine/ORB_SLAM3主要修改了以下内容(未全部列出,具体修改内容请参考 commit )
ORB_SLAM3/CMakeLists.txt 新增版本号和路径输出
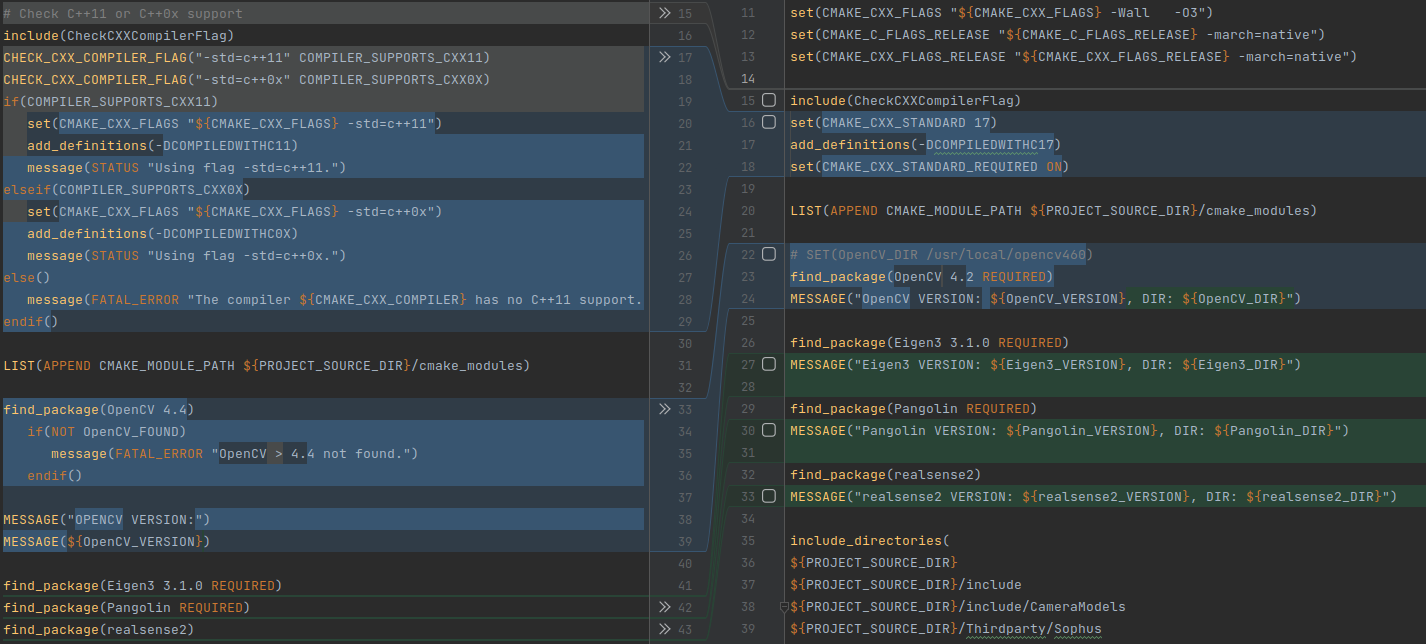
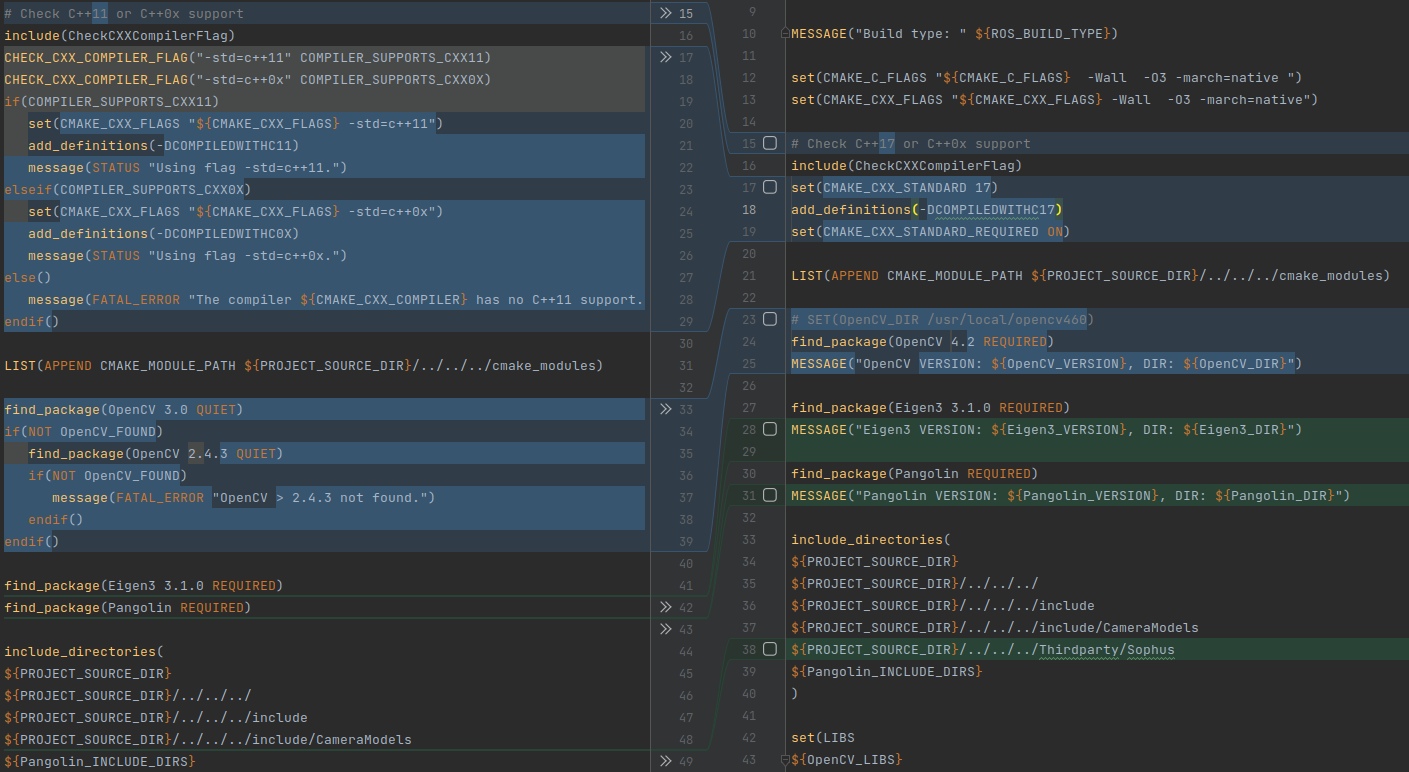
ORB_SLAM3/DBoW2/CMakeLists.txt

ORB_SLAM3/Examples_old/ROS/ORB_SLAM3/CMakeLists.txt指定 Sophus路径,如果需要指定 OpenCV 路径,注释掉 23 行
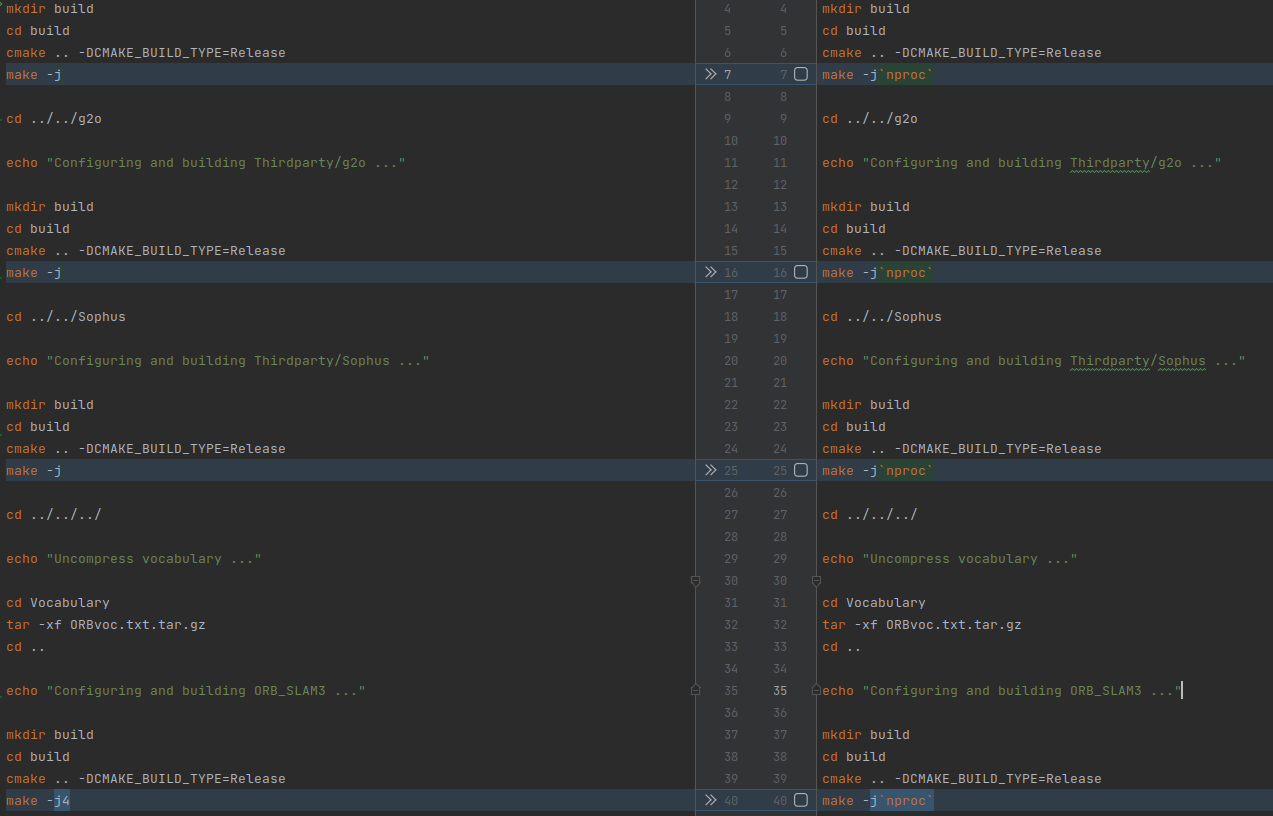
/ORB_SLAM3/build_ros.sh线程数自适应

/ORB_SLAM3/build.sh线程数自适应
开始编译,可能在编译过程中还会遇到其他问题,需要自行查阅
./build.sh添加路径到 bash ,可以每次运行时添加也可以永久性添加,为后续调试方便,笔者选择永久性添加,父目录 your_path 改为自己的路径
echo "export ROS_PACKAGE_PATH=${ROS_PACKAGE_PATH}:your_path/ORB_SLAM3/Examples_old/ROS" >> ~/.bashrc
source ~/.bashrc
运行 roscore,因为后续都会用到,所以可以一直开着
roscore在 ORB_SLAM3/Examples_old/ROS/ORB_SLAM3/launch目录下新建文件(可以从 /opt/ros/noetic/share/realsense2_camera/launch/下复制过来),修改分辨率和帧数等参数,以下以 rgbd 为例,其他文件可以在 github 查看,受带宽和性能限制,仅在对应启动文件里开启需要发布的话题
my_rs_rgbd.launch
<launch>
  <arg name="serial_no"                           default=""/>
  <arg name="usb_port_id"                         default=""/>
  <arg name="device_type"                         default=""/>
  <arg name="json_file_path"                      default=""/>
  <arg name="camera"                              default="camera"/>
  <arg name="tf_prefix"                           default="$(arg camera)"/>
  <arg name="external_manager"                    default="false"/>
  <arg name="manager"                             default="realsense2_camera_manager"/>
  <arg name="output"                              default="screen"/>

  <arg name="enable_fisheye"                      default="false"/>
  <arg name="fisheye_width"                       default="-1"/>
  <arg name="fisheye_height"                      default="-1"/>
  <arg name="fisheye_fps"                         default="-1"/>

  <arg name="enable_depth"                        default="true"/>
  <arg name="align_depth"                         default="true"/>
  <arg name="depth_width"                         default="848"/>
  <arg name="depth_height"                        default="480"/>
  <arg name="depth_fps"                           default="30"/>

  <arg name="enable_confidence"                   default="false"/>
  <arg name="confidence_width"                    default="-1"/>
  <arg name="confidence_height"                   default="-1"/>
  <arg name="confidence_fps"                      default="-1"/>

  <arg name="enable_infra1"                       default="false"/>
  <arg name="enable_infra2"                       default="false"/>
  <arg name="infra_rgb"                           default="false"/>
  <arg name="infra_width"                         default="848"/>
  <arg name="infra_height"                        default="480"/>
  <arg name="infra_fps"                           default="30"/>

  <arg name="enable_color"                        default="true"/>
  <arg name="color_width"                         default="848"/>
  <arg name="color_height"                        default="480"/>
  <arg name="color_fps"                           default="30"/>

  <arg name="enable_gyro"                         default="true"/>
  <arg name="enable_accel"                        default="true"/>
  <arg name="gyro_fps"                            default="400"/>
  <arg name="accel_fps"                           default="200"/>

  <arg name="enable_pointcloud"                   default="false"/>
  <arg name="pointcloud_texture_stream"           default="RS2_STREAM_COLOR"/>
  <arg name="pointcloud_texture_index"            default="0"/>
  <arg name="allow_no_texture_points"             default="false"/>
  <arg name="ordered_pc"                          default="false"/>

  <arg name="enable_sync"                         default="true"/>
  <arg name="filters"                             default=""/>

  <arg name="publish_tf"                          default="true"/>
  <arg name="tf_publish_rate"                     default="0"/> <!-- 0 - static transform -->

  <!-- rgbd_launch specific arguments -->

  <!-- Arguments for remapping all device namespaces -->
  <arg name="rgb"                                 default="color"/>
  <arg name="ir"                                  default="infra1"/>
  <arg name="depth"                               default="depth"/>
  <arg name="depth_registered_pub"                default="depth_registered"/>
  <arg name="depth_registered"                    default="depth_registered" unless="$(arg align_depth)"/>
  <arg name="depth_registered"                    default="aligned_depth_to_color" if="$(arg align_depth)"/>
  <arg name="depth_registered_filtered"           default="$(arg depth_registered)"/>
  <arg name="projector"                           default="projector"/>

  <!-- Disable bond topics by default -->
  <arg name="bond"                                default="false"/>
  <arg name="respawn"                             default="$(arg bond)"/>

  <!-- Processing Modules -->
  <arg name="rgb_processing"                      default="true"/>
  <arg name="debayer_processing"                  default="false"/>
  <arg name="ir_processing"                       default="false"/>
  <arg name="depth_processing"                    default="false"/>
  <arg name="depth_registered_processing"         default="true"/>
  <arg name="disparity_processing"                default="false"/>
  <arg name="disparity_registered_processing"     default="false"/>
  <arg name="hw_registered_processing"            default="$(arg align_depth)"/>
  <arg name="sw_registered_processing"            default="true" unless="$(arg align_depth)"/>
  <arg name="sw_registered_processing"            default="false" if="$(arg align_depth)"/>

  <group ns="$(arg camera)">
    <!-- Launch the camera device nodelet-->
    <include file="$(find realsense2_camera)/launch/includes/nodelet.launch.xml">
      <arg name="serial_no"                       value="$(arg serial_no)"/>
      <arg name="usb_port_id"                     value="$(arg usb_port_id)"/>
      <arg name="device_type"                     value="$(arg device_type)"/>
      <arg name="json_file_path"                  value="$(arg json_file_path)"/>
      <arg name="tf_prefix"                       value="$(arg tf_prefix)"/>
      <arg name="external_manager"                value="$(arg external_manager)"/>
      <arg name="manager"                         value="$(arg manager)"/>
      <arg name="output"                          value="$(arg output)"/>
      <arg name="respawn"                         value="$(arg respawn)"/>

      <arg name="enable_fisheye"                  value="$(arg enable_fisheye)"/>
      <arg name="fisheye_width"                   value="$(arg fisheye_width)"/>
      <arg name="fisheye_height"                  value="$(arg fisheye_height)"/>
      <arg name="fisheye_fps"                     value="$(arg fisheye_fps)"/>

      <arg name="enable_depth"                    value="$(arg enable_depth)"/>
      <arg name="align_depth"                     value="$(arg align_depth)"/>
      <arg name="depth_width"                     value="$(arg depth_width)"/>
      <arg name="depth_height"                    value="$(arg depth_height)"/>
      <arg name="depth_fps"                       value="$(arg depth_fps)"/>

      <arg name="enable_confidence"               value="$(arg enable_confidence)"/>
      <arg name="confidence_width"                value="$(arg confidence_width)"/>
      <arg name="confidence_height"               value="$(arg confidence_height)"/>
      <arg name="confidence_fps"                  value="$(arg confidence_fps)"/>

      <arg name="enable_infra1"                   value="$(arg enable_infra1)"/>
      <arg name="enable_infra2"                   value="$(arg enable_infra2)"/>
      <arg name="infra_rgb"                       value="$(arg infra_rgb)"/>
      <arg name="infra_width"                     value="$(arg infra_width)"/>
      <arg name="infra_height"                    value="$(arg infra_height)"/>
      <arg name="infra_fps"                       value="$(arg infra_fps)"/>

      <arg name="enable_color"                    value="$(arg enable_color)"/>
      <arg name="color_width"                     value="$(arg color_width)"/>
      <arg name="color_height"                    value="$(arg color_height)"/>
      <arg name="color_fps"                       value="$(arg color_fps)"/>

      <arg name="enable_gyro"                     value="$(arg enable_gyro)"/>
      <arg name="enable_accel"                    value="$(arg enable_accel)"/>
      <arg name="gyro_fps"                        value="$(arg gyro_fps)"/>
      <arg name="accel_fps"                       value="$(arg accel_fps)"/>

      <arg name="enable_pointcloud"               value="$(arg enable_pointcloud)"/>
      <arg name="pointcloud_texture_stream"       value="$(arg pointcloud_texture_stream)"/>
      <arg name="pointcloud_texture_index"        value="$(arg pointcloud_texture_index)"/>
      <arg name="allow_no_texture_points"         value="$(arg allow_no_texture_points)"/>
      <arg name="ordered_pc"                      value="$(arg ordered_pc)"/>

      <arg name="enable_sync"                     value="$(arg enable_sync)"/>
      <arg name="filters"                         value="$(arg filters)"/>

      <arg name="publish_tf"                      value="$(arg publish_tf)"/>
      <arg name="tf_publish_rate"                 value="$(arg tf_publish_rate)"/>
    </include>

    <!-- RGB processing -->
    <include if="$(arg rgb_processing)"
             file="$(find rgbd_launch)/launch/includes/rgb.launch.xml">
      <arg name="manager"                         value="$(arg manager)"/>
      <arg name="respawn"                         value="$(arg respawn)"/>
      <arg name="rgb"                             value="$(arg rgb)"/>
      <arg name="debayer_processing"              value="$(arg debayer_processing)"/>
    </include>

    <group if="$(eval depth_registered_processing and sw_registered_processing)">
      <node pkg="nodelet" type="nodelet" name="register_depth"
            args="load depth_image_proc/register $(arg manager) $(arg bond)" respawn="$(arg respawn)">
        <remap from="rgb/camera_info"             to="$(arg rgb)/camera_info"/>
        <remap from="depth/camera_info"           to="$(arg depth)/camera_info"/>
        <remap from="depth/image_rect"            to="$(arg depth)/image_rect_raw"/>
        <remap from="depth_registered/image_rect" to="$(arg depth_registered)/sw_registered/image_rect_raw"/>
      </node>

      <!-- Publish registered XYZRGB point cloud with software registered input -->
      <node pkg="nodelet" type="nodelet" name="points_xyzrgb_sw_registered"
            args="load depth_image_proc/point_cloud_xyzrgb $(arg manager) $(arg bond)" respawn="$(arg respawn)">
        <remap from="rgb/image_rect_color"        to="$(arg rgb)/image_rect_color"/>
        <remap from="rgb/camera_info"             to="$(arg rgb)/camera_info"/>
        <remap from="depth_registered/image_rect" to="$(arg depth_registered_filtered)/sw_registered/image_rect_raw"/>
        <remap from="depth_registered/points"     to="$(arg depth_registered)/points"/>
      </node>
    </group>

    <group if="$(eval depth_registered_processing and hw_registered_processing)">
      <!-- Publish registered XYZRGB point cloud with hardware registered input (ROS Realsense depth alignment) -->
      <node pkg="nodelet" type="nodelet" name="points_xyzrgb_hw_registered"
            args="load depth_image_proc/point_cloud_xyzrgb $(arg manager) $(arg bond)" respawn="$(arg respawn)">
        <remap from="rgb/image_rect_color"        to="$(arg rgb)/image_rect_color"/>
        <remap from="rgb/camera_info"             to="$(arg rgb)/camera_info"/>
        <remap from="depth_registered/image_rect" to="$(arg depth_registered)/image_raw"/>
        <remap from="depth_registered/points"     to="$(arg depth_registered_pub)/points"/>
      </node>
    </group>
    <rosparam> /camera/stereo_module/emitter_enabled: 1 </rosparam>
  </group>
</launch>
使用以下命令启动传感器
roslaunch ORB_SLAM3 my_rs_rgbd.launch查看相机发布的话题
rostopic listrgbd 模式使用的话题是 /camera/color/image_raw和 /camera/aligned_depth_to_color/image_raw,修改以下部分,单目和双目也需要做相应的修改,详见 github
# ORB_SLAM3/Examples_old/ROS/ORB_SLAM3/src/ros_rgbd.cc:66-67
message_filters::Subscriber<sensor_msgs::Image> rgb_sub(nh, "/camera/color/image_raw", 100);
message_filters::Subscriber<sensor_msgs::Image> depth_sub(nh, "/camera/aligned_depth_to_color/image_raw", 100);
开始编译
./build_ros.sh使用一个笔者校准后的参数文件以测试设备(校准设备是必要的,否则可能会出现跟踪失败和漂移等问题,文件仅用于测试是否编译成功)
gedit Examples_old/D455.yamlD455.yaml
%YAML:1.0

#--------------------------------------------------------------------------------------------
# Camera Parameters (Need to be Adjusted)
#--------------------------------------------------------------------------------------------
Camera.type: "PinHole"

Camera.fx: 428.095886230469
Camera.fy: 427.559661865234
Camera.cx: 433.961669921875
Camera.cy: 239.139083862305

Camera.k1: -0.0564233511686325
Camera.k2: 0.0676868334412575
Camera.p1: 0.000179319584276527
Camera.p2: 0.000386114203138277

Camera.width: 848
Camera.height: 480

Camera.fps: 30.0

# IR projector baseline (d455: 95mm) times fx (aprox.)
Camera.bf: 40.669

# Color order of the images (0: BGR, 1: RGB. It is ignored if images are grayscale)
Camera.RGB: 1

# Close/Far threshold. Baseline times.
ThDepth: 50.0

# Deptmap values factor
DepthMapFactor: 1000.0

# Left Camera to IMU Transform
#Tbc: !!opencv-matrix
#  rows: 4
#  cols: 4
#  dt: f
#  data:
#    [0.999997,         0.00178305,       0.00186204,       0.0288179721683264,
#     -0.00177265,      0.999983,        -0.00557174,       0.00749534415081143,
#     -0.00187194,      0.00556842,       0.999983,         0.0157551020383835,
#     0.0,              0.0,              0.0,              1.0]
Tbc: !!opencv-matrix
  rows: 4
  cols: 4
  dt: f
  data:
    [0.999997,        -0.00177265,      -0.00187194,      -0.0287750978022814,
     0.00178305,       0.999983,         0.00556842,      -0.00763433100655675,
     0.00186204,      -0.00557174,       0.999983,        -0.0157667268067598,
     0.0,              0.0,              0.0,              1.0]

IMU.NoiseGyro: 2.8227829947665693e-03
IMU.NoiseAcc: 1.6324958258624640e-02
IMU.GyroWalk: 2.2798061029608936e-05
IMU.AccWalk: 1.8448325759171436e-04
IMU.Frequency: 400

#--------------------------------------------------------------------------------------------
# ORB Parameters
#--------------------------------------------------------------------------------------------

# Number of features per image
ORBextractor.nFeatures: 1000

# Scale factor between levels in the scale pyramid
ORBextractor.scaleFactor: 1.2

# Number of levels in the scale pyramid
ORBextractor.nLevels: 8

# Fast threshold
# Image is divided in a grid. At each cell FAST are extracted imposing a minimum response.
# Firstly we impose iniThFAST. If no corners are detected we impose a lower value minThFAST
# You can lower these values if your images have low contrast
ORBextractor.iniThFAST: 20
ORBextractor.minThFAST: 7

#--------------------------------------------------------------------------------------------
# Viewer Parameters
#--------------------------------------------------------------------------------------------
Viewer.KeyFrameSize: 0.05
Viewer.KeyFrameLineWidth: 1
Viewer.GraphLineWidth: 0.9
Viewer.PointSize: 2
Viewer.CameraSize: 0.08
Viewer.CameraLineWidth: 3
Viewer.ViewpointX: 0
Viewer.ViewpointY: -0.7
Viewer.ViewpointZ: -1.8
Viewer.ViewpointF: 500
连接设备,再打开一个命令行窗口,两个模式分别为以下命令
rosrun ORB_SLAM3 RGBD Vocabulary/ORBvoc.txt Examples_old/D455.yaml
rosrun ORB_SLAM3 Mono_Inertial Vocabulary/ORBvoc.txt Examples_old/D455.yaml
此时应该就可以看到图像界面了(单目模式在初始化的时候需要以一定的速度进行一定范围的移动)
校准/标定
注明:以下操作流程和方法不一定正确,仅为笔者个人理解,如有错误欢迎指出
网上能看到的校准多是基于 Kalibr 实现的,但目前没有搞到标定板,这部分之后再更新,几番搜索后发现 realsense 官方提供了校准工具,有手机就能使用,因此尝试一下,先安装动态校准工具
sudo add-apt-repository "deb https://librealsense.intel.com/Debian/apt-repo $(lsb_release -cs) main" -u
sudo apt-key adv --keyserver keyserver.ubuntu.com --recv-key F6E65AC044F831AC80A06380C8B3A55A6F3EFCDE || sudo apt-key adv --keyserver  hkp://keyserver.ubuntu.com:80 --recv-key F6E65AC044F831AC80A06380C8B3A55A6F3EFCDE
sudo apt-get update
sudo apt-get install librscalibrationtool
sudo dpkg -L librscalibrationtool
Intel.Realsense.DynamicCalibrator
具体操作流程可以看此视频,手机也是可以用来校准的,不过最好能去除环境中其他光源,否则反光会导致无法校准(这也是氧化铝标定板的优势了),手机亮度需要根据情况降低,直到画面中可以看到灰色的背景为止
https://www.bilibili.com/video/BV19y4y147Lw校准完后可以用此工具检验校准效果(视频中有说明)
rs-depth-quality然后校准 IMU ,下载 python 脚本和说明文档(不过校准时用的帧率和实际的不同,不知道有没有影响)
https://github.com/IntelRealSense/librealsense/tree/master/tools/rs-imu-calibration在开始校准后,按图示六个方向放置传感器
python3 rs-imu-calibration.py以上校准结果都会自动上传到内部存储器并覆盖,查看储存的内外参
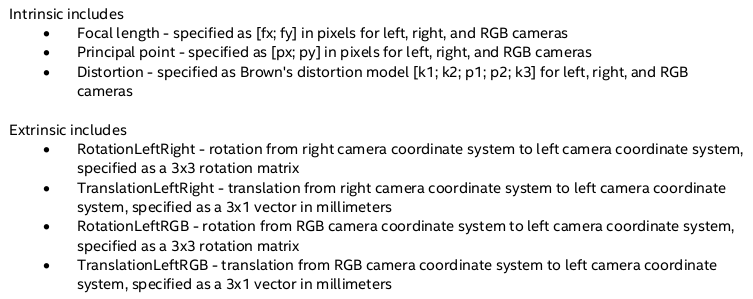
rs-enumerate-devices -c找到我们关心的部分,其中坐标映射从 IMU 到相机和从相机到 IMU 经笔者测试似乎均可行(存疑)


根据文档 Intel-RealSense-D400-Series-Calibration-Tools-User-Guide 的说明,可以将数据填入之前的 D455.yaml 配置文件,Camera.bf为 Camera.fxx Baseline,后者查阅官方手册可得 D455 是 0.095 (即 95mm),因此乘积约为 40.525594
Camera.fx: 426.585205078125
Camera.fy: 426.050872802734
Camera.cx: 433.961669921875
Camera.cy: 239.139083862305

Camera.k1: -0.0564233511686325
Camera.k2: 0.0676868334412575
Camera.p1: 0.000179319584276527
Camera.p2: 0.000386114203138277

Tbc: !!opencv-matrix
  rows: 4
  cols: 4
  dt: f
  data:
    [0.999997,        -0.00177265,      -0.00187194,      -0.0287750978022814,
     0.00178305,       0.999983,         0.00556842,      -0.00763433100655675,
     0.00186204,      -0.00557174,       0.999983,        -0.0157667268067598,
     0.0,              0.0,              0.0,              1.0]

Camera.bf: 40.525594
如果使用 rgbd 模式到这就校准完成了,如果使用单目或双目 + IMU 的方式则还需要校准 IMU ,因为kalibr_allan需要安装 Matlab ,因此本文使用 imu_utils进行校准,如果之前有 ros 的工作环境可以直接在里面创建,如果没有可以创建文件夹 catkin_ws/src ,需要先安装 ceres ,可以参阅前文,然后编译 code_utils
git clone https://github.com/gaowenliang/code_utils适配新版库
# code_utils/CMakeLists.txt:5
set(CMAKE_CXX_STANDARD 17)
set(CMAKE_CXX_STANDARD_REQUIRED ON)

# code_utils/mat_io_test.cpp:33
Mat img1 = imread( "/home/gao/IMG_1.png", IMREAD_UNCHANGED );

# code_utils/sumpixel_test.cpp:2
#include "code_utils/backward.hpp"

# code_utils/sumpixel_test.cpp:84
Mat img1 = imread( "/home/gao/IMG_1.png", IMREAD_GRAYSCALE );

# code_utils/sumpixel_test.cpp:94
normalize( img, img2, 0, 255, NORM_MINMAX );

# code_utils/sumpixel_test.cpp:107
Mat img1 = imread( "/home/gao/IMG_1.png", IMREAD_GRAYSCALE );

# code_utils/sumpixel_test.cpp:117
normalize( img, img2, 0, 255, NORM_MINMAX );
回到 catkin目录下开始编译
catkin_make再编译 imu_utils
git clone https://github.com/gaowenliang/imu_utils# imu_utils/CMakeLists.txt:6
set(CMAKE_CXX_STANDARD 17)
set(CMAKE_CXX_STANDARD_REQUIRED ON)catkin_make创建一个文件夹 catkin_ws/bag 储存 bag 包(可以在线运行,不过因为可能会出现问题,录制数据包可以多次运行),录制一个时长不低于两小时的 IMU 数据包,时间到了按 ctrl+c终止录制即可
roslaunch ORB_SLAM3 my_rs_camera.launch
rosbag record /camera/imu -O bag/imu_2h.bag
由前文可知,IMU 的话题为 /camera/imu,因此编写配置文件 catkin_ws/src/imu_utils/launch/D455.launch ,因为使用的是 allan 方差,因此 type_name和 name为 imu_an,imu_topic改为 /camera/imu,imu_name改为 D455(可以自行设定),截断时间为 120 分钟
<launch>
    <node pkg="imu_utils" type="imu_an" name="imu_an" output="screen">
        <param name="imu_topic" type="string" value= "/camera/imu"/>
        <param name="imu_name" type="string" value= "D455"/>
        <param name="data_save_path" type="string" value= "$(find imu_utils)/data/"/>
        <param name="max_time_min" type="int" value= "120"/>
        <param name="max_cluster" type="int" value= "100"/>
    </node>
</launch>
启动两个命令行,按顺序启动(检查是否已关闭 realsense sdk 的进程),以 200 倍的速度回放
roslaunch imu_utils D455.launch
rosbag play -r 200 bag/imu_8h.bag
运行结束可以得到参数信息 catkin_ws/src/imu_utils/data/D455_imu_param.yaml ,其中gyr_n、gyr_w、acc_n和acc_w分别对应 IMU.NoiseGyro、IMU.GyroWalk、IMU.NoiseAcc和IMU.AccWalk
%YAML:1.0
---
type: IMU
name: D455
Gyr:
   unit: " rad/s"
   avg-axis:
      gyr_n: 2.8227829947665693e-03
      gyr_w: 2.2798061029608936e-05
   x-axis:
      gyr_n: 2.3591515350614850e-03
      gyr_w: 2.6703936532429232e-05
   y-axis:
      gyr_n: 2.9030200539273080e-03
      gyr_w: 2.3684003510839035e-05
   z-axis:
      gyr_n: 3.2061773953109161e-03
      gyr_w: 1.8006243045558546e-05
Acc:
   unit: " m/s^2"
   avg-axis:
      acc_n: 1.6324958258624640e-02
      acc_w: 1.8448325759171436e-04
   x-axis:
      acc_n: 1.5726592861703304e-02
      acc_w: 1.7503886115910502e-04
   y-axis:
      acc_n: 1.6924785081384619e-02
      acc_w: 1.4960729526877187e-04
   z-axis:
      acc_n: 1.6323496832785993e-02
      acc_w: 2.2880361634726616e-04
IMU 帧率可以通过查看话题帧率得到(在传感器运行时)
rostopic hz /camera/imu取平均值 avg_axis 作为参数填入 D455.yaml对应位置
IMU.NoiseGyro: 2.8227829947665693e-03
IMU.NoiseAcc: 1.6324958258624640e-02
IMU.GyroWalk: 2.2798061029608936e-05
IMU.AccWalk: 1.8448325759171436e-04
IMU.Frequency: 400
至此,相机和 IMU 都标定完毕
运行
两个命令行窗口,一个启动传感器一个 ORB_SLAM3 ,根据实际情况选择
1、带 IMU 的模式在初始化的时候需要朝六个方向做一定范围的平移运动,然后尝试缓慢旋转,如果不出现漂移则初始化成功
2、双目使用的是红外摄像头,因此只有黑白画面,因为没有做额外标定,因此最后传入 false
3、RGBD 模式在配置中开启了红外点阵辅助,双目中则关闭
# RGBD
roslaunch ORB_SLAM3 my_rs_rgbd.launch
rosrun ORB_SLAM3 RGBD Vocabulary/ORBvoc.txt Examples_old/D455.yaml
# Mono
roslaunch ORB_SLAM3 my_rs_mono_imu.launch
rosrun ORB_SLAM3 Mono Vocabulary/ORBvoc.txt Examples_old/D455.yaml# Mono+IMU
roslaunch ORB_SLAM3 my_rs_mono_imu.launch
rosrun ORB_SLAM3 Mono_Inertial Vocabulary/ORBvoc.txt Examples_old/D455.yaml# Stereo
roslaunch ORB_SLAM3 my_rs_stereo_imu.launch
rosrun ORB_SLAM3 Stereo Vocabulary/ORBvoc.txt Examples_old/D455.yaml false# Stereo+IMU
roslaunch ORB_SLAM3 my_rs_stereo_imu.launch
rosrun ORB_SLAM3 Stereo_Inertial Vocabulary/ORBvoc.txt Examples_old/D455.yaml false可以通过命令 rqt_image_view查看话题中的原始图像,rosrun rqt_reconfigure rqt_reconfigure可以实时调整参数,两个配合可以实时查看参数变动的效果
记录与回放
在需要储存数据包的位置执行以下命令,具体话题名称根据环境而定,以下以 rgbd 模式为例(因为均为未经压缩的原始数据,文件将会非常大)
rosbag record -o subset /camera/color/image_raw /camera/aligned_depth_to_color/image_raw回放则用以下命令,文件名需根据实际情况修改
rosbag play subset_xxxxxx.bag
GDB 调试
在 ORB_SLAM3目录下,运行 gdb 命令进入调试状态
gdb Examples_old/ROS/ORB_SLAM3/RGBD此时可以设置断点、监视变量等,具体命令可以自行查阅,然后输入运行参数启动程序,数据来源和前文相同,可以是实时数据,也可以是回放数据,通过另一个命令行窗口执行
run Vocabulary/ORBvoc.txt Examples/D455.yaml
感谢
Linux/Ubuntu - RealSense SDK 2.0 Build Guide
https://dev.intelrealsense.com/docs/compiling-librealsense-for-linux-ubuntu-guide

Intel RealSense D400 Series Product Family Datasheet
https://dev.intelrealsense.com/docs/intel-realsense-d400-series-product-family-datasheet

User guide for Intel RealSense D400 Series calibration tools
https://dev.intelrealsense.com/docs/intel-realsensetm-d400-series-calibration-tools-user-guide

IMU Calibration Tool for Intel® RealSense™ Depth Camera
https://dev.intelrealsense.com/docs/imu-calibration-tool-for-intel-realsense-depth-camera

Intel RealSense D400 Series Custom Calibration Whitepaper
https://dev.intelrealsense.com/docs/d400-series-custom-calibration-white-paper

How to Install OpenCV on Ubuntu 20.04
https://linuxize.com/post/how-to-install-opencv-on-ubuntu-20-04/

librealsense installing
https://github.com/IntelRealSense/librealsense/blob/master/doc/distribution_linux.md#installing-the-packages

librealsense building
https://github.com/IntelRealSense/librealsense/blob/master/doc/installation.md

Calibration and setting suggestions
https://github.com/raulmur/ORB_SLAM2/issues/89

Emitter Turns On Automatically
https://github.com/IntelRealSense/realsense-ros/issues/1379

v1.0 release ros版本编译,提示找不到sophus库,及 Sophus::SE3f, cv::MAT,Eigen::Vector3f类型转换报错
https://github.com/UZ-SLAMLab/ORB_SLAM3/issues/442

ORB-SLAM3结合RealSense D455相机实时运行&离线官方样例测试部署
https://blog.csdn.net/ByYastal/article/details/111589721

用D455摄像头跑通ORB-SLAM2
https://blog.csdn.net/weixin_56750372/article/details/124694443

利用Kalibr对Intel RealSense D435i进行相机及相机-IMU联合标定
http://zhaoxuhui.top/blog/2020/09/29/intel-realsense-D435i-calibration-kalibr.html

从零手写VIO(二)——IMU仿真、MU imu_utils或kalibr_allan标定
https://blog.51cto.com/u_14929337/4719402#31_imu_utils_274

ROS实验笔记之——VINS-Mono在l515上的实现
https://blog.csdn.net/gwplovekimi/article/details/120474023

【入坑ORB-SLAM3系列2】未标定的realsense D435i试运行ORB-SLAM3(手把手教学,含realsense d435i一些错误的解决)
https://blog.csdn.net/weixin_46135347/article/details/121771922

ROS采坑日记(3)----在ROS下 编译ORB_SLAM2时遇到问题:[rosbuild] rospack found package "ORB_SLAM2" at ""........
https://blog.csdn.net/weixin_45137708/article/details/105650078

RealSense D455的标定并运行VINS-FUSION_Z_Jin16的博客-程序员宅基地_d455运行vins
https://www.cxyzjd.com/article/qq_40186909/113104595#D455_116

ORB_SLAM3 v1.0 ROS接口编译问题汇总
https://blog.csdn.net/weixin_44911075/article/details/123881212

OpenCV 笔记(04)— OpenCV2 升级到 OpenCV3/CV4 的改动(去掉 CV_前缀、使用新的前缀替换、使用新的命名空间宏)
https://blog.csdn.net/wohu1104/article/details/108678370

使用gdb调试ros程序
https://zhi-ang.github.io/2019/08/20/ros_debug/


 浙公网安备 33010602011771号