

.Net 6 使用Ocelot、Consul、Ids4系列
主要以Ocelot为切入点,先进行.net 6的简单实现于应用在此基础上逐步扩展
一、先了解一下Ocelot的用法
API网关是:系统暴露在外部的一个访问入口。从面向对象设计的角度看,它与外观模式类似。API网关封装了系统内部架构,为每个客户端提供一个定制的API。它可能还具有其它职责,如身份验证、监控、负载均衡、缓存、请求分片与管理、静态响应处理等等。
API网关方式的核心要点是,所有的客户端和消费端都通过统一的网关接入微服务,在网关层处理所有的非业务功能。通常,网关也是提供REST/HTTP的访问API。服务端通过API-GW注册和管理服务。
Ocelot在API网关实现上有什么优点呢?
它的功能包括了:路由、请求聚合、服务发现、认证、鉴权、限流熔断、并内置了负载均衡器、Service Fabric、Butterfly Tracing等的集成。而且这些功能都只需要简单的配置即可完成。
Ocelot的开源地址:https://github.com/ThreeMammals/Ocelot
Ocelot工作流程是怎样的呢?
实际上Ocelot就是一系列按特定顺序排列的中间件。
Ocelot首先通过配置将HttpRequest对象保存到一个指定的状态直到它到达用来创建HttpRequestMessage对象并将创建的HttpRequestMessage对象发送到下游服务中的请求构造中间件。通过中间件来发出请求是Ocelot管道中做的最后一件事。它不会再调用下一个中间件。下游服务的响应会存储在每个请求 scoped repository中,并作为一个请求返回到Ocelot管道中。有一个中间件将HttpResponseMessage映射到HttpResponse对象并返回给客户端。
接下来是你使用Ocelot是可能会使用的配置。
基本集成

用一台web service来host Ocelot,在这里有一个json配置文件,里面设置了所有对当前这个网关的配置。它会接收所有的客户端请求,并路由到对应的下游服务器进行处理,再将请求结果返回。而这个上下游请求的对应关系也被称之为路由。
注意:只有一个网关是很危险的,单点模式下只要它挂了,所有的服务全挂。这显然无法达到高可用,所以我们也可以部署多台Ocelot网关。当然这个时候在多台网关前,你还需要一台负载均衡器。
扩展Consul的用途:
在Ocelot已经支持简单的负载功能,也就是当下游服务存在多个结点的时候,Ocelot能够承担起负载均衡的作用。
但是它不提供健康检查,服务的注册也只能通过手动在配置文件里面添加完成。这不够灵活并且在一定程度下会有风险。这个时候我们就可以用Consul来做服务发现,它能与Ocelot完美结合。
扩展Ids4的用途:
Ocelot在入口加入Ids4在进入系统前进行权限验证,IdentityServer是基于OpenID Connect协议标准的身份认证和授权程序,它实现了OpenID Connect 和 OAuth 2.0 协议。目的都是在软件应用中为客户端颁发令牌并用于安全访问的。
IdentityServer应用场景:
- 保护你的资源
- 使用本地帐户或通过外部身份提供程序对用户进行身份验证
- 提供会话管理和单点登录
- 管理和验证客户机
- 向客户发出标识和访问令牌
- 验证令牌
开始简单应用不注入任何应用下的服务是这样的
项目工程目录如下

Program类
using Ocelot.DependencyInjection;
using Ocelot.Middleware;

var builder = WebApplication.CreateBuilder(args);

//builder.Host.ConfigureAppConfiguration(c =>
//{
//    c.AddJsonFile("", optional: false, reloadOnChange: true);
//});

//IConfiguration configuration = new ConfigurationBuilder()
//.AddJsonFile($"ocelot.{builder.Environment.EnvironmentName}.json", true, true)
//.Build();

//IConfiguration configuration = new ConfigurationBuilder().AddJsonFile("Ocelot_Config_Origin.json").Build();

builder.Configuration.AddJsonFile("ocelot.json"); //添加配置文件(1.可以使用数据库配置,读取数据库配置 2.使用json的配置文件进行配置)

builder.Services.AddControllers();

builder.Services.AddEndpointsApiExplorer();

builder.Services.AddOcelot();//加入Ocelot服务

var app = builder.Build();

app.UseHttpsRedirection();

app.UseOcelot().Wait(); //加入管道中

app.UseAuthorization();

app.MapControllers();

app.Run();
这里使用的是配置文件的方式(配置如下)
//无Consul配置,简单配置,包含两大配置块,转发路由和全局配置
{
  // 转发路由,数组中的每个元素都是某个服务的一组路由转发规则
  "Routes": [
    {
      // 下游(服务提供方)服务路由模板
      "DownstreamPathTemplate": "/api/{path}",
      // Uri方案,http、https
      "DownstreamScheme": "http",
      // 服务地址和端口,如果是集群就设置多个
      "DownstreamHostAndPorts": [
        {
          "Host": "localhost",
          "Port": 5240
        },
        {
          "Host": "localhost",
          "Port": 5240
        }
      ],
      // 允许的HTTP请求方法,可以写多个
      "UpstreamHttpMethod": [ "Get", "Post" ],
      // 上游(客户端,服务消费方)请求路由模板
      "UpstreamPathTemplate": "/OcelotNotes/{path}", //OcelotNotes/{path}
      // 负载均衡,只有上面匹配了集群,才有效
      /*
       负载均衡算法,总共三种类型。
        LeastConnection:最小链接,将请求发往最空闲的那个服务器
        RoundRobin:轮询,轮流发送
        NoLoadBalance:无负载均衡,总是发往第一个请求或者是服务发现
        */
      "LoadBalancerOptions": {
        "Type": "RoundRobin" // 轮询
      }
    },
    {
      // 下游(服务提供方)服务路由模板
      "DownstreamPathTemplate": "/api/{path}",
      // Uri方案,http、https
      "DownstreamScheme": "http",
      // 服务地址和端口,如果是集群就设置多个
      "DownstreamHostAndPorts": [
        {
          "Host": "localhost",
          "Port": 7001
        },
        {
          "Host": "localhost",
          "Port": 7002
        }
      ],
      // 允许的HTTP请求方法,可以写多个
      "UpstreamHttpMethod": [ "Get", "Post" ],
      // 上游(客户端,服务消费方)请求路由模板
      "UpstreamPathTemplate": "/MyServiceB/{path}",
      // 负载均衡,只有上面匹配了集群,才有效
      "LoadBalancerOptions": {
        "Type": "RoundRobin" // 轮询
      }
    }
  ],
  // 全局配置,此节点的配置会覆盖Routes,可以在这里设置一些通用的配置
  "GlobalConfiguration": {
    "ReRouteIsCaseSensitive": false, // 路由是否区分大小写
    "BaseUrl": "http://localhost:5200"
  },
  "ServiceDiscoveryProvider": {
    "Host": "localhost",
    "Port": 5200
  }
}

然后自己写一个简单的心跳服务用来 验证心跳是否转发

结果

现在开始注入Consul服务
继续补充:
这里呢有两个步骤需要补充
1.linux环境下部署consul集群发服务 可以参考我的博客园的:https://www.cnblogs.com/OneSeting/p/17295707.html (这里面有详细的讲解如何部署)
2.基于linux环境部署完consul后,需要由下游(提供服务端)主动注入到consul服务上,这样我们在使用网关时才能够根据上游配置的地址信息去找到下游的这个服务(才会达到网关成为统一入口的目的) 可以参考我的博客 : https://www.cnblogs.com/OneSeting/p/17297151.html
ok 以上全部弄完之后,就代表你目前已经有一个consul集群 和 一个已经注入到consul集群上的服务可供调用
现在继续 在项目目录值添加一个ocelot_consul.json 文件用来写配置
然后注入

using Ocelot.DependencyInjection;
using Ocelot.Middleware;
using Ocelot.Provider.Consul;

var builder = WebApplication.CreateBuilder(args);

//builder.Host.ConfigureAppConfiguration(c =>
//{
//    c.AddJsonFile("", optional: false, reloadOnChange: true);
//});

//IConfiguration configuration = new ConfigurationBuilder()
//.AddJsonFile($"ocelot.{builder.Environment.EnvironmentName}.json", true, true)
//.Build();

//IConfiguration configuration = new ConfigurationBuilder().AddJsonFile("Ocelot_Config_Origin.json").Build();

//builder.Configuration.AddJsonFile("ocelot.json");
builder.Configuration.AddJsonFile("ocelot_consul.json");

builder.Services.AddControllers();

builder.Services.AddEndpointsApiExplorer();

builder.Services.AddOcelot().AddConsul(); //注入 AddOcelot 注入 AddConsul

var app = builder.Build();

app.UseHttpsRedirection();

app.UseOcelot().Wait();

app.UseAuthorization();

app.MapControllers();

app.Run();
{
  //路由配置(16.1版本将ReRoutes换成Routes)
  "Routes": [
    {
      "DownstreamPathTemplate": "/api/{path}", // 下游(服务提供方)服务路由模板
      "DownstreamScheme": "http", //下游协议
      "UpstreamHttpMethod": [ "Get", "Post", "Put", "Delete" ], //上游允许的Http请求方式
      "UpstreamPathTemplate": "/VipUsers/{path}", //Hero:上游路径模版
      "UseServiceDiscovery": true, //启用服务发现,若Ocelot集合Consul必须配置此项
      "ServiceName": "VipUser", //Consul服务名称
      "LoadBalancerOptions": {
        "Type": "RoundRobin"
      },    "ReRoutesCaseSensitive": false // non case sensitive
    }
  ],

  //全局配置
  "GlobalConfiguration": {
    "BaseUrl": "http://localhost:5000", //网关对外地址
    "ReRouteIsCaseSensitive": false, //是否区分路由字母大小写
    "RequestIdKey": "OcRequestId",
    "ServiceDiscoveryProvider": { //服务发现提供者,配置Consul地址
      "Host": "xxx.xx.xxx.xxx", //Consul主机名称
      "Port": 8500, //Consul端口号
      "Type": "Consul" //必须指定Consul服务发现类型 PollConsul
    }
  }

}
ServiceName 是注入到consul上的服务名称
这里需要注意配置文件的路由配置(16.1版本以后的将ReRoutes换成Routes)
然后开始调用测试(先测本地服务)

这里先看一个错误案列
这个地方特别要注意 如果路由匹配规则是按照如下 那么恭喜你你的配置文件没生效 (当然按照我的配置文件是没问题的)
然后再调用本地Ocelot 看 是否会根据url将请求转发到 对应的下游服务 (我这里是本地测试 本地连接线上的consul集群然后测试 看是否会转发到下游) 仔细看我的url地址


当配置文件的内容没生效时url匹配的路径规则是这样的:http://xxx.xxx.xx.xx:5000/ConsulName/api/user/addorupdate
为什么呢看完这篇博客: https://www.cnblogs.com/OneSeting/p/17341460.html
当配置文件生效后:http://localhost:5000/自定义名称/user/GetUserInfoVerify {path}的内容才是替补的内容
查看打印日

这类是地址有问题但能访问到consul集群

这类是完全报错

ok 暂时到这里 其实配置consul的配置文件中有很多好用的配置(限流、熔断等等等) 如果后期用到限流、熔断再做补充
接下来是Ocelot注入Ids4的简单应用,让请求在网关这里就进行鉴权、授权、Ip黑名单等等(待补充)
在ocelot注入Ids4鉴权之前呢,需要先创建一个Ids4服务用来做统一的鉴权服务,等鉴权服务完成,所有的访问都经一次网关验证和每个服务的验证

SmsAuthCodeGrantType 类主要是自定义授权方式的验证扩展方法
我这里还注入其他服务
using Autofac;
using Autofac.Extensions.DependencyInjection;
using Com.Ctrip.Framework.Apollo;
using Consul;
using DnsClient;
using IdentityServer4.Validation;
using Microsoft.Extensions.Options;
using OneLove.IdentityService4;
using OneLove.IdentityService4.Authentication;
using OneLove.IdentityService4.Dto;
using OneLove.IdentityService4.IService;
using OneLove.IdentityService4.Service;
using OneLove.Redis.Extension;
using OneLove.Consul.Extension;
using System.Net;
using OneLove.Consul.Extension.Service;
using OneLove.Consul.Extension.Model;

var builder = WebApplication.CreateBuilder(args);

IConfiguration configuration = builder.Configuration;
builder.Services.Configure<ConsulRegisterOptions>(builder.Configuration.GetSection("ConsulRegisterOptions"));

//services.AddSingleton<MySingleton>(provider => new MySingleton(provider.GetService<IMyDependency>()));
//builder.Services.AddSingleton<UserService>(provider => new UserService());

#region 底层注入
builder.Host.UseServiceProviderFactory(new AutofacServiceProviderFactory());
builder.Host.ConfigureContainer<ContainerBuilder>(builder =>
{
    builder.RegisterModule<RedisModule>();
});
builder.Services.AddHostedService<ConsulRegister>();
#endregion


#region 注入Apollo配置中心
// 添加Apollo配置中心
builder.Host.ConfigureAppConfiguration((context, b) =>
{
    b.AddApollo(b.Build().GetSection("Apollo"))
    //b.AddApollo(configuration.GetSection("apollo"))
     .AddDefault();
});
#endregion


//builder.Services.Configure<ServiceDiscoveryOptions>(builder.Configuration.GetSection("ServiceDiscovery"));


builder.Services.AddSingleton<ISendEmailService, SendEmailService>();
builder.Services.AddSingleton<IUserService, UserService>();
builder.Services.AddSingleton<SmsAuthCodeGrantType>();
builder.Services.AddSingleton<HttpClient>();
builder.Services.AddSingleton<IConsulClient>(new ConsulClient(x => {
    x.Address = new Uri(configuration["consulHost"] ??"");
}));

builder.Services.AddSingleton<IDnsQuery>(p =>
{
    return new LookupClient(new IPEndPoint(IPAddress.Parse(configuration["consulIPAddress"] ?? ""), Int32.Parse(configuration["consulIPAddressPort"]??"0")));
});


// Add services to the container.
builder.Services.AddControllers();

//注入Identity Server4服务到DI容器中
builder.Services.AddIdentityServer()
                .AddExtensionGrantValidator<SmsAuthCodeGrantType>()
                //注入临时签名凭据到DI容器,后期可用签名证书的密钥替换,用于生成零时密钥
                .AddDeveloperSigningCredential()
                //注入需要访问受Identity Server4保护的Api资源的客户端(密钥模式)注入到DI容器中 -内存级别
                .AddInMemoryClients(Config.GetClients())
                .AddInMemoryIdentityResources(Config.GetIdentityResources())
                //注入需要受Identity Server4保护的Api资源添注入到DI容器中 -内存级别
                .AddInMemoryApiResources(Config.GetApiResources()); //identityserver 认证
                //.AddInMemoryApiScopes(Config.GetApiScopes());
#region Cors
builder.Services.AddCors(
options => options.AddPolicy("AllowAllOrigin", buildler =>
{
    buildler.AllowAnyMethod().AllowAnyHeader().SetIsOriginAllowed(origin => true).AllowCredentials();
}));
#endregion

builder.WebHost.UseUrls("http://0.0.0.0:5003/");

var app = builder.Build();

// Configure the HTTP request pipeline.

//consul的心跳检查
app.UseHealthCheckMiddleware();

app.UseAuthentication();

app.UseAuthorization();

app.UseCors("AllowAllOrigin");

app.UseIdentityServer();

app.MapControllers();

app.Run();
然后是Config配置类
public class Config
    {
        public static IEnumerable<Client> GetClients()
        {
            return new List<Client>{
                new Client{
                    ClientId = "android",
                    ClientSecrets = new List<Secret>
                    {
                        new Secret("secret".Sha256())
                    },
                    RefreshTokenExpiration  = TokenExpiration.Sliding,
                    AllowOfflineAccess = true,
                    RequireClientSecret = false,
                    AccessTokenLifetime = 86400,
                    AllowedGrantTypes = new List<string>{"sms_auth_code"},
                    AlwaysIncludeUserClaimsInIdToken = true,
                    AllowedScopes = new List<string>
                    {
                        "gateway_api",
                        "user_api",
                        "contact_api",
                        "project_api",
                        IdentityServerConstants.StandardScopes.OfflineAccess,
                        IdentityServerConstants.StandardScopes.OpenId,
                        IdentityServerConstants.StandardScopes.Profile
                    }
                }
            };
        }

        public static IEnumerable<IdentityResource> GetIdentityResources()
        {
            return new List<IdentityResource>
            {
                new IdentityResources.OpenId(),
                new IdentityResources.Profile()
            };
        }

        public static IEnumerable<ApiResource> GetApiResources()
        {
            return new List<ApiResource>
            {
                new ApiResource("gateway_api","gateway service"),
                new ApiResource("contact_api","contact service"),
                new ApiResource("user_api","user service"),
                new ApiResource("project_api","project service")
            };
        }

    }
SmsAuthCodeGrantType 配置类的扩展
public class SmsAuthCodeGrantType : IExtensionGrantValidator
    {
        private readonly IUserService _userService;
        private readonly IRedisGetter _redisGetter;
        public SmsAuthCodeGrantType(IRedisGetter redisGette, IUserService userServicer) //
        {
            _userService = userServicer;
            _redisGetter = redisGette;
        }

        string IExtensionGrantValidator.GrantType => "sms_auth_code";

        async Task IExtensionGrantValidator.ValidateAsync(ExtensionGrantValidationContext context)
        {
            //var phone = context.Request.Raw["phone"];
            var code = context.Request.Raw["auth_code"];
            var email = context.Request.Raw["email"];

            var errorValidationResult = new GrantValidationResult(TokenRequestErrors.InvalidGrant);

            //验证手机号跟code不能为null
            if (string.IsNullOrWhiteSpace(code) || string.IsNullOrWhiteSpace(email))//string.IsNullOrWhiteSpace(phone) ||
            {
                context.Result = errorValidationResult;
                return;
            }

            //检查邮箱验证码、和手机号码  (正常是用手机号发短信验证但是这里没有接入api就先用手机号和邮箱验证码单独分开验证)
            if (!await Validate(code, email))
            {
                context.Result = errorValidationResult;
                return;
            }

            //根据用户邮箱查询用户信息
            var userinfo = await _userService.CheckOrCreate(email);
            if (userinfo == null)
            {
                context.Result = errorValidationResult;
                return;
            }
            var claims = new Claim[]
            {
                new Claim("name",userinfo.Name??string.Empty),
                new Claim("email",userinfo.Email??string.Empty),
                new Claim("age",userinfo.Age.ToString()??string.Empty),
                new Claim("createTime",userinfo.CreateTime.ToString("yyyy-MM-dd HH:mm:ss")??string.Empty),
            };

            context.Result = new GrantValidationResult(
                                subject: userinfo.Id.ToString(),
                                authenticationMethod: "custom",
                                claims: claims);
        }

        private async Task<bool> Validate(string authCode, string email, string phone = null)
        {
            //if (string.IsNullOrEmpty(phone)) return false;
            //bool status = true;
            //// 验证手机号是否符合规范,规范手机号应该为11位数字,且以1开头
            //Regex regex = new Regex(@"^1\d{10}$");
            //if (regex.IsMatch(phone) == false) return false;

            bool isValid = Regex.IsMatch(email, @"^[\w-\.]+@([\w-]+\.)+[\w-]{2,4}$");
            if (!isValid)
            {
                return false;
            }

            bool status = true;
            var emailData = await _redisGetter.GetAsync(email);
            //去redis中根据邮箱查询code
            if ((string.IsNullOrEmpty(emailData) ? "0" : emailData) != authCode)
            {
                status = false;
            };
            return status;
        }
    }
这里先展示一部分,后面再把地址贴上
然后准备开始调用获取token

获取token后开始准备需要鉴权的服务(这里先以普通服务为例)

贴配置文件
using Autofac;
using Autofac.Extensions.DependencyInjection;
using AutoMapper;
using Com.Ctrip.Framework.Apollo;
using OneLove.FreeSqlHelper.Extension.IService;
using OneLove.VipUser.DataAccess;
using OneLove.VipUser.DataContract;
using OneLove.VipUser.Domain;
using OneLove.VipUser.Domain.UserInfos;
using OneLove.VipUser.Interface.Common;
using OneLove.VipUser.Interface.Expand;
using System.Diagnostics;
using System.Reflection;
using OneLove.Consul.Extension;
using OneLove.Consul.Extension.Model;
using OneLove.Consul.Extension.IService;
using System.IdentityModel.Tokens.Jwt;
using Microsoft.AspNetCore.Authentication.JwtBearer;
using Microsoft.IdentityModel.Logging;

var builder = WebApplication.CreateBuilder(args);

// Add services to the container.
// Learn more about configuring Swagger/OpenAPI at https://aka.ms/aspnetcore/swashbuckle
builder.Services.AddEndpointsApiExplorer();
builder.Services.AddSwaggerGen();
builder.Services.AddMvc();
builder.Services.AddControllers();

IConfiguration configuration = builder.Configuration;
builder.Services.Configure<ConsulRegisterOptions>(builder.Configuration.GetSection("ConsulRegisterOptions"));

#region 注入Apollo配置中心
// 添加Apollo配置中心
builder.Host.ConfigureAppConfiguration((context, b) =>
{
    b.AddApollo(b.Build().GetSection("Apollo"))
    //b.AddApollo(configuration.GetSection("apollo"))
     .AddDefault();
});
#endregion

#region 底层注入
builder.Host.UseServiceProviderFactory(new AutofacServiceProviderFactory());
builder.Host.ConfigureContainer<ContainerBuilder>(builder =>
{
    builder.RegisterModule<IocRegisterModule>();
});
#endregion

#region AutoMapper
AutoMapper.IConfigurationProvider configurationProvider = new MapperConfiguration(cfg =>
{
    cfg.AddProfile<SystemInfrastructureProfile>();
});
builder.Services.AddSingleton(configurationProvider);
builder.Services.AddScoped<IMapper, Mapper>();
#endregion

#region 后台模式启动
builder.Services.AddHostedService<MyBackgroundService>();
#endregion

#region Cors
builder.Services.AddCors(
options => options.AddPolicy("AllowAllOrigin", buildler =>
{
    buildler.AllowAnyMethod().AllowAnyHeader().SetIsOriginAllowed(origin => true).AllowCredentials();
}));
#endregion

#region ids4鉴权
JwtSecurityTokenHandler.DefaultInboundClaimTypeMap.Clear();
IdentityModelEventSource.ShowPII = true;
builder.Services.AddAuthentication("Bearer")  //这个是Token的开头 一般格式为: bearer xxxxxxxxxxxxxxxx
    .AddIdentityServerAuthentication(option =>
    {
        option.Authority = "http://localhost:5003";// token一般是非对称加密的形式,所以这个配置的是我们服务端获取公钥的地址 用以解密
        option.ApiName = "project_api";     // 这个就是我们在搭建服务端的时候 授权范围的名称, 必须与其一致,要不然就会导致鉴权失败。
        option.RequireHttpsMetadata = false;    // htpps就设置为true
        option.LegacyAudienceValidation = true;

    });
#endregion


builder.WebHost.UseUrls("http://0.0.0.0:5001");

var app = builder.Build();

// Configure the HTTP request pipeline.
if (app.Environment.IsDevelopment())
{
    app.UseSwagger();
    app.UseSwaggerUI();
}

app.UseRouting();
app.UseAuthentication();
app.UseAuthorization();
app.UseCors("AllowAllOrigin");

//consul的心跳检查
app.UseHealthCheckMiddleware();

app.MapGet("/test", (IConfiguration configuration) =>
{
    return $"{Assembly.GetExecutingAssembly().FullName};当前时间:{DateTime.Now}";
});

app.UseEndpoints(endpoints =>
{
    endpoints.MapControllers();
});

app.Run();
然后再需要请求使用token的地方加上特性

然后调用api请求查看是否正常

正常调用后在后台控制台能看到 当前服务调用鉴权服务的控制台信息,因为在需要鉴权的api有url调用(异常也会在控制台打印)

参考博客:https://www.cnblogs.com/liumengchen-boke/p/11223377.html
github地址:https://github.com/madeinchinalmc/User.Api
接下来部署网关接入鉴权服务(限流、网关鉴权)
再原来的基础上我们有个ids4认证中心 在ocelot上添加ids4的客户端验证请求 在原来的基础上再加配置

program文件
using IdentityServer4.AccessTokenValidation;
using Microsoft.AspNetCore.Authentication.JwtBearer;
using Microsoft.IdentityModel.Logging;
using Ocelot.DependencyInjection;
using Ocelot.Middleware;
using Ocelot.Provider.Consul;
using Ocelot.Provider.Polly;
using System.IdentityModel.Tokens.Jwt;
using Com.Ctrip.Framework.Apollo;

var builder = WebApplication.CreateBuilder(args);

//builder.Host.ConfigureAppConfiguration(c =>
//{
//    c.AddJsonFile("", optional: false, reloadOnChange: true);
//});

//IConfiguration configuration = new ConfigurationBuilder()
//.AddJsonFile($"ocelot.{builder.Environment.EnvironmentName}.json", true, true)
//.Build();

//IConfiguration configuration = new ConfigurationBuilder().AddJsonFile("Ocelot_Config_Origin.json").Build();

//builder.Configuration.AddJsonFile("ocelot.json");

IConfiguration configuration = builder.Configuration;

#region 注入Apollo配置中心
// 添加Apollo配置中心
builder.Host.ConfigureAppConfiguration((context, b) =>
{
    b.AddApollo(b.Build().GetSection("Apollo"))
    //b.AddApollo(configuration.GetSection("apollo"))
     .AddDefault();
});
#endregion

builder.Configuration.AddJsonFile("ocelot_consul_service.json");

builder.Services.AddControllers();

builder.Services.AddEndpointsApiExplorer();

#region 注入鉴权
JwtSecurityTokenHandler.DefaultInboundClaimTypeMap.Clear();
IdentityModelEventSource.ShowPII = true;
builder.Services.AddAuthentication(JwtBearerDefaults.AuthenticationScheme)
               .AddIdentityServerAuthentication("Bearer", options =>
               {
                   options.Authority = configuration["Ids4Host"];//id4服务地址 "http://localhost:5003";//
                   options.ApiName = "gateway_api";//id4 api资源里的apiname gateway_api
                   options.RequireHttpsMetadata = false; //不使用https
                   options.LegacyAudienceValidation = true;
                   options.SupportedTokens = SupportedTokens.Both;
               });
#endregion

builder.Services.AddOcelot().AddConsul().AddPolly(); ; //注入 AddOcelot 注入 AddConsul 注入AddPolly

builder.WebHost.UseUrls("http://0.0.0.0:5000");

var app = builder.Build();

app.UseHttpsRedirection();

app.UseOcelot().Wait();

app.UseAuthentication();

app.UseAuthorization();

app.MapControllers();

app.Run();
在 ocelot_consul.json中再加内容

这里是完整的配置文件
{
  //路由配置(16.1版本将ReRoutes换成Routes)
  "Routes": [
    {
      "DownstreamPathTemplate": "/connect/{path}", // 下游(服务提供方)服务路由模板
      "DownstreamScheme": "http", //下游协议
      "UpstreamHttpMethod": [ "Get", "Post", "Put", "Delete" ], //上游允许的Http请求方式
      "UpstreamPathTemplate": "/Ids4/{path}", //Hero:上游路径模版
      "UseServiceDiscovery": true, //启用服务发现,若Ocelot集合Consul必须配置此项
      "ServiceName": "IdentityService4", //Consul服务名称
      "LoadBalancerOptions": {
        "Type": "RoundRobin"
      },
      "RateLimitOptions": {
        "ClientWhitelist": [ "admin" ], // 白名单
        "EnableRateLimiting": true, // 是否启用限流
        "Period": "1m", // 统计时间段:1s, 5m, 1h, 1d
        "PeriodTimespan": 15, // 多少秒之后客户端可以重试
        "Limit": 10 // 在统计时间段内允许的最大请求数量
      },
      "QoSOptions": {
        "ExceptionsAllowedBeforeBreaking": 2, // 允许多少个异常请求
        "DurationOfBreak": 5000, // 熔断的时间,单位为秒
        "TimeoutValue": 3000 // 如果下游请求的处理时间超过多少则视如该请求超时
      },
      "ReRoutesCaseSensitive": false // non case sensitive
    },
    {
      "DownstreamPathTemplate": "/api/{path}", // 下游(服务提供方)服务路由模板
      "DownstreamScheme": "http", //下游协议
      "UpstreamHttpMethod": [ "Get", "Post", "Put", "Delete" ], //上游允许的Http请求方式
      "UpstreamPathTemplate": "/VipUsers/{path}", //Hero:上游路径模版
      "UseServiceDiscovery": true, //启用服务发现,若Ocelot集合Consul必须配置此项
      "ServiceName": "VipUser", //Consul服务名称
      "LoadBalancerOptions": {
        "Type": "RoundRobin"
      },
      "RateLimitOptions": {
        "ClientWhitelist": [ "admin" ], // 白名单
        "EnableRateLimiting": true, // 是否启用限流
        "Period": "1m", // 统计时间段:1s, 5m, 1h, 1d
        "PeriodTimespan": 15, // 多少秒之后客户端可以重试
        "Limit": 10 // 在统计时间段内允许的最大请求数量
      },
      "QoSOptions": {
        "ExceptionsAllowedBeforeBreaking": 2, // 允许多少个异常请求
        "DurationOfBreak": 5000, // 熔断的时间,单位为秒
        "TimeoutValue": 3000 // 如果下游请求的处理时间超过多少则视如该请求超时
      },
      "AuthenticationOptions": {
        "AuthenticationProviderKey": "Bearer",
        "AllowedScopes": []
      },
      "ReRoutesCaseSensitive": false // non case sensitive
    }
  ],

  //全局配置
  "GlobalConfiguration": {
    "BaseUrl": "http://localhost:5000", //网关对外地址
    "ReRouteIsCaseSensitive": false, //是否区分路由字母大小写
    "RequestIdKey": "OcRequestId",
    "ServiceDiscoveryProvider": { //服务发现提供者,配置Consul地址
      "Host": "xxx.xx.xx.xxx", //Consul主机名称
      "Port": 8500, //Consul端口号
      "Type": "Consul" //必须指定Consul服务发现类型 PollConsul
    },
    "RateLimitOptions": {
      //是否禁用X-Rate-Limit和Retry-After标头。
      "DisableRateLimitHeaders": false,
      //限流返回的消息。
      "QuotaExceededMessage": "Customize Tips!"
    }
  }


}
好来看结果
这个是通过ocelot进行token的获取操作

再来通过ocelot进行调用
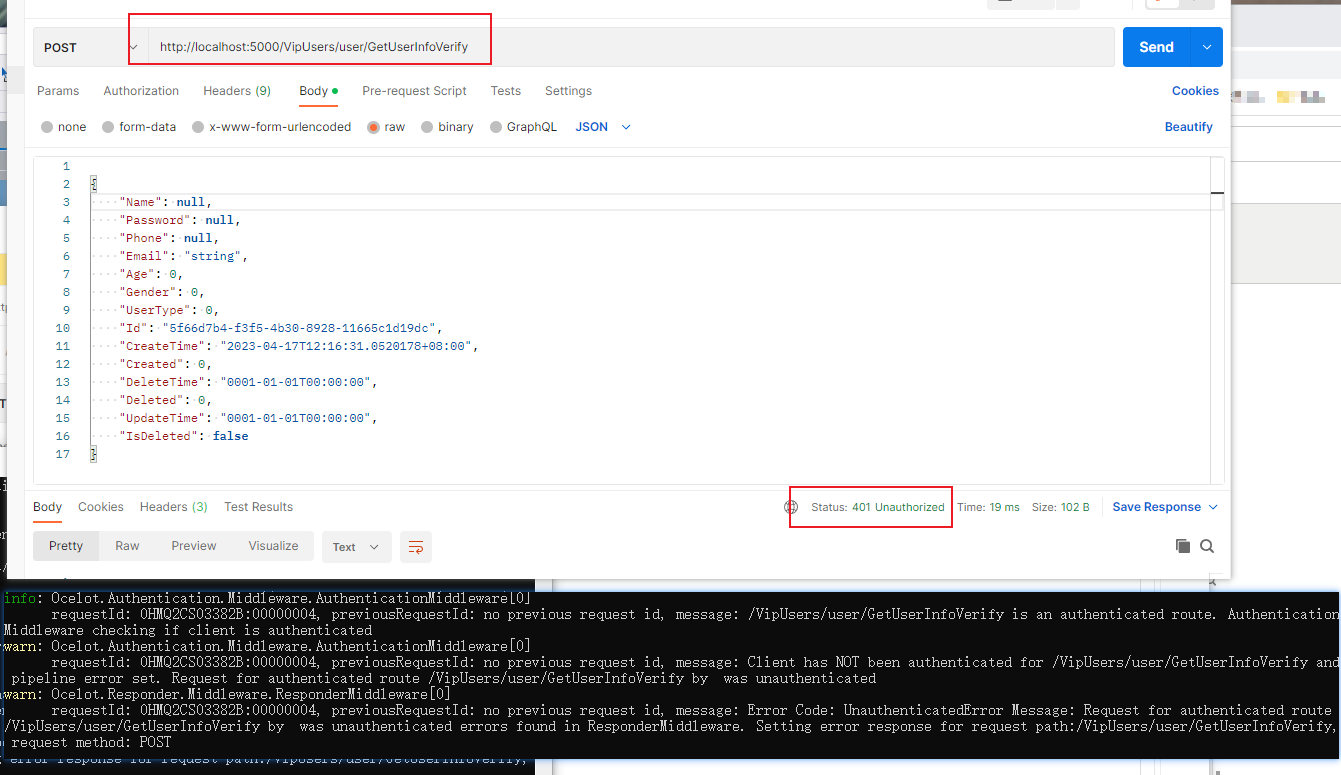
这里是通过ocelot进行拦截的 网关处就被拦截了 (当然我每个服务里都加了ids4验证)
然后在Herads中加入token

好了 到这里就完全结束了~有问题、有优化、有更好的方案欢迎各位大佬留言交流

 浙公网安备 33010602011771号