
netty 服务启动流程

NioServerSocketChannel 初始化过程:
1.创建 Java NIO的 ServerSocketChannel;
2.为ServerSocketChannel 注册感兴趣的键以及设置为非阻塞模式;
3.创建默认的 pipeline 以及unsafe 对象;
(1)创建 ServerSocketChannel
 /**
     * Create a new instance
     */
    public NioServerSocketChannel() {
        this(newSocket(DEFAULT_SELECTOR_PROVIDER));
    }
newSocket(DEFAULT_SELECTOR_PROVIDER) :用来创建一个Java NIO的 ServerSocketChannel ;以下操作等于 ServerSocketChannel.open();为了解决性能问题(每次回进行加锁)
 private static final SelectorProvider DEFAULT_SELECTOR_PROVIDER = SelectorProvider.provider();

    private static final InternalLogger logger = InternalLoggerFactory.getInstance(NioServerSocketChannel.class);

    private static ServerSocketChannel newSocket(SelectorProvider provider) {
        try {
            /**
             *  Use the {@link SelectorProvider} to open {@link SocketChannel} and so remove condition in
             *  {@link SelectorProvider#provider()} which is called by each ServerSocketChannel.open() otherwise.
             *
             *  See <a href="https://github.com/netty/netty/issues/2308">#2308</a>.
             */
            return provider.openServerSocketChannel();
        } catch (IOException e) {
            throw new ChannelException(
                    "Failed to open a server socket.", e);
        }
    }
(2)为ServerSocketChannel 注册感兴趣的键以及设置为非阻塞模式;
 protected AbstractNioChannel(Channel parent, SelectableChannel ch, int readInterestOp) {
        super(parent);
        this.ch = ch;
        //感兴趣的key
        this.readInterestOp = readInterestOp;
        try {
        //设置为非阻塞模式
            ch.configureBlocking(false);
        } catch (IOException e) {
            try {
                ch.close();
            } catch (IOException e2) {
                if (logger.isWarnEnabled()) {
                    logger.warn(
                            "Failed to close a partially initialized socket.", e2);
                }
            }

            throw new ChannelException("Failed to enter non-blocking mode.", e);
        }
    }
(3).创建默认的 pipeline 以及unsafe 对象;
  protected AbstractChannel(Channel parent) {
        this.parent = parent;
        id = newId();
        unsafe = newUnsafe();
        pipeline = newChannelPipeline();
    }
pipeline创建流程
无论在创建服务端还是处理客户端请求连接的时候,会对每一个客户端的连接创建一个NiosocketChannel 以及 pipeline组件;我们来看一看pipeline的创建流程;
首先需要知道的是pipeline 创建是跟随者NioServerSocketChannel 或者NioSocketChannel 一起创建的;
NioSocketChannel 与NioServerSocketChannel 都继承了AbstractNioChannel 这个抽象类,源码可知所以对于一些方法的实现以及pipeline 实现都是相同的
(1).进入AbstractNioChannel 的父类 AbstractChannel 构造函数,这里进行了pipeline 的创建
protected AbstractChannel(Channel parent) {
        this.parent = parent;
        id = newId();
        unsafe = newUnsafe();
        pipeline = newChannelPipeline();
    }
(2).在构造pipeline 会将当前的对象this(NioServerSocketChannel 或者NioSocketChannel 传进来),创建默认的channelpipeline;
protected DefaultChannelPipeline newChannelPipeline() {
        return new DefaultChannelPipeline(this);
    }
(3).接下来就是赋值操作
protected DefaultChannelPipeline(Channel channel) {
    //维护当前的channel 对象
        this.channel = ObjectUtil.checkNotNull(channel, "channel");
        succeededFuture = new SucceededChannelFuture(channel, null);
        voidPromise =  new VoidChannelPromise(channel, true);
        //创建尾巴哨兵
        tail = new TailContext(this);
        //创建头哨兵
        head = new HeadContext(this);
        //链表连起来,以后的addLat 操作就是基于这个链表的
        head.next = tail;
        tail.prev = head;
    }
pipeline 的addlast 方法会将我们的handler 转换为一个handlercontext 对象;
//新构造一个channelHandlerContext 对象
newCtx = newContext(group, filterName(name, handler), handler);
//链表
 addLast0(newCtx);
用图表示的话就是:

netty新连接接入(即创建NioSocketChannel)
在上图中,在初始化channel 中,进行了新连接接入的方法,看一下吧;
void init(Channel channel) throws Exception {
    //获取用户配置的option 属性
        final Map<ChannelOption<?>, Object> options = options0();
        synchronized (options) {
            setChannelOptions(channel, options, logger);
        }
        //获取用户的attr属性
        final Map<AttributeKey<?>, Object> attrs = attrs0();
        synchronized (attrs) {
            for (Entry<AttributeKey<?>, Object> e: attrs.entrySet()) {
                @SuppressWarnings("unchecked")
                AttributeKey<Object> key = (AttributeKey<Object>) e.getKey();
                channel.attr(key).set(e.getValue());
            }
        }
        //得到NioServerSocketChannel pipeline
        ChannelPipeline p = channel.pipeline();

        final EventLoopGroup currentChildGroup = childGroup;
        final ChannelHandler currentChildHandler = childHandler;
        final Entry<ChannelOption<?>, Object>[] currentChildOptions;
        final Entry<AttributeKey<?>, Object>[] currentChildAttrs;
        synchronized (childOptions) {
            currentChildOptions = childOptions.entrySet().toArray(newOptionArray(childOptions.size()));
        }
        synchronized (childAttrs) {
            currentChildAttrs = childAttrs.entrySet().toArray(newAttrArray(childAttrs.size()));
        }
        //添加ServerBootstrapAcceptor 用来处理NioSocketChannel
        p.addLast(new ChannelInitializer<Channel>() {
            @Override
            public void initChannel(final Channel ch) throws Exception {
                final ChannelPipeline pipeline = ch.pipeline();
                ChannelHandler handler = config.handler();
                if (handler != null) {
                    pipeline.addLast(handler);
                }

                ch.eventLoop().execute(new Runnable() {
                    @Override
                    public void run() {
                        pipeline.addLast(new ServerBootstrapAcceptor(
                                ch, currentChildGroup, currentChildHandler, currentChildOptions, currentChildAttrs));
                    }
                });
            }
        });
    }
经过这样之后,pipeline的结构就是这样的;可以说这个ServerBootStrapAcceptor 就是一个桥梁

我们看一下ServerBootStrapAcceptor 这个进站处理器一个核心方法,进行socketChannel 的注册以及监听
@Override
        @SuppressWarnings("unchecked")
        //这个传过来的msg 其实是NioSocketChannel 对象,这个我后面说
        public void channelRead(ChannelHandlerContext ctx, Object msg) {
            final Channel child = (Channel) msg;
        //为NioSocketChannel 的pipeline 进行添加我们定义的处理器
            child.pipeline().addLast(childHandler);

            setChannelOptions(child, childOptions, logger);

            for (Entry<AttributeKey<?>, Object> e: childAttrs) {
                child.attr((AttributeKey<Object>) e.getKey()).set(e.getValue());
            }

            try {
                //socketChannel 交给work 线程管理,注册监听其Read事件,并事件传播ad dhandler 等方法;
                childGroup.register(child).addListener(new ChannelFutureListener() {
                    @Override
                    public void operationComplete(ChannelFuture future) throws Exception {
                        if (!future.isSuccess()) {
                            forceClose(child, future.cause());
                        }
                    }
                });
            } catch (Throwable t) {
                forceClose(child, t);
            }
        }
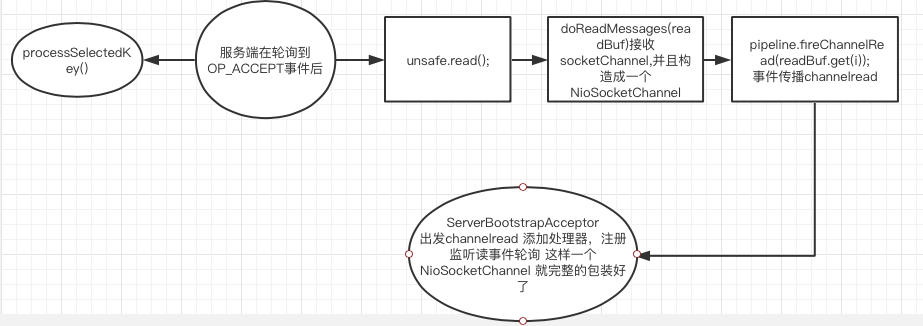
到这里,估计疑惑的就是什么时候触发执行这个channelread方法呢?显而易见的,是我们的selector 轮询到有新链接接入的时候,即触发accept 方法
主要从绑定端口的操作开始的
private static void doBind0(
            final ChannelFuture regFuture, final Channel channel,
            final SocketAddress localAddress, final ChannelPromise promise) {

        // This method is invoked before channelRegistered() is triggered.  Give user handlers a chance to set up
        // the pipeline in its channelRegistered() implementation.
        //execute 方法,会进行selector 的轮询,可以点进去这个execute 内部,startThread 方法
        channel.eventLoop().execute(new Runnable() {
            @Override
            public void run() {
                if (regFuture.isSuccess()) {
                    channel.bind(localAddress, promise).addListener(ChannelFutureListener.CLOSE_ON_FAILURE);
                } else {
                    promise.setFailure(regFuture.cause());
                }
            }
        });
    }
最终会运行到NioEventLoop 方法中的如下
private void processSelectedKey(SelectionKey k, AbstractNioChannel ch) {
我们主要看这个unsafe.read() 方法;NioServerSocketChannel 的unsafe 实现类是NioMessageUnsafe;
  if ((readyOps & (SelectionKey.OP_READ | SelectionKey.OP_ACCEPT)) != 0 || readyOps == 0) {
                unsafe.read();
            }
accept 一个SocketChannel,也就是Java nio 操作,并构造成一个NioSocketChannel ;
int localRead = doReadMessages(readBuf);
protected int doReadMessages(List<Object> buf) throws Exception {
        //jdk SocketChannel
        SocketChannel ch = SocketUtils.accept(javaChannel());

        try {
            if (ch != null) {
            //构造成一个NioSocketChannel
                buf.add(new NioSocketChannel(this, ch));
                return 1;
            }
        } catch (Throwable t) {
            logger.warn("Failed to create a new channel from an accepted socket.", t);

            try {
                ch.close();
            } catch (Throwable t2) {
                logger.warn("Failed to close a socket.", t2);
            }
        }

        return 0;
    }
这样一个NioSocketChannel 就创建出来了;接下来就是连接的接入,监听read 事件;
 for (int i = 0; i < size; i ++) {
                    readPending = false;
//事件的传播,就会执行到ServerBootStrapAcceptor 的channelread 方法中,参数就是Niosocketchannel

                    pipeline.fireChannelRead(readBuf.get(i));
                }
                readBuf.clear();
                allocHandle.readComplete();
                pipeline.fireChannelReadComplete();
流程图如下:
线程轮询
(一)我们先看一看 EventLoopGroup 的初始化;
在此声明,Netty 是基于java NIO 的,建议知道java NIO 运行机制(Selector,Channel ,ByteBuffer ,zeroCopy) ,再阅读此篇文章,不然会一头雾水;
netty 是对javanio 的顶层封装扩展,所以对于一些底层的重要操作,还是基于Javanio的;
EventLoopGroup :事件循环组:
EventLoopGroup bossGroup =new NioEventLoopGroup();
EventLoopGroup workGroup =new NioEventLoopGroup();
主要是完成一些变量的赋值
主要发生了什么:Look,源码就是一层一层的调用构造函数,往里面赋值;
1.extends 多线程事件循环组, 被用于基于channel 的NIO selector 实现
/**
 * {@link MultithreadEventLoopGroup} implementations which is used for NIO {@link Selector} based {@link Channel}s.
 */
public class NioEventLoopGroup extends MultithreadEventLoopGroup {
2.我们一步一步点击下来,发现就是在它的构造函数里面调来调去,我们发现他创建了一个空的 Executor 对象 (java 1. 5 并发库重要内容,执行器,进行线程执行),以及 nThreads 线程数量为 0(这里的0并不是说我们给我们创建 0个线程,后面会有判断);
  */
    public NioEventLoopGroup() {
        this(0);
    }

    /**
     * Create a new instance using the specified number of threads, {@link ThreadFactory} and the
     * {@link SelectorProvider} which is returned by {@link SelectorProvider#provider()}.
     */
    public NioEventLoopGroup(int nThreads) {
        this(nThreads, (Executor) null);
    }
3.我们可以看到在这个构造方法里调用了 SelectorProvider.provider(),这个不陌生吧,在java nio 中创建selector 的Selector.open() 方法中其实调用的就是这个
/**
  * Create a new instance using the specified number of threads, the given {@link ThreadFactory} and the
  * {@link SelectorProvider} which is returned by {@link SelectorProvider#provider()}.
  */

public NioEventLoopGroup(int nThreads, Executor executor) {
this(nThreads, executor, SelectorProvider.provider());
}
4.继续点,可以看到它又添加了一些新的内容 DefaultSelectStrategyFactory 工厂 Factory which uses the default select strategy. 默认的选择策略
public NioEventLoopGroup(
int nThreads, Executor executor, final SelectorProvider selectorProvider) {
this(nThreads, executor, selectorProvider, DefaultSelectStrategyFactory.INSTANCE);
}

//在这个构造方法里用添加了一个参数  DefaultSelectStrategyFactory.INSTANCE ,提供一个默认选择策略,工厂模式
/**
* Factory which uses the default select strategy.
*/
public final class DefaultSelectStrategyFactory implements SelectStrategyFactory {
public static final SelectStrategyFactory INSTANCE = new DefaultSelectStrategyFactory();

private DefaultSelectStrategyFactory() { }

@Override
public SelectStrategy newSelectStrategy() {
return DefaultSelectStrategy.INSTANCE;
}
}
5. 继续走,这里就开始调用父类super(MultithreadEventLoopGroup)方法了,在这里我们就可以知道默认给我们创建多少线程了;
public NioEventLoopGroup(int nThreads, Executor executor, final SelectorProvider selectorProvider,
final SelectStrategyFactory selectStrategyFactory) {
super(nThreads, executor, selectorProvider, selectStrategyFactory, RejectedExecutionHandlers.reject());
}


protected MultithreadEventLoopGroup(int nThreads, Executor executor, Object... args) {
super(nThreads == 0 ? DEFAULT_EVENT_LOOP_THREADS : nThreads, executor, args); }


//分析线程数量
//线程数量判断,如果是0的话,就是 DEFAULT_EVENT_LOOP_THREADS  ,是多少呢?我们点进去看一看,我们会看到一个静态代码块


static {
DEFAULT_EVENT_LOOP_THREADS = Math.max(1, SystemPropertyUtil.getInt(
"io.netty.eventLoopThreads", NettyRuntime.availableProcessors() * 2));

if (logger.isDebugEnabled()) {
logger.debug("-Dio.netty.eventLoopThreads: {}", DEFAULT_EVENT_LOOP_THREADS);
}
}


//调用Runtime.availableProcessors将会获取 可用的处理器
@SuppressForbidden(reason = "to obtain default number of available processors")
synchronized int availableProcessors() {
if (this.availableProcessors == 0) {
final int availableProcessors =
SystemPropertyUtil.getInt(
"io.netty.availableProcessors",
Runtime.getRuntime().availableProcessors());
setAvailableProcessors(availableProcessors);
}
return this.availableProcessors;
}


由此可以看到 默认创建的线程数不是0 而是根据不同电脑的处理器个数*2
6,接下来就是Excutor 的赋值了,因为从第二部可以看到,初始的Excutor 的null;
protected MultithreadEventExecutorGroup(int nThreads, Executor executor, Object... args) {
this(nThreads, executor, DefaultEventExecutorChooserFactory.INSTANCE, args);
}

protected MultithreadEventExecutorGroup(int nThreads, Executor executor,
EventExecutorChooserFactory chooserFactory, Object... args) {
if (nThreads <= 0) {
throw new IllegalArgumentException(String.format("nThreads: %d (expected: > 0)", nThreads));
}


//**********源码解释***********//
//我们看红色部分,就是对 executor 进行初始化操作,这里我们需要了解的是Excutor 接口 以及ThreadFactory 接口的作用
//在netty 里实现了ThreadFactory关于自己的DefaultThreadFactory
if (executor == null) {
executor = new ThreadPerTaskExecutor(newDefaultThreadFactory());
}

children = new EventExecutor[nThreads];

for (int i = 0; i < nThreads; i ++) {
boolean success = false;
try {
children[i] = newChild(executor, args);
success = true;
} catch (Exception e) {
// TODO: Think about if this is a good exception type
throw new IllegalStateException("failed to create a child event loop", e);
} finally {
if (!success) {
for (int j = 0; j < i; j ++) {
children[j].shutdownGracefully();
}

for (int j = 0; j < i; j ++) {
EventExecutor e = children[j];
try {
while (!e.isTerminated()) {
e.awaitTermination(Integer.MAX_VALUE, TimeUnit.SECONDS);
}
} catch (InterruptedException interrupted) {
// Let the caller handle the interruption.
Thread.currentThread().interrupt();
break;
}
}
}
}
}

chooser = chooserFactory.newChooser(children);

final FutureListener<Object> terminationListener = new FutureListener<Object>() {
@Override
public void operationComplete(Future<Object> future) throws Exception {
if (terminatedChildren.incrementAndGet() == children.length) {
terminationFuture.setSuccess(null);
}
}
};

for (EventExecutor e: children) {
e.terminationFuture().addListener(terminationListener);
}

Set<EventExecutor> childrenSet = new LinkedHashSet<EventExecutor>(children.length);
Collections.addAll(childrenSet, children);
readonlyChildren = Collections.unmodifiableSet(childrenSet);
