万字剖析OpenFeign整合Ribbon实现负载均衡的原理
大家好,前面我已经剖析了OpenFeign的动态代理生成原理和Ribbon的运行原理,这篇文章来继续剖析SpringCloud组件原理,来看一看OpenFeign是如何基于Ribbon来实现负载均衡的,两组件是如何协同工作的。
一、Feign动态代理调用实现rpc流程分析
通过Feign客户端接口的动态代理生成原理讲解,我们可以清楚的知道,Feign客户端接口的动态代理生成是基于JDK的动态代理来实现的,那么在所有的方法调用的时候最终都会走InvocationHandler接口的实现,默认就是ReflectiveFeign.FeignInvocationHandler,那我们接下来就来看看,FeignInvocationHandler是如何实现rpc调用的。
FeignInvocationHandler对于invoke方法的实现。
private final Map<Method, MethodHandler> dispatch;
    @Override
    public Object invoke(Object proxy, Method method, Object[] args) throws Throwable {
      if ("equals".equals(method.getName())) {
        try {
          Object otherHandler =
              args.length > 0 && args[0] != null ? Proxy.getInvocationHandler(args[0]) : null;
          return equals(otherHandler);
        } catch (IllegalArgumentException e) {
          return false;
        }
      } else if ("hashCode".equals(method.getName())) {
        return hashCode();
      } else if ("toString".equals(method.getName())) {
        return toString();
      }

      return dispatch.get(method).invoke(args);
    }
前几个if判断很简单,就是判断是不是调用的方法是不是equals,hashCode,toString,因为这些方法的调是不需要走rpc调用的。
接下就是从dispatch获取要调用的方法对应的MethodHandler,然后调用MethodHandler的invoke方法。那MethodHandler是什么时候生成的呢?MethodHandler是在构建动态代理的时候生成的,不清楚的同学可以翻一下OpenFeign那篇文章最后关于生成动态代理的那部分源码。那MethodHandler作用是什么呢?你可以理解为最终rpc的调用都是基于这个MethodHandler来实现的,每个方法都有对应MethodHandler来实现rpc调用,接下来我们就来看一下MethodHandler的invoke方法的实现。
MethodHandler是个接口,有两个实现类,一个是DefaultMethodHandler,这个是处理接口中的默认方法的,另一个是SynchronousMethodHandler,这个是实现rpc调用的方法。接下来我们就看看SynchronousMethodHandler关于invoke方法的实现。
 @Override
  public Object invoke(Object[] argv) throws Throwable {
    RequestTemplate template = buildTemplateFromArgs.create(argv);
    Options options = findOptions(argv);
    Retryer retryer = this.retryer.clone();
    while (true) {
      try {
        return executeAndDecode(template, options);
      } catch (RetryableException e) {
        try {
          retryer.continueOrPropagate(e);
        } catch (RetryableException th) {
          Throwable cause = th.getCause();
          if (propagationPolicy == UNWRAP && cause != null) {
            throw cause;
          } else {
            throw th;
          }
        }
        if (logLevel != Logger.Level.NONE) {
          logger.logRetry(metadata.configKey(), logLevel);
        }
        continue;
      }
    }
  }
第一行通过方法的参数构建了一个RequestTemplate,RequestTemplate可以看成是组装http请求所需各种参数的封装,比如什么情头,body之类的都放在这里面。
第二行 Options options = findOptions(argv); 这个很有意思,Options主要是封装了发送请求是连接超时时间和读超时时间的配置,findOptions(argv)也就是先从参数里面找有没有Options,没有就返回构造SynchronousMethodHandler的入参时的Options,也就是说,连接超时时间和读超时时间可以从方法入参来传入,不过一般没有人这么玩。
第三行就是搞一个重试的组件,是可以实现重试的,一般不设置。
然后执行到executeAndDecode(template, options),进入这个方法
Object executeAndDecode(RequestTemplate template, Options options) throws Throwable {
    Request request = targetRequest(template);

    if (logLevel != Logger.Level.NONE) {
      logger.logRequest(metadata.configKey(), logLevel, request);
    }

    Response response;
    long start = System.nanoTime();
    try {
      response = client.execute(request, options);
    } catch (IOException e) {
      if (logLevel != Logger.Level.NONE) {
        logger.logIOException(metadata.configKey(), logLevel, e, elapsedTime(start));
      }
      throw errorExecuting(request, e);
    }
    long elapsedTime = TimeUnit.NANOSECONDS.toMillis(System.nanoTime() - start);

    boolean shouldClose = true;
    try {
      if (logLevel != Logger.Level.NONE) {
        response =
            logger.logAndRebufferResponse(metadata.configKey(), logLevel, response, elapsedTime);
      }
      if (Response.class == metadata.returnType()) {
        if (response.body() == null) {
          return response;
        }
        if (response.body().length() == null ||
            response.body().length() > MAX_RESPONSE_BUFFER_SIZE) {
          shouldClose = false;
          return response;
        }
        // Ensure the response body is disconnected
        byte[] bodyData = Util.toByteArray(response.body().asInputStream());
        return response.toBuilder().body(bodyData).build();
      }
      if (response.status() >= 200 && response.status() < 300) {
        if (void.class == metadata.returnType()) {
          return null;
        } else {
          Object result = decode(response);
          shouldClose = closeAfterDecode;
          return result;
        }
      } else if (decode404 && response.status() == 404 && void.class != metadata.returnType()) {
        Object result = decode(response);
        shouldClose = closeAfterDecode;
        return result;
      } else {
        throw errorDecoder.decode(metadata.configKey(), response);
      }
    } catch (IOException e) {
      if (logLevel != Logger.Level.NONE) {
        logger.logIOException(metadata.configKey(), logLevel, e, elapsedTime);
      }
      throw errorReading(request, response, e);
    } finally {
      if (shouldClose) {
        ensureClosed(response.body());
      }
    }
  }
首先调用了targetRequest方法,贴出源码
Request targetRequest(RequestTemplate template) {
    for (RequestInterceptor interceptor : requestInterceptors) {
      interceptor.apply(template);
    }
    return target.apply(template);
  }
这个方法会遍历所有的拦截器RequestInterceptor,这是feign的一个扩展点,也就说再发送请求前,你仍然还有机会对请求的内容进行调整,比如说加个请求头,这也是很常见的一种方式,在微服务之间鉴权的时候使用。RequestInterceptor是在构建Feign.Builder的时候传进来的,Feign.Builder的组件都是通过ioc容器获取的,组件又是通过配置类来的,所以你需要的话就可以在配置类中声明RequestInterceptor对象。配置类有不同的优先级,按照自己的需求,可以在其中一个优先级使用,不过一般这种通用的东西,不是某个微服务特有的功能,一般选择在springboot启动中的容器中配置。
执行完targetRequest,回到executeAndDecode之后,会构建出一个Request,Request很好理解,就是一个请求,里面封装了http请求的东西。接下来就会调用Client的execute方法来执行请求,拿到响应,接下来就是基于处理这个响应,将响应数据封装成需要返回的参数,之后返回给调用方。
到这里,我们已经分析出接口的动态代理是如何运行的。其实就是通过每个方法对应的MethodHandler来实现的,MethodHandler主要就是拼接各种参数,组装成一个请求,随后交由Client接口的实现去发送请求。
二、LoadBalancerFeignClient
通过上面分析整个动态代理调用过程可以看出,Client是发送http请求的关键类。那么Client是什么玩意?还记得我在关于OpenFeign动态代理生成的那篇文章中留下的一个疑问么,当Feign客户端在构建动态代理的时候,填充很多组件到Feign.Builder中,其中有个组件就是Client的实现,我们并没有在FeignClientsConfiguration配置类中找到关于Client的对象的声明。不过当时我就提到了,这个组件的实现是要依赖负载均衡的,也就是这个组件是Feign用来整合Ribbon的入口。
接下来,我们就着重看一下Client的实现,看看Feign是如何通过ribbon实现负载均衡的。
我们先来看一下Feign跟ribbon整合的配置类。
@Import({ HttpClientFeignLoadBalancedConfiguration.class,
    OkHttpFeignLoadBalancedConfiguration.class,
    DefaultFeignLoadBalancedConfiguration.class })
public class FeignRibbonClientAutoConfiguration {

  @Bean
  @Primary
  @ConditionalOnMissingBean
  @ConditionalOnMissingClass("org.springframework.retry.support.RetryTemplate")
  public CachingSpringLoadBalancerFactory cachingLBClientFactory(
      SpringClientFactory factory) {
    return new CachingSpringLoadBalancerFactory(factory);
  }

  @Bean
  @Primary
  @ConditionalOnMissingBean
  @ConditionalOnClass(name = "org.springframework.retry.support.RetryTemplate")
  public CachingSpringLoadBalancerFactory retryabeCachingLBClientFactory(
      SpringClientFactory factory, LoadBalancedRetryFactory retryFactory) {
    return new CachingSpringLoadBalancerFactory(factory, retryFactory);
  }

  @Bean
  @ConditionalOnMissingBean
  public Request.Options feignRequestOptions() {
    return LoadBalancerFeignClient.DEFAULT_OPTIONS;
  }

}
我们来分析一下,首先通过@Impot注解导入了三个配置类。
-
HttpClientFeignLoadBalancedConfiguration:基于HttpClient实现http调用的。
-
OkHttpFeignLoadBalancedConfiguration:基于OkHttp实现http调用的。
-
DefaultFeignLoadBalancedConfiguration:默认的,也就是Feign原生的发送http的实现。
这里我们看一下DefaultFeignLoadBalancedConfiguration配置类,因为默认就是这,HttpClientFeignLoadBalancedConfiguration和OkHttpFeignLoadBalancedConfiguration都需要有引入HttpClient和OkHttp依赖才会有用
@Configuration(proxyBeanMethods = false)
class DefaultFeignLoadBalancedConfiguration {

  @Bean
  @ConditionalOnMissingBean
  public Client feignClient(CachingSpringLoadBalancerFactory cachingFactory,
      SpringClientFactory clientFactory) {
    return new LoadBalancerFeignClient(new Client.Default(null, null), cachingFactory,
        clientFactory);
  }

}
这个配置类很简单,声明了LoadBalancerFeignClient到spring容器,传入了三个参数,一个Client的实现,一个CachingSpringLoadBalancerFactory和一个SpringClientFactory。LoadBalancerFeignClient这个类实现了Client接口,也就数说我们在构建Feign.Builder填充的就是这个对象,也就是上面说feign的执行流程最后用来执行请求的Client的实现。
接下来我说一下入参的三个参数是什么意思。
-
Client.Default:就是Feign自己实现的Client,里面封装了真正发送http发送请求的功能,LoadBalancerFeignClient虽然也实现了Client接口,但是这个实现其实是为了整合Ribbon用的,并没有发送http的功能,所以需要有个可以发送http功能的实现。
-
CachingSpringLoadBalancerFactory:后面会说这个类的作用
-
SpringClientFactory:这个跟Feign里面的FeignContext的作用差不多,用来实现配置隔离的,当然,这个也在关于Ribbon的那篇文章有剖析过。
其实大家可以自行去看OkHttpFeignLoadBalancedConfiguration和HttpClientFeignLoadBalancedConfiguration,其实他们配置跟DefaultFeignLoadBalancedConfiguration是一样的,声明的对象都是LoadBalancerFeignClient,只不过将Client.Default换成了基于HttpClient和OkHttp的实现,也就是发送http请求使用的工具不一样。
FeignRibbonClientAutoConfiguration除了导入配置类还声明了CachingSpringLoadBalancerFactory,只不过一种是带基于spring实现的重试功能的,一种是不带的,主要看有没有引入spring重试功能的包,所以上面构建LoadBalancerFeignClient注入的CachingSpringLoadBalancerFactory就是在这声明的。
这里就说完了Feign整合ribbon的配置类FeignRibbonClientAutoConfiguration,我们也找到了构造Feign.Builder的实现LoadBalancerFeignClient,接下来就来剖析LoadBalancerFeignClient的实现。
public class LoadBalancerFeignClient implements Client {

  static final Request.Options DEFAULT_OPTIONS = new Request.Options();

  private final Client delegate;

  private CachingSpringLoadBalancerFactory lbClientFactory;

  private SpringClientFactory clientFactory;

  public LoadBalancerFeignClient(Client delegate,
      CachingSpringLoadBalancerFactory lbClientFactory,
      SpringClientFactory clientFactory) {
    this.delegate = delegate;
    this.lbClientFactory = lbClientFactory;
    this.clientFactory = clientFactory;
  }

  static URI cleanUrl(String originalUrl, String host) {
    String newUrl = originalUrl;
    if (originalUrl.startsWith("https://")) {
      newUrl = originalUrl.substring(0, 8)
          + originalUrl.substring(8 + host.length());
    }
    else if (originalUrl.startsWith("http")) {
      newUrl = originalUrl.substring(0, 7)
          + originalUrl.substring(7 + host.length());
    }
    StringBuffer buffer = new StringBuffer(newUrl);
    if ((newUrl.startsWith("https://") && newUrl.length() == 8)
        || (newUrl.startsWith("http://") && newUrl.length() == 7)) {
      buffer.append("/");
    }
    return URI.create(buffer.toString());
  }

  @Override
  public Response execute(Request request, Request.Options options) throws IOException {
    try {
      URI asUri = URI.create(request.url());
      String clientName = asUri.getHost();
      URI uriWithoutHost = cleanUrl(request.url(), clientName);
      FeignLoadBalancer.RibbonRequest ribbonRequest = new FeignLoadBalancer.RibbonRequest(
          this.delegate, request, uriWithoutHost);

      IClientConfig requestConfig = getClientConfig(options, clientName);
      return lbClient(clientName)
          .executeWithLoadBalancer(ribbonRequest, requestConfig).toResponse();
    }
    catch (ClientException e) {
      IOException io = findIOException(e);
      if (io != null) {
        throw io;
      }
      throw new RuntimeException(e);
    }
  }

  IClientConfig getClientConfig(Request.Options options, String clientName) {
    IClientConfig requestConfig;
    if (options == DEFAULT_OPTIONS) {
      requestConfig = this.clientFactory.getClientConfig(clientName);
    }
    else {
      requestConfig = new FeignOptionsClientConfig(options);
    }
    return requestConfig;
  }

  protected IOException findIOException(Throwable t) {
    if (t == null) {
      return null;
    }
    if (t instanceof IOException) {
      return (IOException) t;
    }
    return findIOException(t.getCause());
  }

  public Client getDelegate() {
    return this.delegate;
  }

  private FeignLoadBalancer lbClient(String clientName) {
    return this.lbClientFactory.create(clientName);
  }

  static class FeignOptionsClientConfig extends DefaultClientConfigImpl {

    FeignOptionsClientConfig(Request.Options options) {
      setProperty(CommonClientConfigKey.ConnectTimeout,
          options.connectTimeoutMillis());
      setProperty(CommonClientConfigKey.ReadTimeout, options.readTimeoutMillis());
    }

    @Override
    public void loadProperties(String clientName) {

    }

    @Override
    public void loadDefaultValues() {

    }

  }

}
在动态代理调用的那里我们得出一个结论,那就是最后会调用Client接口的execute方法的实现,所以我们就看一下execute方法的实现,这里就是一堆操作,从请求的URL中拿到了clientName,也就是服务名。
为什么可以拿到服务名?
其实很简单,OpenFeign构建动态代理的时候,传入了一个HardCodedTarget,当时说在构建HardCodedTarget的时候传入了一个url,那个url当时说了其实就是http://服务名,所以到这里,虽然有具体的请求接口的路径,但是还是类似 http://服务名/api/sayHello这种,所以可以通过路径拿到你锁请求的服务名。
拿到服务名之后,再拿到了一个配置类IClientConfig,最后调用lbClient,我们看一下lbClient的方法实现。
private FeignLoadBalancer lbClient(String clientName) {
    return this.lbClientFactory.create(clientName);
}
就是调用CachingSpringLoadBalancerFactory的create方法
public FeignLoadBalancer create(String clientName) {
    FeignLoadBalancer client = this.cache.get(clientName);
    if (client != null) {
      return client;
    }
    IClientConfig config = this.factory.getClientConfig(clientName);
    ILoadBalancer lb = this.factory.getLoadBalancer(clientName);
    ServerIntrospector serverIntrospector = this.factory.getInstance(clientName,
        ServerIntrospector.class);
    client = this.loadBalancedRetryFactory != null
        ? new RetryableFeignLoadBalancer(lb, config, serverIntrospector,
            this.loadBalancedRetryFactory)
        : new FeignLoadBalancer(lb, config, serverIntrospector);
    this.cache.put(clientName, client);
    return client;
  }
创建的过程就是从每个服务对应的容器中获取到IClientConfig和ILoadBalancer。Ribbon那篇文章都讲过这些核心类,这里不再赘述。
默认就是创建不带spring重试功能的FeignLoadBalancer,放入缓存,最后返回这个FeignLoadBalancer。所以第一次来肯定没有,需要构建,也就是最终一定会返回FeignLoadBalancer,所以我们通过lbClient方法拿到的是FeignLoadBalancer。从这里可以看出CachingSpringLoadBalancerFactory是构建FeignLoadBalancer的工厂类,只不过先从缓存中查找,找不到再创建FeignLoadBalancer。
拿到FeignLoadBalancer之后就会调用executeWithLoadBalancer,接收到Response之后直接返回。
三、FeignLoadBalancer
那么这个FeignLoadBalancer又是啥呢?这里放上FeignLoadBalancer核心源码。
public class FeignLoadBalancer extends
    AbstractLoadBalancerAwareClient<FeignLoadBalancer.RibbonRequest, FeignLoadBalancer.RibbonResponse> {

  private final RibbonProperties ribbon;

  protected int connectTimeout;

  protected int readTimeout;

  protected IClientConfig clientConfig;

  protected ServerIntrospector serverIntrospector;

  public FeignLoadBalancer(ILoadBalancer lb, IClientConfig clientConfig,
      ServerIntrospector serverIntrospector) {
    super(lb, clientConfig);
    this.setRetryHandler(RetryHandler.DEFAULT);
    this.clientConfig = clientConfig;
    this.ribbon = RibbonProperties.from(clientConfig);
    RibbonProperties ribbon = this.ribbon;
    this.connectTimeout = ribbon.getConnectTimeout();
    this.readTimeout = ribbon.getReadTimeout();
    this.serverIntrospector = serverIntrospector;
  }

  @Override
  public RibbonResponse execute(RibbonRequest request, IClientConfig configOverride)
      throws IOException {
    Request.Options options;
    if (configOverride != null) {
      RibbonProperties override = RibbonProperties.from(configOverride);
      options = new Request.Options(override.connectTimeout(this.connectTimeout),
          override.readTimeout(this.readTimeout));
    }
    else {
      options = new Request.Options(this.connectTimeout, this.readTimeout);
    }
    Response response = request.client().execute(request.toRequest(), options);
    return new RibbonResponse(request.getUri(), response);
  }
 }
FeignLoadBalancer继承自AbstractLoadBalancerAwareClient,AbstractLoadBalancerAwareClient又是啥玩意?看过我写的关于Ribbon核心组件已经运行原理的那篇文章小伙伴肯定知道,AbstractLoadBalancerAwareClient类主要作用是通过ILoadBalancer组件获取一个Server,然后基于这个Server重构了URI,也就是将你的请求路径http://服务名/api/sayHello转换成类似http://192.168.1.101:8088/api/sayHello这种路径,也就是将原服务名替换成服务所在的某一台机器ip和端口,替换之后就交由子类实现的exceut方法来发送http请求。
所以我们知道调用executeWithLoadBalancer之后,就会重构请求路径,将服务名替换成某个具体的服务器所在的ip和端口,之后交给子类execute来处理,对于这里来说,也就是FeignLoadBalancer的execute方法,因为FeignLoadBalancer继承AbstractLoadBalancerAwareClient。
直接定位到execute方法最核心的一行代码
Response response = request.client().execute(request.toRequest(), options);
request.client()就会拿到构建LoadBalancerFeignClient传入的那个Client的实现,我提到过,这个Client的实现是具体发送请求的实现,默认的就是Client.Default类(不是默认就有可能是基于HttpClient或者是OkHttp的实现)。所以这行代码就是基于这个Client就成功的发送了Http请求,拿到响应,然后将这个Response 封装成一个RibbonResponse返回,最后就返回给MethodHandler,然后解析响应,封装成方法的返回值返回给调用者。
好了,其实到这里就完全知道Feign是如何整合Ribbon的,LoadBalancerFeignClient其实是OpenFeign适配Ribbon的入口,FeignLoadBalancer才是真正实现选择负载均衡,发送http请求的组件,因为他继承了AbstractLoadBalancerAwareClient。
为了大家能够清楚的知道整个动态代理的调用过程,我在Ribbon的那张图的基础上,加上Feign的调用链路。
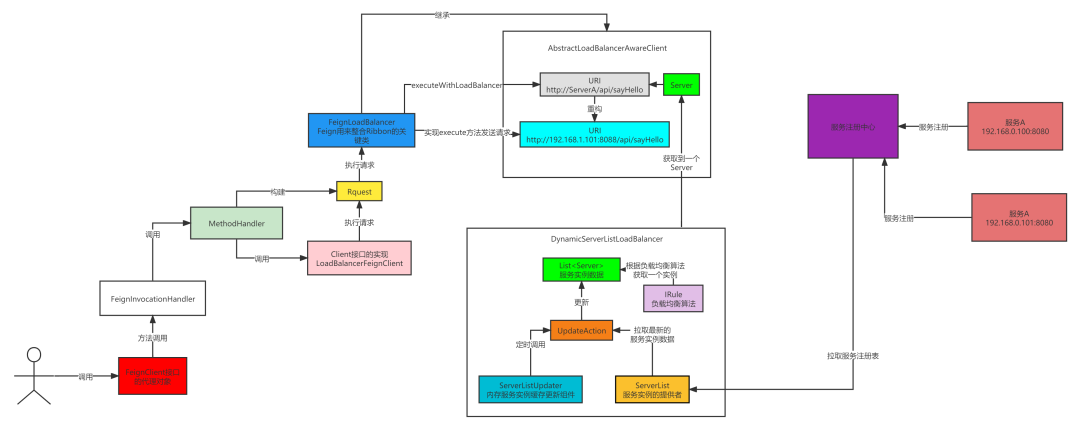
通过这张图,我们可以清楚地看出OpenFeign、Ribbon以及注册中心之间的协同关系。
四、总结
到这里,我通过三篇文章,算上Nacos那两篇,总共五篇文章完整的讲述了在微服务架构中,OpenFeign、Ribbon、Nacos(当然其它注册中心也可以)这三个组件协同工作的核心源码和流程。这里我再用简洁的话来总结一下他们的协同工作原理,OpenFeign在进行rpc调用的时候,由于不知道服务具体在哪台机器上,所以需要Ribbon这个负载均衡组件从服务所在的机器列表中选择一个,Ribbon中服务所在的机器列表是从注册中心拉取的,Ribbon提供了一个ServerList接口,注册中心实现之后,Ribbon就可以获取到服务所在的机器列表,这就是这三个组件最基本的原理。希望通过这五篇文章,小伙伴们可以对微服务架构的最基本的原理有一定的了解,同时也对OpenFeign、Ribbon、Nacos源码有一定的认识。
往期热门文章推荐
扫码或者搜索关注公众号 三友的java日记 ,及时干货不错过,公众号致力于通过画图加上通俗易懂的语言讲解技术,让技术更加容易学习。


 浙公网安备 33010602011771号