
WPF 入门 (三) MVVM 提高
此入门教程是记录下方参考资料视频的学习过程
开发工具:Visual Studio 2019
目录
进阶案例:游戏商城
新建 WPF 项目,命名 GameStore.Client
新建 Models、Views、ViewModels、Services、Data 文件夹
NuGet 安装 Prism.Wpf 或 Prism.Core
准备数据
因为只是 MVVM 的案例,为了方便就不写数据库了,用 xml 文件
实际开发应该用 Service 从数据库读取数据
Data 目录新建 xml 文件,我的命名是 Data.xml
<?xml version="1.0" encoding="utf-8" ?>
<Games>
	<Game>
		<Name>古剑奇谭:琴心剑魄今何在</Name>
		<Developer>烛龙</Developer>
		<Publisher>网元</Publisher>
		<Score>9.5</Score>
	</Game>
	<Game>
		<Name>古剑奇谭二:永夜初晗凝碧天</Name>
		<Developer>烛龙</Developer>
		<Publisher>网元</Publisher>
		<Score>7</Score>
	</Game>
	<Game>
		<Name>古剑奇谭三:梦付千秋星垂野</Name>
		<Developer>烛龙</Developer>
		<Publisher>网元</Publisher>
		<Score>10</Score>
	</Game>
	<Game>
		<Name>Half-Life</Name>
		<Developer>Valve</Developer>
		<Publisher>Valve</Publisher>
		<Score>10</Score>
	</Game>
	<Game>
		<Name>Half-Life 2</Name>
		<Developer>Valve</Developer>
		<Publisher>Valve</Publisher>
		<Score>10</Score>
	</Game>
	<Game>
		<Name>Half-Life: Alyx</Name>
		<Developer>Valve</Developer>
		<Publisher>Valve</Publisher>
		<Score>10</Score>
	</Game>
	<Game>
		<Name>Avicii Invector</Name>
		<Developer>Hello There Games</Developer>
		<Publisher>Wired Productions</Publisher>
		<Score>10</Score>
	</Game>
	<Game>
		<Name>Mirror's Edge</Name>
		<Developer>DICE</Developer>
		<Publisher>Electronic Arts</Publisher>
		<Score>10</Score>
	</Game>
	<Game>
		<Name>Mirror's Edge: Catalyst</Name>
		<Developer>DICE</Developer>
		<Publisher>Electronic Arts</Publisher>
		<Score>10</Score>
	</Game>
	<Game>
		<Name>Thief</Name>
		<Developer>Eidos-Montreal</Developer>
		<Publisher>Square Enix</Publisher>
		<Score>9</Score>
	</Game>
	<Game>
		<Name>Devil May Cry 5</Name>
		<Developer>Capcom</Developer>
		<Publisher>Capcom</Publisher>
		<Score>10</Score>
	</Game>
	<Game>
		<Name>Bioshock</Name>
		<Developer></Developer>
		<Publisher>2K</Publisher>
		<Score>10</Score>
	</Game>
	<Game>
		<Name>Bioshock 2</Name>
		<Developer></Developer>
		<Publisher>2K</Publisher>
		<Score>8.5</Score>
	</Game>
	<Game>
		<Name>Bioshock Infinite</Name>
		<Developer>Irrational Games</Developer>
		<Publisher>2K</Publisher>
		<Score>10</Score>
	</Game>
	<Game>
		<Name>Nioh</Name>
		<Developer>KOEI TECMO GAMES</Developer>
		<Publisher>KOEI TECMO GAMES</Publisher>
		<Score>9</Score>
	</Game>
</Games>
设置 xml 文件的属性
Build Action:Content
Copy to Output Directory:copy Always
这样编译之后,xml 文件就会到编译出来的目录底下
Model
Models 目录下
public class Game
{
    public string Name { get; set; }
    public string Developer { get; set; }
    public string Publisher { get; set; }
    public double Score { get; set; }
}
public class OnlineGameStore
{
    public string Name { get; set; }
    public string Url { get; set; }
    public string TelephoneNumber { get; set; }
}
Service
Services 目录下,假装我们有依赖注入
IDataService 用于加载数据的接口
public interface IDataService
{
    List<Game> GetAllGames();
}
XmlDataService ,用于读取 XML 文件中的数据
public class XmlDataService : IDataService
{
    public List<Game> GetAllGames()
    {
        List<Game> gameList = new List<Game>();
        string xmlFilName = Path.Combine(Environment.CurrentDirectory, @"Data\Data.xml");
        XDocument xDoc = XDocument.Load(xmlFilName);

        var games = xDoc.Descendants("Game");
        foreach (var item in games)
        {
            Game dish = new Game();

            dish.Name = item.Element("Name").Value;
            dish.Developer = item.Element("Developer").Value;
            dish.Publisher = item.Element("Publisher").Value;
            dish.Score = double.Parse(item.Element("Score").Value);

            gameList.Add(dish);
        }

        return gameList;
    }
}
IOrderService ,用于下订单的接口
public interface IOrderService
{
    void PlaceOrder(List<string> gameList);
}
MockOrderService ,假的下订单,只写入一个文件
public class MockOrderService : IOrderService
{
    public void PlaceOrder(List<string> gameList)
    {
        //创建一个新文件,向其中写入一个字符串集合,然后关闭该文件。
        File.WriteAllLines(@"D:\order.txt", gameList);
    }
}
ViewModel
这里使用了 Prism
ViewModel 要继承 BindableBase ,在较旧的版本中是 NotificationObject ,也就是之前初级案例的 NotificationObjector
DelegateCommand 也是 Prism 里面的
业务逻辑分析
GameList 游戏列表
数据属性:
- 名称
- 开发商
- 发行商
- 评分
- 是否选中
主界面
数据属性:
- 商店名称
- 商店网址
- 商店客服电话
- 游戏列表
- 游戏列表中选中的游戏数量
命令属性:
- 选中一个 Game
- 点击 order 按钮
一个 Game 的选中与否这个布尔值并不是 Game 本身的属性,而是 Game 在被用户操作的时候所具备的属性,就是说这个布尔值是 ViewModel 的属性,并不是 Model 的属性
所以,名称、开发商、发行商、评分 是 Game 的属性,而是否选中是 ViewModel 的属性
注意:ViewModel 有多种引入 Model 的方式,以当前类 GameListItemViewModel 和 Game 这两个类举例
- Game 作为 GameListItemViewModel 的属性
- Game 继承 NotificationObject 类,GameListItemViewModel 再继承 Game 类(NotificationObject 在较新的版本里是 BindableBase)
- 将 Game 里的部分属性重新再 GameListItemViewModel 类里写一遍
方法一,如果 Game 里的属性很多,那么 ViewModel 就会占用很多内存
方法二,破坏了设计模式
方法三,写起来更麻烦
具体使用哪个看情况
因为 Game 类只有四个属性,所以我使用第一种方法
ViewModels 目录下
GameListItemViewModel ,列表中的每一项
public class GameListItemViewModel : BindableBase
{
    public Game Game { get; set; }

    private bool _isSelected;

    public bool IsSelected
    {
        get { return _isSelected; }
        set
        {
            _isSelected = value;
            this.RaisePropertyChanged(nameof(IsSelected));
        }
    }

}
MainWindowViewModel,完整的窗体
public class MainWindowViewModel : BindableBase
{
    public DelegateCommand PlaceOrderCommand { get; set; }
    public DelegateCommand SelectListItemCommand { get; set; }

    private int _count;

    public int Count
    {
        get { return _count; }
        set
        {
            _count = value;
            this.RaisePropertyChanged(nameof(Count));
        }
    }

    private OnlineGameStore _onlineGameStore;

    public OnlineGameStore OnlineGameStore
    {
        get { return _onlineGameStore; }
        set
        {
            _onlineGameStore = value;
            this.RaisePropertyChanged(nameof(OnlineGameStore));
        }
    }

    private List<GameListItemViewModel> _gameList;

    public List<GameListItemViewModel> GameList
    {
        get { return _gameList; }
        set
        {
            _gameList = value;
            this.RaisePropertyChanged(nameof(GameList));
        }
    }

    public MainWindowViewModel()
    {
        this.LoadOnlineGameStore();
        this.LoadGameList();
        this.PlaceOrderCommand = new DelegateCommand(this.PlaceOrderCommandExecute);
        this.SelectListItemCommand = new DelegateCommand(this.SelectListItemExecute);
    }

    private void LoadOnlineGameStore()
    {
        this.OnlineGameStore = new OnlineGameStore();
        this.OnlineGameStore.Name = "Sbeam 游戏商城";
        this.OnlineGameStore.Url = "www.sbeam.com";
        this.OnlineGameStore.TelephoneNumber = "123456";
    }

    private void LoadGameList()
    {
        IDataService xmlDataService = new XmlDataService();
        var gameList = xmlDataService.GetAllGames();

        this.GameList = new List<GameListItemViewModel>();
        foreach (var item in gameList)
        {
            GameListItemViewModel gameList_Item = new GameListItemViewModel();
            gameList_Item.Game = item;
            this.GameList.Add(gameList_Item);
        }
    }

    private void PlaceOrderCommandExecute()
    {
        var selectedGames = this.GameList.Where(i => i.IsSelected == true).Select(i => i.Game.Name).ToList();
        IOrderService orderService = new MockOrderService();
        orderService.PlaceOrder(selectedGames);
        MessageBox.Show("下订单成功");
    }

    private void SelectListItemExecute()
    {
        this.Count = this.GameList.Count(i => i.IsSelected == true);
    }

}
View
这里我就直接写在 MainWindow.xaml 里了
<Window x:Class="GameStore.Client.MainWindow"
        xmlns="http://schemas.microsoft.com/winfx/2006/xaml/presentation"
        xmlns:x="http://schemas.microsoft.com/winfx/2006/xaml"
        xmlns:d="http://schemas.microsoft.com/expression/blend/2008"
        xmlns:mc="http://schemas.openxmlformats.org/markup-compatibility/2006"
        xmlns:local="clr-namespace:GameStore.Client"
        mc:Ignorable="d"
        Title="{Binding OnlineGameStore.Name,StringFormat=\{0\}-在线游戏商城}" Height="600" Width="800"
        WindowStartupLocation="CenterScreen">
    <Border BorderBrush="Orange" BorderThickness="3" CornerRadius="6" Background="CornflowerBlue">
        <Grid x:Name="Root" Margin="4">
            <Grid.RowDefinitions>
                <RowDefinition Height="Auto"/>
                <RowDefinition Height="*"/>
                <RowDefinition Height="Auto"/>
            </Grid.RowDefinitions>
            <Border BorderBrush="Orange" BorderThickness="1" CornerRadius="6" Padding="4">
                <StackPanel>
                    <StackPanel Orientation="Horizontal">
                        <StackPanel.Effect>
                            <DropShadowEffect Color="LightGray"/>
                        </StackPanel.Effect>
                        <TextBlock Text="欢迎光临 - " FontSize="60" FontFamily="LiShu"/>
                        <TextBlock Text="{Binding OnlineGameStore.Name}" FontSize="60" FontFamily="LiShu"/>
                    </StackPanel>
                    <StackPanel Orientation="Horizontal">
                        <StackPanel.Effect>
                            <DropShadowEffect Color="LightGray"/>
                        </StackPanel.Effect>
                        <TextBlock Text="本站网址 : " FontSize="24" FontFamily="LiShu"/>
                        <TextBlock Text="{Binding OnlineGameStore.Url}" FontSize="24" FontFamily="LiShu"/>
                    </StackPanel>
                    <StackPanel Orientation="Horizontal">
                        <StackPanel.Effect>
                            <DropShadowEffect Color="LightGray"/>
                        </StackPanel.Effect>
                        <TextBlock Text="客服电话 : " FontSize="24" FontFamily="LiShu"/>
                        <TextBlock Text="{Binding OnlineGameStore.TelephoneNumber}" FontSize="24" FontFamily="LiShu"/>
                    </StackPanel>
                </StackPanel>
            </Border>
            <DataGrid AutoGenerateColumns="False" GridLinesVisibility="None" CanUserDeleteRows="False" CanUserAddRows="False" Margin="0,4" Grid.Row="1" FontSize="16" ItemsSource="{Binding GameList}">
                <DataGrid.Columns>
                    <DataGridTextColumn Header="名称" Binding="{Binding Game.Name}" Width="Auto"/>
                    <DataGridTextColumn Header="开发商" Binding="{Binding Game.Developer}" Width="Auto"/>
                    <DataGridTextColumn Header="发行商" Binding="{Binding Game.Publisher}" Width="Auto"/>
                    <DataGridTextColumn Header="评分" Binding="{Binding Game.Score}" Width="Auto"/>
                    <DataGridTemplateColumn Header="选中" SortMemberPath="IsSelected" Width="*">
                        <DataGridTemplateColumn.CellTemplate>
                            <DataTemplate>
                                <CheckBox IsChecked="{Binding Path=IsSelected,UpdateSourceTrigger=PropertyChanged}" VerticalAlignment="Center" HorizontalAlignment="Center" Command="{Binding Path=DataContext.SelectListItemCommand,RelativeSource={RelativeSource Mode=FindAncestor,AncestorType={x:Type DataGrid}}}"/>
                            </DataTemplate>
                        </DataGridTemplateColumn.CellTemplate>
                    </DataGridTemplateColumn>
                </DataGrid.Columns>
            </DataGrid>
            <StackPanel Orientation="Horizontal" HorizontalAlignment="Right" Grid.Row="2">
                <TextBlock Text="共计" VerticalAlignment="Center"/>
                <TextBox IsReadOnly="True" TextAlignment="Center" Width="120" Text="{Binding Count}" Margin="4,0"/>
                <Button Content="Order" Height="24" Width="120" Command="{Binding PlaceOrderCommand}"/>
            </StackPanel>
        </Grid>
    </Border>
</Window>
对应的类里面也别忘记,MainWindow
public partial class MainWindow : Window
{
    public MainWindow()
    {
        InitializeComponent();

        this.DataContext = new MainWindowViewModel();
    }
}
效果
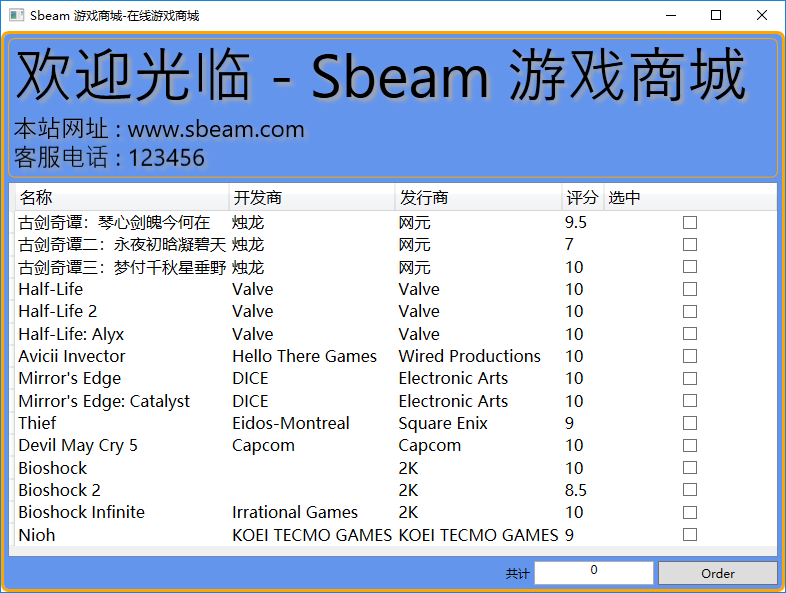
点击 order 按钮就会保存文件到对应的位置
分析一下这一段
<CheckBox IsChecked="{Binding Path=IsSelected,UpdateSourceTrigger=PropertyChanged}" VerticalAlignment="Center" HorizontalAlignment="Center" Command="{Binding Path=DataContext.SelectListItemCommand,RelativeSource={RelativeSource Mode=FindAncestor,AncestorType={x:Type DataGrid}}}"/>
CheckBox 可以直接使用 IsSelected 是因为在 DataGrid 绑定的 Item 就是 GameListViewModel
但是 CheckBox 又找不到 SelectListItemCommand ,所以要找到最外层的 Context ,这里找的是外层的 DataGrid ,找 Window 也可以
补充
ViewModel 与 View 进行交互,可以起到数据的过滤和校验的作用,这样从 ViewModel 传回来的数据就是干净的数据,Model 和 View 隔离过滤的作用,对 Model 的保护作用
是否需要继承 NotificationObject 要看对象是否需要通知 UI (是否有机会作为 Binding 的 Source,并且值发生变化)
Code Behind 中没有代码是使用 MVVM 后的“现象”,而非“目的”,不要本末倒置,不是为了后台没有代码而使用 MVVM
this.DataContext = new MainWindowViewModel(); 也可以写在 xaml 中
有时可能会需要在后台写代码,比如纯UI逻辑
如果需要传递参数,在 View 中使用 CommandParameter 属性,ViewModel 的CommandExecute加一个 object 类型的参数,委托也要加一个泛型DelegateCommand<object>
绑定事件和命令
用 NuGet 安装一个包 System.Windows.Interactivity.WPF

View 添加这个命名空间
xmlns:i="clr-namespace:System.Windows.Interactivity;assembly=System.Windows.Interactivity"
使用方法,例子
<Button>
    <i:Interaction.Triggers>
        <i:EventTrigger EventName="">
            <i:InvokeCommandAction Command="{}"/>
        </i:EventTrigger>
        <i:EventTrigger EventName="">
            <i:InvokeCommandAction Command="{}" CommandParameter="{}"/>
        </i:EventTrigger>
    </i:Interaction.Triggers>
</Button>
EventName是事件的名称,其它方面跟 MVVM 一样,但是可以选择绑定的事件,也能绑定多个事件
