
WPF 入门 (一) XAML 基础知识
此入门教程是记录下方参考资料视频的学习过程
开发工具:Visual Studio 2019
其实也不能算是入门教程,毕竟 WPF 已经出来很久了,教程多的很,我看的教程还挺旧的,就当是我的一个备忘录吧
目录
剖析最简单的 WPF 程序
随便创建一个 WPF 项目
App.xaml
App.xaml 的 Application 标签中的 StartUri="MainWindow.xaml" ,就是把 MainWindow 当作主窗体
MainWindow.xaml
xaml 是一种声明性语言,xaml 编译器会为每个标签声明一个对应标签的对象
标签分为开始标签和结束标签,开始标签里可以写一些属性 Attribute
xmlns="http://schemas.microsoft.com/winfx/2006/xaml/presentation"
- xmlns:xaml namespace 的缩写
http://schemas.microsoft.com/winfx/2006/xaml/presentation:不是网址,是一个硬编码的字符串,告诉 xaml 编译器,就把这一系列类库引入到当前的 xaml 文件里
xmlns:x="http://schemas.microsoft.com/winfx/2006/xaml"
- xmlns:x:x 是命名空间映射的名称,xaml 规定可以有一个命名空间是不加名称的,就是默认命名空间,映射命名空间之后以
名称:标签或名称:属性方式使用 x:Class:就是这个类的命名空间,用于指示 xaml 文件与哪个 C# 编译的类合并到一起
MainWindow
MainWindow 这个类是 partial 声明的,所以它可以出现在多个地方,MainWindow.xaml 和 MainWindow.xaml.cs 编译完会合并到一起
InitializeComponent() 就是由 xaml 生成的
启动时的窗口是由 App.xaml 的 StartupUri 属性决定的,指向的是 xaml 文件,不是命名空间
可以使用反编译工具查看
浅析用户界面的树形结构
传统方法绘制 UI 和 WinForm 是平面布局的界面,没有包含
WPF 是树形结构,可以嵌套,可以在 Blend for Visual Studio 中打开项目查看
比如这么一个界面,代码会在之后的随笔里给出
在 XAML 中为对象属性赋值
三种方式:
- Attribute = Value
- 属性标签
- 标签扩展
Attribute = Value
Human 类,在 MainWindow 中
public class Human
{
    public string Name {get;set;}
    public Human Child {get;set;}
}
用标签形式声明一个 Human 对象
注册命名空间,当前程序集的命名空间一般使用 local
xmlns:local="clr-namespace:命名空间"
在 Window.Resources 标签中声明 Human 对象
<Window.Resources>
    <local:Human x:Key="human" Name="ZhangSan">
</Window.Resources>
每一个 WPF 程序以一个资源字典的形式维护一系列资源, x:Key="human" 就是一个键
检索资源
Human h = this.FindResource("human") as Human;
if(null != h)
{
    MessageBox.Show(h.Name);
}
字符串值转化为其它类型
如何智能的转化类型?
将 Child 的值转化为对象
<Window.Resources>
    <local:Human x:Key="human" Name="ZhangSan" Child="LiSi">
</Window.Resources>
添加一个 TypeConverter 类
public class NameToHumanTypeConverter : TypeConverter
{
    public override object ConvertFrom(ITypeDescriptorContext context, System.Globalization.CultureInfo culture, object value)
    {
        string name = value.ToString();
        Human child = new Human();
        child.Name = name;
        return child;
    }
}
ConvertFrom() 中的 value 参数就是在 xaml 中使用 Attribute = "value" 这种形式赋值的时候我们得到的 value
[TypeConverterAttribute(typeof(NameToHumanTypeConverter))]
public class Human
{
    public string Name {get;set;}
    public Human Child {get;set;}
}
缺点:
- 只能使用简单的字符串进行赋值,无法应付复杂的类型转换,比如,在按钮的 Content 属性里加入一个 Rectangle 标签
属性标签
<Button Width="120" Height="30" /> 使用 /> 结尾,是一个空标签,就是说这个标签不具有内容
在开始标签和结束标签之间的就是 内容 Content ,是标签的内容
<Button Width="120" Height="30" >
    <!--Content-->
    <Button.Content>
        <Rectangle Width="20" Height="20" Stroke="DarkGreen" Fill="LawnGreen" />
    </Button.Content>
</Button>
效果

属性标签就是 类名.属性,Button.Content 中的 Button 不能省略,否则 xaml 编译器会认为你想要声明一个对象
可以使用复杂对象,弥补了 Attribute = Value 的缺点
例子
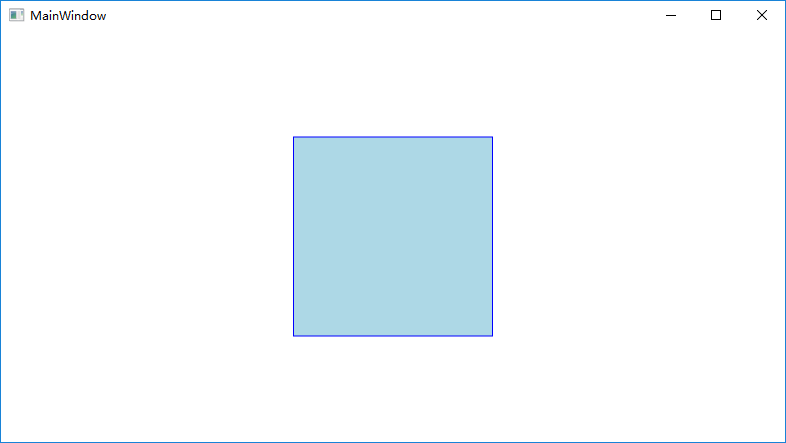
画一个单一颜色的矩形框
<Rectangle Width="200" Height="200" Stroke="Blue" Fill="LightBlue" />
效果
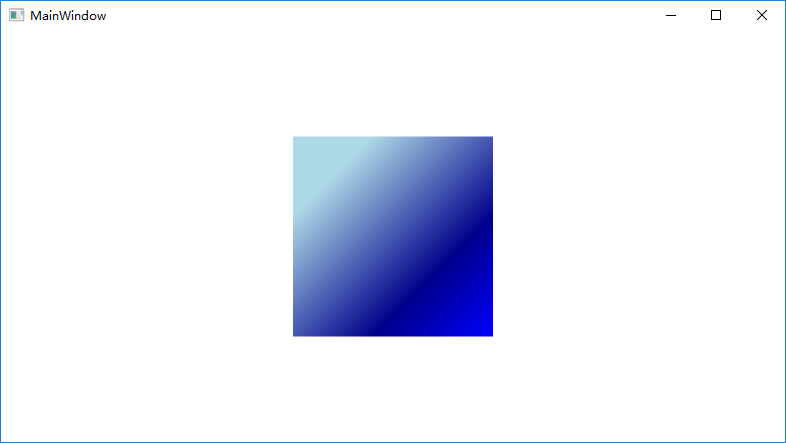
若想画一个渐变颜色的矩形框,就需要使用复杂对象
<Rectangle Width="200" Height="200">
    <Rectangle.Fill>
        <LinearGradientBrush>
            <LinearGradientBrush.StartPoint>
                <Point X="0" Y="0" />
            </LinearGradientBrush.StartPoint>
            <LinearGradientBrush.EndPoint>
                <Point X="1" Y="1" />
            </LinearGradientBrush.EndPoint>
            <LinearGradientBrush.GradientStops>
                <GradientStopCollection>
                    <GradientStop Offset="0.2" Color="LightBlue" />
                    <GradientStop Offset="0.7" Color="DarkBlue" />
                    <GradientStop Offset="1.0" Color="Blue" />
                </GradientStopCollection>
            </LinearGradientBrush.GradientStops>
        </LinearGradientBrush>
    </Rectangle.Fill>
</Rectangle>
效果
缺点:
- 代码变得很复杂
建议:
- 能使用 Attribute = Value 赋值的地方,一定使用 Attribute = Value 的形式赋值
- 如果需要的属性值正好是默认值,就不要写出来
- 标签集合可以把元素写在内容区域
优化之后的代码
<Rectangle Width="200" Height="200">
    <Rectangle.Fill>
        <LinearGradientBrush>
            <LinearGradientBrush.GradientStops>
                <GradientStop Offset="0.2" Color="LightBlue" />
                <GradientStop Offset="0.7" Color="DarkBlue" />
                <GradientStop Offset="1.0" Color="Blue" />
            </LinearGradientBrush.GradientStops>
        </LinearGradientBrush>
    </Rectangle.Fill>
</Rectangle>
标签扩展
标签扩展与 Attribute = Value 非常类似,使用 {}
例子,添加命名空间 xmlns:sys="clr-namespace:System;assembly=mscorlib"
<Window.Resources>
    <sys:String x:Key="stringHello">Hello WPF!</sys:String>
</Window.Resources>
<Grid>
    <TextBlock Height="24" Width="120" Background="LightBlue" Text="{StaticResource ResourceKey=stringHello}"/>
</Grid>
ResourceKey 可以省略,直接使用 stringHello ,构造函数的参数可以不写,但是一定要按顺序,为了保证代码的可读性,写出来比较好
因为标签扩展已经使用了双引号把括号引起来了,所以不需要再把里面是属性加双引号,属性之间使用括号分开
Binding 例子
一个 TextBox 显示 Slider 的位置
<Grid Margin="4">
    <Grid.RowDefinitions>
        <RowDefinition Height="24"/>
        <RowDefinition Height="4"/>
        <RowDefinition Height="24"/>
    </Grid.RowDefinitions>
    <TextBox x:Name="tb" Text="{Binding ElementName=sld,Path=Value}"/>
    <Slider x:Name="sld" Grid.Row="2" Value="50" Maximum="100" Minimum="0"/>
</Grid>
事件处理器与代码后置
<Grid>
    <Button x:Name="button1" Width="200" Height="200" Content="Click Me" Click="button1_Click"/>
</Grid>
Click 就是一个事件,Click="button1_Click"就是事件订阅
可以手写事件处理器,也可以自动生成
自动创建的事件会以 事件拥有者 + 事件 ,中间以 下划线 隔开命名,
以 C# 代码绑定事件
public MainWindow()
{
    InitializeComponent();

    //两种方法绑定事件
    //方法一
    this.button1.Click += this.button1_Click;
    //方法二
    this.button1.Click += new RoutedEventHandler(this.button1_Click);
}

private void button1_Click(object sender, RoutedEventArgs e)
{

}
导入程序集和引用其中的名称空间
模块化引用 WPF 窗口
使用 User Control Library
新建一个 空白解决方案
新建一个 WPF 项目和一个 User Control Library 项目
User Control Library 项目的命名为 ControlLibrary
User Control Library 项目删除自带的 xaml 文件,新建一个 User Control,命名 SalaryCalculator
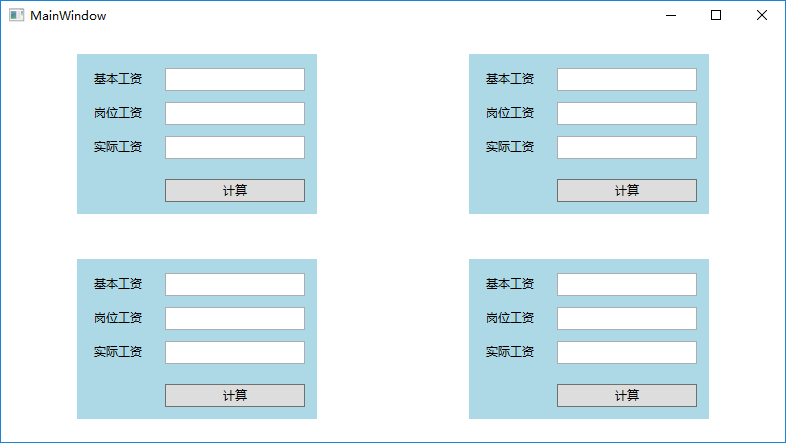
SalaryCalculator.xaml 代码
<UserControl x:Class="ControlLibrary.SalaryCalculator"
             xmlns="http://schemas.microsoft.com/winfx/2006/xaml/presentation"
             xmlns:x="http://schemas.microsoft.com/winfx/2006/xaml"
             xmlns:mc="http://schemas.openxmlformats.org/markup-compatibility/2006"
             xmlns:d="http://schemas.microsoft.com/expression/blend/2008"
             xmlns:local="clr-namespace:ControlLibrary"
             Width="240" Height="160" Background="LightBlue">
    <Canvas>
        <Label Name="label1" Content="基本工资" Canvas.Left="12" Canvas.Top="12" Height="28"/>
        <Label Name="label2" Content="岗位工资" Canvas.Left="12" Canvas.Top="46" Height="28"/>
        <Label Name="label3" Content="实际工资" Canvas.Left="12" Canvas.Top="80" Height="28"/>
        <TextBox Name="textBox1" Canvas.Left="88" Canvas.Top="14" Height="23" Width="140"/>
        <TextBox Name="textBox2" Canvas.Left="88" Canvas.Top="48" Height="23" Width="140"/>
        <TextBox Name="textBox3" Canvas.Left="88" Canvas.Top="82" Height="23" Width="140"/>
        <Button Name="button1" Content="计算" Canvas.Left="88" Canvas.Top="125" Height="23" Width="140" Click="button1_Click"/>
    </Canvas>
</UserControl>
事件函数,写的随便一些,结果不是这次不是重点
private void button1_Click(object sender, RoutedEventArgs e)
{
    this.textBox3.Text = this.textBox1.Text + this.textBox2.Text;
}
编译一下
如何应用到主界面上
WPF 项目
右键依赖项,选择添加项目引用,这样在 xaml 中写命名空间就有智能提示了
xmlns:controls="clr-namespace:ControlLibrary;assembly=ControlLibrary"
完整的窗体代码
<Window x:Class="导入程序集和引用其中的名称空间.MainWindow"
        xmlns="http://schemas.microsoft.com/winfx/2006/xaml/presentation"
        xmlns:x="http://schemas.microsoft.com/winfx/2006/xaml"
        xmlns:d="http://schemas.microsoft.com/expression/blend/2008"
        xmlns:mc="http://schemas.openxmlformats.org/markup-compatibility/2006"
        xmlns:local="clr-namespace:导入程序集和引用其中的名称空间"
        xmlns:controls="clr-namespace:ControlLibrary;assembly=ControlLibrary"
        mc:Ignorable="d"
        Title="MainWindow" Height="450" Width="800">
    <Grid>
        <Grid.RowDefinitions>
            <RowDefinition/>
            <RowDefinition/>
        </Grid.RowDefinitions>
        <Grid.ColumnDefinitions>
            <ColumnDefinition/>
            <ColumnDefinition/>
        </Grid.ColumnDefinitions>
        <controls:SalaryCalculator Grid.Column="0" Grid.Row="0"/>
        <controls:SalaryCalculator Grid.Column="1" Grid.Row="0"/>
        <controls:SalaryCalculator Grid.Column="0" Grid.Row="1"/>
        <controls:SalaryCalculator Grid.Column="1" Grid.Row="1"/>
    </Grid>
</Window>
效果
Telerik 可以买控件
XAML 的注释
<!-- -->
Visual Studio 快捷键
注释:Ctrl + K Ctrl + C
解注释:Ctrl + K Ctrl + U
x 名称空间及其常用元素
x 名称空间的由来和作用
xmlns:x="http://schemas.microsoft.com/winfx/2006/xaml" 是对 x 名称空间的声明
x 名称空间里的类都是用来解析和分析 xaml 代码的,即 x 名称空间就是 xaml 名称空间
x 名称空间里都有些什么
标签扩展
- x:Array
- x:Null
- x:Static
- x:Type
Attribute
- x:Class
- x:ClassModifier
- x:FieldModifier
- x:Key
- x:Name
- x:Shared
- x:Subclass
- x:TypeArguments
- x:Uid
XAML 指令元素
- x:Code
- x:XData
x:Class
x:Class 是用来声明类的
指示 xaml 文件所声明的这个类,最后要与哪个名称空间中的哪个类进行合并
例如 x:Class="WpfApplication1.MainWindow" 就是 WpfApplication1 名称空间下的 MainWindow 类与 xaml 合并
x:ClassModifier
x:ClassModifier 指的是类的访问级别
xaml 文件中的取值必须和类的访问权限一致,否则会报错
x:Name
是 x 名称空间中的 Name ,不是 Name 属性
作用
- 为 xaml 生成的实例创建引用变量
- 若实例有 Name 属性,同时用变量的这个名字给 Name 属性赋值
xaml 语言是一种声明性语言,每见到一个标签,就会声明一个实例,并不是创建一个变量(实例可以独立存在,变量引用实例)
建议使用 x:Name 而不使用 Name ,因为没有继承 FrameworkElement 的类可能没有 Name ,只能使用 x:Name
x:FieldModifier
控制类中字段的访问级别,但是是给标签用的
在 User Control Library 中使用可以防止被外部修改,增强安全性

 浙公网安备 33010602011771号