ASP.NET Core 3.x 入门(四)Razor Page
此入门教程是记录下方参考资料视频的学习过程
开发工具:Visual Studio 2019
参考资料:https://www.bilibili.com/video/BV1c441167KQ
API文档:https://docs.microsoft.com/zh-cn/dotnet/api/?view=aspnetcore-3.1
目录
基本概念
ASP .NET Core 支持多种编程模型
MVC:
- Model:数据
- View:Html、Razor、TagHelper
- Controller:逻辑
Razor Page:
- 数据
- Html、Razor、TagHelper
- 逻辑
使用 Razor Page 重新编写之前的 MVC 例子
Razor Page 路由
Razor Page 所有页面都在 Pages 目录下
-
/Pages/Index.cshtml
若路径存在,则以下方式都可以访问- /
- /Index
-
/Pages/Department.cshtml
只需要去掉 cshtml 后缀名就可以访问- /Department
-
/Pages/Department/EmployeeList.cshtml
若 Pages 目录下还有目录,就在访问路径上添加目录名称- /Department/EmployeeList
-
/Pages/Department/Index.cshtml
若 Pages 目录下的目录也有 Index.cshtml ,以下方式都可以访问- /Department
- /Department/Index
新建项目
- 还是 ASP.NET Core 项目,空模板
- 复制原先项目的 Models 和 Services 文件夹,到新建项目目录下,注意命名空间
- 修改 Startup.cs
private readonly IConfiguration _configuration;

public Startup(IConfiguration configuration)
{
    this._configuration = configuration;
}
- 也别忘记 Options.cs 和 appsettings.json
My_RazorPage_ProgramOptions.cs
public class My_RazorPage_ProgramOptions
{
    public int BoldDepartmentEmployeeCountThreshold { get; set; }
}
appsettings.json
{
  "Logging": {
    "LogLevel": {
      "Default": "Information",
      "Microsoft": "Warning",
      "Microsoft.Hosting.Lifetime": "Information"
    }
  },
  "AllowedHosts": "*",


  "My_RazorPage_Program": {
    //部门人数大于 30 就加粗
    "BoldDepartmentEmployeeCountThreshold": 30
  }
}
- 修改 Start.cs 下的
ConfigureSercvices()方法
public void ConfigureServices(IServiceCollection services)
{
    //注册 RazorPages 服务
    services.AddRazorPages();

    services.AddSingleton<IClock, ChinaClock>();
    services.AddSingleton<IDepartmentService, DepartmentService>();
    services.AddSingleton<IEmployeeService, EmployeeService>();

    services.Configure<My_RazorPage_ProgramOptions>(this._configuration.GetSection("My_RazorPage_Program"));
}
- 修改 Start.cs 下的
Configure()方法
public void Configure(IApplicationBuilder app, IWebHostEnvironment env)
{
    if (env.IsDevelopment())
    {
        app.UseDeveloperExceptionPage();
    }

    app.UseStaticFiles();

    app.UseHttpsRedirection();

    app.UseAuthentication();

    app.UseRouting();

    app.UseEndpoints(endpoints =>
    {
        endpoints.MapRazorPages();
    });
}
-
项目下新建 Pages 文件夹
-
添加静态文件,省略,详细见上文
-
为了使用 TagHelper 和 模板,在 Pages 目录下新建 _ViewImports.cshtml 和 _ViewStart.cshtml 文件,跟上面的项目是一样的
_ViewImports.cshtml
@using My_RazorPage_Program
@namespace My_RazorPage_Program.Pages
@addTagHelper *,Microsoft.AspNetCore.Mvc.TagHelpers
_ViewStart.cshtml
@{
    Layout = "_Layout";
}
具体使用
Pages 目录下 Department、Employee、Shared、Pages/Department/DisplayTemplates 文件夹
Department 和 Employee 是具体页面,Shared 存放布局,DisplayTemplates 存放模板
Pages/Shared 目录下新建 _Layout.cshtml ,内容跟之前的一致
<!DOCTYPE html>

<html>
<head>
    <meta name="viewport" content="width=device-width" />
    <title>@ViewBag.Title</title>
    @* 开发环境加载完整的css *@
    <environment include="Development">
        <link rel="stylesheet" asp-href-include="css/*" asp-href-exclude="css/all.min.css" />
    </environment>
    @* 其它环境 *@
    <environment exclude="Development">
        <link rel="stylesheet" asp-href-include="css/all.min.css" />
    </environment>
</head>
<body>
    <div class="container">
        <div class="row">
            <div class="col-md-2">
                @* asp-append-version="true",不缓存图片 *@
                <img asp-append-version="true" alt="Logo" src="~/images/logo.png" style="height:60px;" />
            </div>
            <div class="col-md-10">
                <span class="h2">@ViewBag.Title</span>
            </div>
        </div>
        <div class="row">
            <div class="col-md-12">
                @RenderBody()
            </div>
        </div>
    </div>
</body>
</html>
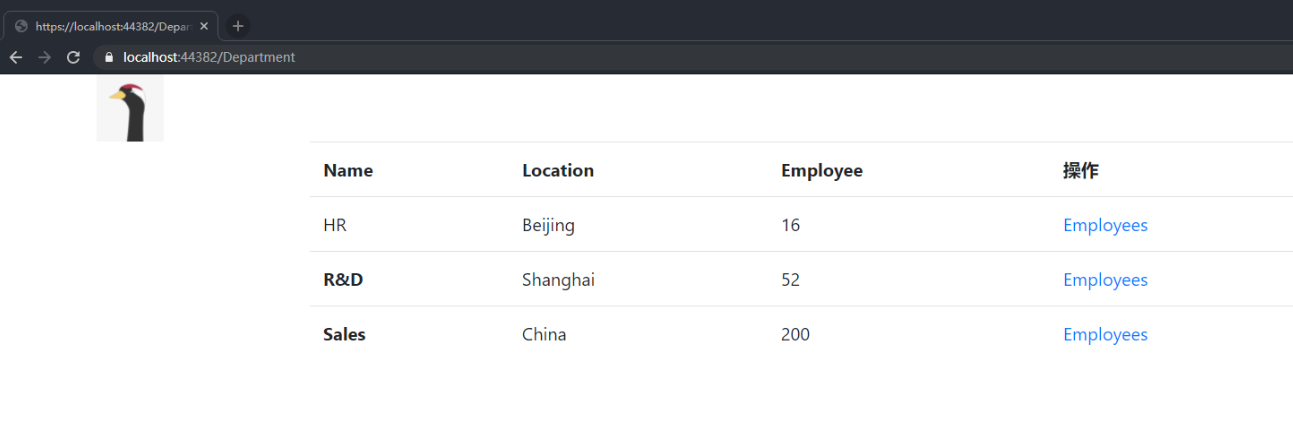
Pages/Department 目录下新建 Index.cshtml
@page
@using My_RazorPage_Program.Services

@inject IDepartmentService departmentService

<div class="row">
    <div class="col-md-10 offset-md-2">
        <table class="table">
            <tr>
                <th>Name</th>
                <th>Location</th>
                <th>Employee</th>
                <th>操作</th>
            </tr>
            @* 由于这个类是匿名的,所以 ReSharper 识别不出来,实际运行不会报错,VS 可以识别和智能提示 *@
            @* 这整个文件对应的类是 _Page_Pages_Index_cshtml ,也是 model ,这个 x 就是这个页面 *@
            @Html.DisplayFor(x => x.Departments)
        </table>
    </div>
</div>


@functions
{
    public IEnumerable<My_RazorPage_Program.Models.Department> Departments { get; set; }

    //OnGet() 处理 GET 请求,可以同步,也可以异步,POST 同理
    public async Task OnGetAsync()
    {
        this.Departments = await departmentService.GetAll();
    }
}
Pages/Department/DisplayTemplates 目录下新建 Department.cshtml
和之前的项目一致,可以直接复制,这里只写一些必要的
@model My_RazorPage_Program.Models.Department

<tr>
    <td>@Model.Name</td>
    <td>@Model.Location</td>
    <td>@Model.EmployeeCount</td>
</tr>
效果图
实现添加部门和查看人员的功能
添加部门
Pages/Department 目录新建 Razor Page 空模板 ,命名 AddDepartment
创建后除了 cshtml 页面还有一个 cshtml.cs 文件,这就是这个页面的类,和上面直接在页面中写代码的效果是一样的,在 @model 中被指定
AddDepartment.cshtml.cs
public class AddDepartmentModel : PageModel
{
    [BindProperty]
    public My_RazorPage_Program.Models.Department Department { get; set; }

    private readonly IDepartmentService _departmentService;

    public AddDepartmentModel(IDepartmentService departmentService)
    {
        this._departmentService = departmentService;
    }

    public async Task<IActionResult> OnPostAsync()
    {
        await this._departmentService.Add(this.Department);

        //若在相同目录下,可以直接写页面名称
        return RedirectToPage("/Department/Index");
    }
}
[BindProperty]用于绑定属性,这样就可以在页面中访问属性,但是需要使用属性去引用
因为 Razor Page 可以使用 url 去访问对应页面,所以这个类的 OnGet() 方法没必要,使用 asp-page 去访问即可
AddDepartment.cshtml
@page
@model My_RazorPage_Program.Pages.Department.AddDepartmentModel

<form asp-action="Add">
    <div class="row form-group">
        <div class="col-md-2 offset-md-2">
            @* asp-for 的作用是将 Model 中使用 [Display(Name = "XX)] 的属性,在 label 中显示为 XX *@
            <label asp-for="Department.Name"></label>
        </div>
        <div class="col-md-6">
            <input class="form-control" asp-for="Department.Name" />
        </div>
    </div>
    <div class="row form-group">
        <div class="col-md-2 offset-md-2">
            <label asp-for="Department.Location"></label>
        </div>
        <div class="col-md-6">
            <input class="form-control" asp-for="Department.Location" />
        </div>
    </div>
    <div class="row form-group">
        <div class="col-md-2 offset-md-2">
            <label asp-for="Department.EmployeeCount"></label>
        </div>
        <div class="col-md-6">
            <input class="form-control" asp-for="Department.EmployeeCount" />
        </div>
    </div>
    <div class="row">
        <div class="col-md-2 offset-1-md-2">
            <button type="submit" class="btn btn-primary">Add</button>
        </div>
    </div>

</form>
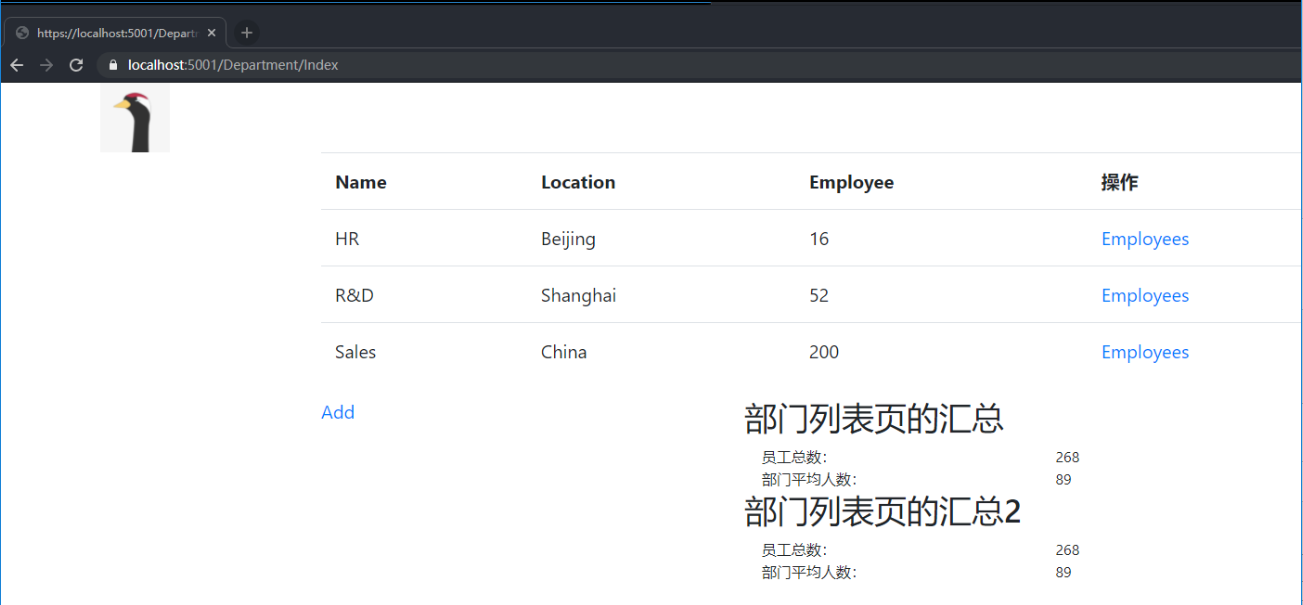
Department/Index.cstml 页面下方添加
<div class="row">
    <div class="col-md-4">
        <a asp-page="AddDepartment">Add</a>
    </div>
</div>
查看人员
/Pages/Employee 目录下新建 Razor View ,命名 EmployeeList.cshtml
@page "{departmentId:int}"

@using Microsoft.AspNetCore.Mvc.RazorPages
@using My_RazorPage_Program.Services

@model EmployeeListModel

<div class="row">
    <div class="col-md-10 offset-md-2">
        <table class="table">
            <tr>
                <th>First Name</th>
                <th>Last Name</th>
                <th>Gender</th>
                <th>Is Fired</th>
                <th>操作</th>
            </tr>
            @Html.DisplayFor(x => x.Employees)
        </table>
        <a asp-page="AddEmployee" asp-route-departmentId="@ViewData["DepartmentId"]">Add</a>
    </div>
</div>


@functions {
    public class EmployeeListModel : PageModel
    {
        private readonly IEmployeeService _employeeService;

        public EmployeeListModel(IEmployeeService employeeService)
        {
            this._employeeService = employeeService;
        }

        public IEnumerable<My_RazorPage_Program.Models.Employee> Employees { get; set; }

        public async Task OnGetAsync(int departmentId)
        {
            this.Employees = await this._employeeService.GetByDepartmentId(departmentId);

            ViewData["DepartmentId"] = departmentId;
        }

        //根据 Employee.cshtml 页面的 asp-action 和 GET、POST 命名
        public async Task<IActionResult> OnGetFireAsync(int employeeId, int departmentId)
        {
            await this._employeeService.Fire(employeeId);
            return RedirectToPage("EmployeeList", new { departmentId });
        }

    }
}
/Pages/Employee/DisplayTemplates 目录下新建 Razor View ,命名 Employee.cshtml
@model My_RazorPage_Program.Models.Employee

<tr>
    <td>@Model.FirstName</td>
    <td>@Model.LastName</td>
    <td>@Model.Gender</td>
    <td>@(Model.Fired?"是":"")</td>

    <td>
        @if (!Model.Fired)
        {
            <a asp-page="EmployeeList" asp-page-handler="Fire" asp-route-employeeId="@Model.Id" asp-route-departmentId="@Model.DepartmentId">
                Fire
            </a>
        }
    </td>
</tr>
/Pages/Employee 目录下新建 Razor Page ,命名 AddEmployee.cshtml
AddEmployee.cshtml
@page "{departmentId:int}"
@using My_RazorPage_Program.Models
@model My_RazorPage_Program.Pages.Employee.AddEmployeeModel

<form method="post">

    <div class="row form-group">
        <div class="col-md-2 offset-md-2">
            <label asp-for="Employee.FirstName"></label>
        </div>
        <div class="col-md-6">
            <input class="form-control" asp-for="Employee.FirstName" />
        </div>
    </div>
    <div class="row form-group">
        <div class="col-md-2 offset-md-2">
            <label asp-for="Employee.LastName"></label>
        </div>
        <div class="col-md-6">
            <input class="form-control" asp-for="Employee.LastName" />
        </div>
    </div>
    <div class="row form-group">
        <div class="col-md-2 offset-md-2">
            <label asp-for="Employee.Gender"></label>
        </div>
        <div class="col-md-6">
            <select class="form-control" asp-for="Employee.Gender" asp-items="Html.GetEnumSelectList<Gender>()">
            </select>
        </div>
    </div>
    <div class="row">
        <div class="col-md-2 offset-1-md-2">
            <button type="submit" class="btn btn-primary">Add</button>
        </div>
    </div>

</form>
AddEmployee.cshtml.cs
public class AddEmployeeModel : PageModel
{
    private readonly IEmployeeService _employeeService;

    public AddEmployeeModel(IEmployeeService employeeService)
    {
        this._employeeService = employeeService;
    }

    [BindProperty]
    public My_RazorPage_Program.Models.Employee Employee { get; set; }

    public async Task<IActionResult> OnPostAsync(int departmentId)
    {
        this.Employee.DepartmentId = departmentId;

        await this._employeeService.Add(Employee);

        return RedirectToPage("EmployeeList", new { departmentId });
    }
}
到此为止,添加部门和查看人员就写完了,效果跟之前的 MVC 是一样的
View Component
项目目录下新建文件夹 ViewComponents
将上一个项目的 CompanySummary.cs 复制到 ViewComponents 目录下
Pages 目录下新建文件夹 Components
Pages/Components 目录下新建 CompanySummary
Pages/Components/CompanySummary 目录下新建 Razor View ,命名 Default.cshtml
@model My_RazorPage_Program.Models.CompanySummary

<div class="small">
    <div class="row h3">@ViewBag.Title</div>
    <div class="row">
        <div class="col-md-8">员工总数:</div>
        <div class="col-md-4">@Model.EmployeeCount</div>
    </div>
    <div class="row">
        <div class="col-md-8">部门平均人数:</div>
        <div class="col-md-4">@Model.AverageDepartmentEmployeeCount</div>
    </div>
</div>
其实直接复制上一个项目的就可以
Pages/Department/Index.cshtml 添加
<div class="col-md-4">
    @await Component.InvokeAsync("CompanySummary", new { title = "部门列表页的汇总" })
    <vc:company-summary title="部门列表页的汇总2"></vc:company-summary>
</div>
效果图
补充
asp-for="" 用于在 label 标签中显示 Model 中属性的 [Display(Name = "XX)] 的 XX
asp-page="" 用于跳转页面,就是正常的 Razor Page 调用,例如 asp-page="/Department/Index"
asp-route-参数名称="@变量" 用于跳转页面时传递参数,一般跟在 asp-page 的后面
asp-page-handler="方法名" 这个有点难说,在官方文档,或者看 EmployeeList.cshtml 中的注解
未提及的去看文档吧,我也不太懂
ASP.NET Core 3.x 入门(四)Razor page 结束
Razor Page 确实比 MVC 使用起来简单,Razor 页面之间的调用很直观
完整项目结构