爬虫学习-05
一、scrapy架构介绍
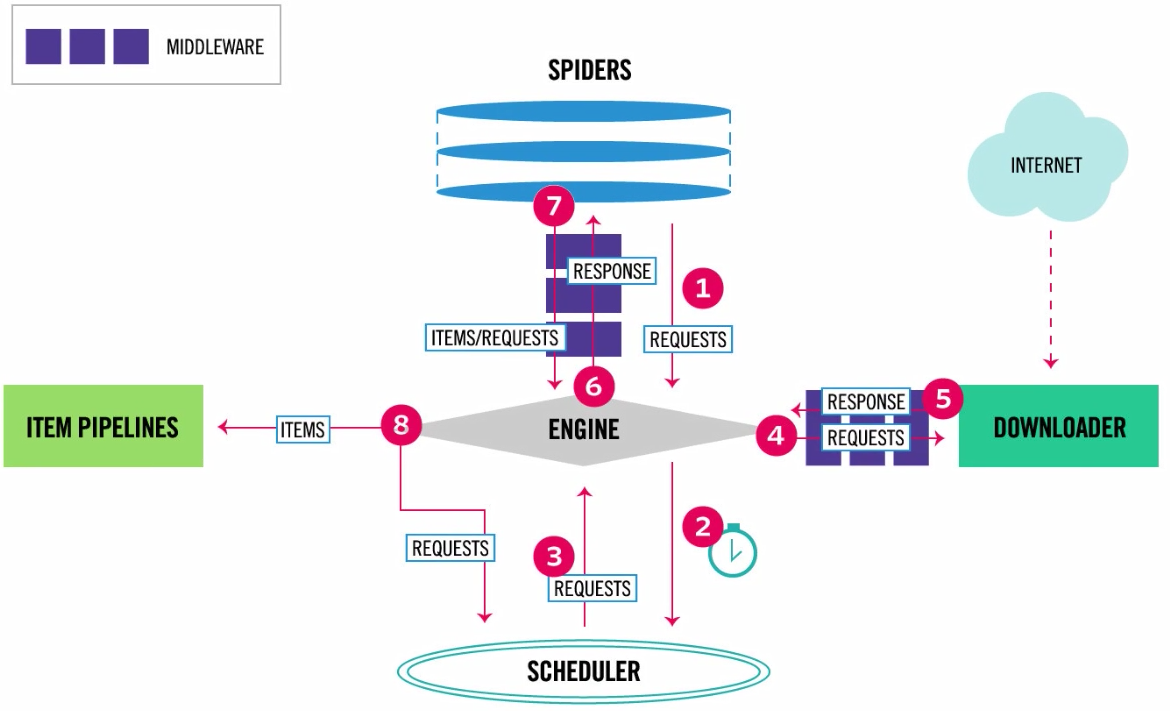
按图流程走
具体释义
| 流程词 | 中文释义 | 使用 |
| EGINE | 引擎 | 引擎负责控制系统所有组件之间的数据流动,并在某些动作发生时触发事件。有关详细信息,请参见上面的数据流部分。 |
| SCHEDULER | 调度器 | 用来接受引擎发过来的请求, 压入队列中, 并在引擎再次请求的时候返回. 可以想像成一个URL的优先级队列, 由它来决定下一个要抓取的网址是什么, 同时去除重复的网址。 |
| DOWLOADER | 下载器 | 用于下载网页内容, 并将网页内容返回给EGINE,下载器是建立在twisted这个高效的异步模型上的。 |
| SPIDERS | 爬虫 | 主要是这里写代码:SPIDERS是开发人员自定义的类,用来解析responses,并且提取items,或者发送新的请求 |
| ITEM PIPLINES | 项目管道 | 在items被提取后负责处理它们,主要包括清理、验证、持久化(比如存到数据库)等操作 |
| Downloader Middlewares | 下载器中间件 | 位于Scrapy引擎和下载器之间,主要用来处理从EGINE传到DOWLOADER的请求request,已经从DOWNLOADER传到EGINE的响应response,你可用该中间件做以下几件事:设置请求头,设置cookie,使用代理,集成selenium |
| Spider Middlewares | 爬虫中间件 | 位于EGINE和SPIDERS之间,主要工作是处理SPIDERS的输入(即responses)和输出(即requests) |
流程走向
- 起始爬取的地址从
SPIDERS(我们写的一个个爬虫)出发①经过中间件MIDDLEWARE组装成请求对象REQUESTS - 进入
引擎EGINE经过②调度器SCHEDULER排队等待和去重(因为可能有很多的REQUESTS需要排队,里面有爬过的地址去重) - 第③进入
引擎EGINE发现是REQUESTS进入第④步下载器DOWNLOADER开始向互联网发送http请求,返回来之后DOWNLOADER把之前REQUESTS对象做成RESPONSE对象 - 经过第⑤步发现是RESPONSE对象进入第⑥步引擎给SPIDERS解析
- 解析完两种情况
- 第一种接着爬取,REQUESTS对象接着走第②步
- 第二种存起来,走第⑦步
ITEMS(保存数据的对象)走第⑧步来到管道ITEM PIPLINES做持久化存储,然后看是存在数据库或文件或redis里
扒博客园的数据
- 方式一:使用bs4
import scrapy
from bs4 import BeautifulSoup
from scrapy import Request


class CnblogsSpider(scrapy.Spider):
    name = 'cnblogs'
    allowed_domains = ['www.cnblogs.com']
    start_urls = ['http://www.cnblogs.com/']

    def parse(self, response):
        # response类似于requests模块的response对象
        print(response.text)
        # 返回的数据,解析数据:方式一:使用bs4(不用了)
        soup = BeautifulSoup(response.text, 'lxml')
        article_list = soup.find_all(class_='post-item')
        for article in article_list:
            title_name = article.find(name='a', class_='post-item-title').text
            print(title_name)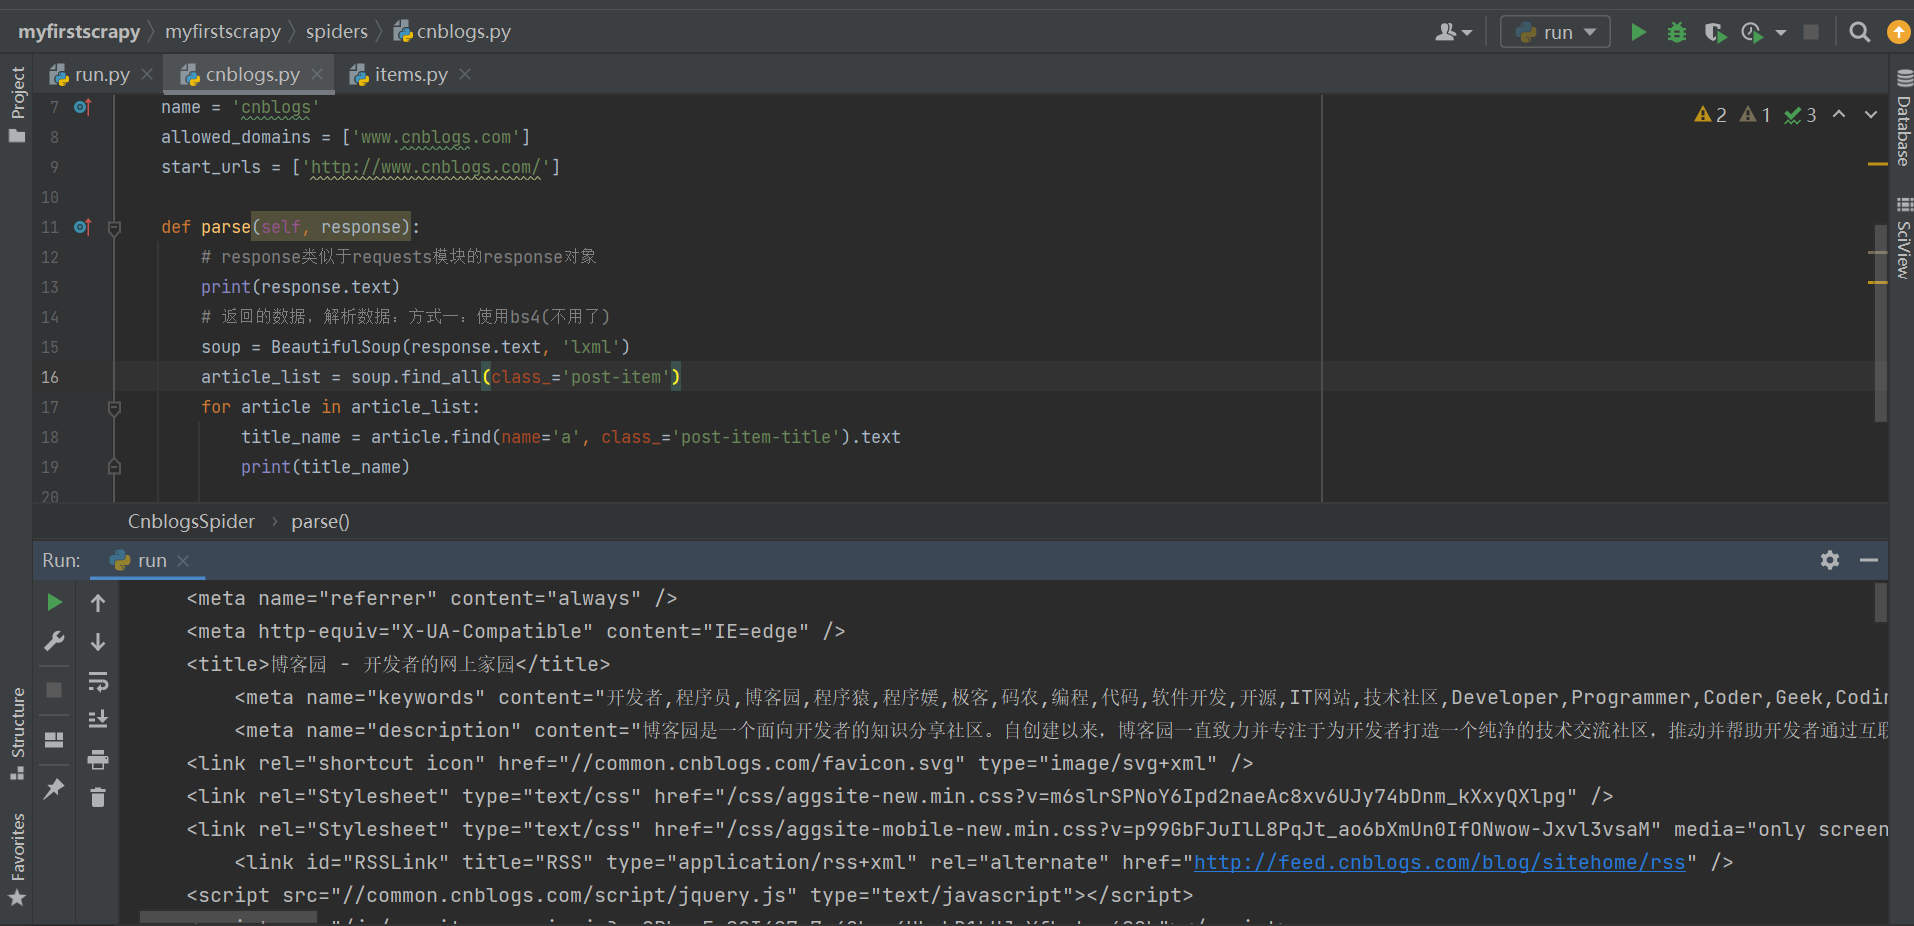
- 方式二:用css和xpath方法
| css | css取文本 | 'a.link-title::text' |
| css取属性 | 'img.image-scale::attr(src)' | |
| xpath | -xpath取文本内容 | './/a[contains(@class,"link-title")]/text()' |
| -xpath取属性 | './/a[contains(@class,"link-title")]/@href' | |
| 通用 | 取一个 | .extract_first() |
| 取所有 | .extract() |
css解析
- 找到所有类名叫article的post-item标签
- for循环然后拿title_name、author_img、desc_list、desc、author_name、article_date
- 中间就是从标签由外到内的找,取文本用
::text,取属性用::attr() - 在代码末尾:取一个
.extract_first(),取所有.extract() - 得到数据发现有\n和空格,去除\n和空格,接下来做个if判断,相当于数据的清洗
        article_list = response.css('article.post-item')
        for article in article_list:
            title_name = article.css('section>div>a::text').extract_first()
            author_img = article.css('p.post-item-summary>a>img::attr(src)').extract_first()
            desc_list = article.css('p.post-item-summary::text').extract()
            desc = desc_list[0].replace('\n', '').replace(' ', '')
            if not desc:
                desc = desc_list[1].replace('\n', '').replace('', '')

            author_name = article.css('section>footer>a>span::text').extract_first()
            article_date = article.css('section>footer>span>span::text').extract_first()
            print('''
                        文章标题:%s
                        作者头像:%s
                        摘要:%s
                        作者名字:%s
                        发布日期:%s
                        ''' % (title_name, author_img, desc, author_name, article_date))
            data_list = []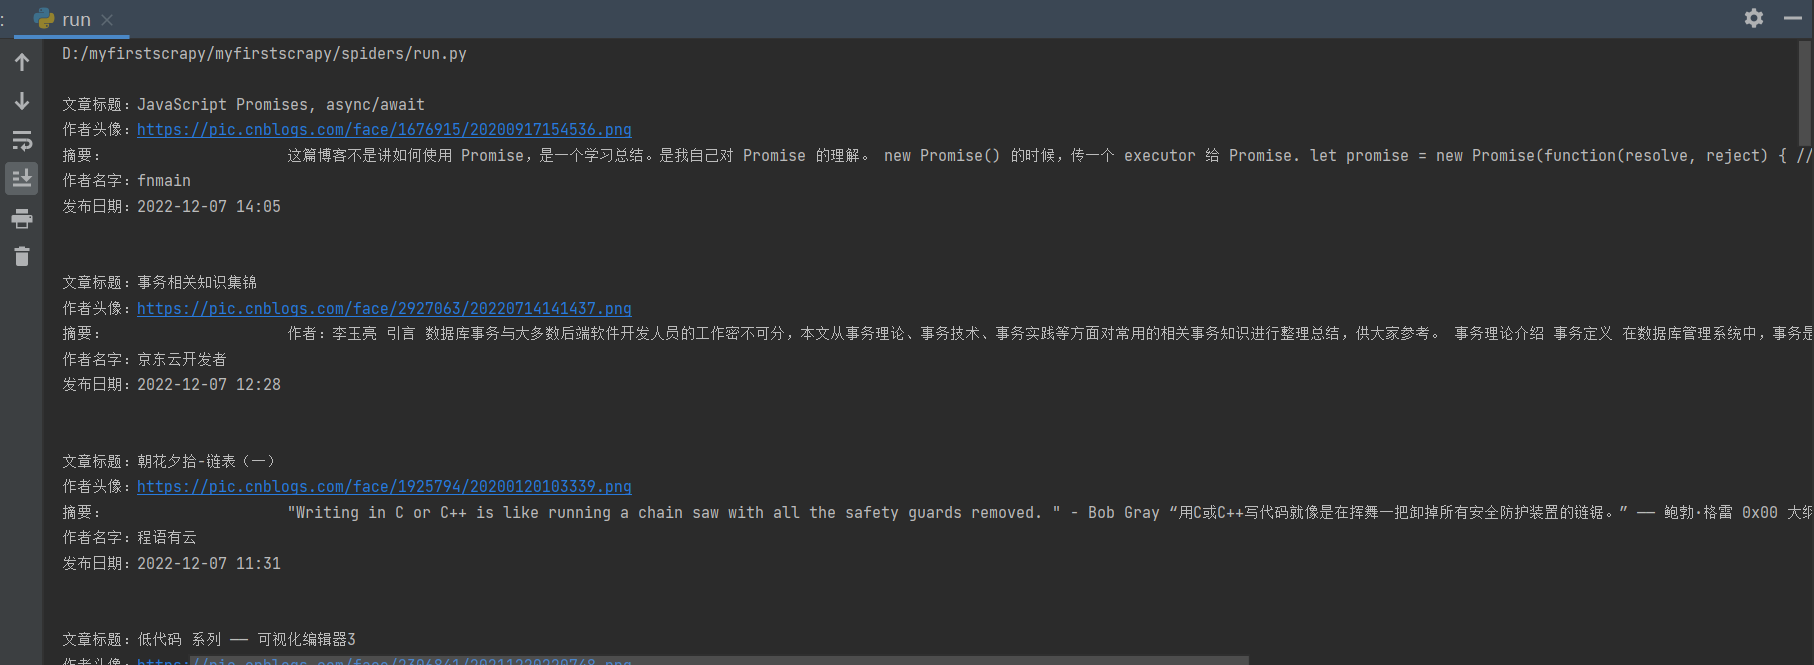
xpath选择器
article_list = response.xpath('//article[contains(@class,"post-item")]')
        for article in article_list:
            title_name = article.xpath('./section/div/a/text()').extract_first()
            author_img = article.xpath('./section/div/p//img/@src').extract_first()
            desc_list = article.xpath('./section/div/p/text()').extract()
            desc = desc_list[0].replace('\n', '').replace(' ', '')
            if not desc:
                desc = desc_list[1].replace('\n', '').replace(' ', '')

            author_name = article.xpath('./section/footer/a/span/text()').extract_first()
            article_date = article.xpath('./section/footer/span/span/text()').extract_first()
            # 文章详情内容,因为在下一页,先不着急
            print('''
            文章标题:%s
            作者头像:%s
            摘要:%s
            作者名字:%s
            发布日期:%s
            ''' % (title_name, author_img, desc, author_name, article_date))
整体代码
import scrapy
from bs4 import BeautifulSoup
from scrapy import Request


class CnblogsSpider(scrapy.Spider):
    name = 'cnblogs'
    allowed_domains = ['www.cnblogs.com']
    start_urls = ['http://www.cnblogs.com/']

    def parse(self, response):
        # # response类似于requests模块的response对象
        # print(response.text)
        # # 返回的数据,解析数据:方式一:使用bs4(不用了)
        # soup = BeautifulSoup(response.text, 'lxml')
        # article_list = soup.find_all(class_='post-item')
        # for article in article_list:
        #     title_name = article.find(name='a', class_='post-item-title').text
        #     print(title_name)
        # 方式二:scrapy自带的解析(css、xpath)
        # css解析
        # article_list = response.css('article.post-item')
        # for article in article_list:
        #     title_name = article.css('section>div>a::text').extract_first()
        #     author_img = article.css('p.post-item-summary>a>img::attr(src)').extract_first()
        #     desc_list = article.css('p.post-item-summary::text').extract()
        #     desc = desc_list[0].replace('\n', '').replace(' ', '')
        #     if not desc:
        #         desc = desc_list[1].replace('\n', '').replace('', '')
        #
        #     author_name = article.css('section>footer>a>span::text').extract_first()
        #     article_date = article.css('section>footer>span>span::text').extract_first()
        #     print('''
        #                 文章标题:%s
        #                 作者头像:%s
        #                 摘要:%s
        #                 作者名字:%s
        #                 发布日期:%s
        #                 ''' % (title_name, author_img, desc, author_name, article_date))
        data_list = []
        # xpath选择器
        # article_list = response.xpath('//article[contains(@class,"post-item")]')
        # for article in article_list:
        #     title_name = article.xpath('./section/div/a/text()').extract_first()
        #     author_img = article.xpath('./section/div/p//img/@src').extract_first()
        #     desc_list = article.xpath('./section/div/p/text()').extract()
        #     desc = desc_list[0].replace('\n', '').replace(' ', '')
        #     if not desc:
        #         desc = desc_list[1].replace('\n', '').replace(' ', '')
        #
        #     author_name = article.xpath('./section/footer/a/span/text()').extract_first()
        #     article_date = article.xpath('./section/footer/span/span/text()').extract_first()
        #     # 文章详情内容,因为在下一页,先不着急
        #     print('''
        #     文章标题:%s
        #     作者头像:%s
        #     摘要:%s
        #     作者名字:%s
        #     发布日期:%s
        #     ''' % (title_name, author_img, desc, author_name, article_date))
三、settings相关配置,提高爬虫效率
1、是否遵循爬虫协议(scrapy会先发送爬虫协议看看让趴吗,但是大部分网站都不让趴,这个改成False)
ROBOTSTXT_OBEY = False2、LOG_LEVEL 日志级别
LOG_LEVEL='ERROR' # 报错如果不打印日志,在控制台看不到错误3、USER_AGENT
USER_AGENT = 'Mozilla/5.0 (Windows NT 10.0; Win64; x64) AppleWebKit/537.36 (KHTML, like Gecko) Chrome/103.0.0.0 Safari/537.36'4、DEFAULT_REQUEST_HEADERS 默认请求头
#DEFAULT_REQUEST_HEADERS = {
#   'Accept': 'text/html,application/xhtml+xml,application/xml;q=0.9,*/*;q=0.8',
#   'Accept-Language': 'en',
#}
5、SPIDER_MIDDLEWARES 爬虫中间件
#SPIDER_MIDDLEWARES = {
#    'cnblogs.middlewares.CnblogsSpiderMiddleware': 543,
#}
6、DOWNLOADER_MIDDLEWARES 下载中间件
#DOWNLOADER_MIDDLEWARES = {
#    'cnblogs.middlewares.CnblogsDownloaderMiddleware': 543,
#}
7、ITEM_PIPELINES 持久化配置
#ITEM_PIPELINES = {
#    'cnblogs.pipelines.CnblogsPipeline': 300,
#}
8、爬虫项目名字
BOT_NAME = 'myfirstscrapy'9、指定爬虫类的py文件的位置
SPIDER_MODULES = ['myfirstscrapy.spiders']
NEWSPIDER_MODULE = 'myfirstscrapy.spiders'
整体代码
settings.py
# 爬虫项目名字
BOT_NAME = 'myfirstscrapy'
# 指定爬虫类的py文件的位置
SPIDER_MODULES = ['myfirstscrapy.spiders']
NEWSPIDER_MODULE = 'myfirstscrapy.spiders'

# 日志级别  只有错误才打印
LOG_LEVEL = 'ERROR'

# 请求头中的 客户端信息
USER_AGENT = 'Mozilla/5.0 (Windows NT 10.0; Win64; x64) AppleWebKit/537.36 (KHTML, like Gecko) Chrome/108.0.0.0 Safari/537.36'

# 是否遵循爬虫协议
ROBOTSTXT_OBEY = False

# 同时爬取的个数,同时发送的请求格式,默认是16
# CONCURRENT_REQUESTS = 32


# DOWNLOAD_DELAY = 3
# CONCURRENT_REQUESTS_PER_DOMAIN = 16
# CONCURRENT_REQUESTS_PER_IP = 16

# COOKIES_ENABLED = False
# TELNETCONSOLE_ENABLED = False

# 默认请求头
# DEFAULT_REQUEST_HEADERS = {
#   'Accept': 'text/html,application/xhtml+xml,application/xml;q=0.9,*/*;q=0.8',
#   'Accept-Language': 'en',
# }

# 爬虫中间件,后面要用
# SPIDER_MIDDLEWARES = {
#    'myfirstscrapy.middlewares.MyfirstscrapySpiderMiddleware': 543,
# }

# 下载中间件,后面要用
# DOWNLOADER_MIDDLEWARES = {
#    'myfirstscrapy.middlewares.MyfirstscrapyDownloaderMiddleware': 543,
# }

# Enable or disable extensions
# See https://docs.scrapy.org/en/latest/topics/extensions.html
# EXTENSIONS = {
#    'scrapy.extensions.telnet.TelnetConsole': None,
# }


# ITEM_PIPELINES = {
#    'myfirstscrapy.pipelines.MyfirstscrapyPipeline': 300,
#    'myfirstscrapy.pipelines.CnblogsMysqlPipeline': 200,
# }

# Enable and configure the AutoThrottle extension (disabled by default)
# See https://docs.scrapy.org/en/latest/topics/autothrottle.html
# AUTOTHROTTLE_ENABLED = True
# The initial download delay
# AUTOTHROTTLE_START_DELAY = 5
# The maximum download delay to be set in case of high latencies
# AUTOTHROTTLE_MAX_DELAY = 60
# The average number of requests Scrapy should be sending in parallel to
# each remote server
# AUTOTHROTTLE_TARGET_CONCURRENCY = 1.0
# Enable showing throttling stats for every response received:
# AUTOTHROTTLE_DEBUG = False

# Enable and configure HTTP caching (disabled by default)
# See https://docs.scrapy.org/en/latest/topics/downloader-middleware.html#httpcache-middleware-settings
# HTTPCACHE_ENABLED = True
# HTTPCACHE_EXPIRATION_SECS = 0
# HTTPCACHE_DIR = 'httpcache'
# HTTPCACHE_IGNORE_HTTP_CODES = []
# HTTPCACHE_STORAGE = 'scrapy.extensions.httpcache.FilesystemCacheStorage'

# Set settings whose default value is deprecated to a future-proof value
REQUEST_FINGERPRINTER_IMPLEMENTATION = '2.7'
TWISTED_REACTOR = 'twisted.internet.asyncioreactor.AsyncioSelectorReactor'
四、增加爬虫的爬取效率
1、增加并发:默认16
- 默认scrapy开启的并发线程为32个,可以适当进行增加。在settings配置文件中修改
CONCURRENT_REQUESTS = 100
值为100,并发设置成了为100。
2、降低日志级别
- 在运行scrapy时,会有大量日志信息的输出,为了减少CPU的使用率。可以设置log输出信息为INFO或者ERROR即可。在配置文件中编写:
LOG_LEVEL = 'INFO'
3、禁止cookie
- 如果不是真的需要cookie,则在scrapy爬取数据时可以禁止cookie从而减少CPU的使用率,提升爬取效率。在配置文件中编写:
COOKIES_ENABLED = False
4、禁止重试
- 对失败的HTTP进行重新请求(重试)会减慢爬取速度,因此可以禁止重试。在配置文件中编写:
RETRY_ENABLED = False
5、减少下载超时
- 如果对一个非常慢的链接进行爬取,减少下载超时可以能让卡住的链接快速被放弃,从而提升效率。在配置文件中进行编写:
DOWNLOAD_TIMEOUT = 10 超时时间为10s
五、持久化方案
保存到硬盘上——>持久化
两种方案:第一种常用第二种做了解
第一种:使用pipline 常用的,管道形式,可以同时存到多个位置的
1、在items.py中写一个类[相当于写django的表模型他是继承Modles.model],继承scrapy.Item
2、在类中写属性,写字段,所有字段都是scrapy.Field类型 title = scrapy.Field()
3、在爬虫中导入类,实例化得到对象,把要保存的数据放到对象中
item['title'] = title  记住!!!!!用中括号放,不要用.
    解析类中 yield item
4、修改配置文件,指定pipline,数字表示优先级,越小越大
ITEM_PIPELINES = {
        'crawl_cnblogs.pipelines.CrawlCnblogsPipeline': 300,
            }
5、写一个pipline:CrawlCnblogsPipeline
-open_spider:数据初始化,打开文件,打开数据库链接
-process_item:真正存储的地方
-一定不要忘了return item,交给后续的pipline继续使用
-close_spider:销毁资源,关闭文件,关闭数据库链接
代码解析
-
定义在for内部,每次都是一个新对象
pipelines打开数据库链接,每次进行插入,然后关闭数据链接
第二种(了解)
- 在解析函数中parse,要return[{},{},{}]
- 执行爬虫:
scrapy crawl cnblogs -o 文件名(json,pickle,csv结尾)
- 执行爬虫:
六、全站爬取cnblogs文章
第一页爬完后,要保存的数据已经保存了
接下来要
- 继续爬取下一页:解析出下一页的地址,包装成request对象
- 继续爬取详情页:解析出详情页地址,包装成request对象
代码解析
- 用css解析出下一页:博客园前缀地址+找到最后一个属性用的
last-child - 现在不存了因为数据不全,创建个Request对象
- 页面不一样,建一个详情解析的方法
- 因为是异步操作,不知道哪个详情先被调回来对应不上
# Request创建:在parse中,for循环中,创建Request对象时,传入meta
	yield Request(url=url, callback=self.detail_parse,meta={'item':item})

# Response对象:detail_parse中,通过response取出meta取出item,把文章详情写入
yield itemimport scrapy
from bs4 import BeautifulSoup
from myfirstscrapy.items import CnblogsItem
from scrapy import Request
# from scrapy.http.request import Request
class CnblogsSpider(scrapy.Spider):
name = 'cnblogs'
allowed_domains = ['www.cnblogs.com']
start_urls = ['http://www.cnblogs.com/']
def parse(self, response):
# item = CnblogsItem() # 外面定义,会有问题
article_list = response.xpath('//article[contains(@class,"post-item")]')
for article in article_list:
item = CnblogsItem() # 定义在for内部,每次都是一个新对象
title_name = article.xpath('./section/div/a/text()').extract_first()
author_img = article.xpath('./section/div/p//img/@src').extract_first()
desc_list = article.xpath('./section/div/p/text()').extract()
desc = desc_list[0].replace('\n', '').replace(' ', '')
if not desc:
desc = desc_list[1].replace('\n', '').replace(' ', '')
author_name = article.xpath('./section/footer/a/span/text()').extract_first()
article_date = article.xpath('./section/footer/span/span/text()').extract_first()
url = article.xpath('./section/div/a/@href').extract_first()
# 文章详情内容,因为在下一页,先不着急
item['title_name'] = title_name
item['author_img'] = author_img
item['desc'] = desc
item['author_name'] = author_name
item['article_date'] = article_date
item['url'] = url
# print(url)
# 现在不存了,因为数据不全,等全了以后再存,继续爬取,就要创建Request对象
# 详情页面,使用self.detail_parse解析
yield Request(url=url, callback=self.detail_parse,meta={'item':item})
# 解析出下一页地址
# css
next_url = 'https://www.cnblogs.com' + response.css('div.pager>a:last-child::attr(href)').extract_first()
print(next_url)
yield Request(url=next_url, callback=self.parse)
def detail_parse(self, response):
# print(len(response.text))
item=response.meta.get('item')
# 解析详情
article_content=response.css('div.post').extract_first()
# print(article_content)
# print('===================')
# 把详情,写入当前meta中得item中
item['article_content']=str(article_content)
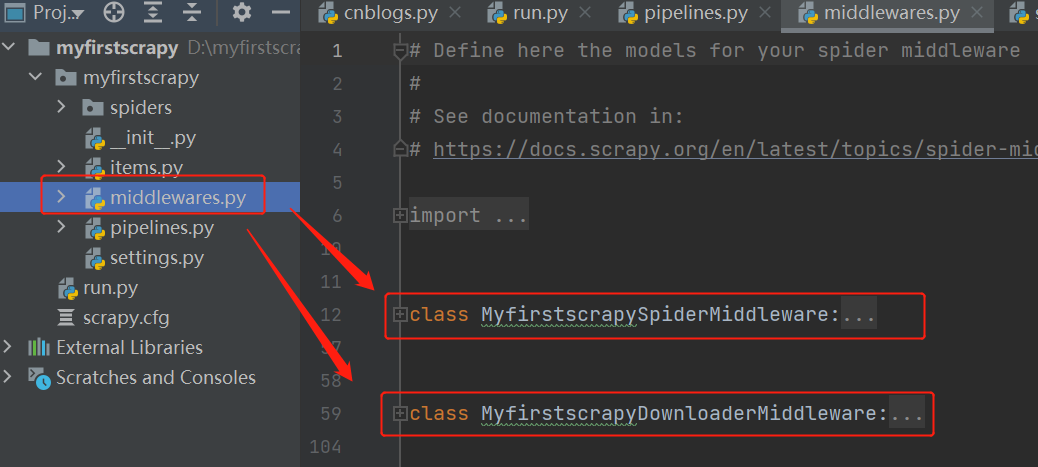
yield item七、爬虫和下载中间件
scrapy的所有中间件都写在middlewares.py中,跟djagno非常像,做一些拦截
爬虫中间件(用的很少,了解即可)
- MyfirstscrapySpiderMiddleware
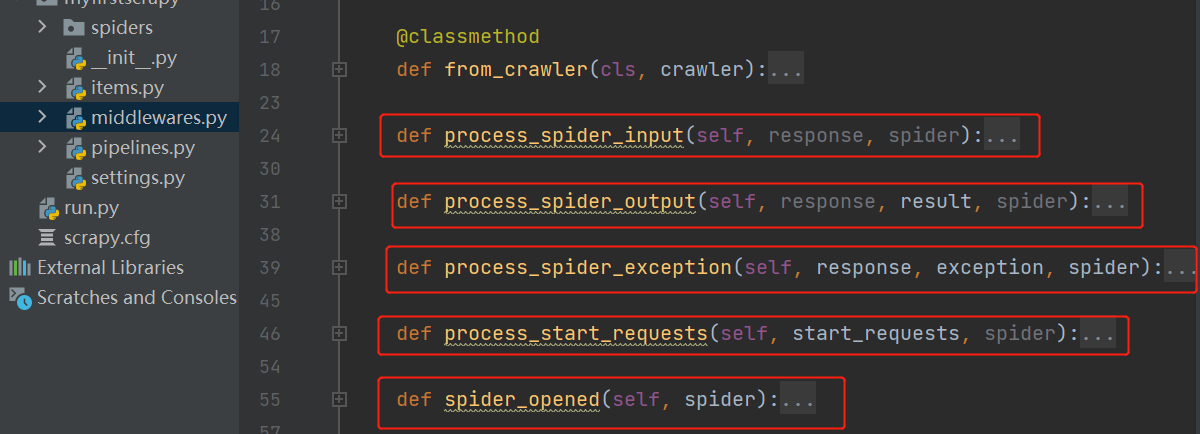
| 进入爬虫会执行它 | def process_spider_input(self, response, spider): |
| 从爬虫出来会执行它 | def process_spider_output(self, response, result, spider): |
| 出了异常会执行 | def process_spider_exception(self, response, exception, spider): |
| 第一次爬取执行 | def process_start_requests(self, start_requests, spider): |
| 爬虫开启执行 | def spider_opened(self, spider): |
下载中间件
MyfirstscrapyDownloaderMiddleware
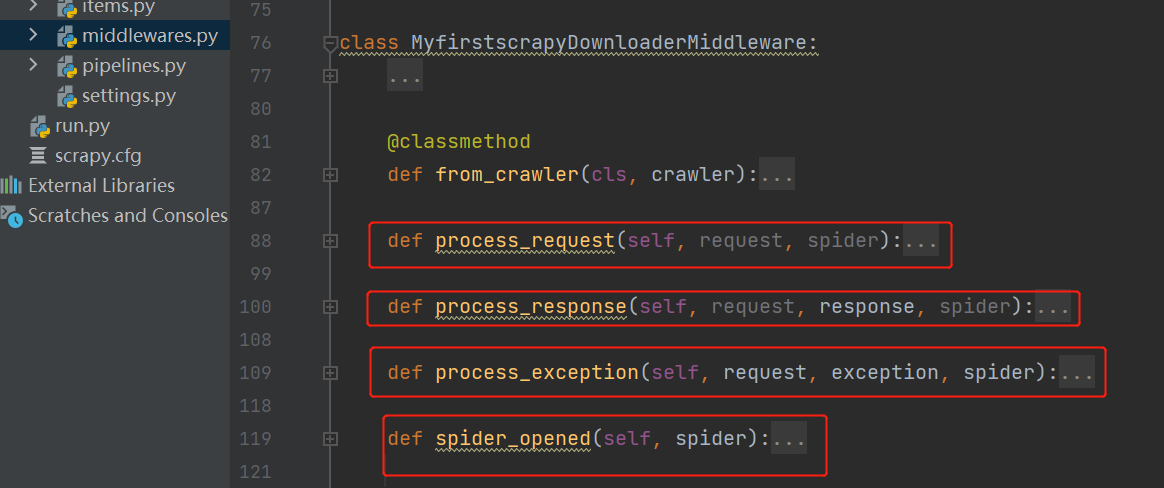
| request对象从引擎进入到下载器会执行 | def process_request(self, request, spider): |
| response对象从下载器进入到引擎会执行 | def process_response(self, request, response, spider): |
| 出异常执行它 | def process_exception(self, request, exception, spider): |
| 爬虫开启执行它 | def spider_opened(self, spider): |
重点
- process_request
- process_response
下载中间件的process_request
返回值(只能返回以下几种格式)
| 继续执行下面的中间件的process_request | return None: |
| 不进入下载中间件了,直接返回给引擎,引擎把它通过6给爬虫 | return a Response object: |
| 不进入中间件了,直接返回给引擎,引擎把它放到调度器中 | return a Request object: |
| 抛异常,会执行process_exception | raise IgnoreRequest: process_exception() |
下载中间件的process_response
返回值
| 第⑤步正常,会进入到引擎,引擎把它给爬虫 | return a Response object: |
| 爬失败了进入到引擎,引擎把它放到调度器中,等待下次爬取 | return a Request object: |
| 会执行process_exception | raise IgnoreRequest |

 浙公网安备 33010602011771号