python+uiautomator2安卓,混合app 操作h5页面
参考文章:https://testerhome.com/topics/15998
uiautomator2 app 原生 + webview 的实际操作记录 (安卓)
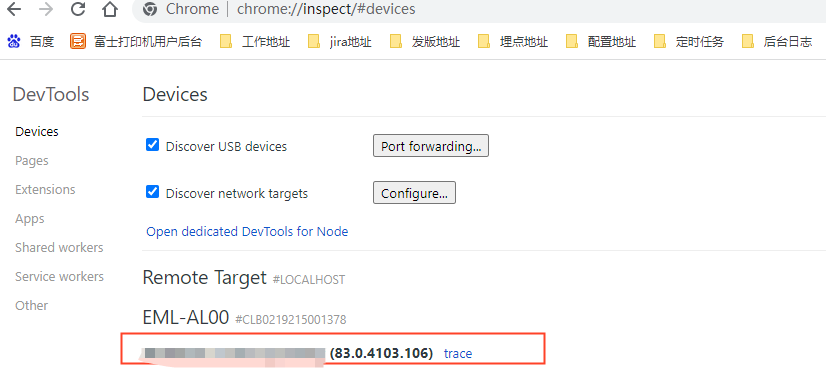
1. 首先 chrome://inspect/#devices 通过连接查看自己的 版本号 ,
必须和我们的手机应用使用的 WebView 版本相对应
https://npm.taobao.org/mirrors/chromedriver/2.28/notes.txt
下载地址 http://npm.taobao.org/mirrors/chromedriver/
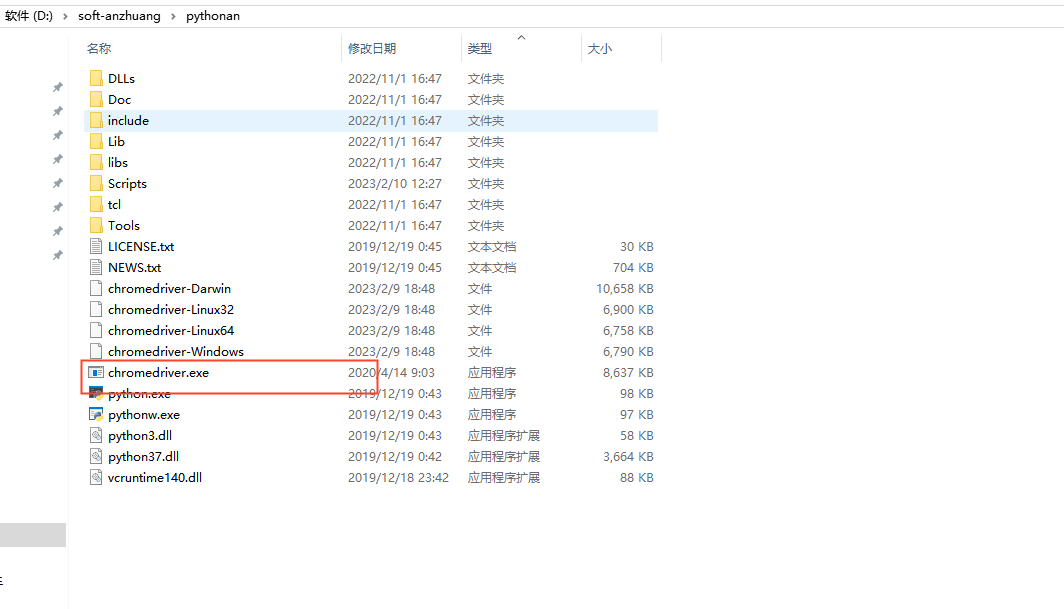
2. 下载对应版本的 放到python安装包下
3. 安装atx
pip3 install atx
内部存在 (这里说的 chromedriver.py 是 atx 模块下的,需要安装 atx)
打开 chromedriver.py文件 此处如果有框架封装的话,可以直接修改此文件,后期直接调用即可,此处建议重新改写此方法\
class ChromeDriver_new(ChromeDriver):
    """
    check_into_h5方法需要
    由于此处直接调用chromedriver.py 文件直接调用driver会出现连接失败,主要原因应该是版本问题,暂时需要进行重写
    """

    def driver(self, package=None, attach=True, activity=None, process=None):
        app = self._d.current_app()
        print(app)
        options = webdriver.ChromeOptions()
        options.add_experimental_option('androidDeviceSerial', self._d.serial)
        options.add_experimental_option('androidPackage', app.get('package'))
        options.add_experimental_option('androidUseRunningApp', True)
        options.add_experimental_option('androidActivity', app.get('activity'))

        driver = webdriver.Chrome('chromedriver', options=options)
        atexit.register(driver.quit)
        return driver
然后封装 从原生切入h5的方法:
def check_into_h5(self):
  drivers = ChromeDriver_new(self.d).driver()
return drivers
在用例中直接调用
driver = action.check_into_h5()
print(driver.current_url)
print(driver.page_source)
driver.find_element(By.XPATH, '//span[contains(text(),"爱好")]').click()
4、定位元素
(1)可以通过 特定的方法进行定位,可自行百度,定位h5元素的方法,也可参考此篇:https://www.cnblogs.com/zz-1021/p/17127284.html
(2)此处通过 打印整个页面的元素进行自主定位
# print(driver.current_url)
# print(driver.page_source)
打印对应的driver.page_source ,直接对于元素进行定位,常用定位方法://div[contains(text(),"文本")]
5.单独使用代码如下
d = u2.connect()
app = d.app_current()
print(app)
driver =ChromeDriver_new(d).driver()
print(driver.current_url)
driver.find_element(By.XPATH, '//span[contains(text(),"爱好")]').click()

 浙公网安备 33010602011771号