08*:flutter之Image:(Image、Image.network)
问题
目录
1:构造器
2:属性详解
预备
正文
1:构造器
一、构造函数
const Image({
    Key key,
    @required this.image,
    this.frameBuilder,
    this.loadingBuilder,
    this.semanticLabel,
    this.excludeFromSemantics = false,
    this.width,
    this.height,
    this.color,
    this.colorBlendMode,
    this.fit,
    this.alignment = Alignment.center,
    this.repeat = ImageRepeat.noRepeat,
    this.centerSlice,
    this.matchTextDirection = false,
    this.gaplessPlayback = false,
    this.filterQuality = FilterQuality.low,
  }) : assert(image != null),
       assert(alignment != null),
       assert(repeat != null),
       assert(filterQuality != null),
       assert(matchTextDirection != null),
       super(key: key);

二、命名构造函数
// 2.1 用于创建来自网络的图片
Image.network(
    String src, {
    Key key,
    double scale = 1.0,
    this.frameBuilder,
    this.loadingBuilder,
    this.semanticLabel,
    this.excludeFromSemantics = false,
    this.width,
    this.height,
    this.color,
    this.colorBlendMode,
    this.fit,
    this.alignment = Alignment.center,
    this.repeat = ImageRepeat.noRepeat,
    this.centerSlice,
    this.matchTextDirection = false,
    this.gaplessPlayback = false,
    this.filterQuality = FilterQuality.low,
    Map<String, String> headers,
  }) : image = NetworkImage(src, scale: scale, headers: headers),
       assert(alignment != null),
       assert(repeat != null),
       assert(matchTextDirection != null),
       super(key: key);
// 2.2 创建来自文件为图片
Image.file(
    File file, {
    Key key,
    double scale = 1.0,
    this.frameBuilder,
    this.semanticLabel,
    this.excludeFromSemantics = false,
    this.width,
    this.height,
    this.color,
    this.colorBlendMode,
    this.fit,
    this.alignment = Alignment.center,
    this.repeat = ImageRepeat.noRepeat,
    this.centerSlice,
    this.matchTextDirection = false,
    this.gaplessPlayback = false,
    this.filterQuality = FilterQuality.low,
  }) : image = FileImage(file, scale: scale),
       loadingBuilder = null,
       assert(alignment != null),
       assert(repeat != null),
       assert(filterQuality != null),
       assert(matchTextDirection != null),
       super(key: key);
// 2.3 创建来自asset的图片
Image.asset(
    String name, {
    Key key,
    AssetBundle bundle,
    this.frameBuilder,
    this.semanticLabel,
    this.excludeFromSemantics = false,
    double scale,
    this.width,
    this.height,
    this.color,
    this.colorBlendMode,
    this.fit,
    this.alignment = Alignment.center,
    this.repeat = ImageRepeat.noRepeat,
    this.centerSlice,
    this.matchTextDirection = false,
    this.gaplessPlayback = false,
    String package,
    this.filterQuality = FilterQuality.low,
  }) : image = scale != null
         ? ExactAssetImage(name, bundle: bundle, scale: scale, package: package)
         : AssetImage(name, bundle: bundle, package: package),
       loadingBuilder = null,
       assert(alignment != null),
       assert(repeat != null),
       assert(matchTextDirection != null),
       super(key: key);
// 2.4 创建来自内存的图片
Image.memory(
    Uint8List bytes, {
    Key key,
    double scale = 1.0,
    this.frameBuilder,
    this.semanticLabel,
    this.excludeFromSemantics = false,
    this.width,
    this.height,
    this.color,
    this.colorBlendMode,
    this.fit,
    this.alignment = Alignment.center,
    this.repeat = ImageRepeat.noRepeat,
    this.centerSlice,
    this.matchTextDirection = false,
    this.gaplessPlayback = false,
    this.filterQuality = FilterQuality.low,
  }) : image = MemoryImage(bytes, scale: scale),
       loadingBuilder = null,
       assert(alignment != null),
       assert(repeat != null),
       assert(matchTextDirection != null),
       super(key: key);
ImageProvider image
要显示的图片。
- AssetImage(‘assets/images/lake.jpg’): 获取来自assets的图片;
- NetworkImage(‘http://pic33.nipic.com/20131007/13639685_123501617185_2.jpg’):获取来自网络的图片
- FileImage(File(’/Users/maxlz/Desktop/StudyData/Flutter/flutterdemo/assets/images/lake.jpg’)):加载来自文件的图片
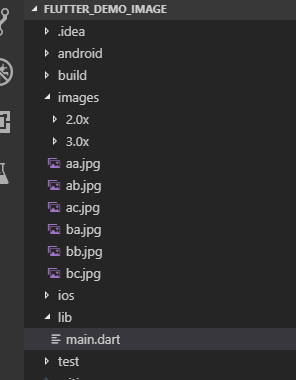
使用资源图片前必做两个步骤:
1、在根目录下创建子目录,子目录中创建2.0x和3.0x(也可以创建4.0x、5.0x... 但是2.0和3.0是必须的)目录,在对应目录中添加对应分辨率图片。(图1)
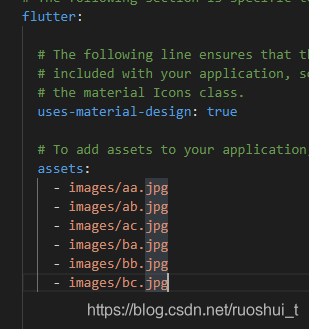
2、打开pubspec.yaml文件, 配置图片源。(图2)
2:属性详解
| 属性 | 说明 |
| image | Image.asset:加载资源图片 不支持 热加载 Image.file:加载本地图片 Image.network:加载网络图片 Image.memory:加载Uint8List资源图片 |
| semanticLabel | 图像的语义描述。 |
| excludeFromSemantics | 默认false 是否启用图像的语义描述 |
| width |
宽度 一般结合 ClipOval 才能看到效果 |
| height |
高度 一般结合 ClipOval 才能看到效果 |
| color | 背景色 |
| colorBlendMode |
使图像与背景色混合 模式 混合模式很多,这里就不多介绍了,具体看官网BlendMode |
| fit | BoxFit.fill:全图显示,图片会被拉伸,并充满父容器。 BoxFit.contain:全图显示,显示原比例,可能会有空隙。 BoxFit.cover:显示可能拉伸,可能裁切,充满(充满容器不变形)。 BoxFit.fitWidth:宽度充满(横向充满),显示可能拉伸,可能裁切。 BoxFit.fitHeight :高度充满(竖向充满),显示可能拉伸,可能裁切。 BoxFit.scaleDown:效果和 contain 差不多,但是此属性不允许显示超过源图片大小,可小不可大。 |
| alignment | 对齐方式 |
| repeat |
平铺 ImageRepeat.repeat : 横向和纵向都进行重复,直到铺满整个画布。 |
| centerSlice |
设定拉伸部位,不能和fit一同使用 图片大于等于容器时 属性无效 |
| matchTextDirection | 默认false
官方翻译:是否在TextDirection的方向上绘制图像。 |
| gaplessPlayback |
默认false 官方翻译:当图像提供者发生变化时,是继续显示旧图像,默认不显示! |
| filterQuality |
默认FilterQuality.low 官方翻译:图像过滤器的质量级别。(渲染模式的质量) |
代码示例
child: Container(
        //设置容器大小
        width: 320.0,
        height: 203.0,
        decoration: BoxDecoration(
          //背景色
          color: Colors.yellow
        ),
        /*
        加载资源图片
        child: Image.asset('images/aa.jpg'),
        */

        /*
        加载网络图片
        child: Image.network(
          'https://raw.githubusercontent.com/think-ing/flutter_demo/master/images/ba.jpg',
        ),
        */

        /*
        图片混合蓝色
        child: Image.network(
          'https://raw.githubusercontent.com/think-ing/flutter_demo/master/images/ba.jpg',
          color: Colors.blue,
          colorBlendMode: BlendMode.colorDodge,
        ),
        */

        /*
        图片平铺
        child: Image.network(
          'https://raw.githubusercontent.com/think-ing/flutter_demo/master/images/bc.jpg',
          repeat: ImageRepeat.repeat,
        ),
        */

        /*
        设定拉伸部位
        child: Image.network(
          'https://raw.githubusercontent.com/think-ing/flutter_demo/master/images/bc.jpg',
          centerSlice:Rect.fromLTRB(10, 11, 12, 13),
        ),
        */

        // 圆形图片
        child: ClipOval(
              child:Image.network(
                'https://raw.githubusercontent.com/think-ing/flutter_demo/master/images/a.jpg',
                height: 100,
                width: 100,
                fit: BoxFit.cover,
              ),
            ),
      ),
图片混合蓝色

图片平铺

设定拉伸部位
注意


 浙公网安备 33010602011771号