07*:Flutter之TextField
问题
目录
预备
正文
一:参数详解
TextField同时也使用Text 的部分属性:
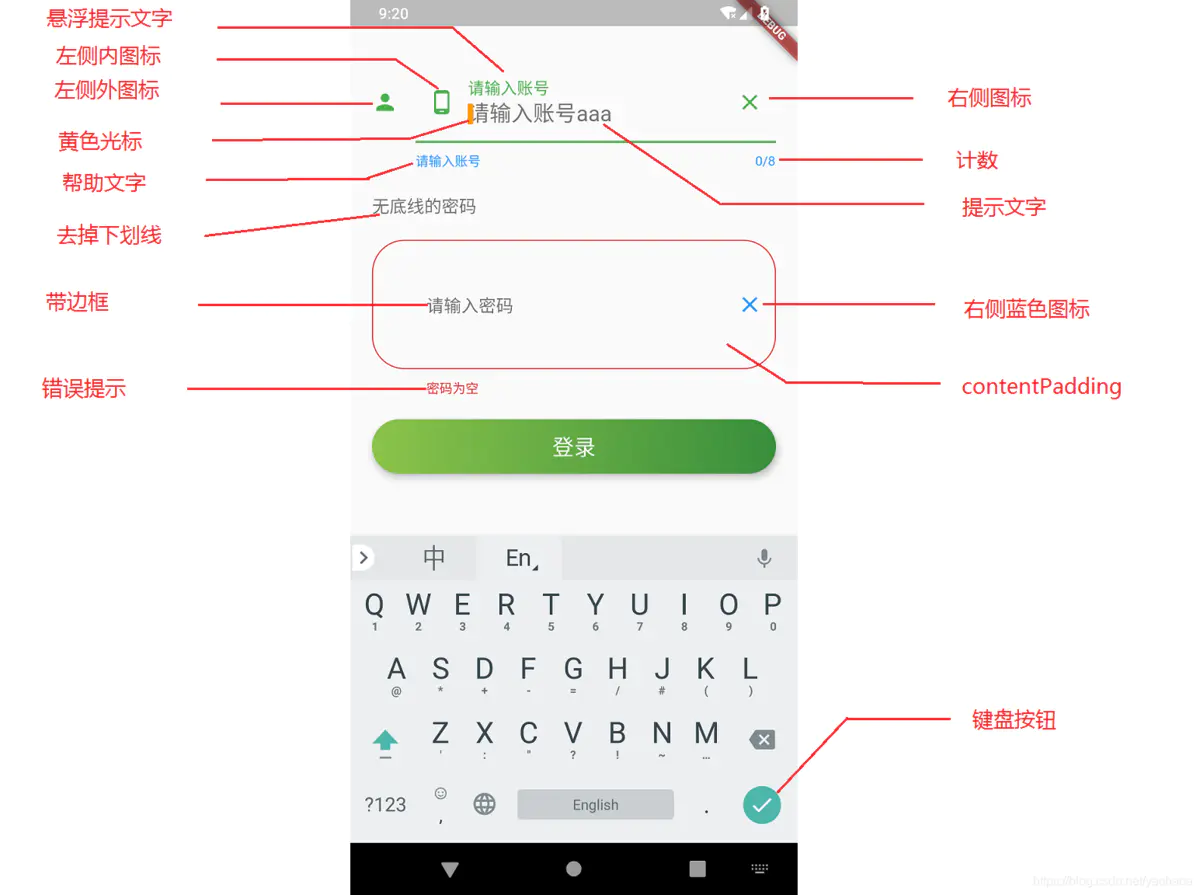
TextField用于文本输入,它提供了很多属性,我们先简单介绍一下主要属性的作用,然后通过几个示例来演示一下关键属性的用法。
1:TextField构造器
 const TextField({
    Key key,
    this.controller, //文本控制器
    this.focusNode, //焦点控制
    this.decoration = const InputDecoration(), //边框装饰
    TextInputType keyboardType, // 键盘类型
    this.textInputAction, //键盘的操作按钮
    this.textCapitalization = TextCapitalization.none, //用户输入类型
    this.style, //输入文本样式
    this.strutStyle,
    this.textAlign = TextAlign.start, //水平方向对齐方式。  值为  left、  right  、center、  justify 、 start、  end
    this.textAlignVertical, // 文本垂直方向对齐方式 。 值为 top   、 center 、  bottom
    this.textDirection,   //文本方向  rtl(right to left)   ltr(left to right)
    this.readOnly = false,
    ToolbarOptions toolbarOptions,   //工具栏选项的配置
    this.showCursor,    //是否显示光标
    this.autofocus = false,   //自动获取焦点
    this.obscuringCharacter = '•',    //隐藏内容时,显示的文字
    this.obscureText = false,  //  是否隐藏内容,例如密码格式
    this.autocorrect = true,  //是否自动校正
    SmartDashesType smartDashesType,   //指示如何处理文本输入中破折号的智能替换
    SmartQuotesType smartQuotesType,  //指示如何处理文本输入中引号的智能替换。
    this.enableSuggestions = true,  //启用建议
    this.maxLines = 1,  //最大行数
    this.minLines, //最小行数
    this.expands = false, //
    this.maxLength,  // 最多输入数,有值后右下角就会有一个计数器
    this.maxLengthEnforced = true, //是否允许超过输入最大长度
    this.onChanged, // 文本内容变更时回调
    this.onEditingComplete,    // 输入完成回调 主要配合TextInputAction.done使用
    this.onSubmitted,  //提交 配合TextInputAction
    this.onAppPrivateCommand,
    this.inputFormatters,   //输入校验
    this.enabled,  //是否可用
    this.cursorWidth = 2.0, // 光标宽度
    this.cursorHeight, //光标高度
    this.cursorRadius, //光标圆角
    this.cursorColor, //光标颜色
    this.selectionHeightStyle = ui.BoxHeightStyle.tight,
    this.selectionWidthStyle = ui.BoxWidthStyle.tight,
    this.keyboardAppearance,   // 键盘亮度
    this.scrollPadding = const EdgeInsets.all(20.0),  // 滚动到视图中时,填充边距
    this.dragStartBehavior = DragStartBehavior.start,
    this.enableInteractiveSelection = true,    // 长按是否展示 剪切/复制/粘贴菜单
    this.onTap,  //点击事件
    this.mouseCursor, // 鼠标指针进入或悬停在鼠标指针上时的光标
    this.buildCounter,
    this.scrollController,  //控制可滚动的小部件
    this.scrollPhysics, //确定[Scrollable]小部件的物理性质。
    this.autofillHints,//自动填充提示
    this.restorationId, //恢复ID以保存和恢复文本字段的状态。
属性详解
- controller:编辑框的控制器,通过它可以设置/获取编辑框的内容、选择编辑内容、监听编辑文本改变事件。大多数情况下我们都需要显式提供一个controller来与文本框交互。如果没有提供controller,则TextField内部会自动创建一个。
- focusNode:用于控制TextField是否占有当前键盘的输入焦点。它是我们和键盘交互的一个句柄(handle)
- InputDecoration:用于控制TextField的外观显示,如提示文本、背景颜色、边框等。
- keyboardType:用于设置该输入框默认的键盘输入类型
1:InputDecoration
const InputDecoration({
    // 接收Widget, 在输入框左侧显示的图片
    this.icon,

    // String, 输入框的描述, 当输入框获取焦点时默认会浮动到上方
    this.labelText,
    // TextStyle, 样式
    this.labelStyle,

    // 辅助文本, 位于输入框下方,如果errorText不为空的话,则helperText不显示
    this.helperText,
    this.helperStyle,

    /// 提示文本,位于输入框内部
    this.hintText,
    this.hintStyle,

    // 错误信息提示文本
    this.errorText,
    this.errorStyle,
    // errorText显示的最大行数
    this.errorMaxLines,
    // errorText不为空,输入框没有焦点时要显示的边框
    this.errorBorder,

    // labelText是否浮动,默认为true,修改为false则labelText在输入框获取焦点时不会浮动且不显示
    this.hasFloatingPlaceholder = true,
    // 改变输入框是否为密集型,默认为false,修改为true时,图标及间距会变小
    this.isDense,
    // 内间距
    this.contentPadding,

    // 位于输入框内部起左侧置的图标
    this.prefixIcon,
    // 预先填充在输入框左侧的Widget,跟prefixText同时只能出现一个
    this.prefix,
    //预填充在输入框左侧的文本, 不可修改删除,例如手机号前面预先加上区号等
    this.prefixText,
    this.prefixStyle,

    // 位于输入框内部右侧位置的图标
    this.suffixIcon,
    // 预先填充在输入框右侧的Widget,跟suffixText同时只能出现一个
    this.suffix,
    // 预填充在输入框右侧的文本, 不可修改删除
    this.suffixText,
    this.suffixStyle,

    // 位于右下方显示的文本,常用于显示输入的字符数量
    this.counterText,
    this.counterStyle,

    // 相当于输入框的背景颜色
    this.fillColor,
    // 如果为true,则输入使用fillColor指定的颜色填充
    this.filled,

    // 输入框有焦点时的边框,如果errorText不为空的话,该属性无效
    this.focusedBorder,
    // errorText不为空时,输入框有焦点时的边框
    this.focusedErrorBorder,
    // 输入框禁用时显示的边框,如果errorText不为空的话,该属性无效
    this.disabledBorder,
    // 输入框可用时显示的边框,如果errorText不为空的话,该属性无效
    this.enabledBorder,
    // 正常情况下的边框
    this.border,
    // 输入框是否可用
    this.enabled = true,
    // counterText的语义标签, 如果赋值将替换counterText, 但是我试了好像没什么效果
    this.semanticCounterText,
  })

注意
prefix和prefixText 以及suffix和suffixText 不能同时存在
2:keyboardType
keyboardType: TextInputType.number,
TextInputTypetext文本输入键盘multiline多行文本,需和maxLines配合使用(设为null或大于1)number纯数字键盘phone电话号码输入键盘会弹出数字键盘并显示* #datetime日期输入键盘, Android上会显示: -emailAddress电子邮件地址,会显示@ .url连接输入键盘, 会显示/ .示例:登录输入框
import 'package:flutter/cupertino.dart';
import 'package:flutter/material.dart';

main() {
  runApp(Myapp());
}

class Myapp extends StatelessWidget {
  @override
  Widget build(BuildContext context) {
    return MaterialApp(
      home: Scaffold(
        appBar: AppBar(
          title: Text("基础组件"),
        ),
        body: YshContent(),
      ),
    );
  }
}

class YshContent extends StatelessWidget {
  @override
  Widget build(BuildContext context) {
    return Column(
      children: [
        Padding(
          padding: const EdgeInsets.all(8.0),
          child: TextField(
            decoration: InputDecoration(
                labelText: "请输入用户名",
                icon: Icon(Icons.people),
                hintText: "请输入用户名",
                prefixIcon: Icon(Icons.people_alt_rounded)),
          ),
        ),
        Padding(
          padding: const EdgeInsets.all(8.0),
          child: TextField(
            obscureText: true,
            decoration: InputDecoration(
              labelText: "请输入密码",
              prefixIcon: Icon(Icons.lock),
              hintText: "请输入密码",
            ),
          ),
        ),
      ],
    );
  }
}
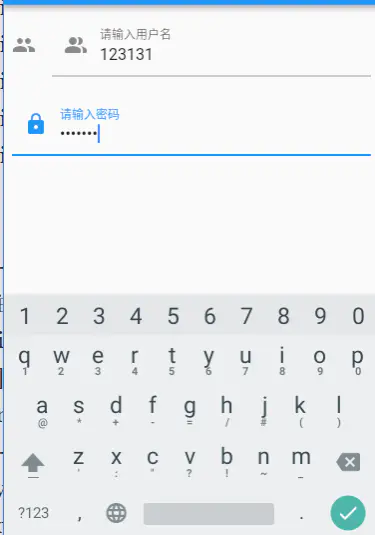
- 编辑框的控制器,通过它可以设置/获取编辑框的内容、选择编辑内容、监听编辑文本改变事件
- 大多数情况下我们都需要显式提供一个
controller来与文本框交互 - 如果没有提供
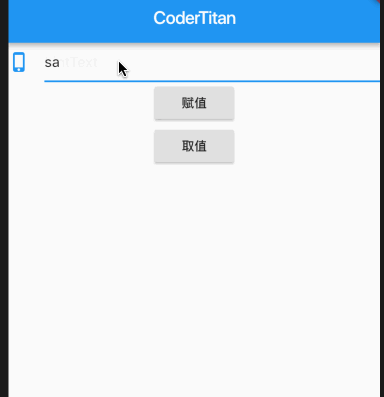
controller,则TextField内部会自动创建一个 - 下面是一个
TextField的取值和赋值的操作
class TextFieldWidget extends StatefulWidget {
  @override
  State<StatefulWidget> createState() {
    // TODO: implement createState
    return ControllerText();
  }
}

class ControllerText extends State<TextFieldWidget> {
  TextEditingController _textController = TextEditingController();

  @override
  Widget build(BuildContext context) {
    // TODO: implement build
    return Container(
      width: 414.0,
      height: 600.0,
      color: Colors.white12,
      child: Column(
        children: <Widget>[
          TextField(
            controller: _textController,
            decoration: InputDecoration(icon: Icon(Icons.phone_iphone), hintText: 'hintText'),
          ),
          RaisedButton(
            child: Text('赋值'),
            onPressed: (){
              setState(() {
                  _textController.text = "https://www.titanjun.top";
              });
            },
          ),
          RaisedButton(
            child: Text('取值'),
            onPressed: (){
              setState(() {});
            },
          ),
          Text(_textController.text)
        ],
      ),
    );
  }
}
4:textInputAction
textInputAction | 样式 |
|---|---|
none |
不支持iOS |
unspecified |
显示return |
done |
显示Done |
go |
显示Go |
search |
显示Search |
send |
显示Send |
next |
显示Next |
previous |
不支持iOS |
continueAction |
显示Continue |
join |
显示Join |
route |
显示Route |
emergencyCall |
显示Emergency Call |
5:textCapitalization
设置什么状态下使用大写字母键盘TextCapitalization枚举值
enum TextCapitalization {
  // 每个单词的第一个字母使用大写字母
  words,
  // 默认为每个句子的第一个字母使用大写键盘。
  sentences,
  // 每个字符默认使用大写键盘
  characters,
  /// 不使用大写字母键盘
  none,
}
6:textAlign
输入框内文本在水平方向的对齐方式
// 默认值
this.textAlign = TextAlign.start

// 所有枚举值
left: 左对齐
right: 右对齐
center: 居中
start: 起始位置, 和textDirection有关
end: 终点位置, 和textDirection有关
justify: 文本的拉伸行,以软换行符结束,以填充容器的宽度
7:textDirection
决定文本是从右向左对其还是从左向右对齐
enum TextDirection {
  rtl,
  ltr,
}
8:inputFormatters
- 用于限制输入的内容,接收一个
TextInputFormatter类型的集合 TextInputFormatter是一个抽象类, 官方给我们提供了他的三个子类,分别是WhitelistingTextInputFormatter: 白名单校验,也就是只允许输入符合规则的字符BlacklistingTextInputFormatter: 黑名单校验,除了规定的字符其他的都可以输入LengthLimitingTextInputFormatter: 长度限制,跟maxLength作用类似
- 构造函数如下
// 白名单校验
WhitelistingTextInputFormatter(this.whitelistedPattern)
// 黑名单校验
BlacklistingTextInputFormatter(
    this.blacklistedPattern, {
    // 当输入禁止输入的字符时候, 会被替换成设置的replacementString字符
    this.replacementString = '',
})
// 长度校验
LengthLimitingTextInputFormatter(this.maxLength)

// whitelistedPattern和blacklistedPattern都是Pattern类型的,
abstract class RegExp implements Pattern {
    external factory RegExp(String source,
      {bool multiLine: false, bool caseSensitive: true});
}
使用介绍
// 白名单
inputFormatters: [
    // 只能输入数字
    WhitelistingTextInputFormatter.digitsOnly,
    // 是能输入小写字母
    WhitelistingTextInputFormatter(RegExp("[a-z]"))
],

// 黑名单
inputFormatters: [
    // 不能输入回车符
    BlacklistingTextInputFormatter.singleLineFormatter,
    // 不能输入小写字母
    BlacklistingTextInputFormatter(RegExp("[a-z]"), replacementString: '-')
],

// 字符限制
[LengthLimitingTextInputFormatter(10)]

// 也可是三种或两种一起使用一起使用
inputFormatters: [
  // 不能输入小写字母
  BlacklistingTextInputFormatter(RegExp("[a-z]")),
  // 限制输入10个字符
  LengthLimitingTextInputFormatter(10)
],
9:光标设置
设置输入框光标的样式
// 光标的宽度
this.cursorWidth = 2.0,
// 光标的圆角
this.cursorRadius,
// 光标的颜色
this.cursorColor,

// 示例如下
cursorWidth: 10,
cursorColor: Colors.cyan,
cursorRadius: Radius.circular(5),
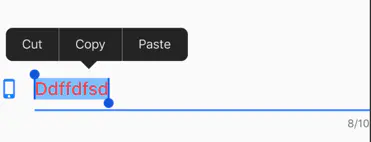
10:enableInteractiveSelection
长按输入的文本, 设置是否显示剪切,复制,粘贴按钮, 默认是显示的
// 默认值
this.enableInteractiveSelection = true,
11:事件监听
// 输入文本发生变化时的回调,参数即为输入框中的值
onChanged: (val) {
    print(val);
},

// 点击键盘的动作按钮时的回调,没有参数
onEditingComplete: (){
    print("点击了键盘上的动作按钮");
},

// 点击键盘的动作按钮时的回调,参数为当前输入框中的值
onSubmitted: (val){
    print("点击了键盘上的动作按钮,当前输入框的值为:${val}");
},

// 点击输入框时的回调(){}, 没有参数
onTap: (){
    print('点击输入框');
},
12:Form
- 实际业务中,在正式向服务器提交数据前,都会对各个输入框数据进行合法性校验,但是对每一个
TextField都分别进行校验将会是一件很麻烦的事 Flutter提供了一个表单Form,它可以对输入框进行分组,然后进行一些统一操作,如输入内容校验、输入框重置以及输入内容保存。Form继承自StatefulWidget对象,它对应的状态类为FormState
// Form类的定义
const Form({
    Key key,
    @required this.child,

    // 是否自动校验输入内容;当为true时,每一个子FormField内容发生变化时都会自动校验合法性,并直接显示错误信息。否则,需要通过调用FormState.validate()来手动校验
    this.autovalidate = false,

    // 决定Form所在的路由是否可以直接返回(如点击返回按钮),该回调返回一个Future对象,如果Future的最终结果是false,则当前路由不会返回;如果为true,则会返回到上一个路由。此属性通常用于拦截返回按钮
    this.onWillPop,

    // Form的任意一个子FormField内容发生变化时会触发此回调
    this.onChanged,
})
13:FormField
Form的子元素必须是FormField类型,FormField是一个抽象类,FormState内部通过定义的属性来完成操作,FormField部分定义如下
const FormField({
    Key key,
    @required this.builder,
    // 保存回调
    this.onSaved,
    // 验证回调
    this.validator,
    // 初始值
    this.initialValue,
    // 是否自动校验。
    this.autovalidate = false,
    this.enabled = true,
})
14:TextFormField
为了方便使用,Flutter提供了一个TextFormField,它继承自FormField类,也是TextField的一个包装类,所以除了FormField定义的属性之外,它还包括TextField的属性。
class TextFormField extends FormField<String> {

  TextFormField({
    Key key,
    this.controller,
    String initialValue,
    FocusNode focusNode,
    InputDecoration decoration = const InputDecoration(),
    TextInputType keyboardType,
    TextCapitalization textCapitalization = TextCapitalization.none,
    TextInputAction textInputAction,
    TextStyle style,
    TextDirection textDirection,
    TextAlign textAlign = TextAlign.start,
    bool autofocus = false,
    bool obscureText = false,
    bool autocorrect = true,
    bool autovalidate = false,
    bool maxLengthEnforced = true,
    int maxLines = 1,
    int maxLength,
    VoidCallback onEditingComplete,
    ValueChanged<String> onFieldSubmitted,
    FormFieldSetter<String> onSaved,
    FormFieldValidator<String> validator,
    List<TextInputFormatter> inputFormatters,
    bool enabled = true,
    Brightness keyboardAppearance,
    EdgeInsets scrollPadding = const EdgeInsets.all(20.0),
    bool enableInteractiveSelection = true,
  })
}
16:FormState
FormState为Form的State类,可以通过Form.of()或GlobalKey获得。- 我们可以通过它来对
Form的子元素FormField进行统一操作 - 我们看看其常用的三个方法:
  // 调用此方法后,会调用Form子元素FormField的save回调,用于保存表单内容
  void save() {
    for (FormFieldState<dynamic> field in _fields)
      field.save();
  }

  /// 调用此方法后,会将子元素FormField的内容清空。
  void reset() {
    for (FormFieldState<dynamic> field in _fields)
      field.reset();
    _fieldDidChange();
  }

  /// 调用此方法后,会调用Form子元素FormField的validate回调,如果有一个校验失败,则返回false,所有校验失败项都会返回用户返回的错误提示。
  bool validate() {
    _forceRebuild();
    return _validate();
  }
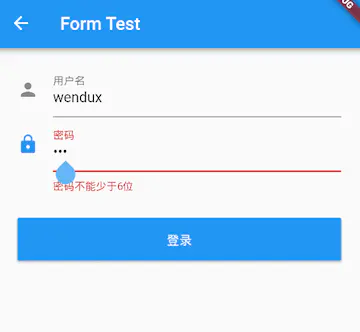
需求示例
用户登录示例, 在提交之前校验:
- 用户名不能为空,如果为空则提示“用户名不能为空”。
- 密码不能小于6位,如果小于6为则提示“密码不能少于6位”。
class TextStateWidget extends StatefulWidget {
  @override
  State<StatefulWidget> createState() {
    return TextWidget();
  }
}

class TextWidget extends State<TextStateWidget>  {
  TextEditingController _nameController = TextEditingController();
  TextEditingController _psdController = TextEditingController();
  GlobalKey _formKey = GlobalKey<FormState>();

  @override
  Widget build(BuildContext context) {
    return Padding(
      padding: EdgeInsets.symmetric(vertical: 20, horizontal: 30),
      child: Form(
        key: _formKey,
        autovalidate: true,
        child: Column(
          children: <Widget>[
            TextFormField(
              autofocus: true,
              controller: _nameController,
              decoration: InputDecoration(
                labelText: '用户名',
                hintText: '用户名或密码',
                icon: Icon(Icons.person)
              ),
              validator: (value) {// 校验用户名
                return value.trim().length > 0 ? null : '用户名不能为空';
              },
            ),
            TextFormField(
              controller: _psdController,
              obscureText: true,
              decoration: InputDecoration(
                labelText: '密码',
                hintText: '登录密码',
                icon: Icon(Icons.lock)
              ),
              validator: (psd) {
                return psd.trim().length > 5 ? null : '密码不能少于6位';
              },
            ),
            Padding(
              padding: EdgeInsets.only(top: 30),
              child: Row(
                children: <Widget>[
                  Expanded(
                    child: RaisedButton(
                      padding: EdgeInsets.all(15),
                      child: Text('登录'),
                      color: Theme.of(context).primaryColor,
                      textColor: Colors.white,
                      onPressed: () {
                        // 反正这里我是没看懂, 后面再慢慢学习吧
                        if((_formKey.currentState as FormState).validate()){
                          //验证通过提交数据
                        }
                      },
                    ),
                  )
                ],
              ),
            )
          ],
        ),
      ),
    );
  }
}
