003:对象原理下-isa指针(isa[联合体位域]->class、bits->shiftcls)
问题
1:_objc_initInstanceIsa的流程三部曲
2:isa为什么是8字节
3:isa流程图
目录
1:oc对象本质
2:探索objc_setProperty原理
3:结构体和联合体位域
4:源码查找isa指针
5:isa指针位域具体信息
6:isa关联地址和类的过程
7:关联的验证
8:isa走向图
预备
1:LLVM与clang
LLVM是构架编译器(compiler)的框架系统,以C++编写而成,用于优化以任意程序语言编写的程序的编译时间(compile-time)、链接时间(link-time)、运行时间(run-time)以及空闲时间(idle-time),对开发者保持开放,并兼容已有脚本。Clang是一个C++编写、基于LLVM、发布于LLVM BSD许可证下的C/C++/Objective-C/Objective-C++编译器。比起GCC,Clang编译速度快、占用内存小、非常方便进行二次开发。
下图是LLVM和Clang的关系图
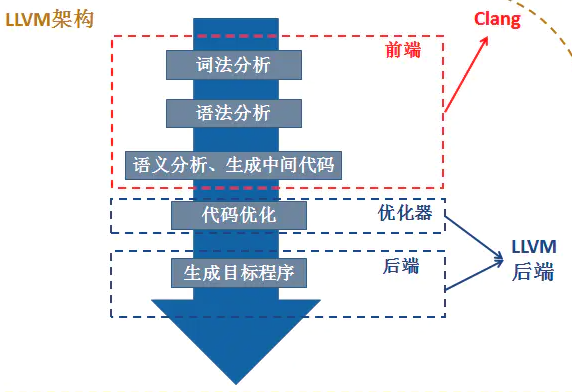
1. Clang相当于编译过程的前端,而LLVM相当于编译过程的后端。
2. Clang侧重于
语法语义分析和生成中间代码,而LLVM侧重于代码优化,生成目标程序。3.clang命令编译mian.c的指令:
clang -rewrite-objc main.m -o main.cpp2:利用
clang将main.m编译成 main.cpp,有以下几种编译命令,//1、将 main.m 编译成 main.cpp clang -rewrite-objc main.m -o main.cpp //2、将 ViewController.m 编译成 ViewController.cpp clang -rewrite-objc -fobjc-arc -fobjc-runtime=ios-13.0.0 -isysroot / /Applications/Xcode.app/Contents/Developer/Platforms/iPhoneSimulator.platform/Developer/SDKs/iPhoneSimulator13.7.sdk ViewController.m //以下两种方式是通过指定架构模式的命令行,使用xcode工具 xcrun //3、模拟器文件编译 - xcrun -sdk iphonesimulator clang -arch arm64 -rewrite-objc main.m -o main-arm64.cpp //4、真机文件编译 - xcrun -sdk iphoneos clang -arch arm64 -rewrite-objc main.m -o main- arm64.cpp
正文
1: OC对象的本质
1.1:首先我们定义一个对象
@interface FYPerson : NSObject
@property (nonatomic, copy) NSString *name;
@end

@implementation FYPerson
@end
2:通过终端利用clang将main.m编译成 main.cpp
3:打开编译好的main.cpp,找到FYPerson的定义,可以看到FYPerson在底层会被编译成 struct 结构体
声明的底层编译
//NSObject的定义
@interface NSObject <NSObject> {
    Class isa  OBJC_ISA_AVAILABILITY;
}

//NSObject 的底层编译
struct NSObject_IMPL {
    Class isa;
};
//FYPerson的底层编译
struct FYPerson_IMPL {
    struct NSObject_IMPL NSObject_IVARS; // 等效于 Class isa;
    NSString *_name;
};
实现的底层编译
struct FYPerson_IMPL {
    struct NSObject_IMPL NSObject_IVARS;
    NSString *_name;
};

// @property (nonatomic, copy) NSString *name;
/* @end */


// @implementation FYPerson

//这是get方法
static NSString * _I_FYPerson_name(FYPerson * self, SEL _cmd) { return (*(NSString **)((char *)self + OBJC_IVAR_$_FYPerson$_name)); }
extern "C" __declspec(dllimport) void objc_setProperty (id, SEL, long, id, bool, bool);

//这是set方法
static void _I_FYPerson_setName_(FYPerson * self, SEL _cmd, NSString *name) { objc_setProperty (self, _cmd, __OFFSETOFIVAR__(struct FYPerson, _name), (id)name, 0, 1); }
// @end
1.4:类的本质是结构体
struct FYPerson_IMPL {
    struct NSObject_IMPL NSObject_IVARS;
    NSString *_name;
};
通过上述分析我们的出结论:
OC对象的本质就是一个结构体
结构体在C++是可以继承的,在c可以伪继承,FYPerson_IMPL中的第一个属性其实就是isa,是继承自NSObject,属于伪继承,伪继承的方式是直接将NSObject结构体定义为FYPerson中的第一个属性,意味着FYPerson拥有 NSObject中的所有成员变量。
FYPerson中的第一个属性 NSObject_IVARS等效于 NSObject中的 isa
2:探索objc_setProperty原理
objc_setProperty 源码
void objc_setProperty(id self, SEL _cmd, ptrdiff_t offset, id newValue, BOOL atomic, signed char shouldCopy)
{
    bool copy = (shouldCopy && shouldCopy != MUTABLE_COPY);
    bool mutableCopy = (shouldCopy == MUTABLE_COPY);
    reallySetProperty(self, _cmd, newValue, offset, atomic, copy, mutableCopy);
}
再进入reallySetProperty中:

我们可以发现其方法的原理就是retain新值,release旧值,基于这段源码我们可以了解到:
-
objc_setProperty方法的目的适用于关联 上层的set方法 以及 底层的set方法,其本质就是一个接口。 -
这么设计的原因是,上层的set方法有很多,如果直接调用底层
set方法中,会产生很多的临时变量,当你想查找一个sel时,会非常麻烦 -
基于上述原因,苹果采用了适配器设计模式(即将底层接口适配为客户端需要的接口),对外提供一个接口,供上层的
set方法使用,对内调用底层的set方法,使其相互不受影响,即无论上层怎么变,下层都是不变的,或者下层的变化也无法影响上层,主要是达到上下层接口隔离的目的

3:结构体和联合体位域
联合体(union)
构造数据类型的方式有以下两种:
结构体(struct)联合体(union,也称为共用体)
1.结构体
结构体是指把不同的数据组合成一个整体,其变量是共存的,变量不管是否使用,都会分配内存。
- 优点:
存储容量较大,包容性强,且成员之间不会相互影响 - 缺点:struct内存空间的分配是粗放的,不管用不用,全分配。
2.联合体
联合体也是由不同的数据类型组成,但其变量是互斥的,所有的成员共占一段内存。而且共用体采用了内存覆盖技术,同一时刻只能保存一个成员的值,如果对新的成员赋值,就会将原来成员的值覆盖掉。
- 优点:内存使用更为精细灵活,也节省了内存空间。
- 缺点:不够“包容”。
4:源码查找isa指针
1:obj->initInstanceIsa(cls, hasCxxDtor);
inline void objc_object::initInstanceIsa(Class cls, bool hasCxxDtor)
{
    ASSERT(!cls->instancesRequireRawIsa());
    ASSERT(hasCxxDtor == cls->hasCxxDtor());

    initIsa(cls, true, hasCxxDtor);
}
2:initIsa(cls, true, hasCxxDtor);
inline void objc_object::initIsa(Class cls, bool nonpointer, bool hasCxxDtor)
{
    ASSERT(!isTaggedPointer());

    if (!nonpointer) {
        isa = isa_t((uintptr_t)cls);
    } else {
        ASSERT(!DisableNonpointerIsa);
        ASSERT(!cls->instancesRequireRawIsa());

        isa_t newisa(0);
#if SUPPORT_INDEXED_ISA
        ASSERT(cls->classArrayIndex() > 0);
        newisa.bits = ISA_INDEX_MAGIC_VALUE;
        // isa.magic is part of ISA_MAGIC_VALUE
        // isa.nonpointer is part of ISA_MAGIC_VALUE
        newisa.has_cxx_dtor = hasCxxDtor;
        newisa.indexcls = (uintptr_t)cls->classArrayIndex();
#else
        newisa.bits = ISA_MAGIC_VALUE;
        // isa.magic is part of ISA_MAGIC_VALUE
        // isa.nonpointer is part of ISA_MAGIC_VALUE
        newisa.has_cxx_dtor = hasCxxDtor;
        newisa.shiftcls = (uintptr_t)cls >> 3;
#endif
        // This write must be performed in a single store in some cases
        // (for example when realizing a class because other threads
        // may simultaneously try to use the class).
        // fixme use atomics here to guarantee single-store and to
        // guarantee memory order w.r.t. the class index table
        // ...but not too atomic because we don't want to hurt instantiation
        isa = newisa;
    }
}
3:可以看到不管!nonpointer条件是否满足,都会生成一个isa_t的类型
union isa_t {
    isa_t() { }
    isa_t(uintptr_t value) : bits(value) { }

    Class cls;
    uintptr_t bits;
#if defined(ISA_BITFIELD)
    struct {
        ISA_BITFIELD;  // defined in isa.h
    };
#endif
};
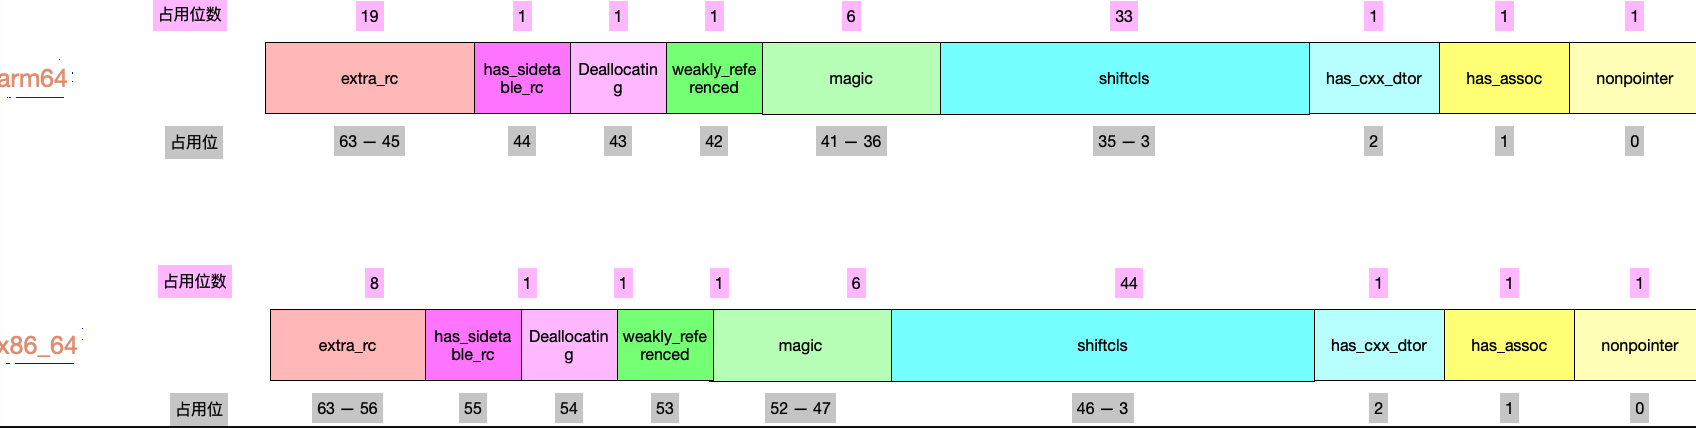
4: ISA_BITFIELD宏定义,我们看到定义的是位域, 在__arm64__和__x86_64__下里面定义的变量是相同的,只是所占的字节数略微有些不同。
# if __arm64__
#   define ISA_BITFIELD                                                      \
      uintptr_t nonpointer        : 1;                                       \
      uintptr_t has_assoc         : 1;                                       \
      uintptr_t has_cxx_dtor      : 1;                                       \
      uintptr_t shiftcls          : 33; /*MACH_VM_MAX_ADDRESS 0x1000000000*/ \
      uintptr_t magic             : 6;                                       \
      uintptr_t weakly_referenced : 1;                                       \
      uintptr_t deallocating      : 1;                                       \
      uintptr_t has_sidetable_rc  : 1;                                       \
      uintptr_t extra_rc          : 19
# elif __x86_64__
#   define ISA_BITFIELD                                                        \
      uintptr_t nonpointer        : 1;                                         \
      uintptr_t has_assoc         : 1;                                         \
      uintptr_t has_cxx_dtor      : 1;                                         \
      uintptr_t shiftcls          : 44; /*MACH_VM_MAX_ADDRESS 0x7fffffe00000*/ \
      uintptr_t magic             : 6;                                         \
      uintptr_t weakly_referenced : 1;                                         \
      uintptr_t deallocating      : 1;                                         \
      uintptr_t has_sidetable_rc  : 1;                                         \
      uintptr_t extra_rc          : 8
endif
5:所以其实isa_t的真正结构是联合体位域,__x86_64__下,我们可以看到位域里面所有变量所占的字节总数是64位,恰好是8字节
union isa_t {
    Class cls;
    uintptr_t bits;
    struct {
       uintptr_t nonpointer       : 1;
      uintptr_t has_assoc         : 1;
      uintptr_t has_cxx_dtor      : 1;
      uintptr_t shiftcls          : 44;
      uintptr_t magic             : 6;
      uintptr_t weakly_referenced : 1;
      uintptr_t deallocating      : 1;
      uintptr_t has_sidetable_rc  : 1;
      uintptr_t extra_rc          : 8;
    };
};
5:isa指针位域具体信息
-
nonpointer:表示是否对 isa 指针开启指针优化, 0:纯isa指针,1:不⽌是类对象地址,isa 中包含了类信息、对象的引⽤计数等 (自定义的类nonpointer为1) -
has_assoc:关联对象标志位,0没有,1存在 -
has_cxx_dtor:该对象是否有 C++ 或者 Objc 的析构器,如果有析构函数,则需要做析构逻辑, 如果没有,则可以更快的释放对象 -
shiftcls: 存储类指针的值。开启指针优化的情况下,在 arm64 架构中有 33 位⽤来存储类指针,x86架构用44位来存储 -
magic:⽤于调试器判断当前对象是真的对象还是没有初始化的空间 -
weakly_referenced:志对象是否被指向或者曾经指向⼀个 ARC 的弱变量,没有弱引⽤的对象可以更快释放。
-
deallocating:标志对象是否正在释放内存 -
has_sidetable_rc:当对象引⽤技术⼤于 10 时,则需要借⽤该变量存储进位 -
extra_rc:当表示该对象的引⽤计数值,实际上是引⽤计数值减 1,例如,如果对象的引⽤计数为 10,那么 extra_rc 为 9。如果引⽤计数⼤于 10,则需要使⽤到下⾯的 has_sidetable_rc。
总结:
1.isa_t是一个联合体,里面的成员变量共用一段内存,成员变量之间setter方法互斥(不能同时set),所以对cls赋值的时候就不能对bits赋值,对bits赋值的时候就不能对cls赋值。
2.shiftcls是用来存储类信息的。
6:isa关联地址和类的过程
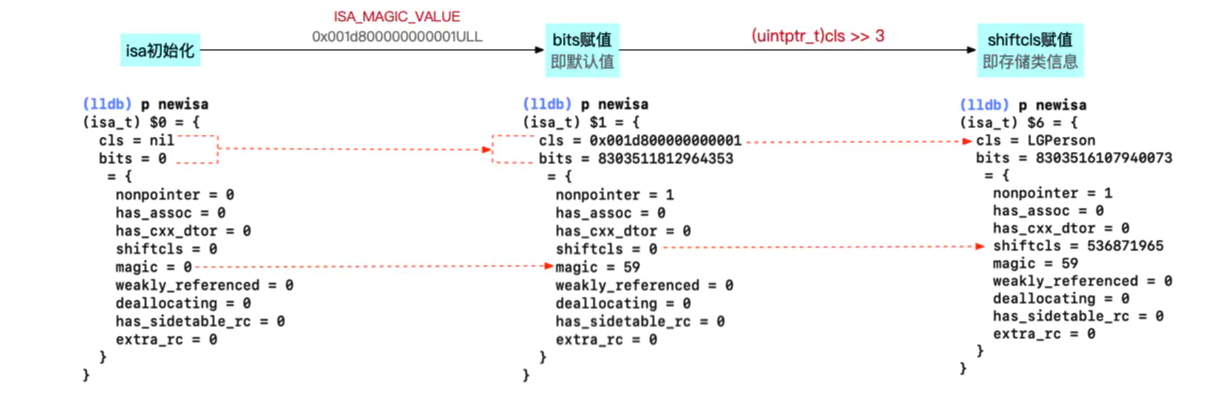
6.1: isa_t newisa(0); 初始化isa
6.2: newisa.bits = ISA_MAGIC_VALUE; 位域赋值
6.3: newisa.shiftcls = (uintptr_t)cls >> 3; class信息赋值
7:
cls与isa关联原理就是isa指针中的shiftcls位域中存储了类信息有以下几种验证方式:
【方式一】通过
initIsa方法中的代码【方式二】通过
isa指针地址与ISA_MSAK的值&来验证【方式三】通过runtime的方法
object_getClass验证【方式四】通过
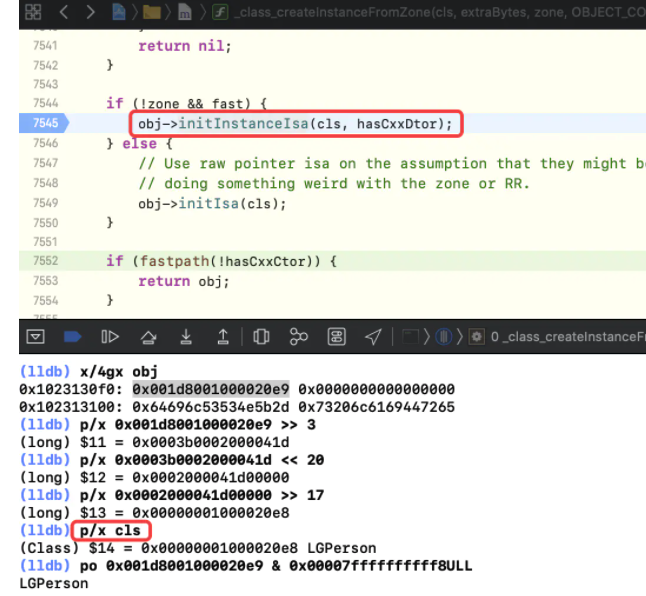
位运算验证7.1:通过
initIsa代码isa_t newisa(0); 初始化isa
newisa.bits = ISA_MAGIC_VALUE; 位域赋值
newisa.shiftcls = (uintptr_t)cls >> 3; class信息赋值
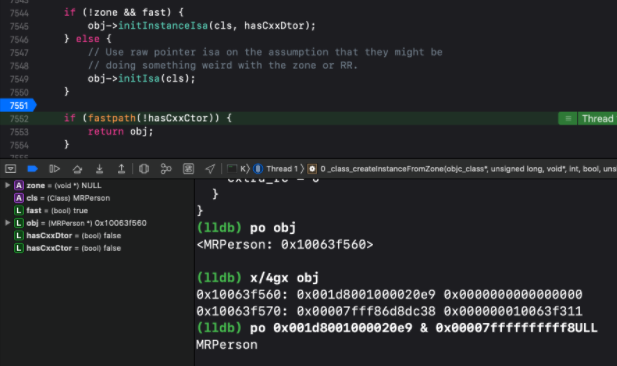
7.2:通过
isa指针地址与ISA_MSAK的值&
arm64中,ISA_MASK宏定义的值为0x0000000ffffffff8ULLx86_64中,ISA_MASK宏定义的值为0x00007ffffffffff8ULL
7.3:通过runtime的方法
object_getClass验证1:#import <objc/runtime.h>
BKPerson *objc = [BKPerson alloc];

NSLog(@"%@", object_getClass(objc));
2:
object_getClass源码Class object_getClass(id obj) { if (obj) return obj->getIsa(); else return Nil; }3:getIsa
inline Class
objc_object::getIsa()
{
    if (fastpath(!isTaggedPointer())) return ISA();

    extern objc_class OBJC_CLASS_$___NSUnrecognizedTaggedPointer;
    uintptr_t slot, ptr = (uintptr_t)this;
    Class cls;

    slot = (ptr >> _OBJC_TAG_SLOT_SHIFT) & _OBJC_TAG_SLOT_MASK;
    cls = objc_tag_classes[slot];
    if (slowpath(cls == (Class)&OBJC_CLASS_$___NSUnrecognizedTaggedPointer)) {
        slot = (ptr >> _OBJC_TAG_EXT_SLOT_SHIFT) & _OBJC_TAG_EXT_SLOT_MASK;
        cls = objc_tag_ext_classes[slot];
    }
    return cls;
}
4:再查找
ISA()inline Class objc_object::ISA() { ASSERT(!isTaggedPointer()); #if SUPPORT_INDEXED_ISA if (isa.nonpointer) { uintptr_t slot = isa.indexcls; return classForIndex((unsigned)slot); } return (Class)isa.bits; #else return (Class)(isa.bits & ISA_MASK); #endif }可以知道走的是这行代码
return (Class)(isa.bits & ISA_MASK);7.4:通过
位运算验证右移3位-->>左移20位-->>右移17位
![]()

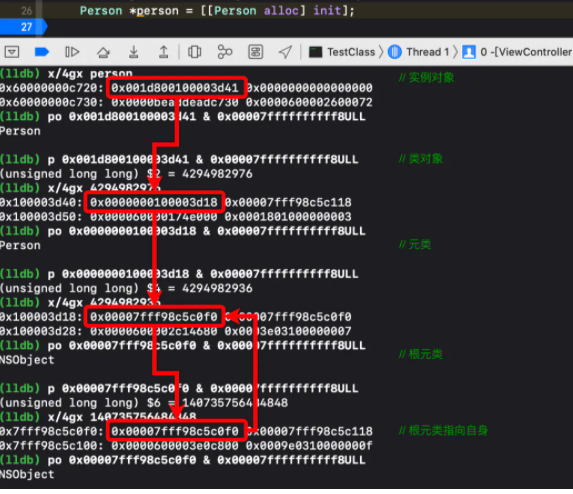
8:isa走向图
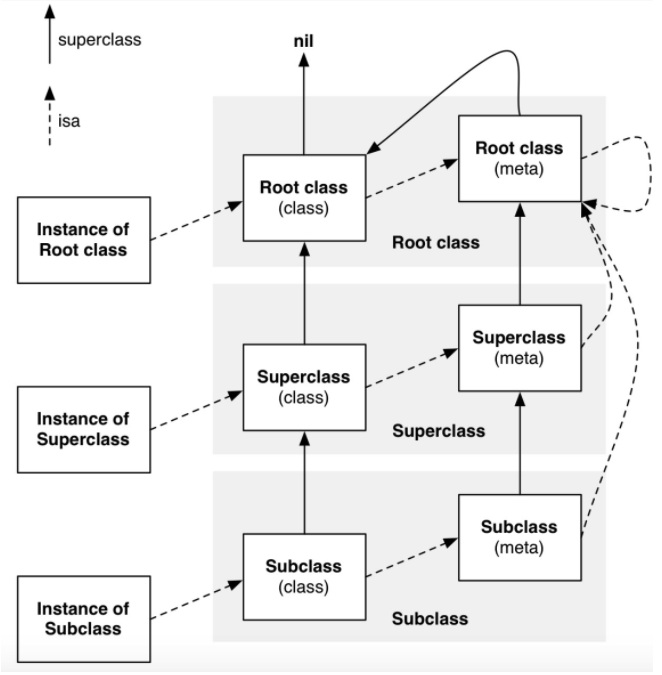
- 子类的isa走位链:
子类对象 --> 子类 --> 子元类 --> NSObject(根元类) --> NSObject(根元类,即自己) - 父类的isa走位链:
父类对象 --> 父类 --> 父元类 --> NSObject(根元类) --> NSObject(根元类,即自己) - 类的继承关系链:
子类 --> 父类 --> NSObject(根类)--> nil - 元类的继承关系链:
子元类 --> 父元类 --> 根元类 --> NSObject(根类)--> nil
注意


 浙公网安备 33010602011771号