应用Dubbo框架打造仿猫眼项目 理解微服务核心思想
1:传统应用带来的问题
单一业务开发的迭代问题
扩容困难
部署回滚困难
2:微服务概述
微服务是一种将业务系统进一步拆分的架构风格
微服务强调每一个业务都独立运行
每个单一服务都应该使用更轻量级的机制保持通信
服务不强调环境,可以不同语言或数据源
3:微服务种类
Dubbo
Spring Cloud
Zero ICE
4:微服务基本概念
Provider:服务提供者,提供服务实现
Consumer:服务调用者,调用Provider提供的服务实现
同一个服务可以既是Provider,又是Consumer
5:spring boot 集成dubbo需要引入依赖
<dependency>
    <groupId>com.alibaba.spring.boot</groupId>
    <artifactId>dubbo-spring-boot-starter</artifactId>
    <version>2.0.0</version>
</dependency>
<dependency>
    <groupId>com.101tec</groupId>
    <artifactId>zkclient</artifactId>
    <version>0.10</version>
</dependency>
6:相关具体代码

provider端
@Component
@Service(interfaceClass = FilmServiceApi.class)
public class DefaultFilmServiceImpl implements FilmServiceApi {
}
consumer端
@Reference(interfaceClass = FilmServiceApi.class,check = false)
private FilmServiceApi filmServiceApi;

7:api网关作用
服务聚合 熔断降级 身份验证
8:启动添加注解
@SpringBootApplication(scanBasePackages = {"com.stylefeng.guns"})
@EnableDubboConfiguration
public class CinemaApplication {

    public static void main(String[] args) {

        SpringApplication.run(CinemaApplication.class, args);
    }
}

9:提取公共api接口
在api项目中新建一个接口以及一个vo对象
public interface FilmServiceApi {

    // 获取banners
    List<BannerVO> getBanners();
}
在gateway和Film项目中分别引用api项目
<dependency>
    <groupId>com.stylefeng</groupId>
    <artifactId>guns-api</artifactId>
</dependency>

在film项目中即provider中
@Component
@Service(interfaceClass = FilmServiceApi.class)
public class DefaultFilmServiceImpl implements FilmServiceApi {

    @Autowired
    private MoocBannerTMapper moocBannerTMapper;

    @Autowired
    private MoocFilmTMapper moocFilmTMapper;


    @Override
    public List<BannerVO> getBanners() {
        List<BannerVO> result = new ArrayList<>();
        List<MoocBannerT> moocBanners = moocBannerTMapper.selectList(null);
EntityWrapper<MoocFilmT> entityWrapper = new EntityWrapper<>();
entityWrapper.eq("film_status","1");
entityWrapper.eq("film_source",sourceId);
String catStr = "%#"+catId+"#%";
entityWrapper.like("film_cats",catStr);
Page<MoocFilmT> page = new Page<>(1,nums);
//排序page = new Page<>(nowPage,nums,"film_box_office");page = new Page<>(nowPage,nums,"film_box_office");
List<MoocFilmT> moocFilms = moocFilmTMapper.selectPage(page, entityWrapper);
int totalCounts = moocFilmTMapper.selectCount(entityWrapper);
          }

}
在gateway项目中即consumer中使用即可 同时也可以新建返回到前端对象的vo
@RestController
@RequestMapping("/film/")
public class FilmController {

    private static final String img_pre = "http://img.meetingshop.cn/";

    @Reference(interfaceClass = FilmServiceApi.class,check = false)
    private FilmServiceApi filmServiceApi;
}
}
10:绑定用户信息到threadlocal中
public class CurrentUser {

    // 线程绑定的存储空间
    private static final InheritableThreadLocal<String> threadLocal = new InheritableThreadLocal<>();
    public static void saveUserId(String userId){
        threadLocal.set(userId);
    }
    public static String getCurrentUser(){
        return threadLocal.get();
    }
     // 将用户信息放入存储空间
//    public static void saveUserInfo(UserInfoModel userInfoModel){
//        threadLocal.set(userInfoModel);
//    }
//
//    // 将用户信息取出
//    public static UserInfoModel getCurrentUser(){
//        return threadLocal.get();
//    }

}
11:mybatis-plus 使用
public boolean checkUsername(String username) {
    EntityWrapper<MoocUserT> entityWrapper = new EntityWrapper<>();
    entityWrapper.eq("user_name",username);
    Integer result = moocUserTMapper.selectCount(entityWrapper);
    if(result!=null && result>0){
        return false;
    }else{
        return true;
    }
}
12:负载均衡
在集群负载均衡时,Dubbo 提供了多种均衡策略,缺省为 random 随机调用。
可以自行扩展负载均衡策略,参见:负载均衡扩展
负载均衡策略
Random LoadBalance
- 随机,按权重设置随机概率。
- 在一个截面上碰撞的概率高,但调用量越大分布越均匀,而且按概率使用权重后也比较均匀,有利于动态调整提供者权重。
RoundRobin LoadBalance
- 轮询,按公约后的权重设置轮询比率。
- 存在慢的提供者累积请求的问题,比如:第二台机器很慢,但没挂,当请求调到第二台时就卡在那,久而久之,所有请求都卡在调到第二台上。
LeastActive LoadBalance
- 最少活跃调用数,相同活跃数的随机,活跃数指调用前后计数差。
- 使慢的提供者收到更少请求,因为越慢的提供者的调用前后计数差会越大。
ConsistentHash LoadBalance
- 一致性 Hash,相同参数的请求总是发到同一提供者。
- 当某一台提供者挂时,原本发往该提供者的请求,基于虚拟节点,平摊到其它提供者,不会引起剧烈变动。
- 算法参见:http://en.wikipedia.org/wiki/Consistent_hashing
- 缺省只对第一个参数 Hash,如果要修改,请配置
<dubbo:parameter key="hash.arguments" value="0,1" /> - 缺省用 160 份虚拟节点,如果要修改,请配置
<dubbo:parameter key="hash.nodes" value="320" />
配置
服务端服务级别
<dubbo:service interface="..." loadbalance="roundrobin" />
客户端服务级别
<dubbo:reference interface="..." loadbalance="roundrobin" />
服务端方法级别
<dubbo:service interface="...">
    <dubbo:method name="..." loadbalance="roundrobin"/>
</dubbo:service>
客户端方法级别
<dubbo:reference interface="...">
    <dubbo:method name="..." loadbalance="roundrobin"/>
</dubbo:reference>
@Component
@Service(interfaceClass = UserAPI.class,loadbalance = "roundrobin" )
public class UserServiceImpl implements UserAPI{
}
13:1、dubbo 协议 (默认)
2、rmi 协议
3、hessian 协议
4、http 协议
5、webservice 协议
6、thrift 协议
7、memcached 协议
8、redis 协议
1、dubbo 协议 (默认)
缺省协议,使用基于mina1.1.7+hessian3.2.1的tbremoting交互。
连接个数:单连接
连接方式:长连接
传输协议:TCP
传输方式:NIO异步传输
序列化:Hessian 二进制序列化
适用范围:传入传出参数数据包较小(建议小于100K),消费者比提供者个数多,单一消费者无法压满提供者,尽量不要用dubbo协议传输大文件或超大字符串。
适用场景:常规远程服务方法调用
1、dubbo默认采用dubbo协议,dubbo协议采用单一长连接和NIO异步通讯,适合于小数据量大并发的服务调用,以及服务消费者机器数远大于服务提供者机器数的情况
2、他不适合传送大数据量的服务,比如传文件,传视频等,除非请求量很低。
2、rmi 协议
Java标准的远程调用协议。
连接个数:多连接
连接方式:短连接
传输协议:TCP
传输方式:同步传输
序列化:Java标准二进制序列化
适用范围:传入传出参数数据包大小混合,消费者与提供者个数差不多,可传文件。
适用场景:常规远程服务方法调用,与原生RMI服务互操作
3、hessian 协议
基于Hessian的远程调用协议。
连接个数:多连接
连接方式:短连接
传输协议:HTTP
传输方式:同步传输
序列化:表单序列化
适用范围:传入传出参数数据包大小混合,提供者比消费者个数多,可用浏览器查看,可用表单或URL传入参数,暂不支持传文件。
适用场景:需同时给应用程序和浏览器JS使用的服务。
1、Hessian协议用于集成Hessian的服务,Hessian底层采用Http通讯,采用Servlet暴露服务,Dubbo缺省内嵌Jetty作为服务器实现。
2、Hessian是Caucho开源的一个RPC框架:http://hessian.caucho.com,其通讯效率高于WebService和Java自带的序列化
14:从v2.7.0开始,Dubbo的所有异步编程接口开始以CompletableFuture为基础
基于 NIO 的非阻塞实现并行调用,客户端不需要启动多线程即可完成并行调用多个远程服务,相对多线程开销较小。

在 consumer.xml 中配置:
<dubbo:reference id="asyncService" interface="org.apache.dubbo.samples.governance.api.AsyncService">
      <dubbo:method name="sayHello" async="true" />
</dubbo:reference>
调用代码:
// 此调用会立即返回null
asyncService.sayHello("world");
// 拿到调用的Future引用,当结果返回后,会被通知和设置到此Future
CompletableFuture<String> helloFuture = RpcContext.getContext().getCompletableFuture();
// 为Future添加回调
helloFuture.whenComplete((retValue, exception) -> {
    if (exception == null) {
        System.out.println(retValue);
    } else {
        exception.printStackTrace();
    }
});
15:spring boot中使用dubbo 中的consumer异步调用
@Reference(interfaceClass = FilmAsyncServiceApi.class,async = true,check = false)
private FilmAsyncServiceApi filmAsyncServiceApi;
    @RequestMapping(value = "films/{searchParam}",method = RequestMethod.GET)
    public ResponseVO films(@PathVariable("searchParam")String searchParam,
                             int searchType) throws ExecutionException, InterruptedException {

        // 根据searchType,判断查询类型
        FilmDetailVO filmDetail = filmServiceApi.getFilmDetail(searchType, searchParam);

        if(filmDetail==null){
            return ResponseVO.serviceFail("没有可查询的影片");
        }else if(filmDetail.getFilmId()==null || filmDetail.getFilmId().trim().length()==0){
            return ResponseVO.serviceFail("没有可查询的影片");
        }

        String filmId = filmDetail.getFilmId();
        // 查询影片的详细信息 -> Dubbo的异步调用
        // 获取影片描述信息
//        FilmDescVO filmDescVO = filmAsyncServiceApi.getFilmDesc(filmId);
        filmAsyncServiceApi.getFilmDesc(filmId);
        Future<FilmDescVO> filmDescVOFuture = RpcContext.getContext().getFuture();
        // 获取图片信息
        filmAsyncServiceApi.getImgs(filmId);
        Future<ImgVO> imgVOFuture = RpcContext.getContext().getFuture();
        // 获取导演信息
        filmAsyncServiceApi.getDectInfo(filmId);
        Future<ActorVO> actorVOFuture = RpcContext.getContext().getFuture();
        // 获取演员信息
        filmAsyncServiceApi.getActors(filmId);
        Future<List<ActorVO>> actorsVOFutrue = RpcContext.getContext().getFuture();

        // 组织info对象
        InfoRequstVO infoRequstVO = new InfoRequstVO();

        // 组织Actor属性
        ActorRequestVO actorRequestVO = new ActorRequestVO();
        actorRequestVO.setActors(actorsVOFutrue.get());
        actorRequestVO.setDirector(actorVOFuture.get());

        // 组织info对象
        infoRequstVO.setActors(actorRequestVO);
        infoRequstVO.setBiography(filmDescVOFuture.get().getBiography());
        infoRequstVO.setFilmId(filmId);
        infoRequstVO.setImgVO(imgVOFuture.get());

        // 组织成返回值
        filmDetail.setInfo04(infoRequstVO);

        return ResponseVO.success("http://img.meetingshop.cn/",filmDetail);
    }
在Application 中添加注解@EnableAsync启用异步调用
16:一对多查询
public class FilmInfoVO implements Serializable {

  private String filmId;
  private String filmName;
  private String filmLength;
  private String filmType;
  private String filmCats;
  private String actors;
  private String imgAddress;
  private List<FilmFieldVO> filmFields;

}

List<FilmInfoVO> getFilmInfos(@Param("cinemaId") int cinemaId);

<!-- 一对多的查询 -->
<resultMap id="getFilmInfoMap" type="com.stylefeng.guns.api.cinema.vo.FilmInfoVO">
  <result column="film_id" property="filmId"></result>
  <result column="film_name" property="filmName"></result>
  <result column="film_length" property="filmLength"></result>
  <result column="film_language" property="filmType"></result>
  <result column="film_cats" property="filmCats"></result>
  <result column="actors" property="actors"></result>
  <result column="img_address" property="imgAddress"></result>
  <collection property="filmFields" ofType="com.stylefeng.guns.api.cinema.vo.FilmFieldVO">
  <result column="UUID" property="fieldId"></result>
  <result column="begin_time" property="beginTime"></result>
  <result column="end_time" property="endTime"></result>
  <result column="film_language" property="language"></result>
  <result column="hall_name" property="hallName"></result>
  <result column="price" property="price"></result>
  </collection>
  </resultMap>

  <select id="getFilmInfos" parameterType="java.lang.Integer" resultMap="getFilmInfoMap">
  SELECT
info.film_id,
  info.`film_name`,
  info.`film_length`,
  info.`film_language`,
  info.`film_cats`,
  info.`actors`,
  info.`img_address`,
  f.`UUID`,
  f.`begin_time`,
  f.`end_time`,
  f.`hall_name`,
  f.`price`
FROM
mooc_hall_film_info_t info
LEFT JOIN
mooc_field_t f
ON f.`film_id` = info.`film_id`
AND f.`cinema_id` = ${cinemaId}
</select>

17:缓存类型
lru基于最近最少使用原则删除多余缓存,保持最热的数据被缓存。threadlocal当前线程缓存,比如一个页面渲染,用到很多 portal,每个 portal 都要去查用户信息,通过线程缓存,可以减少这种多余访问。jcache与 JSR107 集成,可以桥接各种缓存实现。-
配置
<dubbo:reference interface="com.foo.BarService" cache="lru" />或:
<dubbo:reference interface="com.foo.BarService">
    <dubbo:method name="findBar" cache="lru" />
</dubbo:reference>
18:连接控制
服务端连接控制
限制服务器端接受的连接不能超过10 个 :
<dubbo:provider protocol="dubbo" accepts="10" />
或
<dubbo:protocol name="dubbo" accepts="10" />

 客户端连接控制
 限制客户端服务使用连接不能超过 10 个 [2]:
<dubbo:reference interface="com.foo.BarService" connections="10" />
或
<dubbo:service interface="com.foo.BarService" connections="10" />
如果 <dubbo:service> 和 <dubbo:reference> 都配了 connections,<dubbo:reference>
优先,参见:配置的覆盖策略
19并发控制
  配置样例
  样例 1
      限制 com.foo.BarService 的每个方法,服务器端并发执行(或占用线程池线程数)不能超过 10 个:
      <dubbo:service interface="com.foo.BarService" executes="10" />
  样例 2
      限制 com.foo.BarService 的 sayHello 方法,服务器端并发执行(或占用线程池线程数)不能超过 10 个:
      <dubbo:service interface="com.foo.BarService">
      <dubbo:method name="sayHello" executes="10" />
      </dubbo:service>
  样例 3
      限制 com.foo.BarService 的每个方法,每客户端并发执行(或占用连接的请求数)不能超过 10 个:
      <dubbo:service interface="com.foo.BarService" actives="10" />
      或
      <dubbo:reference interface="com.foo.BarService" actives="10" />
  样例 4
      限制 com.foo.BarService 的 sayHello 方法,每客户端并发执行(或占用连接的请求数)不能超过 10 个:
      <dubbo:service interface="com.foo.BarService">
        <dubbo:method name="sayHello" actives="10" />
        </dubbo:service>
      或
      <dubbo:reference interface="com.foo.BarService">
        <dubbo:method name="sayHello" actives="10" />
        </dubbo:service>
      如果 <dubbo:service> 和 <dubbo:reference> 都配了actives,<dubbo:reference> 优先,参见:配置的覆盖策略。
20:ftp 获取json文件封装
引入
<dependency>
    <groupId>commons-net</groupId>
    <artifactId>commons-net</artifactId>
    <version>3.6</version>
</dependency>
在配置文件中配置
ftp:
  host-name: 192.168.1.5
  port: 2100
  user-name: ftp
  password: ftp
@Slf4j
@Data
@Configuration
@ConfigurationProperties(prefix = "ftp")
public class FTPUtil {

    // 地址 端口 用户名 密码
    private String hostName;
    private Integer port;
    private String userName;
    private String password;

    private FTPClient ftpClient = null;

    private void initFTPClient(){
        try{
            ftpClient = new FTPClient();
            ftpClient.setControlEncoding("utf-8");
            ftpClient.connect(hostName,port);
            ftpClient.login(userName,password);
        }catch (Exception e){
            log.error("初始化FTP失败",e);
        }
    }

    // 输入一个路径,然后将路径里的文件转换成字符串返回给我
    public String getFileStrByAddress(String fileAddress){
        BufferedReader bufferedReader = null;
        try{
            initFTPClient();
            bufferedReader = new BufferedReader(
                    new InputStreamReader(
                            ftpClient.retrieveFileStream(fileAddress))
            );

            StringBuffer stringBuffer = new StringBuffer();
            while(true){
                String lineStr = bufferedReader.readLine();
                if(lineStr == null){
                    break;
                }
                stringBuffer.append(lineStr);
            }

            ftpClient.logout();
            return stringBuffer.toString();
        }catch (Exception e){
            log.error("获取文件信息失败",e);
        }finally {
            try {
                bufferedReader.close();
            } catch (IOException e) {
                e.printStackTrace();
            }
        }
        return null;
    }
使用
@Autowired
private FTPUtil ftpUtil;

// 读取位置图,判断seats是否为真
String fileStrByAddress = ftpUtil.getFileStrByAddress(seatPath);

// 将fileStrByAddress转换为JSON对象
JSONObject jsonObject = JSONObject.parseObject(fileStrByAddress);
// seats=1,2,3   ids="1,3,4,5,6,7,88"
String ids = jsonObject.get("ids").toString();

21:总所周知,java在浮点型运算时是非精确计算,如下demo
-
System.out.println(0.05 + 0.01);// 0.060000000000000005
-
System.out.println(1.0 - 0.42);// 0.5800000000000001
-
System.out.println(4.015 * 100);// 401.49999999999994
-
System.out.println(123.3 / 100);// 1.2329999999999999
在商业运算中,这点微小的误差有可能造成非常严重的后果。
所以在商业应用开发中,涉及金额等浮点数计算的数据,全部使用BigDecimal进行加减乘除计算
private static double getTotalPrice(int solds,double filmPrice){
    BigDecimal soldsDeci = new BigDecimal(solds);
    BigDecimal filmPriceDeci = new BigDecimal(filmPrice);

    BigDecimal result = soldsDeci.multiply(filmPriceDeci);

    // 四舍五入,取小数点后两位
    BigDecimal bigDecimal = result.setScale(2, RoundingMode.HALF_UP);

    return bigDecimal.doubleValue();
}
22:分组聚合
按组合并返回结果 [1],比如菜单服务,接口一样,但有多种实现,用group区分,现在消费方需从每种group中调用一次返回结果,合并结果返回,这样就可以实现聚合菜单项。

配置
搜索所有分组
<dubbo:reference interface="com.xxx.MenuService" group="*" merger="true" />
  合并指定分组
  <dubbo:reference interface="com.xxx.MenuService" group="aaa,bbb" merger="true" />
  指定方法合并结果,其它未指定的方法,将只调用一个 Group
<dubbo:reference interface="com.xxx.MenuService" group="*">
  <dubbo:method name="getMenuItems" merger="true" />
  </dubbo:reference>
某个方法不合并结果,其它都合并结果
<dubbo:reference interface="com.xxx.MenuService" group="*" merger="true">
  <dubbo:method name="getMenuItems" merger="false" />
  </dubbo:reference>
在springboot中没法使用merge的配置 需要自己手动合并结果
@Reference(
  interfaceClass = OrderServiceAPI.class,
  check = false,
  group = "order2018")
private OrderServiceAPI orderServiceAPI;

@Reference(
  interfaceClass = OrderServiceAPI.class,
  check = false,
  group = "order2017")
private OrderServiceAPI orderServiceAPI2017;
Page<OrderVO> result = orderServiceAPI.getOrderByUserId(Integer.parseInt(userId), page);
Page<OrderVO> result2017 = orderServiceAPI2017.getOrderByUserId(Integer.parseInt(userId), page);
// 合并结果
int totalPages = (int)(result.getPages() + result2017.getPages());
// 2017和2018的订单总数合并
List<OrderVO> orderVOList = new ArrayList<>();
orderVOList.addAll(result.getRecords());
orderVOList.addAll(result2017.getRecords());
23:多版本
当一个接口实现,出现不兼容升级时,可以用版本号过渡,版本号不同的服务相互间不引用。
老版本服务提供者配置:
<dubbo:service interface="com.foo.BarService" version="1.0.0" />
  新版本服务提供者配置:
<dubbo:service interface="com.foo.BarService" version="2.0.0" />
  老版本服务消费者配置:
<dubbo:reference id="barService" interface="com.foo.BarService" version="1.0.0" />
  新版本服务消费者配置:
<dubbo:reference id="barService" interface="com.foo.BarService" version="2.0.0" />
  如果不需要区分版本,可以按照以下的方式配置 [1]:
<dubbo:reference id="barService" interface="com.foo.BarService" version="*" />

24:用的限流算法有两种:漏桶算法和令牌桶算法。
1、漏桶算法
漏桶算法思路很简单,水(请求)先进入到漏桶里,漏桶以一定的速度出水,当水流入速度过大会直接溢出,可以看出漏桶算法能强行限制数据的传输速率。因此,漏桶算法对于存在突发特性的流量来说缺乏效率.

2:令牌桶算法
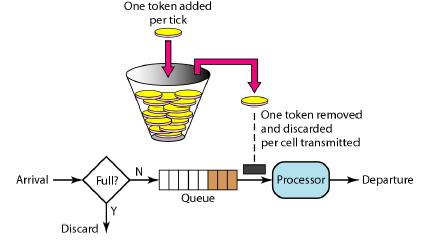
令牌桶算法(Token Bucket)和 Leaky Bucket 效果一样但方向相反的算法,更加容易理解.随着时间流逝,系统会按恒定1/QPS时间间隔(如果QPS=100,则间隔是10ms)往桶里加入Token(想象和漏洞漏水相反,有个水龙头在不断的加水),如果桶已经满了就不再加了.新请求来临时,会各自拿走一个Token,如果没有Token可拿了就阻塞或者拒绝服务.
令牌桶的另外一个好处是可以方便的改变速度. 一旦需要提高速率,则按需提高放入桶中的令牌的速率. 一般会定时(比如100毫秒)往桶中增加一定数量的令牌, 有些变种算法则实时的计算应该增加的令牌的数量.
25:具体实现
// 因为令牌桶对业务有一定的容忍度
public class TokenBucket {

    private int bucketNums=100;  // 桶的容量
    private int rate=1;          // 流入速度
    private int nowTokens;      //  当前令牌数量
    private long timestamp=getNowTime();     //  时间

    private long getNowTime(){
        return System.currentTimeMillis();
    }

    private int min(int tokens){
        if(bucketNums > tokens){
            return tokens;
        }else{
            return bucketNums;
        }
    }

    public boolean getToken(){
        // 记录来拿令牌的时间
        long nowTime = getNowTime();
        // 添加令牌【判断该有多少个令牌】
        nowTokens = nowTokens + (int)((nowTime - timestamp)*rate);
        // 添加以后的令牌数量与桶的容量那个小
        nowTokens = min(nowTokens);
        System.out.println("当前令牌数量"+nowTokens);
        // 修改拿令牌的时间
        timestamp = nowTime;
        // 判断令牌是否足够
        if(nowTokens < 1){
           return false;
        }else{
            nowTokens -= 1;
            return true;
        }
    }
}
private static TokenBucket tokenBucket = new TokenBucket();
if(tokenBucket.getToken()) {
//获取令牌
}
else
{
  //没获取令牌
}
Google开源工具包Guava提供了限流工具类RateLimiter,该类基于令牌桶算法来完成限流,非常易于使用。

26:spring boot 整合hystrix
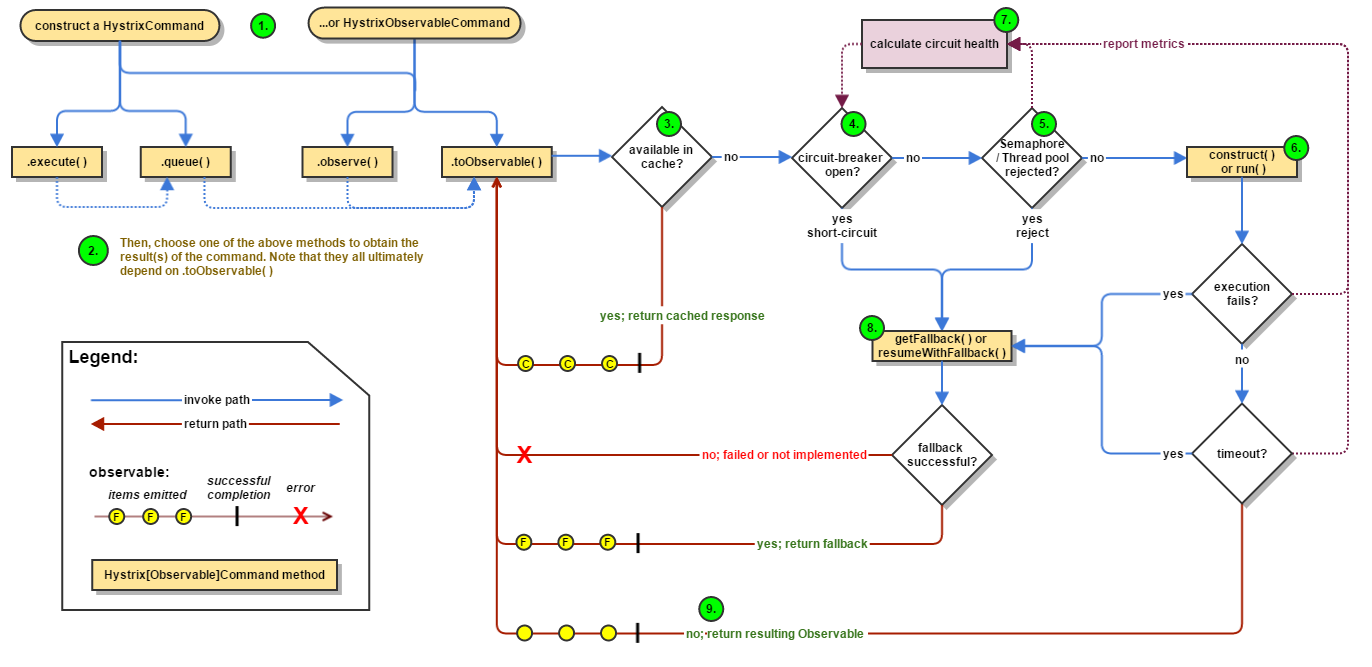
添加依赖包
<dependency>
<groupId>org.springframework.cloud</groupId>
<artifactId>spring-cloud-starter-netflix-hystrix</artifactId>
<version>2.0.0.RELEASE</version>
</dependency>
<dependency>
<groupId>org.springframework.boot</groupId>
<artifactId>spring-boot-starter-actuator</artifactId>
</dependency>
<dependency>
<groupId>org.springframework.cloud</groupId>
<artifactId>spring-cloud-starter-netflix-hystrix-dashboard</artifactId>
<version>2.0.0.RELEASE</version>
</dependency>


添加开启注解
@EnableHystrixDashboard
@EnableCircuitBreaker
@EnableHystrix

配置示例
@HystrixCommand(fallbackMethod = "error", commandProperties = {
  @HystrixProperty(name="execution.isolation.strategy", value = "THREAD"),
    @HystrixProperty(name = "execution.isolation.thread.timeoutInMilliseconds", value
      = "4000"),
  @HystrixProperty(name = "circuitBreaker.requestVolumeThreshold", value = "10"),
    @HystrixProperty(name = "circuitBreaker.errorThresholdPercentage", value = ”50")
}, threadPoolProperties = {
  @HystrixProperty(name = "coreSize", value = "1"),
    @HystrixProperty(name = "maxQueueSize", value = "10"),
  @HystrixProperty(name = "keepAliveTimeMinutes", value = "1000"),
    @HystrixProperty(name = "queueSizeRejectionThreshold", value = "8"),
  @HystrixProperty(name = "metrics.rollingStats.numBuckets", value = "12"),
    @HystrixProperty(name = "metrics.rollingStats.timeInMilliseconds", value = "1500")
})
public ResponseVO error(Integer fieldId,String soldSeats,String seatsName){
    return ResponseVO.serviceFail("抱歉,下单的人太多了,请稍后重试");
}
27:InheritableThreadLocal
InheritableThreadLocal用于子线程能够拿到父线程往ThreadLocal里设置的值。使用代码如下:
public class Test {

    public static ThreadLocal<Integer> threadLocal = new InheritableThreadLocal<Integer>();

    public static void main(String args[]) {
        threadLocal.set(new Integer(456));
        Thread thread = new MyThread();
        thread.start();
        System.out.println("main = " + threadLocal.get());
    }

    static class MyThread extends Thread {
        @Override
        public void run() {
            System.out.println("MyThread = " + threadLocal.get());
        }
    }
}
输出结果如下图:

如果把上面的InheritableThreadLocal换成ThreadLocal的话,在子线程里的输出将为是空。
- InheritableThreadLocal之所以能够完成线程间变量的传递,是在new Thread()的时候对inheritableThreadLocals对像里的值进行了复制。
- 子线程通过继承得到的InheritableThreadLocal里的值与父线程里的
dubbo的本地存根的原理是:远程服务后,客户端通常只剩下接口,而实现全在服务器端,但提供方有些时候想在客户端也执行部分逻辑,那么就在服务消费者这一端提供了一个Stub类,然后当消费者调用provider方提供的dubbo服务时,客户端生成 Proxy 实例,这个Proxy实例就是我们正常调用dubbo远程服务要生成的代理实例,然后消费者这方会把 Proxy 通过构造函数传给 消费者方的Stub ,然后把 Stub 暴露给用户,Stub 可以决定要不要去调 Proxy。会通过代理类去完成这个调用,这样在Stub类中,就可以做一些额外的事,来对服务的调用过程进行优化或者容错的处理。附图:
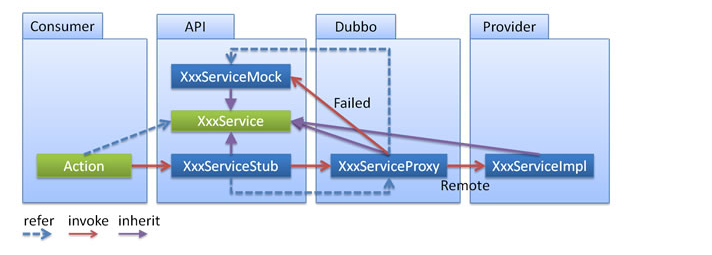
实现步骤:
1. 定义一个服务接口和服务实现类
public interface UserInterface {


       public User getUserById(Integer id) ;

}
public class UserService implements UserInterface {

    public User getUserById(Integer id) {
        User user  = new User() ;
        user.setId(id);
        user.setName("hu");
        return user;
    }

}
2. 服务分布配置
<dubbo:service  interface="org.huxin.dubbo.test.user.service.UserInterface" ref="userService" protocol="dubbo"    retries="0"/>


    <bean id="userService" class="org.huxin.dubbo.test.user.service.impl.UserService" />
3.服务消费者的Stub类
public class UserServiceStub implements UserInterface {

    //必须定义这个接口,以便接收dubbo在调用远程服务生成的服务代理类
    private UserInterface userLocalService ;


    //这个构造函数必须要提供,dubbo框架会在消费者这一方调用这个方法
    public UserServiceStub(UserInterface userLocalService ) {
        this.userLocalService = userLocalService  ;
    }

    public User getUserById(Integer id) {
User user = null ;
try {
if (id == 1) {
user = this.userLocalService.getUserById(id) ;
}else {
user = new User();
user.setName("系统用户");
    }
}catch(Exception e) {
user = new User();
user.setName("异常用户");
}
return user ;
} }
4. 服务消费方的配置
 <dubbo:reference id="userService" interface="org.huxin.dubbo.test.user.service.UserInterface"
                    stub="org.huxin.dubbo.test.UserServiceStub" protocol="dubbo"/>
5.测试代码
|
1
2
3
4
5
6
7
8
|
@Test public void testGetUserById(){ Integer id = 2 ; UserInterface userService = context.getBean(UserInterface.class) ; User user = userService.getUserById( id) ; System.out.println(user.getName()); } |
总结:上述代码当调用服务出错时,消费方会返回“异常用户”,起到了容错的作用
本地伪装通常用于服务降级,例如某验权服务,当服务提供方全部挂掉后,客户端不抛出异常,而是通过 Mock 数据
返回授权失败。使用方式如下,mock指定的实现类在Provider抛出RpcException异常时执行(一定要抛出RpcException异常才执行),取代远程返回结果:
<dubbo:reference id="demoService" interface="com.alibaba.dubbo.demo.DemoService" version="1.0.0" mock="com.alibaba.dubbo.demo.consumer.mock.DemoServiceMock"/>
DemoServiceMock实现源码:
public class DemoServiceMock implements DemoService {
    public String sayHello(String name) {
        return "mock-value";
    }
}
30:隐式参数
可以通过 RpcContext 上的 setAttachment 和 getAttachment 在服务消费方和提供方之间进行参数的隐式传递。 [1]

在服务消费方端设置隐式参数
setAttachment 设置的 KV 对,在完成下面一次远程调用会被清空,即多次远程调用要多次设置。
RpcContext.getContext().setAttachment("index", "1"); // 隐式传参,后面的远程调用都会隐式将这些参数发送到服务器端,类似cookie,用于框架集成,不建议常规业务使用
xxxService.xxx(); // 远程调用
// ...
在服务提供方端获取隐式参数
public class XxxServiceImpl implements XxxService {

    public void xxx() {
        // 获取客户端隐式传入的参数,用于框架集成,不建议常规业务使用
        String index = RpcContext.getContext().getAttachment("index");
    }
}
31:分布式事务
事务简介
事务是用来保证一组数据操作的完整性和一致性
满足ACID
具有四种隔离级别、七种传播行为
分布式事务
将多个节点的事务看成一个整体处理
由事务参与者、资源服务器、事务管理器等组成
常见的分布式事务:支付、下单
实现思路
两段式事务2PC和三段式事务3PC(基础,生产环境中基本没人用)
基于XA的分布式事务
基于消息的最终一致性方案(常用)
TCC编程式补偿性事务(目前最好)
2PC、3PC
- 当需要一个事务的时候事务管理器(看下图)(相当于居委会大妈,是一个管理者身份)就通知全部资源管理器:“要搞事务啦,你们【准备】一下。”
- 资源管理器接收到“大妈”的通知后就开始处理业务,进行事务操作,操作结束后,但是还没有提交,就告诉“大妈”,我的事务已经做好了【就绪】,等待提交。
- “大妈”收到全部资源管理器的【就绪】消息后,就进入第二阶段,“大妈”说:“看来你们都就绪了,那就提交吧”,
- 资源管理器就开始执行【提交】,提交完成后,就告诉“大妈”,我【已提交】了。“大妈”就判断是否收到全部资源管理器的【已提交】请求,一旦没有收到全部的请求,就表示事务出现了问题。
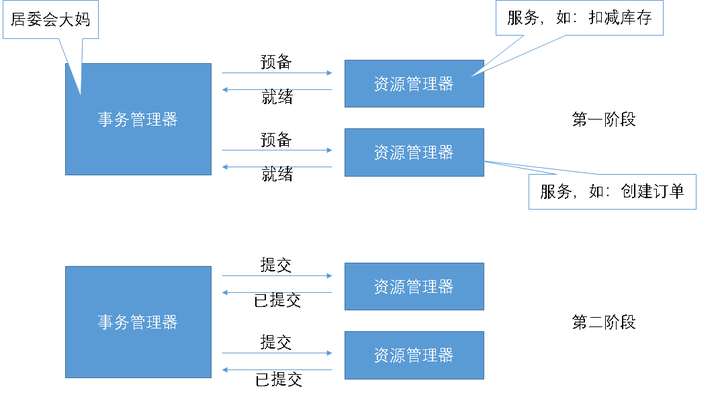
两段式的问题:
比如在提交时:第一个资源管理器提交成功,并返回了,事务管理器也收到了返回的消息;
但是第二个资源管理器提交时,宕机了!!因此它不会返回任何信息,事务管理器就会一直等待,导致事务最终无法完成!
3PC
CanCommit、PreCommit、DoCommit三个阶段
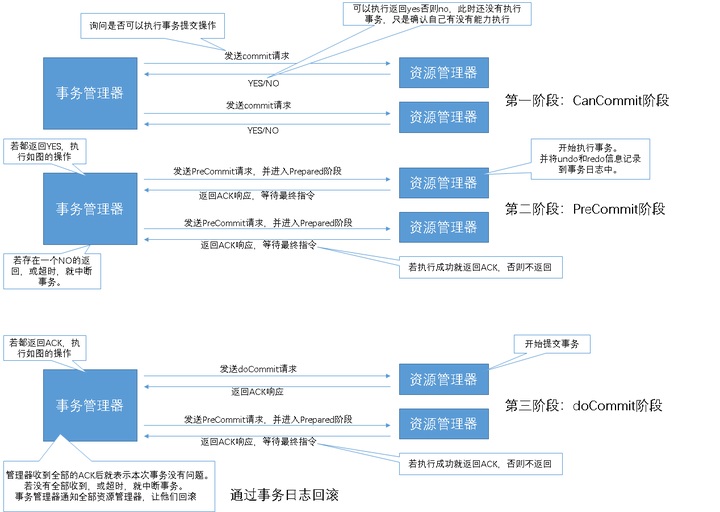
在2PC的基础上,添加了超时检测,在2PC的第一阶段与第二阶段中间加入准备阶段,保证了一旦第三阶段出问题我可以全部回滚。
参照着图看下面的流程
CanCommit阶段
3PC的CanCommit阶段其实和2PC的准备阶段很像。协调者向参与者发送commit请求,参与者如果可以提交就返回Yes响应,否则返回No响应。
1.事务询问 协调者向参与者发送CanCommit请求。询问是否可以执行事务提交操作。然后开始等待参与者的响应。
2.响应反馈 参与者接到CanCommit请求之后,正常情况下,如果其自身认为可以顺利执行事务,则返回Yes响应,并进入预备状态。否则反馈No
PreCommit阶段
协调者根据参与者的反应情况来决定是否可以记性事务的PreCommit操作。根据响应情况,有以下两种可能。
假如协调者从所有的参与者获得的反馈都是Yes响应,那么就会执行事务的预执行。
1.发送预提交请求 协调者向参与者发送PreCommit请求,并进入Prepared阶段。
2.事务预提交 参与者接收到PreCommit请求后,会执行事务操作,并将undo和redo信息记录到事务日志中。
3.响应反馈 如果参与者成功的执行了事务操作,则返回ACK响应,同时开始等待最终指令。
假如有任何一个参与者向协调者发送了No响应,或者等待超时之后,协调者都没有接到参与者的响应,那么就执行事务的中断。
1.发送中断请求 协调者向所有参与者发送abort请求。
2.中断事务 参与者收到来自协调者的abort请求之后(或超时之后,仍未收到协调者的请求),执行事务的中断。
doCommit阶段
该阶段进行真正的事务提交,也可以分为以下两种情况。
执行提交
1.发送提交请求 协调接收到参与者发送的ACK响应,那么他将从预提交状态进入到提交状态。并向所有参与者发送doCommit请求。
2.事务提交 参与者接收到doCommit请求之后,执行正式的事务提交。并在完成事务提交之后释放所有事务资源。
3.响应反馈 事务提交完之后,向协调者发送Ack响应。
4.完成事务 协调者接收到所有参与者的ack响应之后,完成事务。
中断事务 协调者没有接收到参与者发送的ACK响应(可能是接受者发送的不是ACK响应,也可能响应超时),那么就会执行中断事务。
1.发送中断请求 协调者向所有参与者发送abort请求
2.事务回滚 参与者接收到abort请求之后,利用其在阶段二记录的undo信息来执行事务的回滚操作,并在完成回滚之后释放所有的事务资源。
3.反馈结果 参与者完成事务回滚之后,向协调者发送ACK消息
4.中断事务 协调者接收到参与者反馈的ACK消息之后,执行事务的中断。
当进入第三阶段时,由于网络超时等原因,虽然参与者没有收到commit或者abort响应,但是他有理由相信:成功提交的几率很大。
2PC与3PC的区别
相对于2PC,3PC主要解决的单点故障问题,并减少阻塞,因为一旦参与者无法及时收到来自协调者的信息之后,他会默认执行commit。而不会一直持有事务资源并处于阻塞状态。
但是这种机制也会导致数据一致性问题,因为,由于网络原因,协调者发送的abort响应没有及时被参与者接收到,那么参与者在等待超时之后执行了commit操作。这样就和其他接到abort命令并执行回滚的参与者之间存在数据不一致的情况。
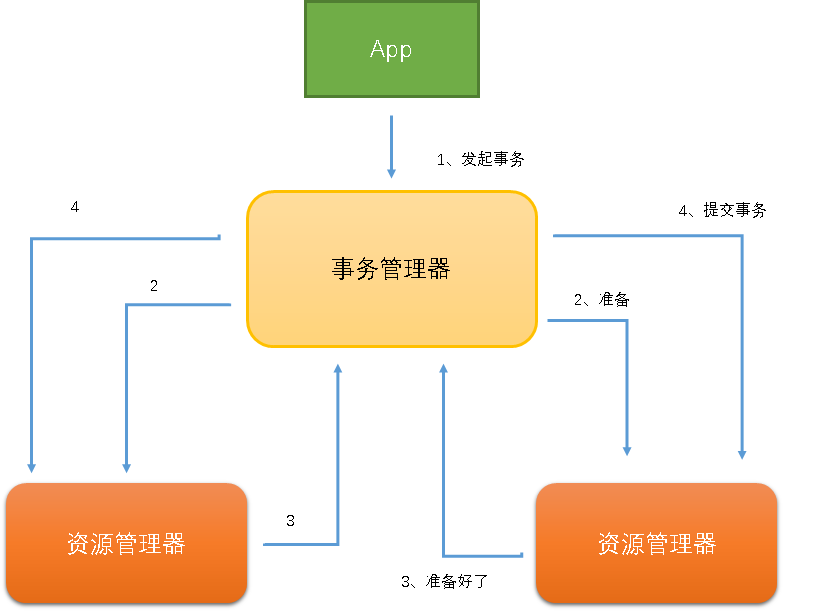
XA
X/OPEN推出的方案,实际业务中很少有人用。(和两段式差不多)
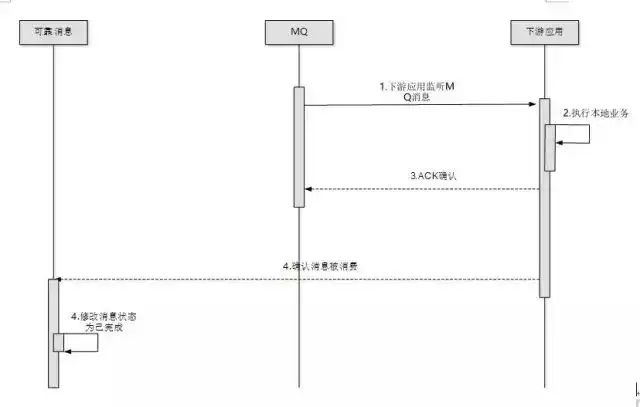
基于消息的最终一致性方案
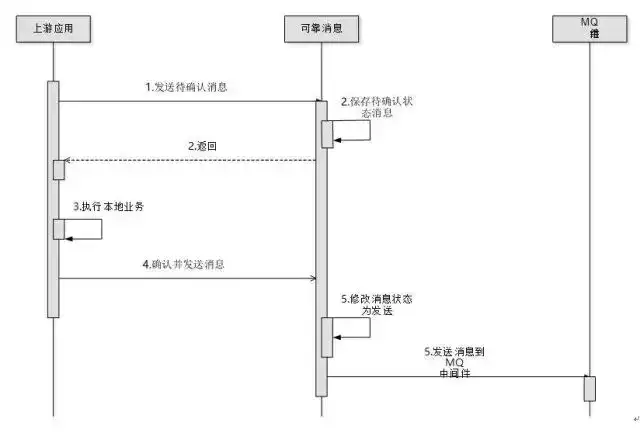
他属于:最终一致性方案。
存在资源浪费浪费了资源,下游应用会一直等待上游传递消息
看图:
TCC编程式补偿性事务
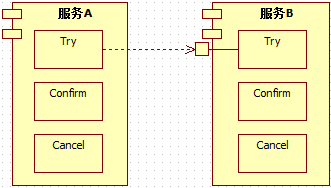
Try,Confirm,Cancel的首字母缩写,蚂蚁金服一直在用(属于常用分布式事务解决方案)
调用Try接口,执行完后返回结果,都成功调用Confirm、一旦存在失败调用Cancel
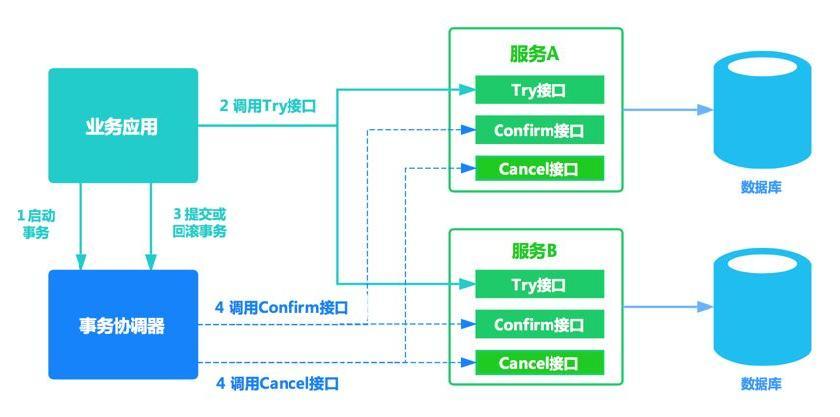
TCC事务机制简介:
TCC事务机制简介 | 百特开源百特开源与基于消息的最终一致性方案的对比百特开源与基于消息的最终一致性方案的对比
- 基于消息的事务是存在资源浪费浪费了资源,下游应用会一直等待上游传递消息
- TCC事务是柔性事务,在try阶段要对资源做预留
- TCC事务在确认或取消阶段释放资源
- TCC的时效性更好
-
TCC 性能和并发不如消息的好
常用分布式事务框架
- 全局事务服务GTS(收费,我试了一下5TPS下可以免费使用)(链接:全局事务服务_GTS_分布式数据库事务_多库事务_消息事务解决方案 - 阿里云)
- 蚂蚁金服分布式事务DTX(收费)(链接:蚂蚁金服金融科技 - DTX)
- 开源TCC框架:tcc-transaction(免费)(链接:changmingxie/tcc-transaction)
- 开源TCC框架:ByteTcc(免费,后起之秀,文档齐全)(链接:liuyangming/ByteTCC)
如果嫌麻烦,就用阿里巴巴的GTS、DTX吧(我选择阿里!)
不然就使用开源框架
尝试使用TCC编程式补偿性事务
为什么不用ByteTcc,因为它的star数没有tcc-transaction高。。更稳定,更好一些。
就是此开源项目:
changmingxie/tcc-transaction我们先尝试一下把他跑起来,体验一下TCC编程式补偿性事务是什么感觉。
这个项目有几处需要我们手动修改的地方,请仔细。
第一步:下载tcc-transaction:git clone git@github.com:changmingxie/tcc-transaction.git
第二步:用IDEA打开下载的工程
第三步:修改几处配置,如图所示修改即可。
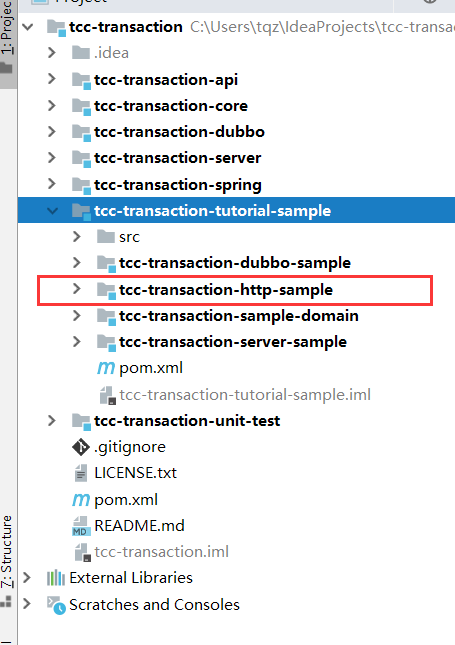
项目导入后的样子如图,目前只需要看sample模块下面的http子模块
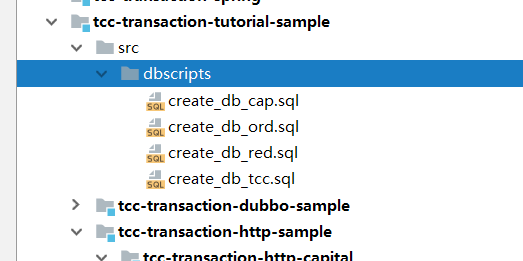
然后导入数据库SQL语句 tcc是必须的数据库其他都是业务演示数据库
把这四个文件导入到你的数据库
特别注意示例给的 create_db_tcc.sql 数据库字段没有IS_DELETE值,需要在创建完此库以后再手动执行以下SQL语句:
ALTER TABLE `TCC_TRANSACTION_CAP` ADD `IS_DELETE` tinyint(1) DEFAULT 0 NOT NULL;
ALTER TABLE `TCC_TRANSACTION_ORD` ADD `IS_DELETE` tinyint(1) DEFAULT 0 NOT NULL;
ALTER TABLE `TCC_TRANSACTION_RED` ADD `IS_DELETE` tinyint(1) DEFAULT 0 NOT NULL;
ALTER TABLE `TCC_TRANSACTION_UT` ADD `IS_DELETE` tinyint(1) DEFAULT 0 NOT NULL;
如果你的版本有此字段,就算了。
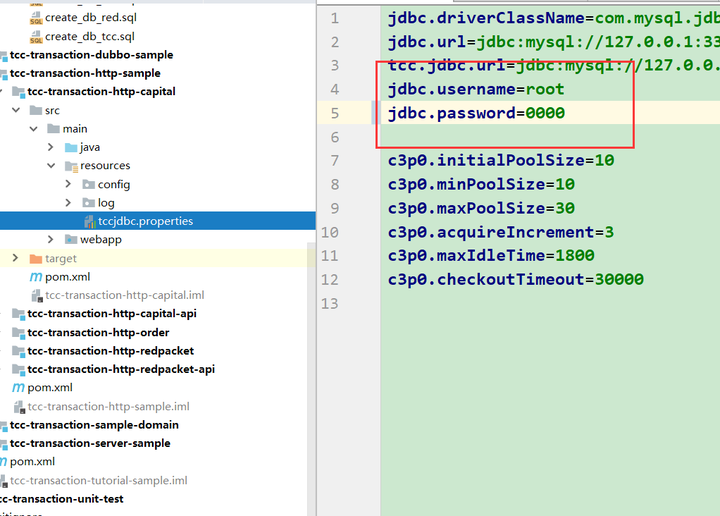
然后修改此三个子模块的数据库配置文件
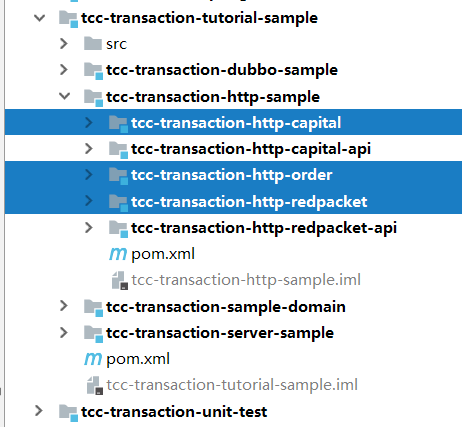
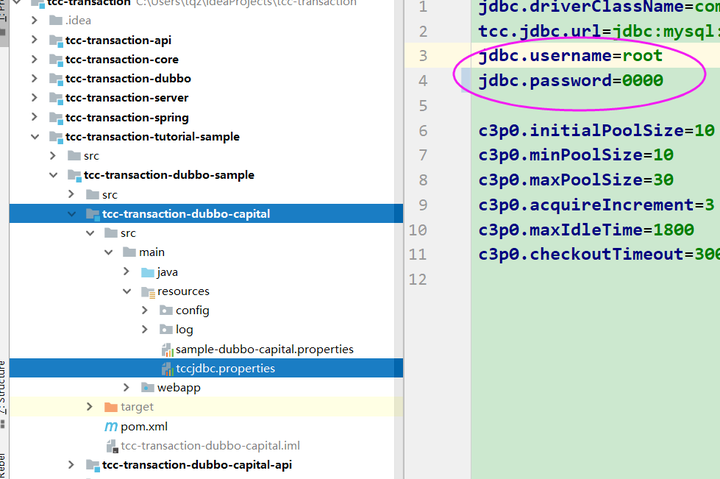
第一个要修改的就是数据库连接信息,改为你的用户名与密码(三处子模块都要修改),如图
第二个就是添加Tomcat部署的时候,把这三个包部署:
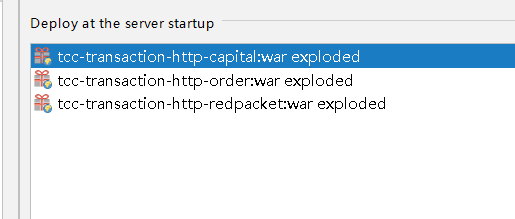
对应部署包后面的应用上下文可以改为:order、cap、red

然后部署发布
会有三个工程启动(速度比较慢)
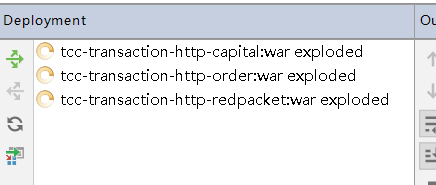
启动成功
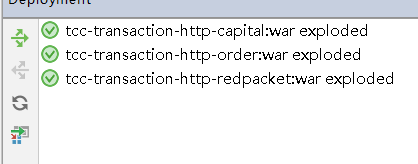
然后访问图示连接,照着网页提示操作,就可以体验一把TCC是什么样子的了

下面看一下dubbo版本的TCC如何启动
还是以sample为例,现在进入dubbo这个子模块,数据库sql语句不用管,上面已经搞过了,修改几处配置文件即可
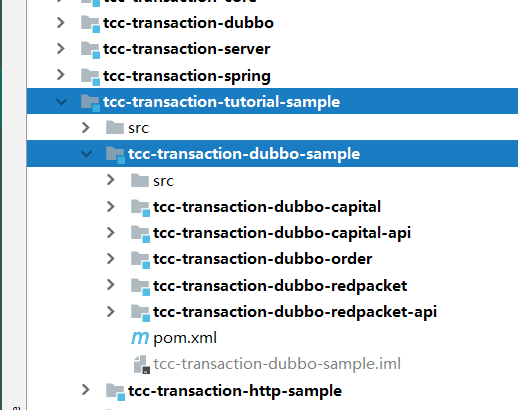
第一处:依然是此三处的数据库配置文件,修改为自己的用户名与密码

如图
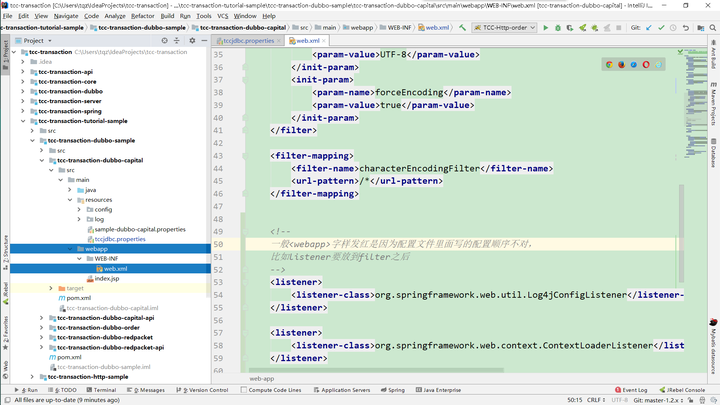
然后修改此三处的web.xml文件,一打开web.xml就会看到发红的<web-app>
其实这是配置的顺序写的不对,把listener放到filter之后就没问题了,
然后在<display-name>Sample Dubbo Capital</display-name> 下面添加如下的东西
<context-param>
    <param-name>webAppRootKey</param-name>
    <param-value>tcc-transaction-dubbo-capital</param-value>
</context-param>
同理,三处子模块都要修改一下
然后部署到Tomcat的时候,也有讲究,按下图的顺序配置

因为Tomcat的插件会按此顺序加载,不然项目无法启动。
然后给order的Application context值就给默认的斜杠
另外两个分别给/red、/cap即可
最后启动tomcat,访问127.0.0.1:8080/即可体验dubbo下的TCC
未完待续。。。
1、需要提供分布式事务支持的接口上添加@Compensable
2、在对应的接口实现上添加@Compensable
3、在接口实现上添加confirmMethod、cancelMethod、transactionContextEditor
4、实现对应的confirmMethod、cancelMethod
注意: confirm方法和cancel方法必须与try方法在同一个类中
5、主事务的业务都已经实现的差不多的时候才调用子事务
注意:
1、分布式事务里,不要轻易在业务层捕获所有异常
2、使用TCC-Transaction时,confirm和cancel的幂等性需要自己代码支持
思考:
为什么要在confirm、cancel里检查订单状态,而不直接修改为结束状态
因为confirm确认的就是刚刚try方法里新增的一个订单。
-》 为了保证服务的幂等性
幂等性:使用相同参数对同一资源重复调用某个接口的结果与调用一次的结果相同
基础环境配置详解
1、 将所有的tcc依赖包 api, core, spring, dubbo加入maven本地仓库

2、 添加依赖包
3、 添加配置文件
4、 修改配置
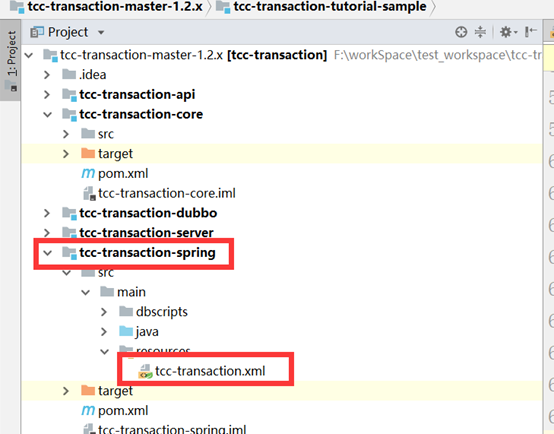
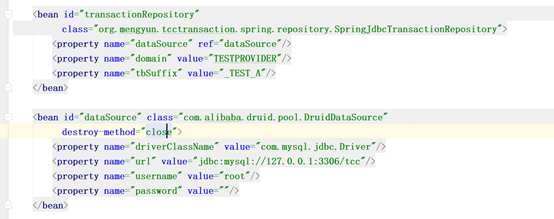
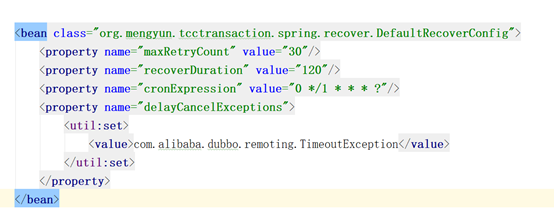
5、 Springboot读取配置文件
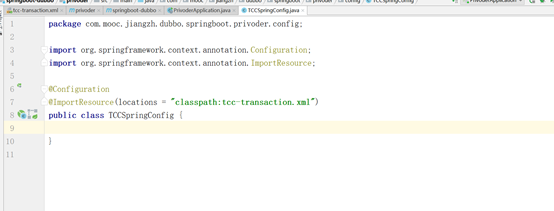
6、 添加事务表
CREATE TABLE `TCC_TRANSACTION_TEST_A`
业务实现演示
生产端代码演示
@Component
@Service(interfaceClass = ServiceAPI.class)
public class TransactionServiceImpl implements ServiceAPI {

    @Override
    @Compensable(confirmMethod = "confirmSendMessage", cancelMethod = "cancelSendMessage", transactionContextEditor = DubboTransactionContextEditor.class)
    public String sendMessage(String message) {
        System.out.println("this is sendMessage try message="+message);
        if(message.equals("123")){
            throw new NullPointerException();
        }

        return "quickstart-provider-message="+message;
    }

    @Override
    @Compensable(confirmMethod = "confirmIsTrueSeats", cancelMethod = "cancelIsTrueSeats", transactionContextEditor = DubboTransactionContextEditor.class)
    public boolean isTrueSeats(String seats) {
        if(seats.equals("1,2,3")){
            throw new IllegalArgumentException();
        }else{
            return true;
        }
    }

    @Override
    @Compensable(confirmMethod = "confirmIsNotSold", cancelMethod = "cancelIsNotSold", transactionContextEditor = DubboTransactionContextEditor.class)
    public boolean isNotSold(String seats) {
        if(seats.equals("4,5")){
            throw new IllegalArgumentException();
        }else{
            return true;
        }
    }

    /*
        千万千万注意幂等性问题
     */
    @Override
    @Compensable(confirmMethod = "confirmSaveOrder", cancelMethod = "cancelSaveOrder", transactionContextEditor = DubboTransactionContextEditor.class)
    public String saveOrder(String fieldId, String seats, String seatsNum) {
        System.out.println("创建一个待支付状态的订单");
        return "";
    }
    public String confirmSaveOrder(String fieldId, String seats, String seatsNum) {
        System.out.println("将订单修改为支付中");
        return "";
    }
    public String cancelSaveOrder(String fieldId, String seats, String seatsNum) {
        System.out.println("将订单修改为已关闭");
        return "";
    }

    public String confirmSendMessage(String message) {
        System.out.println("this is confirmSendMessage message="+message);
        return "quickstart-provider-message="+message;
    }

    public String cancelSendMessage(String message) {
        System.out.println("this is cancelSendMessage message=" + message);
        return "quickstart-provider-message=" + message;
    }

    public boolean confirmIsTrueSeats(String seats) {
        System.out.println("this is confirmIsTrueSeats");
        return true;
    }
    public boolean cancelIsTrueSeats(String seats) {
        System.out.println("this is cancelIsTrueSeats");
        return true;
    }
    public boolean confirmIsNotSold(String seats) {
        System.out.println("this is confirmIsNotSold");
        return true;
    }
    public boolean cancelIsNotSold(String seats) {
        System.out.println("this is cancelIsNotSold");
        return true;
    }

}

api层代码
public interface ServiceAPI {

    @Compensable
    String sendMessage(String message);

    /*
        背景:传入购票数量、传入购买座位、影厅编号
        业务:
            1、判断传入的座位是否存在
            2、查询过往订单、判断座位是否已售
            3、新增订单
        逻辑:
            1、新增一条订单
            2、判断座位是否存在 & 是否已售
            3、任意一条为假,则修改订单为无效状态
     */

    // 判断是否为真座位
    @Compensable
    boolean isTrueSeats(String seats);

    // 是否已售
    @Compensable
    boolean isNotSold(String seats);

    // 保存订单
    @Compensable
    String saveOrder(String fieldId,String seats,String seatsNum);

}

消费端代码
@Component
public class TransactionConsumer {

    @Autowired
    ServiceAPI serviceAPI;

    @Compensable(confirmMethod = "confirmSendMessage", cancelMethod = "cancelSendMessage", asyncConfirm = true)
    public void sendMessage(String message){
//        System.out.println("this is consumer sendMessage message="+message);
//
//        System.out.println(serviceAPI.sendMessage(message));

        // 测试业务
        serviceAPI.saveOrder("001",message,"5");

        serviceAPI.isTrueSeats(message);

        serviceAPI.isNotSold(message);

    }

    public void confirmSendMessage(String message){
        System.out.println("this is consumer confirmSendMessage message="+message);
//        System.out.println(serviceAPI.sendMessage(message));
    }

    public void cancelSendMessage(String message){
        System.out.println("this is consumer cancelSendMessage message="+message);
//        System.out.println(serviceAPI.sendMessage(message));
    }
}

测试
@SpringBootApplication
@EnableDubboConfiguration
public class ConsumerApplication {
    public static void main(String[] args) {
        ConfigurableApplicationContext run =
                SpringApplication.run(ConsumerApplication.class, args);

        // 测试分布式事务使用
        TransactionConsumer transactionConsumer = (TransactionConsumer) run.getBean("transactionConsumer");
        transactionConsumer.sendMessage("4,5");
        // 1,2,3   4,5

    }


}


流程
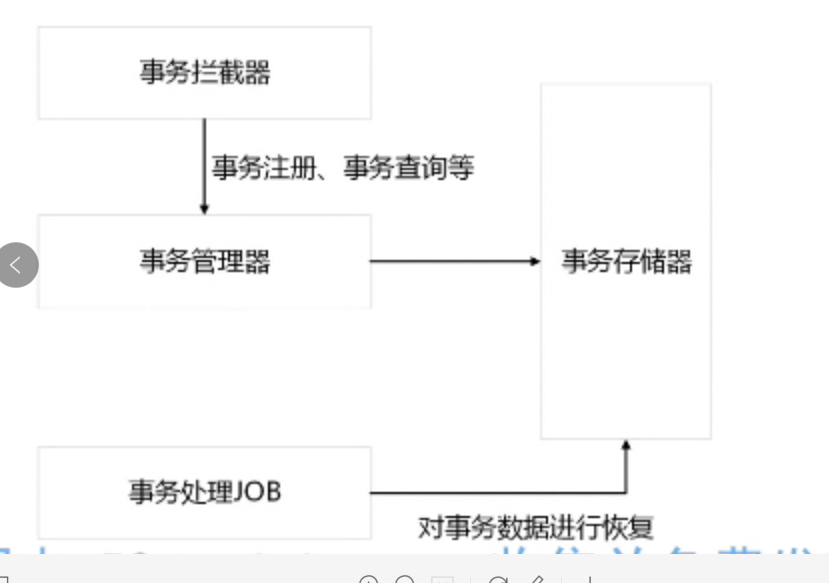
Dubbo Monitor 使用
Dubbo Monitor 下载
dubbo-monitor-simple-2.5.3-assembly.tar.gz
解压后, 编辑conf/dubbo.properties文件
dubbo.container=log4j,spring,registry,jetty
dubbo.application.name=simple-monitor
dubbo.application.owner=
dubbo.registry.address=zookeeper://192.168.3.10:2181
dubbo.protocol.port=10089 #这个是monitor自身要发布的接口使用的端口
dubbo.jetty.port=8082 #这个是monitor提供的web界面的接口
dubbo.jetty.directory=/home/tomcat/dubbo-monitor #这个是dubbo monitor的解压目录
dubbo.charts.directory=/home/tomcat/dubbo-monitor/charts #这个和下面的目录, 最好在dubbo monitor解压目录下
dubbo.statistics.directory=/home/tomcat/dubbo-monitor/statistics
dubbo.log4j.file=logs/dubbo-monitor-simple.log
dubbo.log4j.level=WARN
4. 启动/停止
通过 bin/start.sh, stop.sh来启动停止monitor. 初始启动, charts的生成需要等几分钟
5. 访问
通过 http://host_ip:8082/ (上面配置的端口)访问monitor服务
zpkin使用
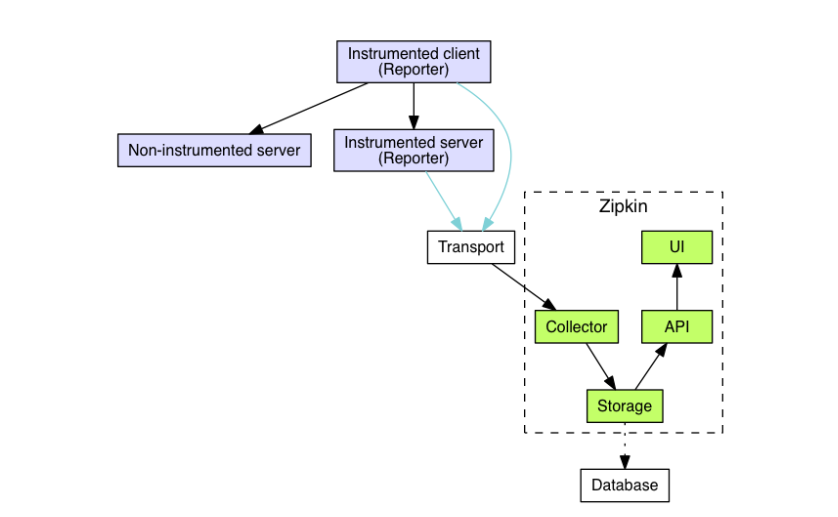
1.Trace
Zipkin使用Trace结构表示对一次请求的跟踪,一次请求可能由后台的若干服务负责处理,每个服务的处理是一个Span,Span之间有依赖关系,Trace就是树结构的Span集合;
2.Span
每个服务的处理跟踪是一个Span,可以理解为一个基本的工作单元,包含了一些描述信息:id,parentId,name,timestamp,duration,annotations等,例如:
{
      "traceId": "bd7a977555f6b982",
      "name": "get-traces",
      "id": "ebf33e1a81dc6f71",
      "parentId": "bd7a977555f6b982",
      "timestamp": 1458702548478000,
      "duration": 354374,
      "annotations": [
        {
          "endpoint": {
            "serviceName": "zipkin-query",
            "ipv4": "192.168.1.2",
            "port": 9411
          },
          "timestamp": 1458702548786000,
          "value": "cs"
        }
      ],
      "binaryAnnotations": [
        {
          "key": "lc",
          "value": "JDBCSpanStore",
          "endpoint": {
            "serviceName": "zipkin-query",
            "ipv4": "192.168.1.2",
            "port": 9411
          }
        }
      ]
}
traceId:标记一次请求的跟踪,相关的Spans都有相同的traceId;
id:span id;
name:span的名称,一般是接口方法的名称;
parentId:可选的id,当前Span的父Span id,通过parentId来保证Span之间的依赖关系,如果没有parentId,表示当前Span为根Span;
timestamp:Span创建时的时间戳,使用的单位是微秒(而不是毫秒),所有时间戳都有错误,包括主机之间的时钟偏差以及时间服务重新设置时钟的可能性,
出于这个原因,Span应尽可能记录其duration;
duration:持续时间使用的单位是微秒(而不是毫秒);
annotations:注释用于及时记录事件;有一组核心注释用于定义RPC请求的开始和结束;
cs:Client Send,客户端发起请求;
sr:Server Receive,服务器接受请求,开始处理;
ss:Server Send,服务器完成处理,给客户端应答;
cr:Client Receive,客户端接受应答从服务器;
transport 是通过brave实现
dubbo-filter
日志记录trace跟踪都是通过filter实现的
dubbo提供了Filter扩展,可以通过自定义Filter来实现这个功能
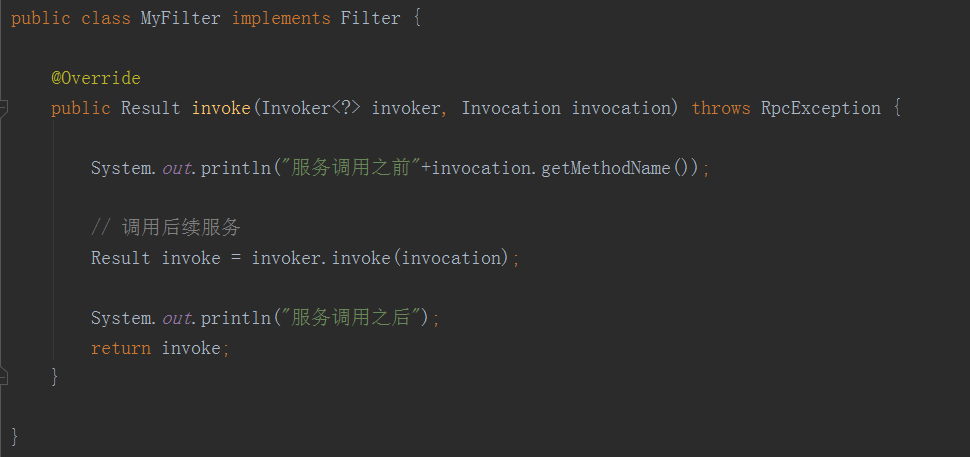
配置文件
参考:调用拦截扩展
在resources目录下添加纯文本文件META-INF/dubbo/com.alibaba.dubbo.rpc.Filter,内容如下:

修改dubbo的provider配置文件,在dubbo:provider中添加配置的filter,如下

下载zpkin项目源码并编译成jar包通过java -jar 启动 即可
项目引入zpkin
父工程引入依赖管理
<dependencyManagement>
  <dependencies>
    <dependency>
      <groupId>io.zipkin.brave</groupId>
      <artifactId>brave-bom</artifactId>
      <version>5.5.0</version>
      <type>pom</type>
      <scope>import</scope>
    </dependency>
    <dependency>
      <groupId>io.zipkin.reporter2</groupId>
      <artifactId>zipkin-reporter-bom</artifactId>
      <version>2.7.9</version>
      <type>pom</type>
      <scope>import</scope>
    </dependency>
  </dependencies>
</dependencyManagement>
product 引入以下依赖
<dependency>
  <groupId>io.zipkin.brave</groupId>
  <artifactId>brave-instrumentation-dubbo-rpc</artifactId>
</dependency>

<dependency>
  <groupId>io.zipkin.brave</groupId>
  <artifactId>brave-spring-beans</artifactId>
</dependency>

<dependency>
  <groupId>io.zipkin.brave</groupId>
  <artifactId>brave-context-slf4j</artifactId>
</dependency>

<dependency>
  <groupId>io.zipkin.reporter2</groupId>
  <artifactId>zipkin-sender-okhttp3</artifactId>
</dependency>

product端注入以下依赖
<bean id="sender" class="zipkin2.reporter.beans.OkHttpSenderFactoryBean">
  <property name="endpoint" value="http://localhost:9411/api/v2/spans"/>
</bean>

<bean id="tracing" class="brave.spring.beans.TracingFactoryBean">
  <property name="localServiceName" value="hello-service"/>
  <property name="spanReporter">
    <bean class="zipkin2.reporter.beans.AsyncReporterFactoryBean">
      <property name="sender" ref="sender"/>
      <!-- wait up to half a second for any in-flight spans on close -->
      <property name="closeTimeout" value="500"/>
    </bean>
  </property>
  <property name="currentTraceContext">
    <bean class="brave.spring.beans.CurrentTraceContextFactoryBean">
      <property name="scopeDecorators">
        <bean class="brave.context.slf4j.MDCScopeDecorator" factory-method="create"/>
      </property>
    </bean>
  </property>
</bean>

声明需要暴露的服务接口需要提供filter="tracing"配置
<!-- 声明需要暴露的服务接口 -->
<dubbo:service
  timeout="10000"
  async="true"
  interface="com.mooc.jiangzh.dubbo.ServiceAPI"
  ref="quickStartService" filter="tracing"/>
springboot集成zpkin
service和reference都需要添加filter="tracing"
  需要多一个依赖
<dependency>
  <groupId>org.apache.curator</groupId>
  <artifactId>curator-framework</artifactId>
  <version>2.0.1-incubating</version>
</dependency>


