
PBRT-v3渲染器文件结构逐行解析(烟雾渲染)
最近在写烟雾渲染,需要一个baseline,就选了pbrt来对照。
代码是我自己综合几份代码魔改的,和PBRT-v3的官方例子(cloud)的结构差不多,渲染文件包括1.cloude.pbrt;2.texture/skylight.exr;3.geometry/desnity.pbrt;4.geometry/density.ply
第一个是总的pbrt文件,包括了渲染器信息光源信息物体信息等等,安装好pbrt(跟着这个博客做的 https://blog.csdn.net/libing_zeng/article/details/72457386 )之后,进行渲染的指令也是pbrt ~/pbrt-v3-scenes/cloud/cloud.pbrt。
第二个是光源的texture信息,pbrt-v3中有三种光源可以用一个图片作为光源强度的texture。exr是pbrt这边使用的图片格式,我还没找到windows系统下好用的阅读器,每次都转png查看,很烦。
第三个是定义烟雾/液体等所谓的“参与介质”的体积密度的文件,以include的形式在第一个文件中被使用。
第四个是一个几何体的三角面片定义,具体来说,在这个渲染文件中的作用是在第一个文件中使用,定义了参与介质的范围。
第一个文件:
Integrator "volpath" "integer maxdepth" [50]

Sampler "02sequence" "integer pixelsamples" [2048]
第一行定义了渲染器“volpath”用于参与介质volume density的渲染,maxdepth是积分器采样的载光路径的最大长度(不懂)。如果这里不定义volpath,就无法对烟雾部分做正确的渲染。
第二行定义了采样方式,在相机的每个像素内进行什么样的采样。
LookAt 1 1 10 0 0 -1 0 1 0 #ex ey ez lx ly lz ux uy uz
定义了相机信息,分别是相机位置,相机看向的点,相机y轴指向方向
Camera "perspective" "float fov" [20]
定义了相机的fov(field of view)
PixelFilter "gaussian"
定义每个像素上采样的点们如何取平均
Film "image" "string filename" ["mycloud.exr"]
     "integer xresolution" [400] "integer yresolution" [400]
定义最后生成的图像的名字和大小
WorldBegin
和最后的WorldEnd一起定义了一个scope,在这个scope内描述整个渲染对象,前面这些信息不能写在这个scope内,渲染对象的信息也不能写在这个scope外。
AttributeBegin
和AttrbuteEnd一起定义一个scope,scope内的平移旋转等坐标系操作不会影响到scope外,在opengl里面也有类似的东西,名字忘了。
AttributeBegin
    LightSource "spot" "rgb I" [ 3000 3000 3000 ]
                "point from" [-1 0.2 1.6] "point to"   [2 0.2 1.6]
                "float coneangle" [3]
                "float conedeltaangle" [0]
AttributeEnd
定义一个光源,类型是“spot”,是一个有fov的锥形光束,I是它的强度的三个颜色分量;from和to定义起点终点;coneangle定义fov;conedeltaangle定义fov边缘开始渐渐变弱的角度范围。
其他一些光源:
#AttributeBegin
#  CoordSysTransform "camera"
#  LightSource "distant"
#              "point from" [0 0 0] "point to"   [0 0 1]
#              "color L"    [10 10 10]
#AttributeEnd
CoordSysTransform "camera"切换到相机坐标系,光源类型是distant,无限远处平行光。其他参数同上。
#AttributeBegin
#    LightSource "point" "rgb I" [ 100 100 100 ]
#                "point from" [-1 0.5 1]
#AttributeEnd
定义点光源,这次只用from定义点光源的位置,没有to定义方向了。
AttributeBegin
Rotate 110 0 1 0
Rotate -90 1 0 0
LightSource "infinite" "string mapname" "textures/sky.exr"
  "rgb L" [5 4 3]  # reduce blue a bit
AttributeEnd
定义一个从上面射下来的环境光,类型为“infinite”,光的强度分布参考sky.exr文件贴图,并根据L进行分量比例调整。
接下来开始定义物体
TransformBegin
	Translate -0.9 0 -1.2
	Rotate 90 1 0 0
	Include "geometry/density_render.70.pbrt"
	  "color sigma_a" [10 10 10] "color sigma_s" [90 90 90]
TransformEnd
这部分include了density文件,并定义了材质sigma_a和sigma_s
AttributeBegin
	Translate -0.9 0 -1.2
	Rotate 90 1 0 0
   Material ""
    MediumInterface "smoke" ""
	Shape "plymesh" "string filename" "geometry/density_render.ply"
AttributeEnd
这里使用了上面include部分定义的density "smoke",并规定smoke的范围如ply文件所示。
下面是density文件结构:
MakeNamedMedium "smoke" "string type" "heterogeneous" "integer nx" 100 "integer ny" 100 "integer nz" 40
	 "point p0" [ 0.0 0.0 0.0 ] "point p1" [0.750000 1.000000 0.750000 ]
	"float density" [
名字是“smoke”,类型是heterogeneous不均匀的,如果定义为homogeneous则是均匀的,不能定义density矩阵;nx,ny,nz定义了density矩阵的大小;“float density”之后是一个长度为nx橙ny乘nz的一维矩阵,根据我的测试应该是[nz,nx,ny]这个方式排列的,相当于把竖着的每一个平面拼接起来。
ply文件在这个例子里面是个长方体。
渲染结果如图:
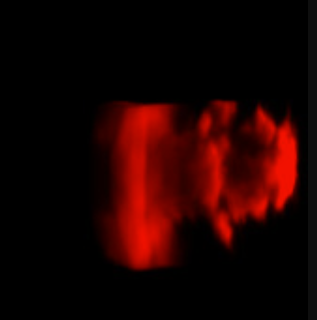
distant light

spotlight
想要做出激光束的效果,用非常强的细光束去照想看看能不能穿透,但是不能:
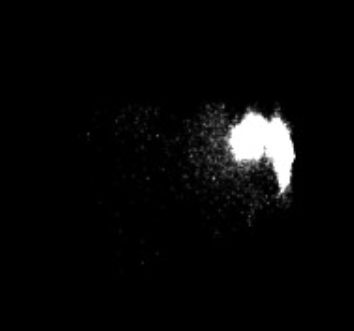
不确定是参数有问题,还是这个烟雾就是太厚了。
整个的代码:
点击查看代码
Integrator "volpath" "integer maxdepth" [50]

Sampler "02sequence" "integer pixelsamples" [2048]

#first we set up the eye
LookAt 1 1 10   0 0 -1  0 1 0 #ex ey ez lx ly lz ux uy uz

#the camera
Camera "perspective" "float fov" [20]

PixelFilter "gaussian"

#name the file
Film "image" "string filename" ["mycloud.exr"]
     "integer xresolution" [400] "integer yresolution" [400]

#begin describing scene
WorldBegin

#AttributeBegin
#  LightSource "spot" "rgb I" [ 100 100 100 ]
#              "point from" [3 0 2] "point to"   [-3 0 2]
#              "float coneangle" [20]
#AttributeEnd

#AttributeBegin
#  Translate 0 3 0
#  Material "matte" "color Kd" [0.1 0.9 0.1]
#
#    Shape "sphere" "float radius" [.75]
#AttributeEnd

#light source
#AttributeBegin
#  CoordSysTransform "camera"
#  LightSource "distant"
#              "point from" [0 0 0] "point to"   [0 0 1]
#              "color L"    [10 10 10]
#AttributeEnd

#AttributeBegin
#  CoordSysTransform "camera"
#  LightSource "distant"
#              "point from" [3 1 -11] "point to"   [-3 1 -11]
#             "color L"    [10 0 0]
#AttributeEnd

#AttributeBegin
#    LightSource "point" "rgb I" [ 100 100 100 ]
#                "point from" [-1 0.5 1]
#AttributeEnd

AttributeBegin
    LightSource "spot" "rgb I" [ 3000 3000 3000 ]
                "point from" [-1 0.2 1.6] "point to"   [2 0.2 1.6]
                "float coneangle" [3]
                "float conedeltaangle" [0]
AttributeEnd

#transform the world
#AttributeBegin
#    CoordSysTransform "camera"
#    Material "matte" "color Kd" [0.1 0.9 0.1]
#   Translate 0 0 50
#  Shape "disk" "float radius" 10
#AttributeEnd

AttributeBegin
  Translate 1 0.5 2
  Rotate 35 0 1 0

#AttributeBegin
#	Translate -0.9 0 -1.2
#	Rotate 90 1 0 0
#    Material "matte" "color Kd" [0.9 0.1 0.1]
#	Shape "plymesh" "string filename" "geometry/density_render.ply"
#AttributeEnd

TransformBegin
	Translate -0.9 0 -1.2
	Rotate 90 1 0 0
	Include "geometry/density_render.70.pbrt"
	  "color sigma_a" [10 10 10] "color sigma_s" [90 90 90]
TransformEnd

AttributeBegin
	Translate -0.9 0 -1.2
	Rotate 90 1 0 0
   Material ""
    MediumInterface "smoke" ""
	Shape "plymesh" "string filename" "geometry/density_render.ply"
AttributeEnd

AttributeEnd
WorldEnd

