
NetFPGA-1G-CML从零开始环境配置
NetFPGA-1G-CML从零开始环境配置
前言
偶得一块NetFPGA-1G-CML,跟着github对NetFPGA-1G-CML的入门指南,一步步把配置环境终于搭建起来,下面重新复现一下此过程。期间感谢开发板的技术人员支持与帮助,得以成功配置环境。
https://github.com/NetFPGA/NetFPGA-public/wiki/NetFPGA-1G-CML-Getting-Started-Guide
实验工具
- NetFPGA-1G-CML开发板
- 一台有PCIe口的主机
下为工具照片:
1、操作系统的选择
官方推荐Fedora 20,于是我也选择了该操作系统。
-
镜像选择
镜像为清华大学镜像源的镜像(国内其他镜像源中没有找到Fedora 20 64bit的版本)下载链接
-
系统盘制作
- 一个8G U盘
- 系统盘制作工具 PowerISO。(切记不要用软碟通UltraISO(软碟通),原因软碟通不适合做linux的系统盘,笔者第一次也是采用软碟通进行系统盘制作,结果出现了一些问题,后来用PowerISO一切正常)
可参照这篇文章:制作Linux(Fedora、Ubuntu、CentOS)优盘启动
2、Xilinx开发工具的下载
这个是整个环境安装中最耗费时间的一个地方,建议在windows下用迅雷下载,然后转到fedora下,因为文件相当庞大。之前笔者也下了下列两个工具的最新的版本,可中途也出了莫名其妙的问题,最终成功的环境还是以以下两个工具为基础。
-
ISE Design Suite 14.6(笔者选择的是链接中基于Linux的完整安装程序5.88G,之前安装过ISE Design Suite 14.7的,可其中缺少EDK变量,后来重新换成了这个。安装教程:见Reference Operating System链接里Installing Xilinx ISE Design Suite on Fedora 14部分,有一点不一样,连接中版本较老,但链接的提示中,选项该去掉依然参照它)
tip:ISE工具需要license,否则无法build。如果您已经拥有license,则可导入,否则还有一种办法:百度一下即可发现惊喜。
-
Vivado Desgin Suite 15.2 (笔者选择的是链接中,2015.02的版本, Vivado 2015.2: Full Installer For Linux Single File Download Image Including SDK (TAR/GZIP - 4.58 GB) ,安装过程遇ISE类似)
3、获得NetFPGA-1G-CML对应github仓库的权限
在次NetFPGA官网的链接中填入你的相关信息,则工作人员会把拉到对应仓库下,然后可以clone下来到本地。
以下步骤皆基于本仓库。
4、Fedora 20操作系统环境所需配置的安装
下面简单罗列命令,至于每个命令所需安装的内容是为何物,请查看Getting Started Guide的Operating System Setup以及Reference Operating System的Additional Required Installation Packages。
-
sudo yum install '*stdc*'
-
sudo yum install libsigc++ libsigc++.i686 qt.i686 qt
-
sudo yum groups mark convert
-
sudo yum group install "Fedora Eclipse"
-
sudo yum install qgit wireshark wireshark-gnome
-
sudo yum install python
-
sudo yum install scapy
-
sudo yum install fxload
-
sudo yum install bison byacc flex
-
sudo yum install glibc.i686
-
sudo yum install kernel-devel
-
sudo yum install libusb-devel
-
sudo yum install libpcap-devel
-
sudo yum install libnet-devel
其后四个命令,由于笔者在安装过程中采用是按tab键得到,相关名称可能会有点差异,具体看操作系统级别(32bit or 64bit)选择安装。
5、环境配置,以及跑一个demo
Step1、获得git仓库权限后,把仓库clone到本地
tip:切记此时你已经获得了该仓库的权限(有时候邮件没收到,可能在垃圾箱里面)
git clone https://github.com/NetFPGA/NetFPGA-1G-CML-live.gitStep2、建立编译环境路径变量
- 取得赛灵思工具的路径
-
source /opt/Xilinx/14.6/ISE_DS/settings64.sh
-
source /opt/Xilinx/Vivado/2015.2/settings64.sh
- 取得clone后仓库的路径
路径的信息保存于该仓库的文件bashrc_addon_NetFPGA_10G中,记得根据实际路径进行修改,比如笔者的仓库位于/home/netfpga/Program/NetFPGA-1G-CML-live,所以笔者该文件的信息修改如下:
-
export NF_ROOT=${HOME}/Program/NetFPGA-1G-CML-live
-
export NF_DESIGN_DIR=${NF_ROOT}/projects/reference_nic_nf1_cml
-
export NF_WORK_DIR=/tmp/${USER}
-
export PYTHONPATH=${NF_ROOT}/lib/python:${NF_DESIGN_DIR}/lib/Python:${NF_ROOT}/tools/scripts:
-
export LD_LIBRARY_PATH=${NF_ROOT}/lib/java/NetFPGAFrontEnd/bin:${LD_LIBRARY_PATH
然后执行命令
source bashrc_addon_NetFPGA_10G为了更好确认上部是否写对,可以执行一下命令看看输出
echo $NF_ROOT此时如果输出为仓库的所在的绝对路径,就证明正确了。
Step3、 Build the Libraries and IP
此处由于笔者还不了解大概这些库的功能,中文无法直接翻译。
tip:这个步骤的过程一定要基于ISE已经导入license
To build the hardware test libraries for the hardware and simulation tests:
-
cd $NF_ROOT
-
make hwtestlib
To build the IP cores used by the NF1-CML projects:
make cml_cores上述两个步骤,若无出现make ...错误都表示步骤已经成功进行。
Step4、编译一个工程
本次 $NF_DESIGN_DIR所选择的工程为 reference_nic_nf1_cml一个简单的网卡(若想编译其他工程,记得去bashrc_addon_NetFPGA_10G修改对应的$NF_DESIGN_DIR路径)
-
cd $NF_DESIGN_DIR
-
make
此时你会等待相当长的一段时间,最后如果成功后最后两行会显示如下:
-
mkdir -p bitfiles
-
cp hw/implementation/download.bit bitfiles/reference_nic_nf1_cml.bit
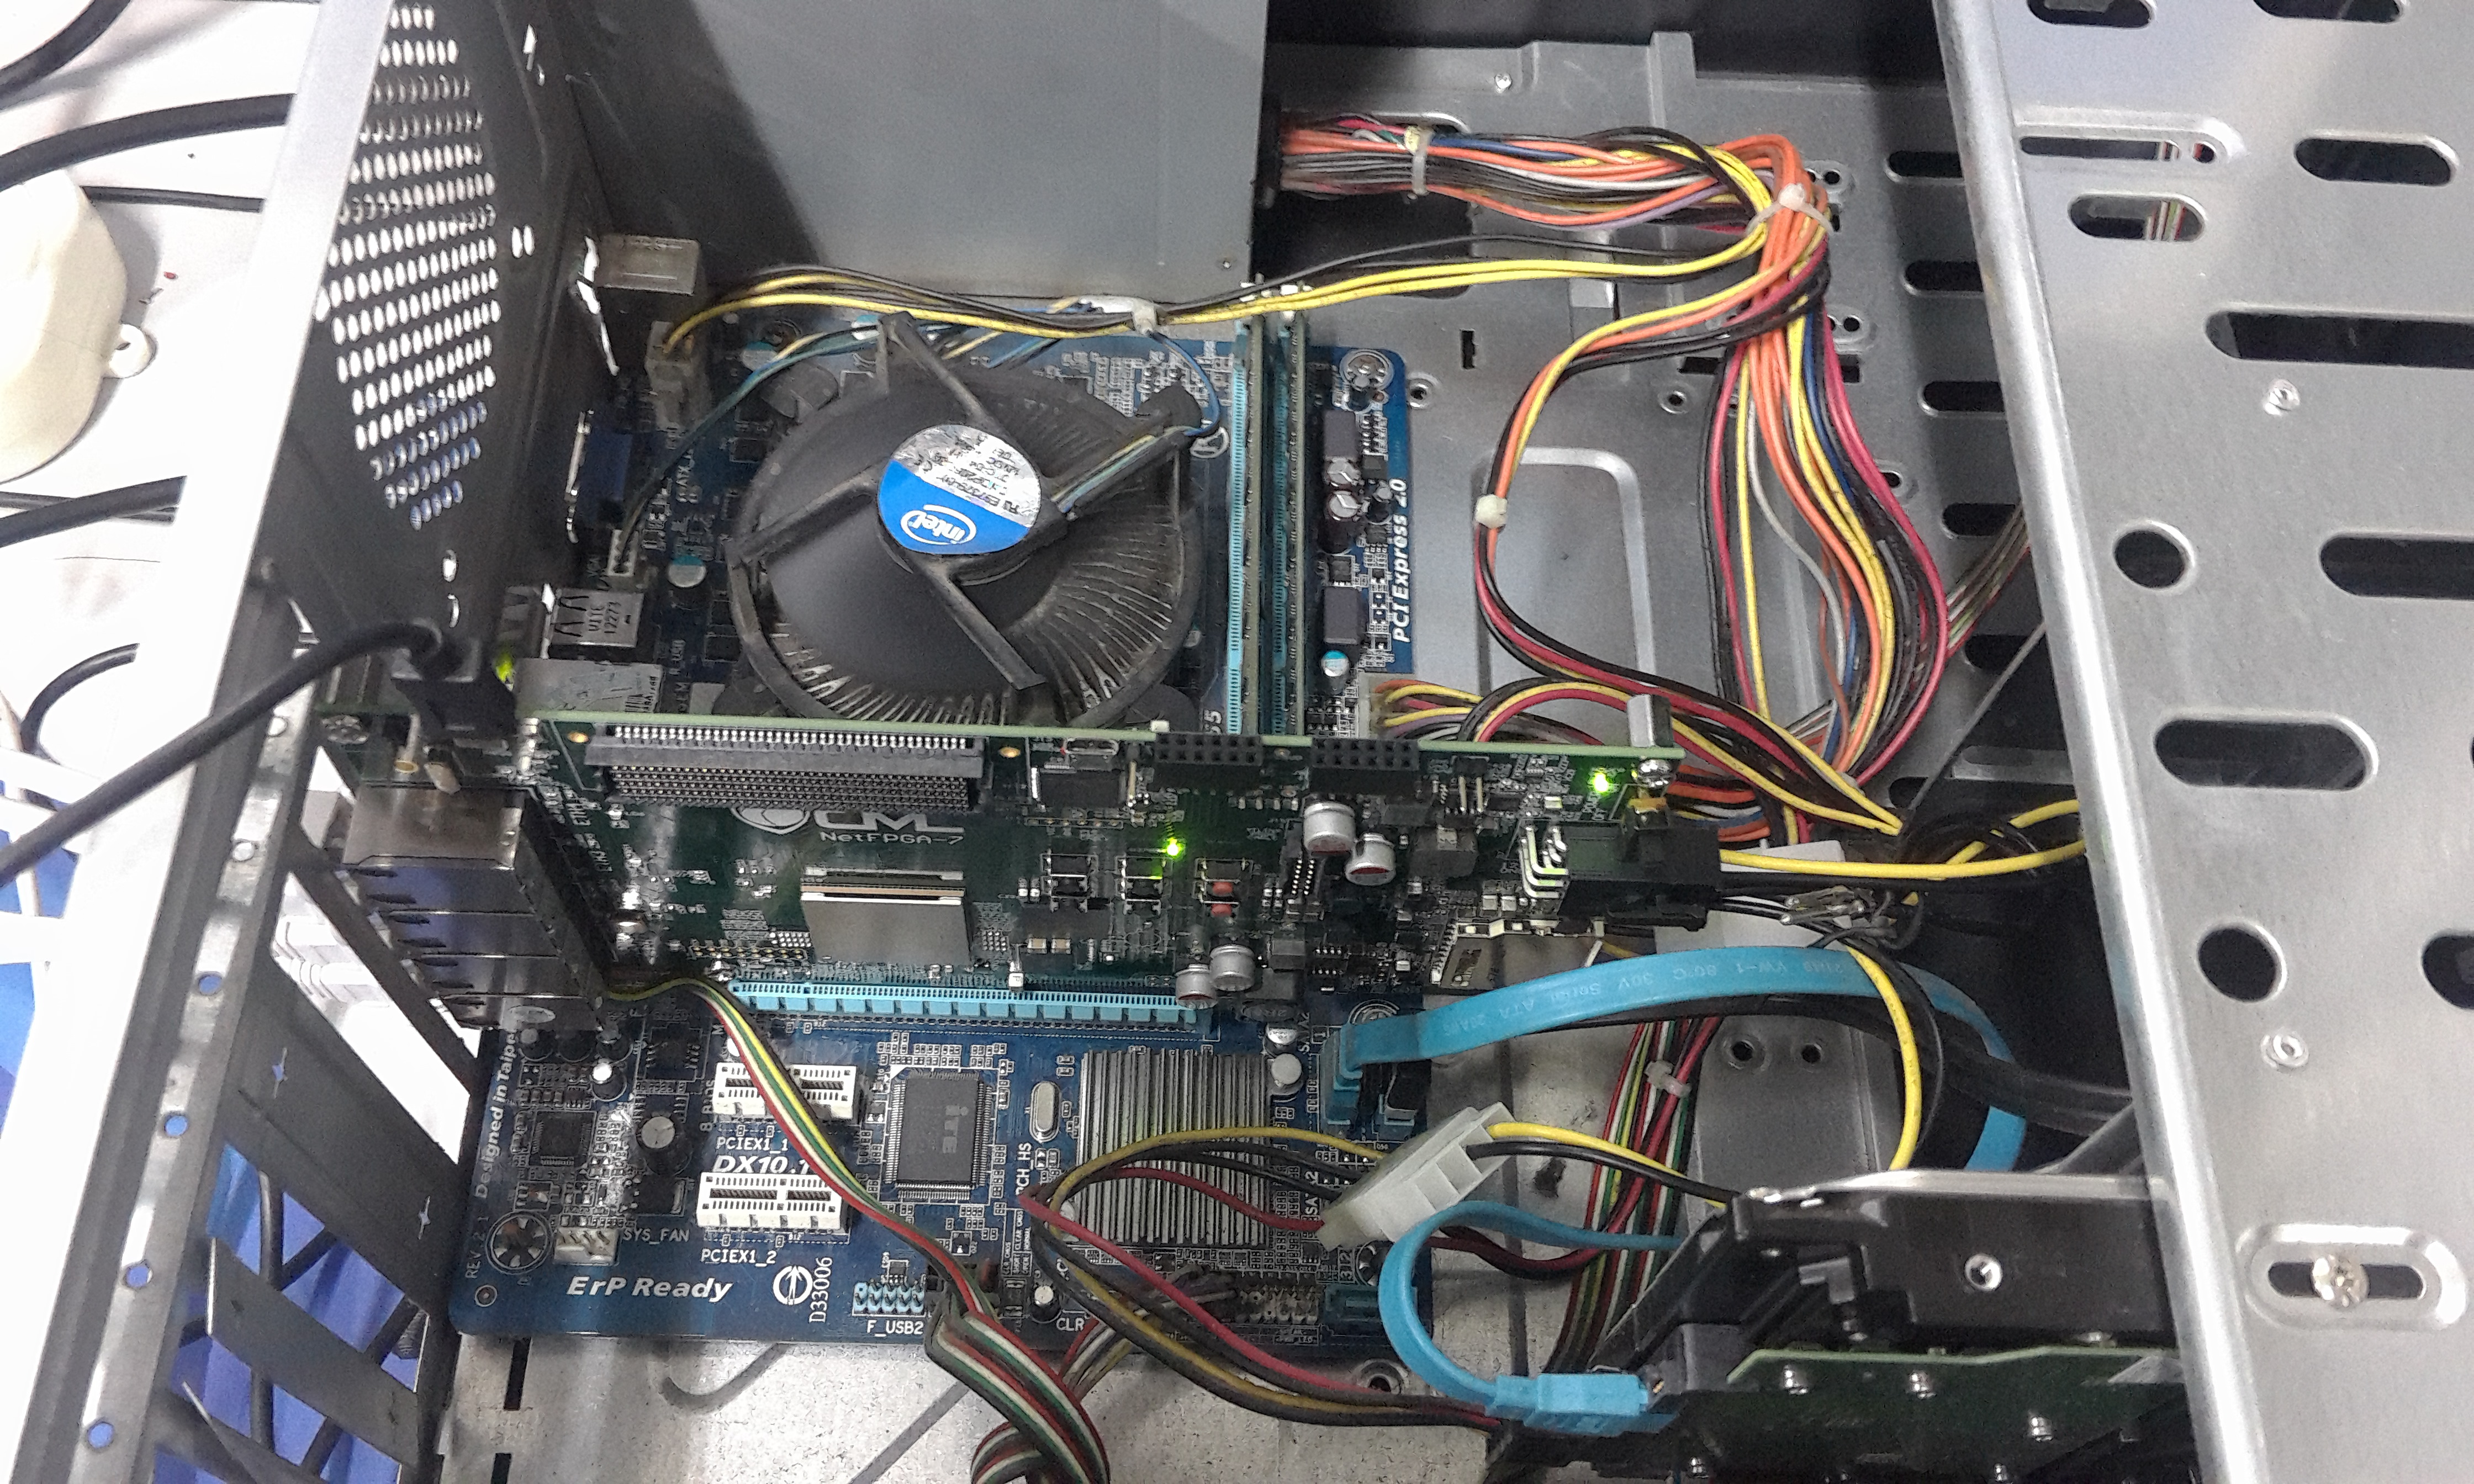
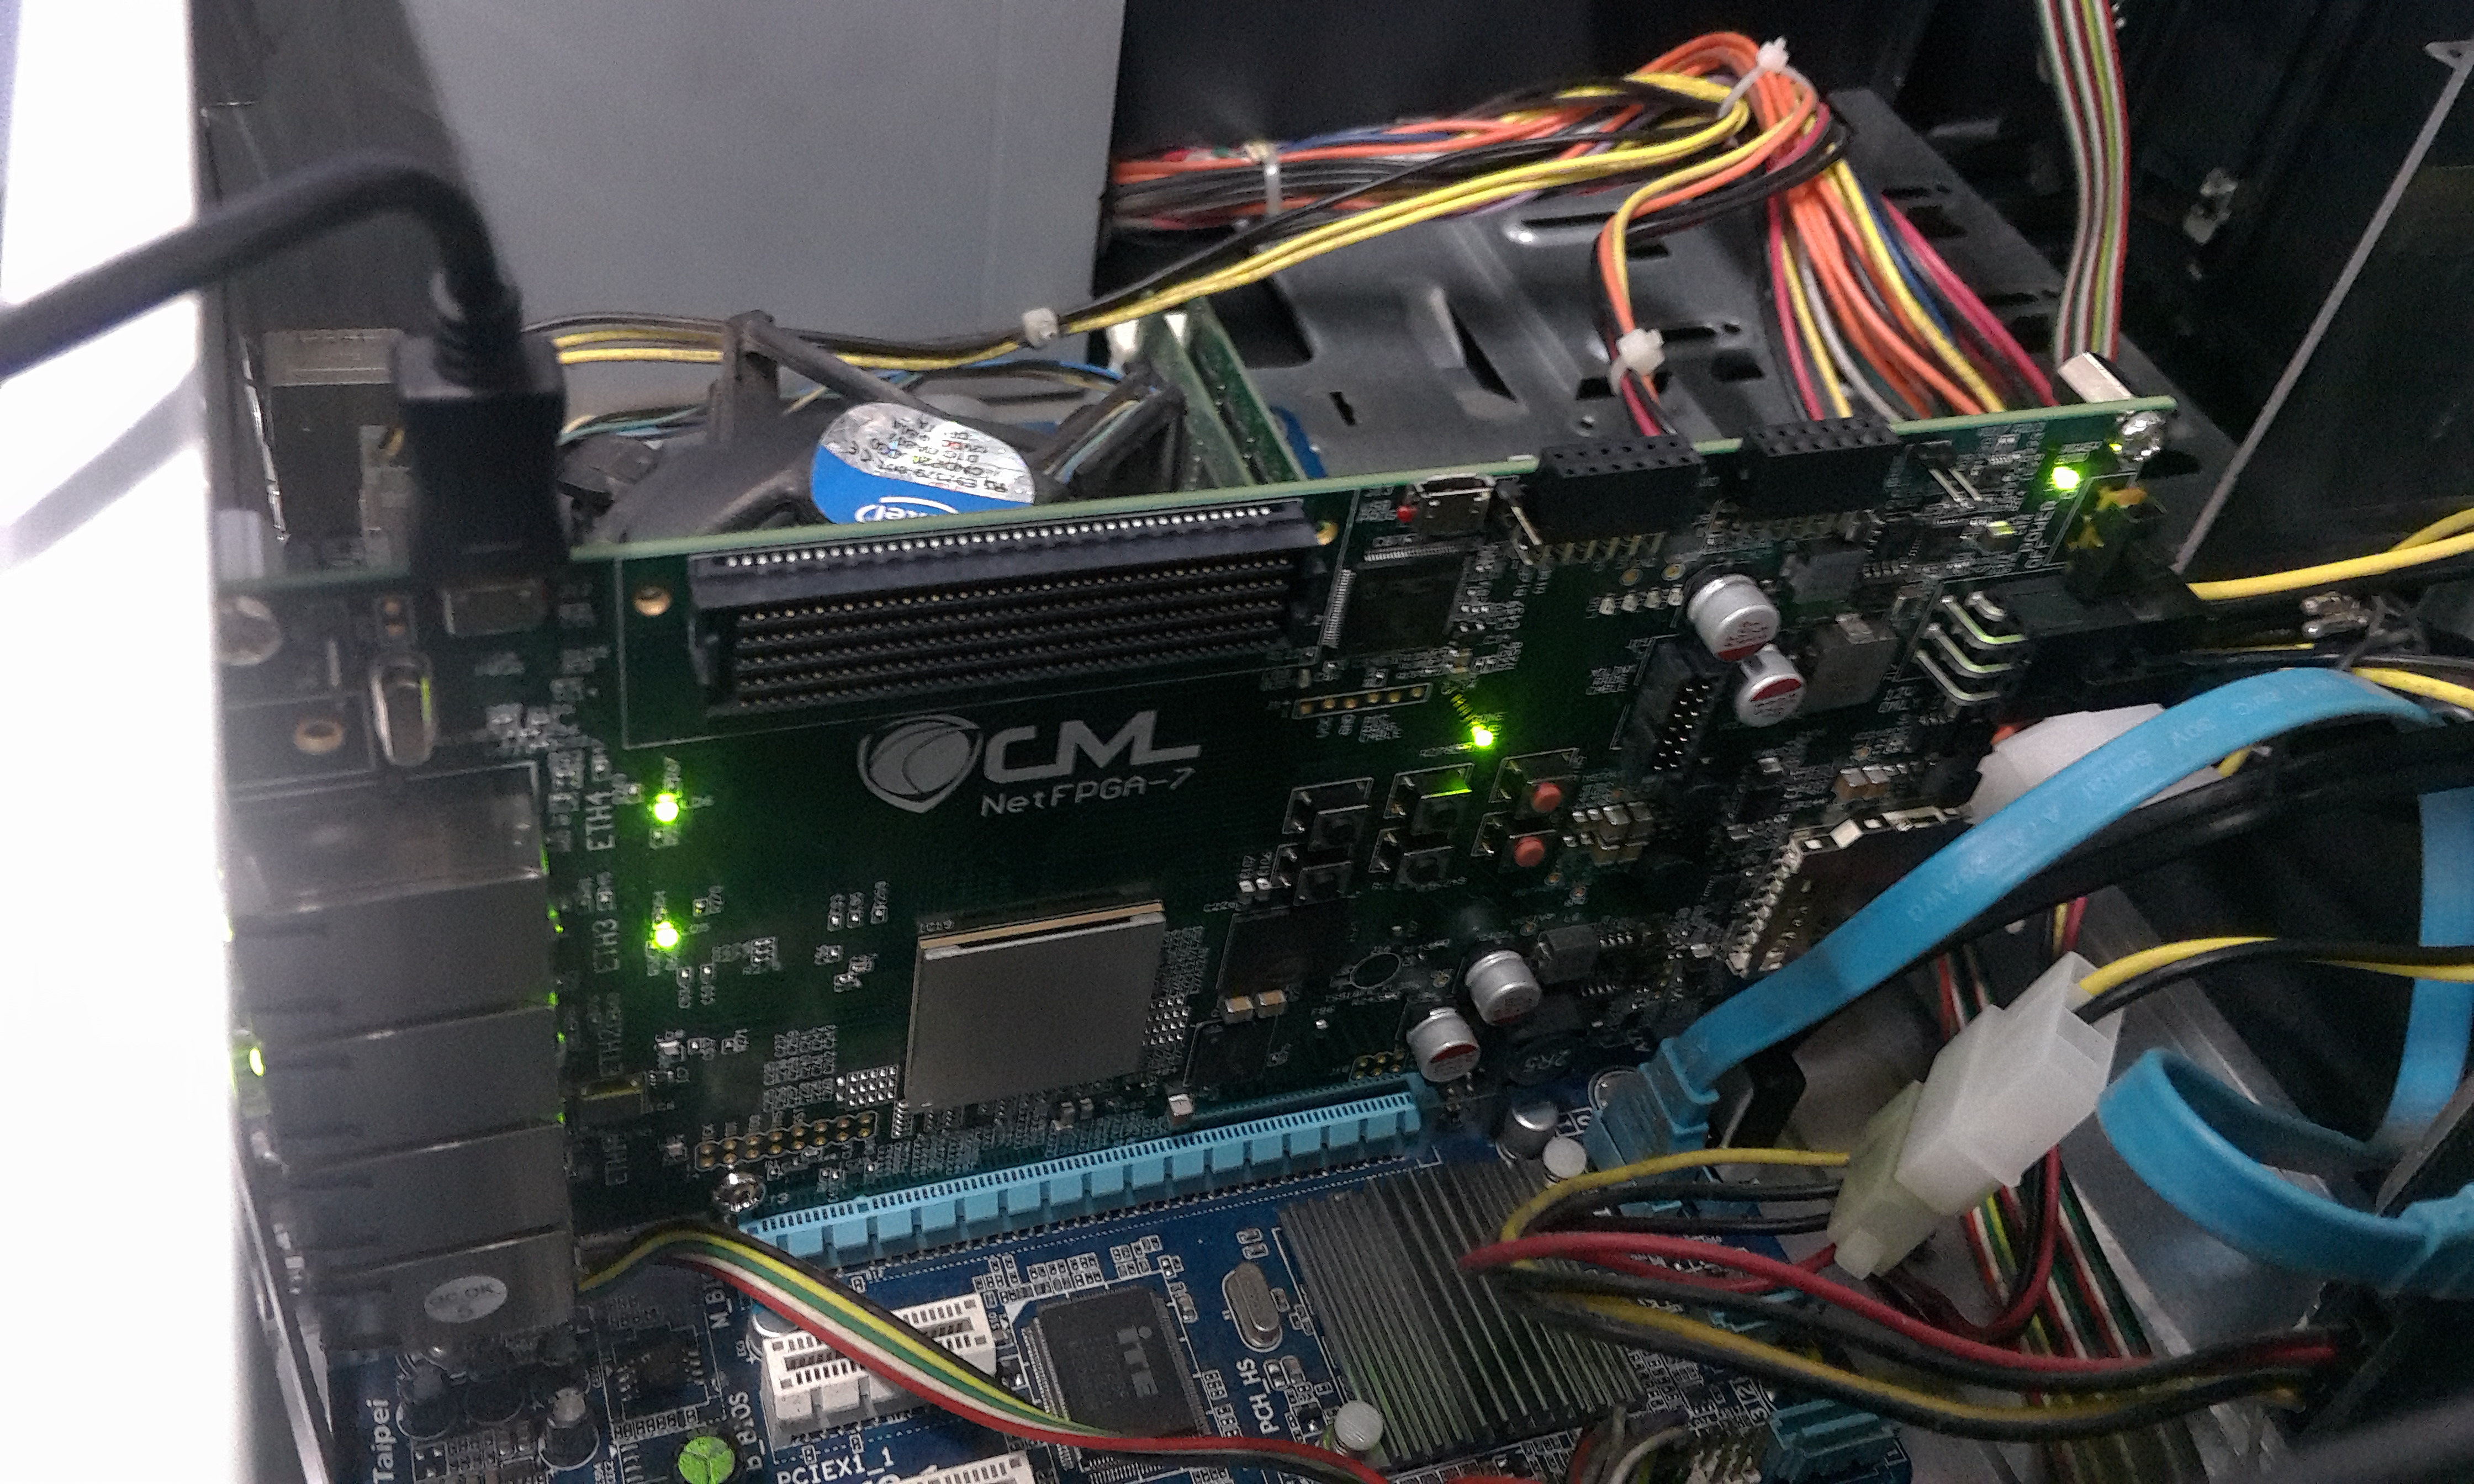
Step5、连接FPGA到主机
笔者是用J12的usb jtag引脚作为连接主机的口,这里主要介绍一下相关驱动的安装,以及一些坑。
如图所示

首先下载usb驱动,驱动:rmdir.de/~michael/xilinx/
驱动安装步骤
-
tar -xvf usb-driver-HEAD-xxxxxxx.tar.gz
-
cd usb-driver-HEAD-xxxxxxx
-
source /opt/Xilinx/13.4/ISE_DS/settings64.sh 这里要相应改变
-
make
-
./setup_pcusb
-
cp libusb-driver.so /usr/local/lib/libusb-jtag-driver.so
-
export LD_PRELOAD=/usr/local/lib/libusb-jtag-driver.so
之后用命令lsusb可以看到
-
[netfpga@localhost bin]$ lsusb
-
Bus 001 Device 002: ID 8087:0024 Intel Corp. Integrated Rate Matching Hub
-
Bus 002 Device 002: ID 8087:0024 Intel Corp. Integrated Rate Matching Hub
-
Bus 001 Device 001: ID 1d6b:0002 Linux Foundation 2.0 root hub
-
Bus 002 Device 001: ID 1d6b:0002 Linux Foundation 2.0 root hub
-
Bus 001 Device 003: ID 1443:0007 Digilent Development board JTAG //这个就是我们的设备
-
Bus 002 Device 003: ID 1c4f:0002 SiGma Micro Keyboard TRACER Gamma Ivory
-
Bus 002 Device 004: ID 192f:0916 Avago Technologies, Pte.
可是通过impact &打开ISE impact又有提示如下图所示问题,需重新装驱动
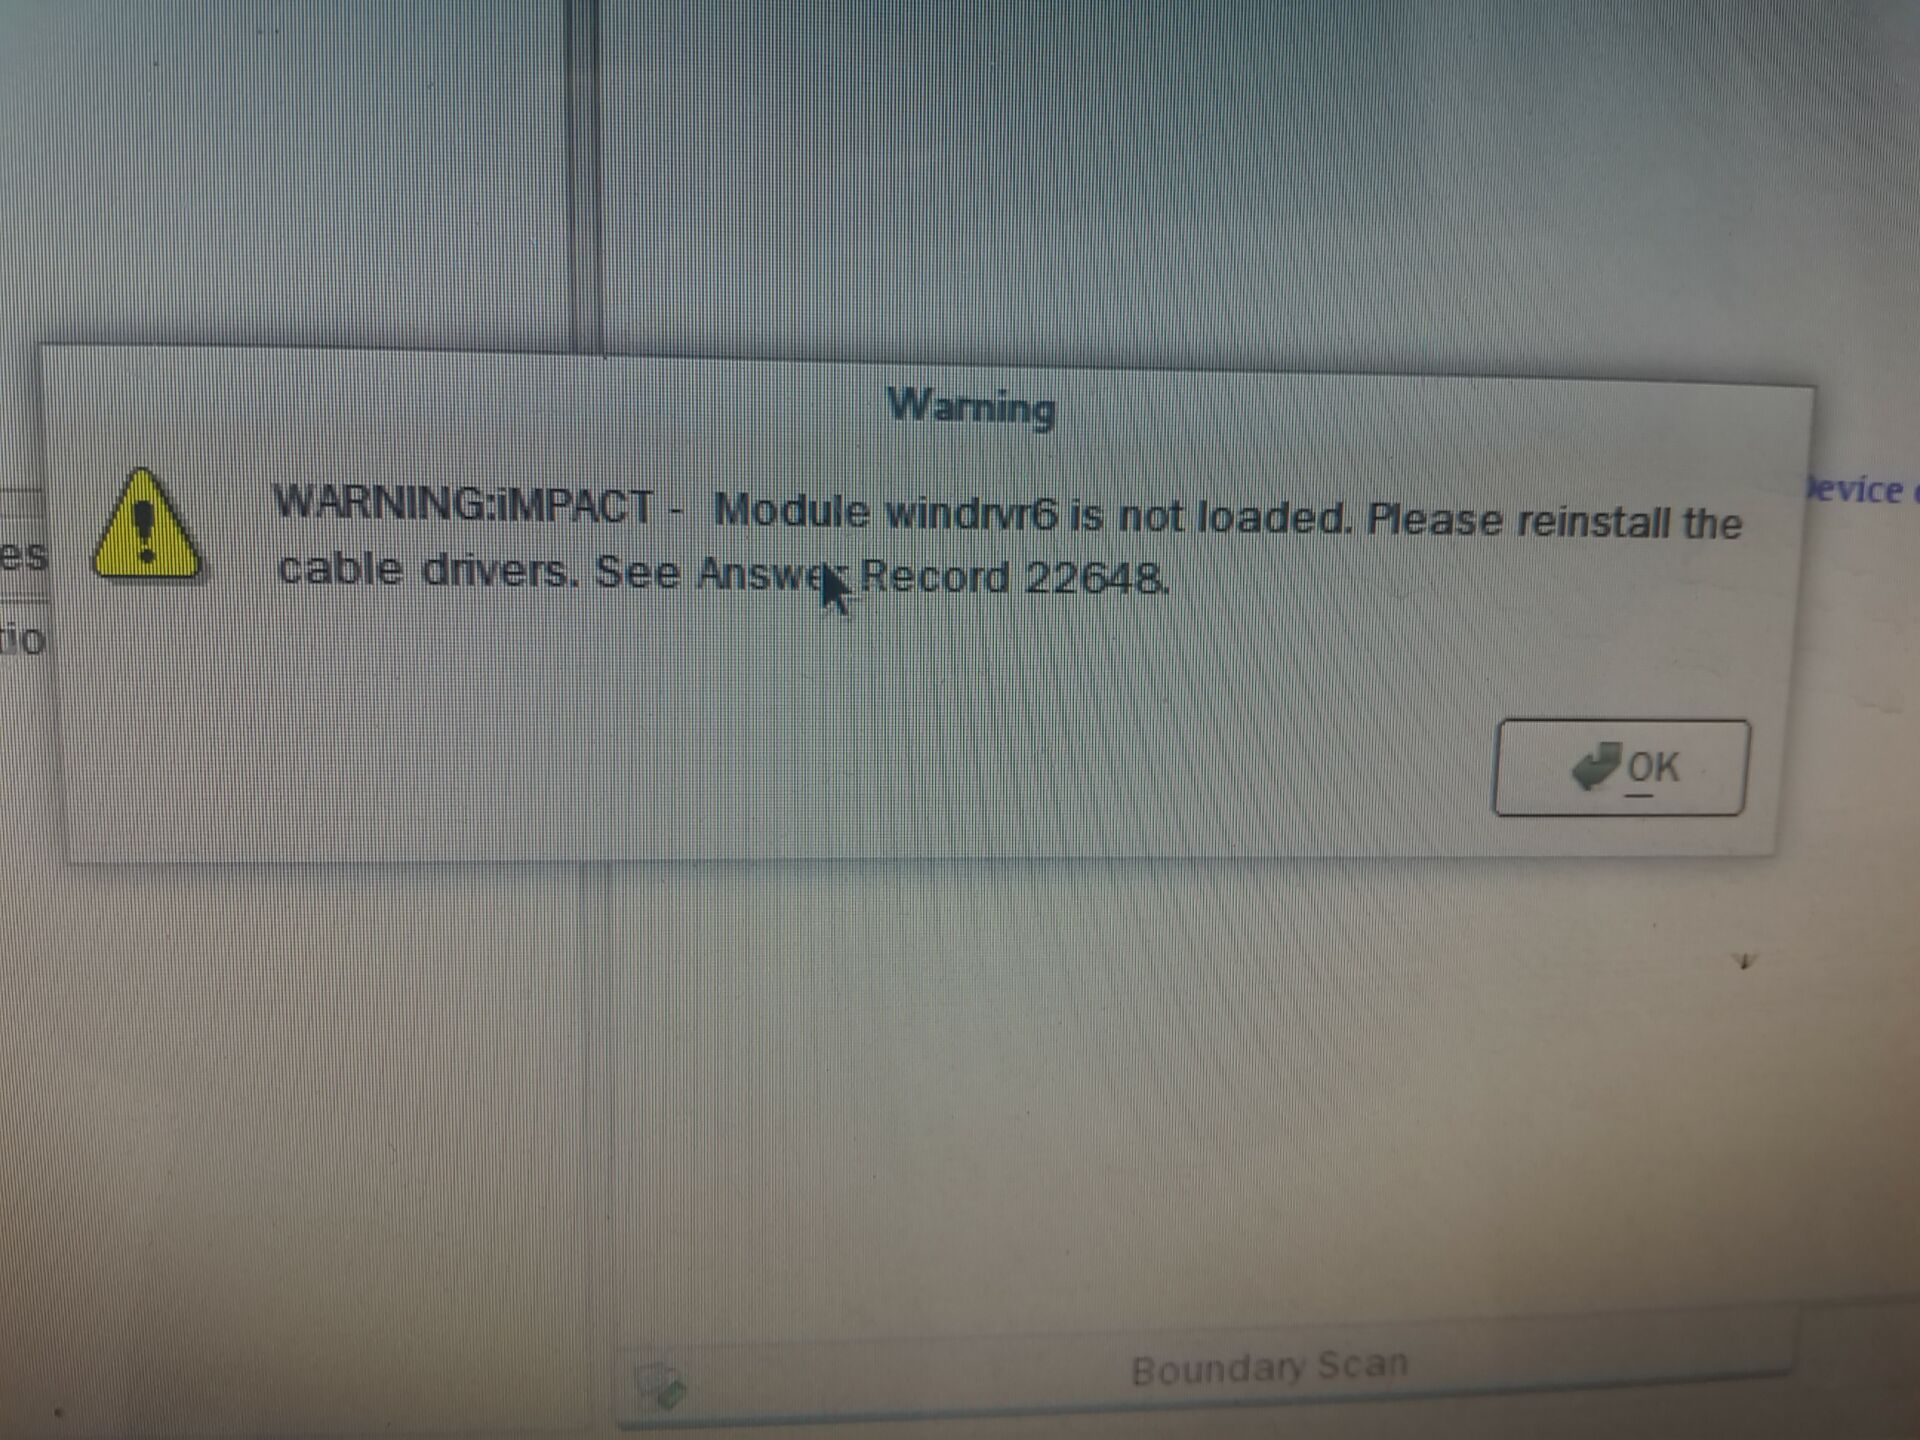

后来在技术人员帮助下,有了一个解决答案,具体的下载文件请移步另外一篇博客:Digilent Xilinx USB Jtag cable。
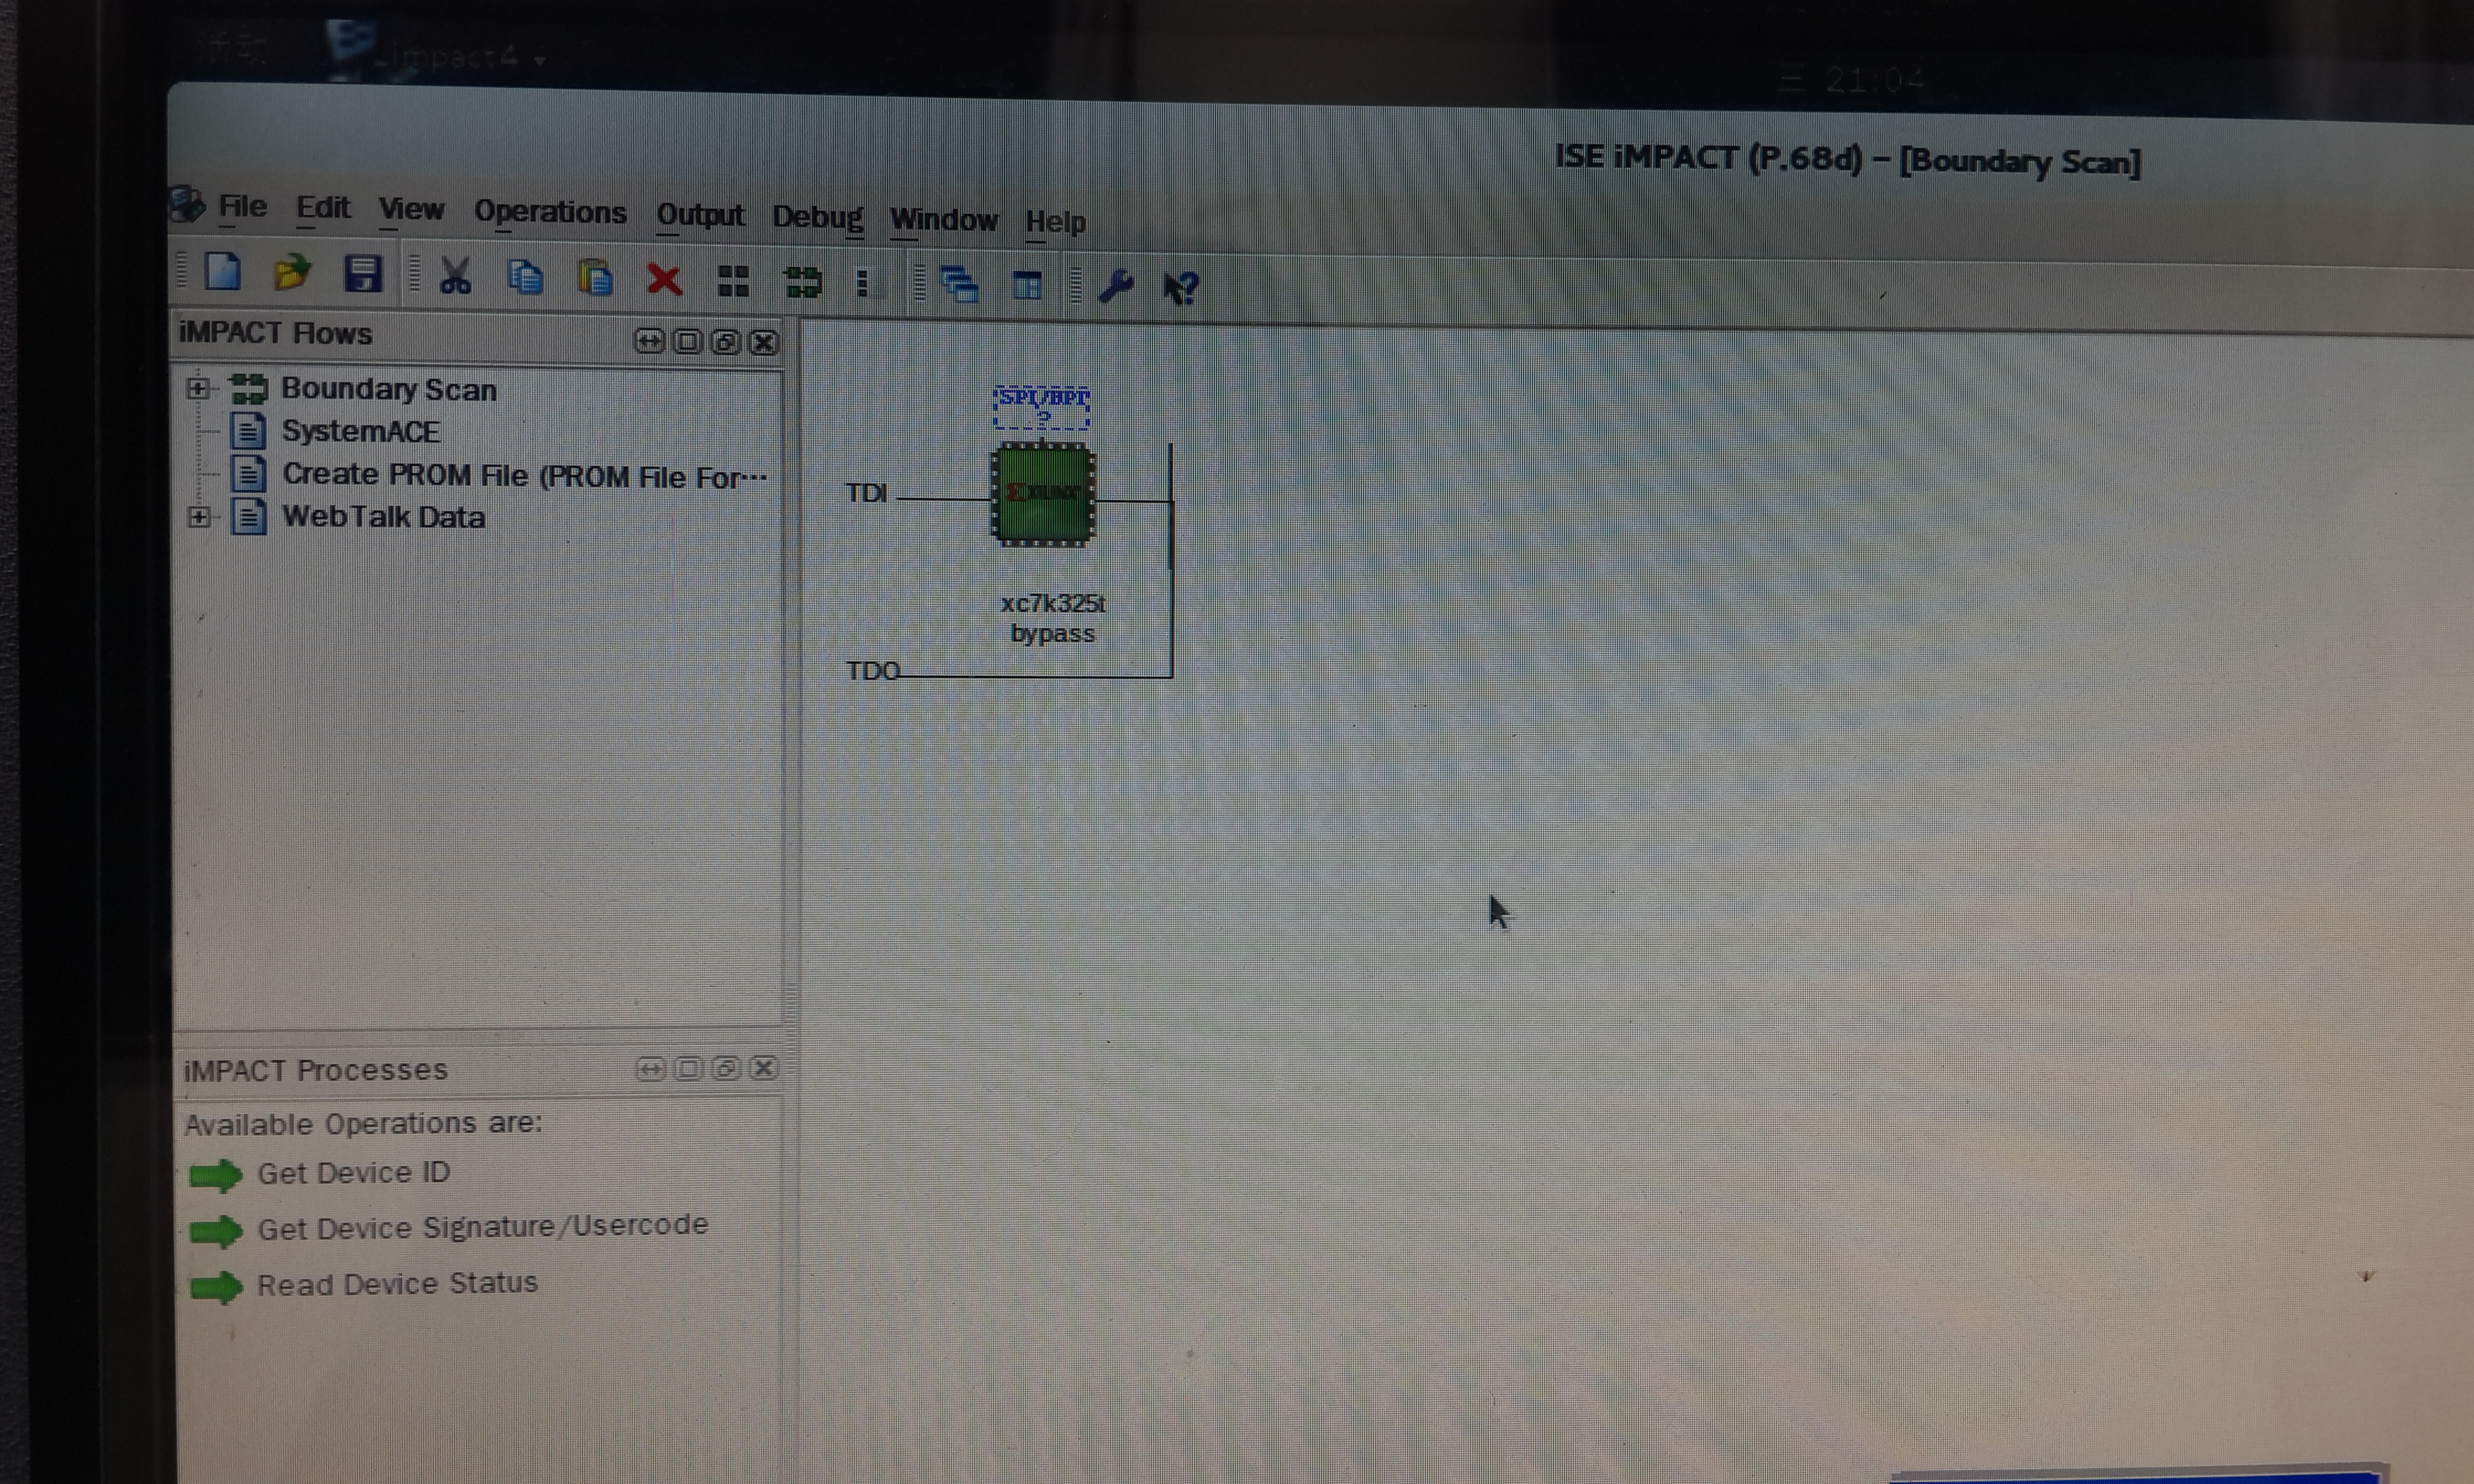
根据上述做完,即可从impact &看到我们的FPGA芯片。
Step6、烧写程序到FPGA中
进入到项目文件夹下,执行以下命令
make download然后烧写成功后,会有如下输出
-
INFO:iMPACT - '1': Checking done pin....done.
-
-
Elapsed time = 62 sec.
-
rm -f bitfiles/download.bit
Step7、安装NetFPGA-1G-CML作为系统设备
首先确保已经把NetFPGA-1G-CML开发板插到PCIe口上,如图所示

然后执行以下命令,并可看到该设备
-
lspci | grep Xilinx
-
01:00.0 Ethernet controller: Xilinx Corporation Device 4244
安装NetFPGA-1G-CML驱动,在这之前,请在执行一次
-
cd $NF_ROOT
-
source bashrc_addon_NetFPGA_10G
-
make hwtestlib
安装必要组件
sudo yum install kernel-devel-3.11.10-301.fc20.x86_64编译驱动
-
cd $NF_DESIGN_DIR/sw/host/driver
-
make
安装驱动
sudo insmod nf10.ko初始化NetFPGA-1G-CML的四个以太网接口
-
sudo ifconfig nf0 up
-
sudo ifconfig nf1 up
-
sudo ifconfig nf2 up
-
sudo ifconfig nf3 up
执行一下ifconfig,可以看到四个以太网卡出现了
-
[netfpga@localhost bin]$ ifconfig
-
lo: flags=73<UP,LOOPBACK,RUNNING> mtu 65536
-
inet 127.0.0.1 netmask 255.0.0.0
-
inet6 ::1 prefixlen 128 scopeid 0x10<host>
-
loop txqueuelen 0 (Local Loopback)
-
RX packets 10 bytes 940 (940.0 B)
-
RX errors 0 dropped 0 overruns 0 frame 0
-
TX packets 10 bytes 940 (940.0 B)
-
TX errors 0 dropped 0 overruns 0 carrier 0 collisions 0
-
-
nf0: flags=4163<UP,BROADCAST,RUNNING,MULTICAST> mtu 1500
-
inet 192.168.200.1 netmask 255.255.255.0 broadcast 192.168.200.255
-
inet6 fe80::24e:46ff:fe31:3000 prefixlen 64 scopeid 0x20<link>
-
ether 00:4e:46:31:30:00 txqueuelen 1000 (Ethernet)
-
RX packets 377 bytes 528796 (516.4 KiB)
-
RX errors 0 dropped 0 overruns 0 frame 0
-
TX packets 377 bytes 534074 (521.5 KiB)
-
TX errors 0 dropped 0 overruns 0 carrier 0 collisions 0
-
device interrupt 30
-
-
nf1: flags=4163<UP,BROADCAST,RUNNING,MULTICAST> mtu 1500
-
inet 192.168.201.1 netmask 255.255.255.0 broadcast 192.168.201.255
-
inet6 fe80::24e:46ff:fe31:3001 prefixlen 64 scopeid 0x20<link>
-
ether 00:4e:46:31:30:01 txqueuelen 1000 (Ethernet)
-
RX packets 377 bytes 528796 (516.4 KiB)
-
RX errors 0 dropped 0 overruns 0 frame 0
-
TX packets 377 bytes 534074 (521.5 KiB)
-
TX errors 0 dropped 0 overruns 0 carrier 0 collisions 0
-
device interrupt 30
-
-
nf2: flags=4163<UP,BROADCAST,RUNNING,MULTICAST> mtu 1500
-
inet 192.168.202.1 netmask 255.255.255.0 broadcast 192.168.202.255
-
inet6 fe80::24e:46ff:fe31:3002 prefixlen 64 scopeid 0x20<link>
-
ether 00:4e:46:31:30:02 txqueuelen 1000 (Ethernet)
-
RX packets 371 bytes 528372 (515.9 KiB)
-
RX errors 0 dropped 0 overruns 0 frame 0
-
TX packets 377 bytes 534074 (521.5 KiB)
-
TX errors 0 dropped 0 overruns 0 carrier 0 collisions 0
-
device interrupt 30
-
-
nf3: flags=4163<UP,BROADCAST,RUNNING,MULTICAST> mtu 1500
-
inet 192.168.203.1 netmask 255.255.255.0 broadcast 192.168.203.255
-
inet6 fe80::24e:46ff:fe31:3003 prefixlen 64 scopeid 0x20<link>
-
ether 00:4e:46:31:30:03 txqueuelen 1000 (Ethernet)
-
RX packets 370 bytes 528316 (515.9 KiB)
-
RX errors 0 dropped 0 overruns 0 frame 0
-
TX packets 377 bytes 534074 (521.5 KiB)
-
TX errors 0 dropped 0 overruns 0 carrier 0 collisions 0
-
device interrupt 30
-
-
p4p1: flags=4163<UP,BROADCAST,RUNNING,MULTICAST> mtu 1500
-
inet 192.168.2.105 netmask 255.255.255.0 broadcast 192.168.2.255
-
inet6 fe80::922b:34ff:feba:728b prefixlen 64 scopeid 0x20<link>
-
ether 90:2b:34:ba:72:8b txqueuelen 1000 (Ethernet)
-
RX packets 3421 bytes 2595675 (2.4 MiB)
-
RX errors 0 dropped 0 overruns 0 frame 0
-
TX packets 5648 bytes 583390 (569.7 KiB)
-
TX errors 0 dropped 0 overruns 0 carrier 0 collisions 0
Step8、Making Registers
对于这个步骤,笔者较为陌生,编译寄存器的相关映射,再次只做操作步骤,原理还需细究
在此处步骤,笔者遇到一个莫名其妙的问题,编译不通过,然后出去吃个饭,重启了一下,重新打开makefile保存了一下,竟莫名其妙的解决了.(已解决)
解决方案,重新打开一个终端,执行命令
-
source /opt/Xilinx/14.6/ISE_DS/settings64.sh
-
source bashrc_addon_NetFPGA_10G
然后在去执行上述步骤
Step9、Verify the Design in Hardware with the Test Infrastructure
最终步骤验证实验,并把四个以太网口按如图所示接上,NF0---NF3,NF1---NF2

-
cd $NF_ROOT/tools/bin
-
su -c "./nf_test.py hw --major loopback --minor maxsize"
然后如果测试成功会有如下显示:
-
Running global setup... PASS
-
Running test both_loopback_maxsize... PASS
-
Running global teardown... PASS
然后在执行一遍ifconfig,可以发现NF0-3各个网卡的收发包较上次执行ifconfig有了上涨
-
[netfpga@localhost bin]$ ifconfig
-
lo: flags=73<UP,LOOPBACK,RUNNING> mtu 65536
-
inet 127.0.0.1 netmask 255.0.0.0
-
inet6 ::1 prefixlen 128 scopeid 0x10<host>
-
loop txqueuelen 0 (Local Loopback)
-
RX packets 10 bytes 940 (940.0 B)
-
RX errors 0 dropped 0 overruns 0 frame 0
-
TX packets 10 bytes 940 (940.0 B)
-
TX errors 0 dropped 0 overruns 0 carrier 0 collisions 0
-
-
nf0: flags=4163<UP,BROADCAST,RUNNING,MULTICAST> mtu 1500
-
inet 192.168.200.1 netmask 255.255.255.0 broadcast 192.168.200.255
-
inet6 fe80::24e:46ff:fe31:3000 prefixlen 64 scopeid 0x20<link>
-
ether 00:4e:46:31:30:00 txqueuelen 1000 (Ethernet)
-
RX packets 427 bytes 603796 (589.6 KiB)
-
RX errors 0 dropped 0 overruns 0 frame 0
-
TX packets 427 bytes 609774 (595.4 KiB)
-
TX errors 0 dropped 0 overruns 0 carrier 0 collisions 0
-
device interrupt 30
-
-
nf1: flags=4163<UP,BROADCAST,RUNNING,MULTICAST> mtu 1500
-
inet 192.168.201.1 netmask 255.255.255.0 broadcast 192.168.201.255
-
inet6 fe80::24e:46ff:fe31:3001 prefixlen 64 scopeid 0x20<link>
-
ether 00:4e:46:31:30:01 txqueuelen 1000 (Ethernet)
-
RX packets 427 bytes 603796 (589.6 KiB)
-
RX errors 0 dropped 0 overruns 0 frame 0
-
TX packets 427 bytes 609774 (595.4 KiB)
-
TX errors 0 dropped 0 overruns 0 carrier 0 collisions 0
-
device interrupt 30
-
-
nf2: flags=4163<UP,BROADCAST,RUNNING,MULTICAST> mtu 1500
-
inet 192.168.202.1 netmask 255.255.255.0 broadcast 192.168.202.255
-
inet6 fe80::24e:46ff:fe31:3002 prefixlen 64 scopeid 0x20<link>
-
ether 00:4e:46:31:30:02 txqueuelen 1000 (Ethernet)
-
RX packets 421 bytes 603372 (589.2 KiB)
-
RX errors 0 dropped 0 overruns 0 frame 0
-
TX packets 427 bytes 609774 (595.4 KiB)
-
TX errors 0 dropped 0 overruns 0 carrier 0 collisions 0
-
device interrupt 30
-
-
nf3: flags=4163<UP,BROADCAST,RUNNING,MULTICAST> mtu 1500
-
inet 192.168.203.1 netmask 255.255.255.0 broadcast 192.168.203.255
-
inet6 fe80::24e:46ff:fe31:3003 prefixlen 64 scopeid 0x20<link>
-
ether 00:4e:46:31:30:03 txqueuelen 1000 (Ethernet)
-
RX packets 420 bytes 603316 (589.1 KiB)
-
RX errors 0 dropped 0 overruns 0 frame 0
-
TX packets 427 bytes 609774 (595.4 KiB)
-
TX errors 0 dropped 0 overruns 0 carrier 0 collisions 0
-
device interrupt 30
-
-
p4p1: flags=4163<UP,BROADCAST,RUNNING,MULTICAST> mtu 1500
-
inet 192.168.2.105 netmask 255.255.255.0 broadcast 192.168.2.255
-
inet6 fe80::922b:34ff:feba:728b prefixlen 64 scopeid 0x20<link>
-
ether 90:2b:34:ba:72:8b txqueuelen 1000 (Ethernet)
-
RX packets 3441 bytes 2598545 (2.4 MiB)
-
RX errors 0 dropped 0 overruns 0 frame 0
-
TX packets 5697 bytes 590789 (576.9 KiB)
-
TX errors 0 dropped 0 overruns 0 carrier 0 collisions 0
至此,安装环境测试完毕
结语
本篇博客只是把NetFPGA-1G-CML的步骤走了一遍,描述了遇到的问题以及相关解决方案,并没有详细描述每一个步骤的目的,建议读者阅读原github上的Getting-Started-Guide,并以本文作为辅助。
图片较为模糊,很抱歉,也较大。
转载于:https://www.cnblogs.com/wpqwpq/p/6771568.html
