SpringBoot整合knife4j
1.概述
Swagger是一款测试文档Api接口,具体用法见SpringBoot整合Swagger。而knife4j是对Swagger进一步封装,其优化了api文档的界面。官网https://doc.xiaominfo.com/knife4j/documentation/。
2.实战演练
2.1环境准备
新建一个SpringBoot的项目,导入需要的依赖
        <dependency>
            <groupId>org.springframework.boot</groupId>
            <artifactId>spring-boot-starter-web</artifactId>
        </dependency>
        <dependency>
            <groupId>org.projectlombok</groupId>
            <artifactId>lombok</artifactId>
        </dependency>
2.2接入knife4j
1)导入依赖
<dependency>
    <groupId>com.github.xiaoymin</groupId>
    <artifactId>knife4j-spring-boot-starter</artifactId>
    <version>3.0.3</version>
</dependency>
2)创建配置类
package com.example.demo.config;

import com.github.xiaoymin.knife4j.spring.annotations.EnableKnife4j;
import org.springframework.context.annotation.Bean;
import org.springframework.context.annotation.Configuration;
import springfox.documentation.builders.ApiInfoBuilder;
import springfox.documentation.builders.PathSelectors;
import springfox.documentation.builders.RequestHandlerSelectors;
import springfox.documentation.service.ApiInfo;
import springfox.documentation.service.Contact;
import springfox.documentation.spi.DocumentationType;
import springfox.documentation.spring.web.plugins.Docket;
import springfox.documentation.swagger2.annotations.EnableSwagger2;

@Configuration
@EnableSwagger2
@EnableKnife4j
public class Knife4jConfig {

    @Bean
    public Docket createRestApi() {
        return new Docket(DocumentationType.SWAGGER_2)
                .useDefaultResponseMessages(false)
                .apiInfo(apiInfo())
                .select()
                .apis(RequestHandlerSelectors.basePackage("com.example.demo.controller"))
                .paths(PathSelectors.any())
                .build();

    }

    private ApiInfo apiInfo() {
        return new ApiInfoBuilder()
                .description("微微一笑接口测试文档")
                .contact(new Contact("哈哈哈", "https://github.com.lenve", "1916008067@qq.com"))
                .version("v1.1.0")
                .title("API测试文档")
                .build();
    }

}
3)创建User实体类
package com.example.demo;

import io.swagger.annotations.ApiModel;
import io.swagger.annotations.ApiModelProperty;
import lombok.Data;

@Data
@ApiModel(value = "用户实体")
public class User {

    @ApiModelProperty(value = "id")
    private Integer id;

    @ApiModelProperty(value = "用户名")
    private  String username;

    @ApiModelProperty(value = "性别,0男,1女")
    private Integer sex;

}
4)创建开发接口
package com.example.demo.controller;

import com.example.demo.User;
import io.swagger.annotations.*;
import org.springframework.web.bind.annotation.*;
import springfox.documentation.annotations.ApiIgnore;

@RestController
@Api(tags = "用户接口")//描述UserController的信息
public class UserController {

    @ApiOperation(value = "查询用户",notes = "根据id查询用户")
    @ApiImplicitParam(paramType = "path",name="id",value = "用户id",required = true)
    @GetMapping("/user/query/{id}")
    public String getUserById(@PathVariable Integer id) {
        return "/user/"+id;
    }

    @ApiResponses({
            @ApiResponse(code=200,message="删除成功"),
            @ApiResponse(code=500,message="删除失败")})
    @ApiOperation(value = "删除用户",notes = "根据id删除用户")
    @DeleteMapping("/user/delete/{id}")
    public Integer deleteUserById(@PathVariable Integer id) {
        return id;
    }

    @ApiOperation(value = "添加用户",notes = "添加一个用户,传入用户名和性别")
    @ApiImplicitParams({
            @ApiImplicitParam(paramType = "query",name="username",value = "用户名",required = true,defaultValue = "张三"),
            @ApiImplicitParam(paramType = "query",name="sex",value = "性别",required = true,defaultValue = "女")
    })
    @PostMapping("/user")
    public String addUser(@RequestParam String username,@RequestParam String sex){
        return username+","+sex;
    }

    @ApiOperation(value="修改用户",notes = "根据传入的用户信息修改用户")
    @PutMapping("/user")
    public String updateUser(@RequestBody User user){
        return user.toString();
    }

    @GetMapping("/ignore")
    @ApiIgnore
    public void ignoreMethod(){}


}
4)测试。启动项目,在浏览器输入http://localhost:8080/doc.html就可以看到接口的信息,展开接口,就能看到所有的接口详细信息。

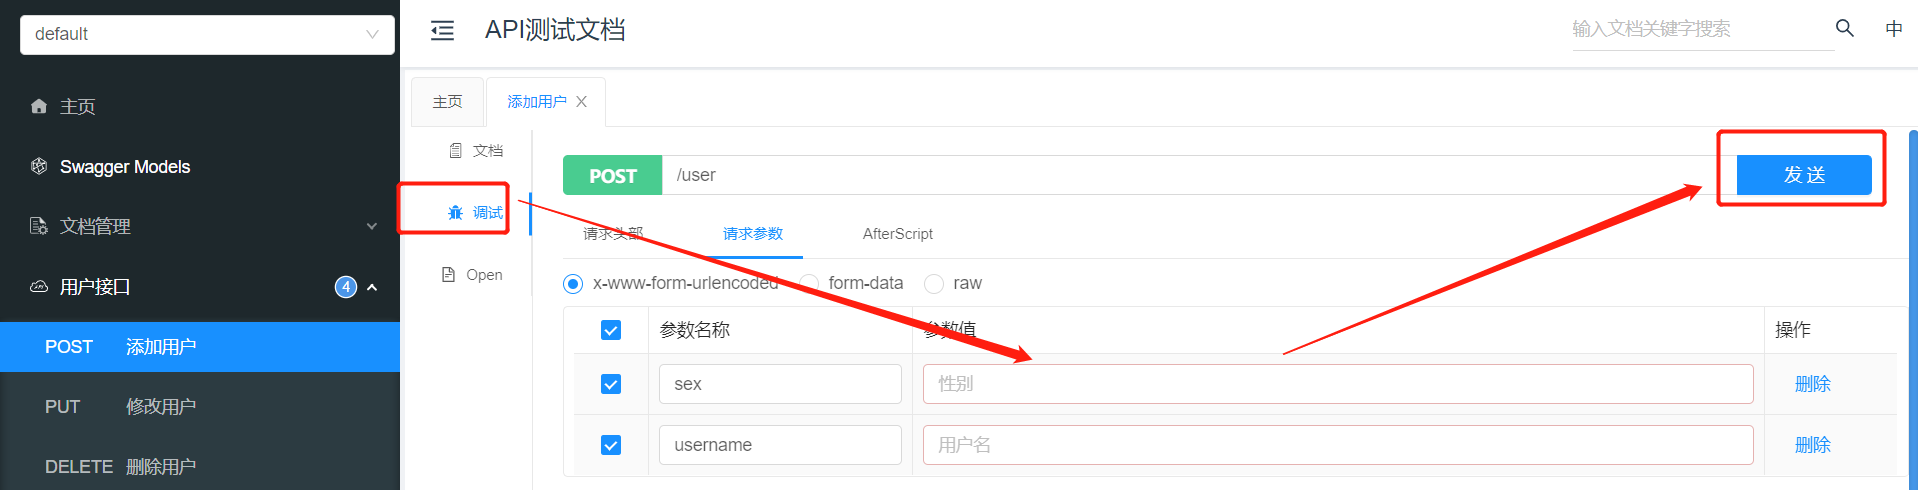
展开后可以对各个请求进行测试。选择接口后点击调试,输入相关的参数点击发送按钮即可。
就是这么简单,你学废了吗?感觉有用的话,给笔者点个赞吧 !

 浙公网安备 33010602011771号