设计模式:命令(Command)模式
设计模式:命令(Command)模式
一、前言
命令也是类,将命令作为一个类来保存,当要使用的时候可以直接拿来使用,比如脚本语言写出的脚本,只需要一个命令就能执行得到我们想要的需要操作很长时间才能得到的结果。这是一个非常有意思的模式,将操作的步骤保存下来,本例之中我们使用java自带的GUI来画图,然后将画图的过程(在哪个地方画了什么东西)保存下来,可以把每一次我们的操作作为一个命令,其实就是<使用什么画布,画点的坐标>,将这个命令对应的对象保存到所有命令对象的集合之中去,这样命令集合就记录下来了每一个命令,如果要显示画的内容的时候,直接将这些命令组合读取出来在进行一次重画即可。通过这种模式保存下来已经执行的步骤,通过重画再复述出来,是一种非常重要的开发理念,在需要保存历史纪录并恢复的场合是非常有用的。

二、代码
Command接口:
1 package zyr.dp.command;
2
3 public interface Command {
4     public abstract void execute();
5 }
DrawCommand类:
 1 package zyr.dp.command;
 2
 3 import java.awt.Point;
 4
 5
 6 public class DrawCommand implements Command {
 7
 8     private Drawable drawable;
 9     private Point position;
10     public  DrawCommand(Drawable drawable,Point position){
11         this.drawable=drawable;
12         this.position=position;
13     }
14
15     public void execute() {
16         drawable.draw(position.x, position.y);
17     }
18
19 }
MacroCommand 类:
 1 package zyr.dp.command;
 2
 3 import java.util.Iterator;
 4 import java.util.Stack;
 5
 6 public class MacroCommand implements Command {
 7
 8     Stack commands=new Stack();
 9
10     public void execute() {
11         Iterator it = commands.iterator();
12         while(it.hasNext()){
13             Command command=(Command)it.next();
14             command.execute();
15         }
16     }
17
18     public void append(Command command){
19         if(command!=this){
20             commands.add(command);
21         }
22     }
23
24     public void clear(){
25         commands.clear();
26     }
27
28     public void undo(){
29         if(!commands.isEmpty()){
30             commands.pop();
31         }
32     }
33
34 }
Drawable接口:
1 package zyr.dp.command;
2
3 public interface Drawable {
4
5     public abstract void draw(int x,int y);
6
7 }
DrawCanvas 实现类:
 1 package zyr.dp.command;
 2
 3 import java.awt.*;
 4 import java.util.Random;
 5
 6
 7 public class DrawCanvas extends Canvas implements Drawable {
 8
 9     private static final long serialVersionUID = 1972130370393242746L;
10
11     private MacroCommand history;
12     private int radius=8;
13
14     public DrawCanvas(int width,int hieght, MacroCommand history){
15         setSize(width,hieght);
16         setBackground(Color.white);
17         this.history=history;
18     }
19
20     public void draw(int x, int y) {
21         Random random = new Random();
22
23         Graphics g = getGraphics();
24         g.setColor((random.nextBoolean())? Color.yellow : Color.MAGENTA);
25         g.fillOval(x-radius, y-radius, radius*2, radius*2);
26     }
27
28     @Override
29     public void paint(Graphics g) {
30         System.out.println("执行一次刷新!"+System.currentTimeMillis());
31         history.execute();
32     }
33
34 }
Main类:
  1 package zyr.dp.command;
  2
  3 import java.awt.event.ActionEvent;
  4 import java.awt.event.ActionListener;
  5 import java.awt.event.MouseEvent;
  6 import java.awt.event.MouseMotionListener;
  7 import java.awt.event.WindowEvent;
  8 import java.awt.event.WindowListener;
  9
 10 import javax.swing.*;
 11
 12
 13 public class Main extends JFrame implements ActionListener,MouseMotionListener,WindowListener{
 14
 15     private MacroCommand history=new MacroCommand() ;
 16
 17     private JButton btnClear=new JButton("清除");
 18     private JButton btnRePaint=new JButton("重现");
 19
 20     private DrawCanvas canvas=new DrawCanvas(400,400,history);
 21
 22     public Main(String title){
 23         super(title);
 24
 25         this.addWindowListener(this);
 26         canvas.addMouseMotionListener(this);
 27         btnClear.addActionListener(this);
 28         btnRePaint.addActionListener(this);
 29
 30         Box btnBox=new Box(BoxLayout.X_AXIS);
 31         btnBox.add(btnClear);
 32         btnBox.add(btnRePaint);
 33
 34         Box mainBox=new Box(BoxLayout.Y_AXIS);
 35         mainBox.add(btnBox);
 36         mainBox.add(canvas);
 37
 38         getContentPane().add(mainBox);
 39
 40         pack();
 41         show();
 42     }
 43
 44     public static void main(String[] args) {
 45
 46         new Main("命令模式");
 47
 48     }
 49
 50
 51     @Override
 52     public void actionPerformed(ActionEvent e) {
 53         if(e.getSource()==btnClear){
 54             history.clear();
 55             canvas.repaint();
 56         }else if(e.getSource()==btnRePaint){
 57             canvas.repaint();
 58         }
 59     }
 60
 61
 62     @Override
 63     public void mouseDragged(MouseEvent e) {
 64         Command cmd=new DrawCommand(canvas,e.getPoint());
 65         history.append(cmd);
 66         cmd.execute();
 67     }
 68
 69     @Override
 70     public void windowClosing(WindowEvent e) {
 71         System.exit(0);
 72     }
 73
 74
 75
 76
 77     @Override
 78     public void windowOpened(WindowEvent e) {
 79     }
 80
 81     @Override
 82     public void windowClosed(WindowEvent e) {
 83     }
 84
 85     @Override
 86     public void windowIconified(WindowEvent e) {
 87     }
 88
 89     @Override
 90     public void windowDeiconified(WindowEvent e) {
 91     }
 92
 93     @Override
 94     public void windowActivated(WindowEvent e) {
 95     }
 96
 97     @Override
 98     public void windowDeactivated(WindowEvent e) {
 99     }
100
101     @Override
102     public void mouseMoved(MouseEvent e) {
103     }
104 }
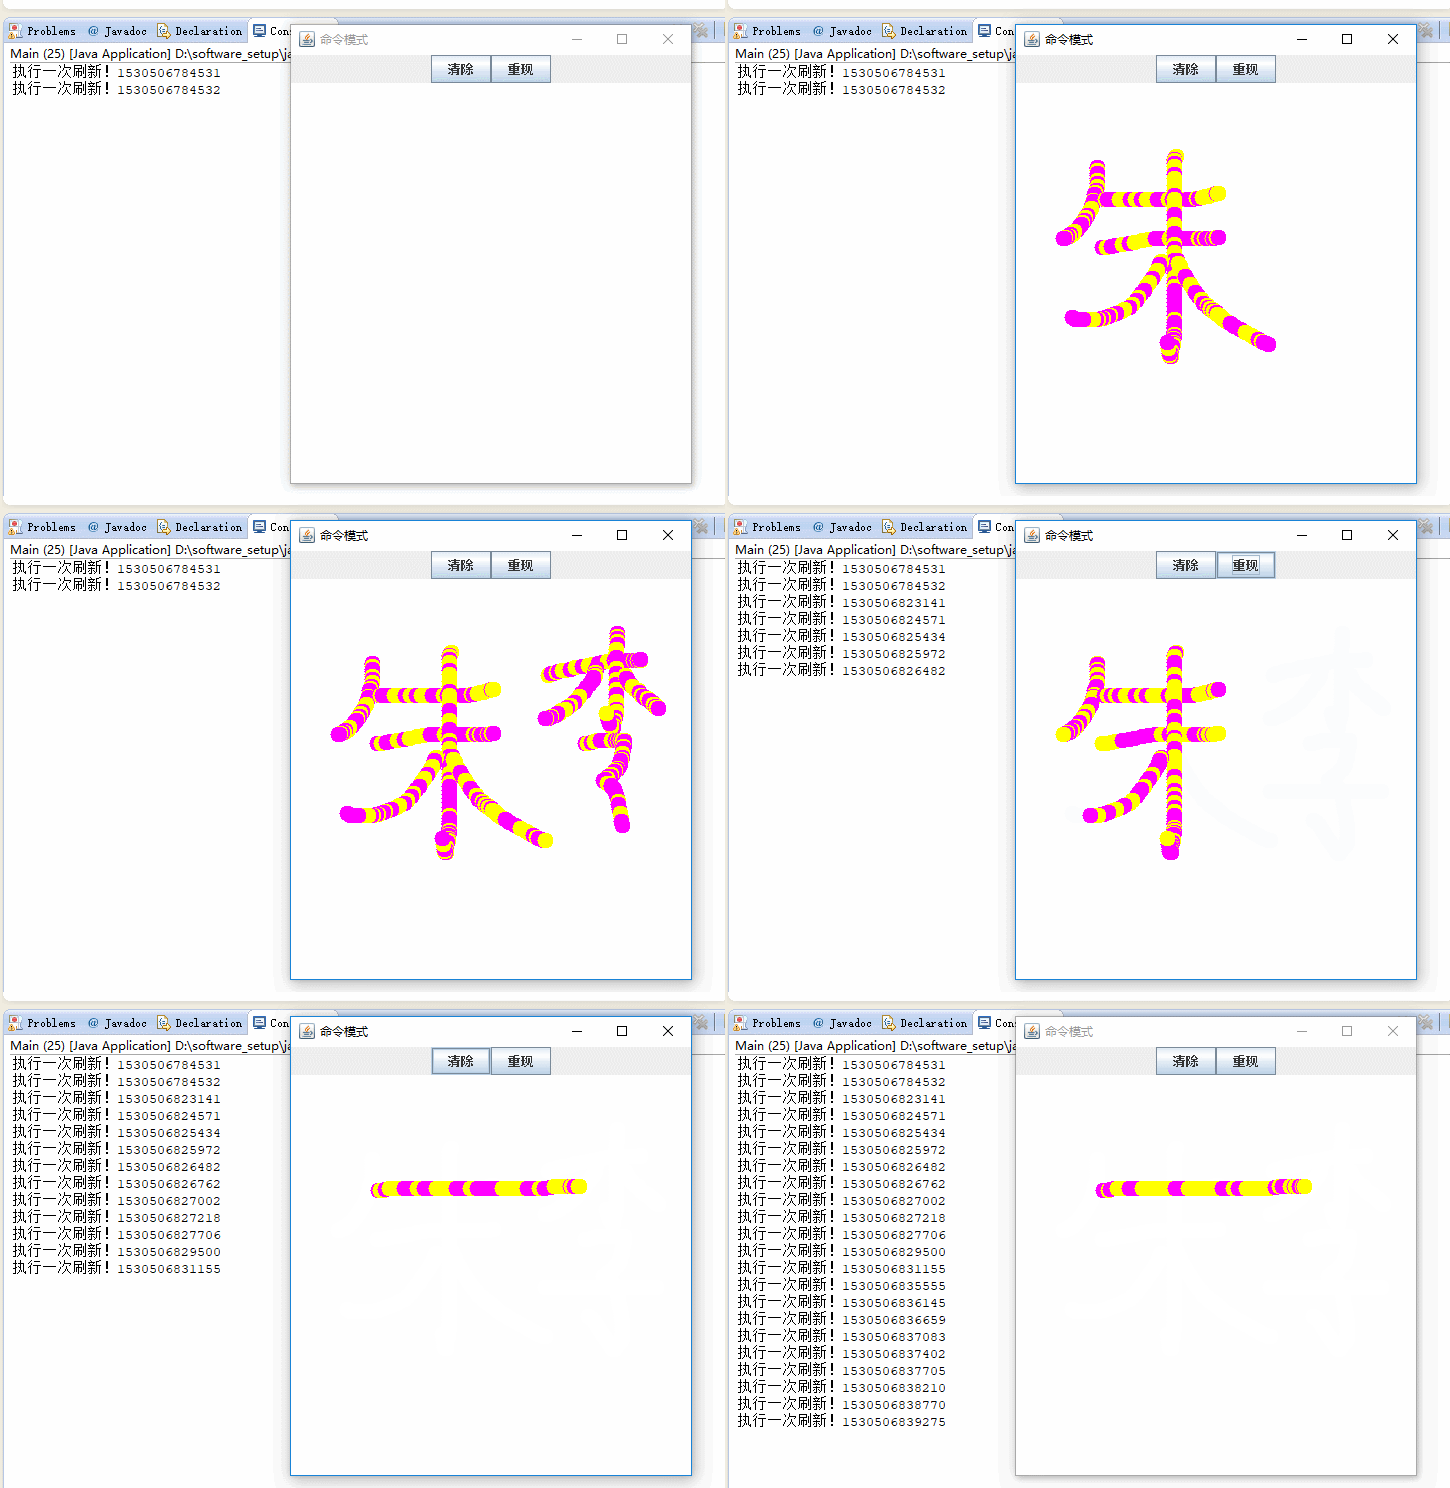
实验结果:

由此我们可以看到保存了的命令就这样一个个的再次执行了一遍,是不是很有意思呢?!
让我们分析一下程序执行的过程:
1、开始执行初始化界面,然后显示:
1     public static void main(String[] args) {
2
3         new Main("命令模式");
4
5     }
 1     public Main(String title){
 2         super(title);
 3
 4         this.addWindowListener(this);
 5         canvas.addMouseMotionListener(this);
 6         btnClear.addActionListener(this);
 7         btnRePaint.addActionListener(this);
 8
 9         Box btnBox=new Box(BoxLayout.X_AXIS);
10         btnBox.add(btnClear);
11         btnBox.add(btnRePaint);
12
13         Box mainBox=new Box(BoxLayout.Y_AXIS);
14         mainBox.add(btnBox);
15         mainBox.add(canvas);
16
17         getContentPane().add(mainBox);
18
19         pack();
20         show();
21     }
2、然后等待用户的操作,当监听到用户在界面上拖动鼠标的时候,执行:
1     @Override
2     public void mouseDragged(MouseEvent e) {
3         Command cmd=new DrawCommand(canvas,e.getPoint());
4         history.append(cmd);
5         cmd.execute();
6     }
3、创建一个命令对象,然后记录进命令堆栈之中,之后我们跟踪 cmd.execute();
1 package zyr.dp.command;
2
3 public interface Command {
4     public abstract void execute();
5 }
4、这里就看到我们的面向抽象编程的好处了,根本不需要知道是谁执行了我们的命令,在命令的时候自然知道了,那就是new DrawCommand(canvas,e.getPoint());我们继续跟踪:
1 public class DrawCommand implements Command {
2
3          。。。
4     public void execute() {
5         drawable.draw(position.x, position.y);
6     }
7
8 }
5、继续跟踪:
1 package zyr.dp.command;
2
3 public interface Drawable {
4
5     public abstract void draw(int x,int y);
6
7 }
6、同理,谁实现了Drawable ,并被传递进去了,Command cmd=new DrawCommand(canvas,e.getPoint());
1 private DrawCanvas canvas=new DrawCanvas(400,400,history);
找到原主:DrawCanvas ,跟踪:
1     public void draw(int x, int y) {
2         Random random = new Random();
3
4         Graphics g = getGraphics();
5         g.setColor((random.nextBoolean())? Color.yellow : Color.MAGENTA);
6         g.fillOval(x-radius, y-radius, radius*2, radius*2);
7     }
8
因此执行我们的程序,画了一个点。之后我们的鼠标不断拖动着,这个流程就一直执行着,直到我们停止为止。
之后我们分析重画方法:
当用户点击按钮:
1     @Override
2     public void actionPerformed(ActionEvent e) {
3         if(e.getSource()==btnClear){
4             history.clear();
5             canvas.repaint();
6         }else if(e.getSource()==btnRePaint){
7             canvas.repaint();
8         }
9     }
调用 canvas.repaint();方法,这是Canvas自动实现的,我们不必深究,只需要知道这个函数之中会调用,我们的继承了Canvas并且重写的方法:
1     public void paint(Graphics g) {
2         System.out.println("执行一次刷新!"+System.currentTimeMillis());
3         history.execute();
4     }
跟踪: history.execute();
1     public void execute() {
2         Iterator it = commands.iterator();
3         while(it.hasNext()){
4             Command command=(Command)it.next();
5             command.execute();
6         }
7     }
可以看到将保存的命令一个个都拿出来,重新走了一遍我们上面的command.execute();所走的流程,这就是命令模式,现在很清晰了。
三、总结
对于命令模式,在本例之中使用了Composite模式,迭代器等模式作为辅助,另外在生成对象的时候还可能使用原型模式,在保存命令的时候还可能使用备忘录模式。本例是一个很好的例子,从本质上说明了命令模式就是将命令抽象成一个类,通过保存接收者的引用,在后期还可以让接收者去执行,同样的使用了组合模式将这些对象一个个的保存了下来,然后一步步的调用单个命令的执行方法,该执行方法通知命令的接收者去再次执行命令,这种方式特别的方便,因为我们保存的是用户的操作,能够一直记录下来,甚至可以保存到文件之中以后可以恢复,由此可以看到命令模式的强大。

