关于在windows10中的vmware9.0里面安装的ubuntukylin15.04和windows共享目录的一些反思
关于在windows10中的vmware9.0里面安装的ubuntukylin15.04和windows共享目录的一些反思
一、遇到的问题
如题目所说,在windows的虚拟机中和windows共享目录,其中虚拟机中安装的系统是ubuntukylin15.04,可以在网上找到如下做法,
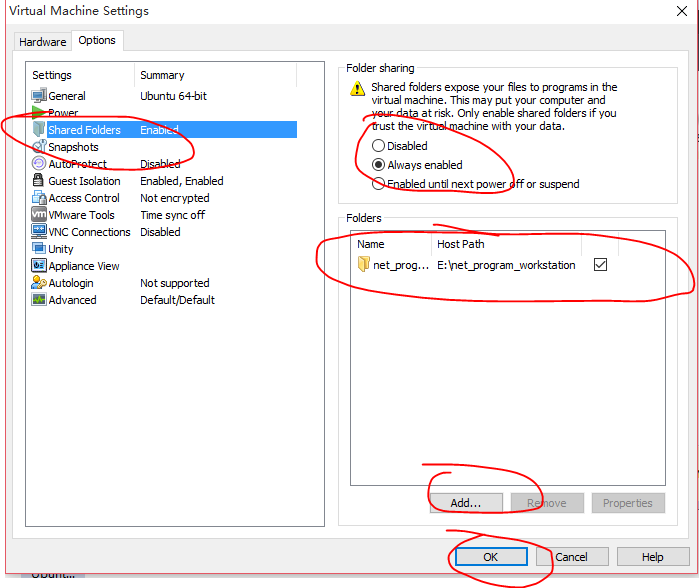
1.1、首先是在vmware中设置共享虚拟目录,这一点非常简单,只需要在vmware中设置就可以了,把权限设置为共享可读写。
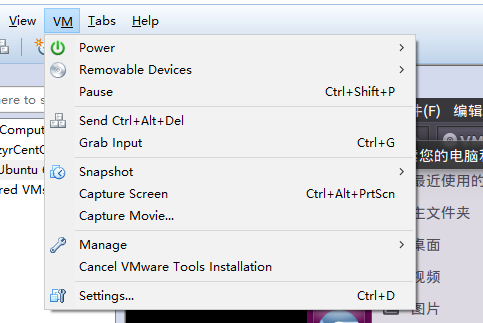
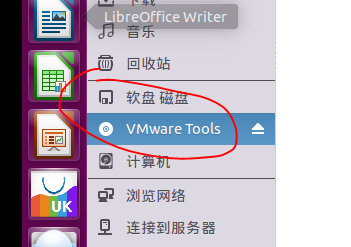
1.2、之后打开linux系统,并且在vmware中的vm菜单项中有一个install vmware tools或者是reinstall vmware tools,如果是后者说明我们已经安装了,或者安装的不成功也会出现,不管怎么样我们在linux打开的情况下,使用该操作,系统会提示我们是否同意通过光驱的方式让vmware tools的安装包嵌入进我们的linux文件系统中,我们点击同意,之后我们可以在文件系统中找到vmware tools这个目录项,之后,我们打开该目录项,可以看到有两个文件,一个是manifest.txt,另一个就是我们的vmwaretool的安装包。
![]()
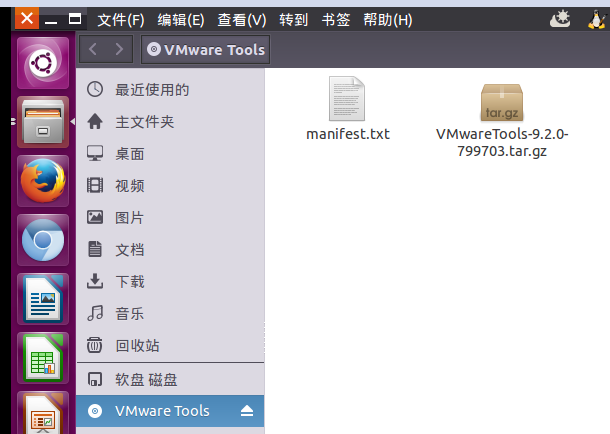
在这里我们要非常注意,我们这种方式使用的是虚拟光驱来查看的文件,我们不能再光驱上对文件进行修改或者解压,这一点非常重要,那怎么办呢,我们要解压并安装该文件,那就只能使用命令将这个文件拷到我们自己的文件系统中,这样就可以解压缩了,或者直接解压缩到文件系统的某一目录中,使用的命令为:tar -zxf VMwareTools-9.2.0-799703.tar.gz -C /media/VMware,这样我们就可以在/media/VMware中得到想要的解压文件了,这个VMware文件夹也是我们自己创建的,很简单。可以看到解压后的文件夹,然我们打开看一下。其中的一个目录下的vmhgfs.tar我们以后会非常的感兴趣!
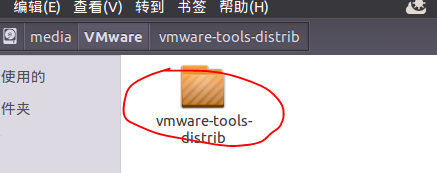
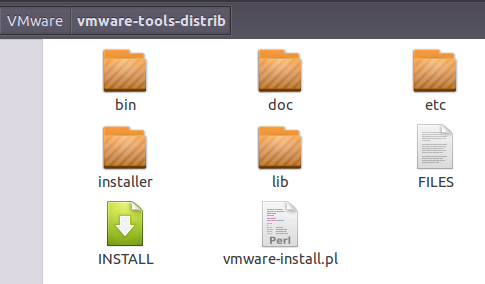
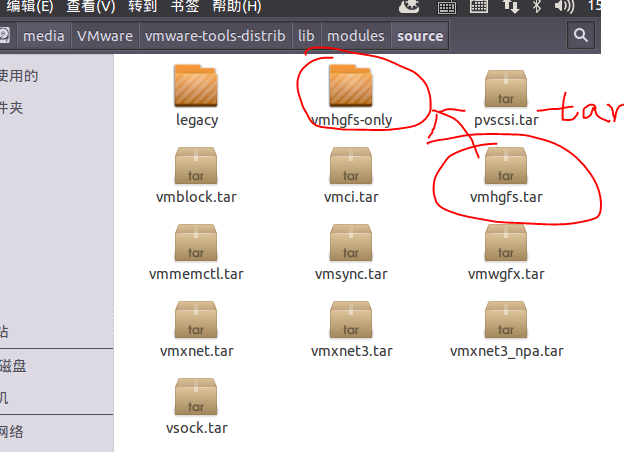
1.3,然后我们安装这个软件,只需运行vmware-install.pl即可。
1 root@zyr-virtual-machine:/media/VMware# cd ./vmware-tools-distrib/
2 root@zyr-virtual-machine:/media/VMware/vmware-tools-distrib# dir
3 bin  doc  etc  FILES  INSTALL  installer  lib  vmware-install.pl
4 root@zyr-virtual-machine:/media/VMware/vmware-tools-distrib# ./vmware-install.pl
下面是安装过程:

  1 root@zyr-virtual-machine:/media/VMware/vmware-tools-distrib# ./vmware-install.pl
  2 The installer found the following conflicting packages installed on the system and will now remove them:
  3
  4 open-vm-tools
  5
  6 (正在读取数据库 ... 系统当前共安装有 159148 个文件和目录。)
  7 正在卸载 open-vm-tools (2:9.4.6-1770165-8ubuntu1) ...
  8 正在处理用于 man-db (2.7.0.2-5) 的触发器 ...
  9 正在处理用于 libc-bin (2.21-0ubuntu4) 的触发器 ...
 10 Creating a new VMware Tools installer database using the tar4 format.
 11
 12 Installing VMware Tools.
 13
 14 The file /etc/vmware-tools/suspend-vm-default that this program was about to
 15 install already exists. Overwrite? [yes] y
 16
 17 The file /etc/vmware-tools/poweroff-vm-default that this program was about to
 18 install already exists. Overwrite? [yes] yes
 19
 20 The file /etc/vmware-tools/scripts/vmware/network that this program was about
 21 to install already exists. Overwrite? [yes] yes
 22
 23 The file /etc/vmware-tools/poweron-vm-default that this program was about to
 24 install already exists. Overwrite? [yes]
 25
 26 The file /etc/vmware-tools/statechange.subr that this program was about to
 27 install already exists. Overwrite? [yes]
 28
 29 The file /etc/vmware-tools/resume-vm-default that this program was about to
 30 install already exists. Overwrite? [yes]
 31
 32 In which directory do you want to install the binary files?
 33 [/usr/bin]
 34
 35 What is the directory that contains the init directories (rc0.d/ to rc6.d/)?
 36 [/etc]
 37
 38 What is the directory that contains the init scripts?
 39 [/etc/init.d]
 40
 41 In which directory do you want to install the daemon files?
 42 [/usr/sbin]
 43
 44 In which directory do you want to install the library files?
 45 [/usr/lib/vmware-tools]
 46
 47 The path "/usr/lib/vmware-tools" does not exist currently. This program is
 48 going to create it, including needed parent directories. Is this what you want?
 49 [yes]
 50
 51
 52 yes
 53
 54
 55
 56
 57 In which directory do you want to install the documentation files?
 58 [/usr/share/doc/vmware-tools]
 59 The path "/usr/share/doc/vmware-tools" does not exist currently. This program
 60 is going to create it, including needed parent directories. Is this what you
 61 want? [yes]
 62 The installation of VMware Tools 9.2.0 build-799703 for Linux completed
 63 successfully. You can decide to remove this software from your system at any
 64 time by invoking the following command: "/usr/bin/vmware-uninstall-tools.pl".
 65
 66 Before running VMware Tools for the first time, you need to configure it by
 67 invoking the following command: "/usr/bin/vmware-config-tools.pl". Do you want
 68 this program to invoke the command for you now? [yes]
 69 The file /etc/pam.d/vmtoolsd that this program was about to install already
 70 exists.  Overwrite? [yes]
 71 Initializing...
 72
 73
 74 Making sure services for VMware Tools are stopped.
 75
 76 Stopping VMware Tools services in the virtual machine:
 77    Guest operating system daemon:                                      done
 78    Unmounting HGFS shares:                                             done
 79    Guest filesystem driver:                                            done
 80 Stopping Thinprint services in the virtual machine:
 81    Stopping Virtual Printing daemon:                                   done
 82
 83
 84 update-rc.d: warning: start and stop actions are no longer supported; falling back to defaults
 85 update-rc.d: warning: start and stop actions are no longer supported; falling back to defaults
 86 The VMware FileSystem Sync Driver (vmsync) allows external third-party backup
 87 software that is integrated with vSphere to create backups of the virtual
 88 machine. Do you wish to enable this feature? [no]
 89 The module vmci has already been installed on this system by another installer
 90 or package and will not be modified by this installer.  Use the flag
 91 --clobber-kernel-modules=vmci to override.
 92
 93 The module vsock has already been installed on this system by another installer
 94 or package and will not be modified by this installer.  Use the flag
 95 --clobber-kernel-modules=vsock to override.
 96
 97 The module vmxnet3 has already been installed on this system by another
 98 installer or package and will not be modified by this installer.  Use the flag
 99 --clobber-kernel-modules=vmxnet3 to override.
100
101 The module pvscsi has already been installed on this system by another
102 installer or package and will not be modified by this installer.  Use the flag
103 --clobber-kernel-modules=pvscsi to override.
104
105 The module vmmemctl has already been installed on this system by another
106 installer or package and will not be modified by this installer.  Use the flag
107 --clobber-kernel-modules=vmmemctl to override.
108
109 The VMware Host-Guest Filesystem allows for shared folders between the host OS
110 and the guest OS in a Fusion or Workstation virtual environment.  Do you wish
111 to enable this feature? [yes]
112 The module vmhgfs has already been installed on this system by another
113 installer or package and will not be modified by this installer.  Use the flag
114 --clobber-kernel-modules=vmhgfs to override.
115
116 The module vmxnet has already been installed on this system by another
117 installer or package and will not be modified by this installer.  Use the flag
118 --clobber-kernel-modules=vmxnet to override.
119
120 The vmblock enables dragging or copying files between host and guest in a
121 Fusion or Workstation virtual environment.  Do you wish to enable this feature?
122 [yes]
123
124 !!! [EXPERIMENTAL] !!!
125 VMware automatic kernel modules enables automatic building and installation of
126 VMware kernel modules at boot that are not already present.  By selecting yes,
127 you will be enabling this experimental feature.  You can always disable this
128 feature by re-running vmware-config-tools.pl.
129
130 Would you like to enable VMware automatic kernel modules?
131 [no]
132
133 Thinprint provides driver-free printing. Do you wish to enable this feature?
134 [yes]
135
136
137 Disabling timer-based audio scheduling in pulseaudio.
138
139
140
141 Detected X server version 1.17.1
142
143
144
145 Distribution provided drivers for Xorg X server are used.
146
147 Skipping X configuration because X drivers are not included.
148
149
150
151
152
153
154
155
156 Creating a new initrd boot image for the kernel.
157 update-initramfs: Generating /boot/initrd.img-3.19.0-15-generic
158    Checking acpi hot plug                                              done
159 Starting VMware Tools services in the virtual machine:
160    Switching to guest configuration:                                   done
161    Blocking file system:                                               done
162    Guest operating system daemon:                                      done
163    Starting Virtual Printing daemon:                                   done
164 The configuration of VMware Tools 9.2.0 build-799703 for Linux for this running
165 kernel completed successfully.
166
167 You must restart your X session before any mouse or graphics changes take
168 effect.
169
170 You can now run VMware Tools by invoking "/usr/bin/vmware-toolbox-cmd" from the
171 command line.
172
173 To enable advanced X features (e.g., guest resolution fit, drag and drop, and
174 file and text copy/paste), you will need to do one (or more) of the following:
175 1. Manually start /usr/bin/vmware-user
176 2. Log out and log back into your desktop session; and,
177 3. Restart your X session.
178
179 Enjoy,
180
181 --the VMware team
182
183 Found VMware Tools CDROM mounted at /media/zyr/VMware Tools. Ejecting device
184 /dev/sr0 ...
185 umount: /media/zyr/VMware Tools: target is busy
186 (In some cases useful info about processes that
187 use the device is found by lsof(8) or fuser(1).)
188 /usr/bin/eject:卸载 `/media/zyr/VMware Tools'失败
189 Eject Failed:  If possible manually eject the Tools installer from the guest
190 cdrom mounted at /media/zyr/VMware Tools before canceling tools install on the
191 host.
1.4、安装完成之后,我们按理说就可以用了,但是比我们想象的复杂,首先我们需要使用mount将我们的Windows上面的共享文件夹目录挂载到Linux中的某一个文件夹下面,这样我们才能找到并使用,使用命令 mount -t vmhgfs .host:/ /mnt/hgfs,可是是是往往不如人意,想必大家还知道我刚才说的vmhgfs.tar,在这里我们运行这条命令,结果为Error: cannot canonicalize mount point: No such file or directory。这是因为我们还没创建hgfs,我们创建mkdir /mnt/hgfs,然后再运行 mount -t vmhgfs .host:/ /mnt/hgfs命令,结果为Error: cannot mount filesystem: No such device,这一下可怎么办,刚刚的是小问题,可是现在的却是大问题呀,没有vmhgfs这样的文件系统,很多人都放弃了试了好多次,网上有人说使用mount -t vmhgfs-fuse .host:/ /mnt/hgfs,或者先安装sudo apt-get install open-vm-dkms,然后再使用上一条命令,可是我的网上库里面根本没有open-vm-dkms文件,有一个open-vm-tools-dkms文件,我使用之后提示下面信息,说明已经存在了并且安装了,所以这些措施根本就没有用,我又在网上看到了什么版本冲突了,什么漏洞了,需要打补丁之类的,搞得我很郁闷,难不成还要重装系统不成?!后来我又尝试了很久还是不行,基本上也没办法了,就把虚拟机关闭又重启了一次,然后打开,还是什么都没有,我又尝试着使用了一遍mount -t vmhgfs .host:/ /mnt/hgfs命令,看到出错的信息变了,变成了下面的提示Could not add entry to mtab, continuing,然后我又查了一些资料,还是无解,并且运行了vmware-hgfsclient,也能正常显示我的共享目录,如下图所示。不甘心之下我在被mount的目录看了一下,没想到竟然成功了,我看到了共享的文件。
root@zyr-virtual-machine:/# sudo apt-get install open-vm-tools-dkms
正在读取软件包列表... 完成
正在分析软件包的依赖关系树
正在读取状态信息... 完成
open-vm-tools-dkms 已经是最新的版本。
下列软件包是自动安装的并且现在不需要了:
  libdumbnet1 zerofree
使用'apt-get autoremove'来卸载它(它们)。
升级了 0 个软件包,新安装了 0 个软件包,要卸载 0 个软件包,有 343 个软件包未被升级。


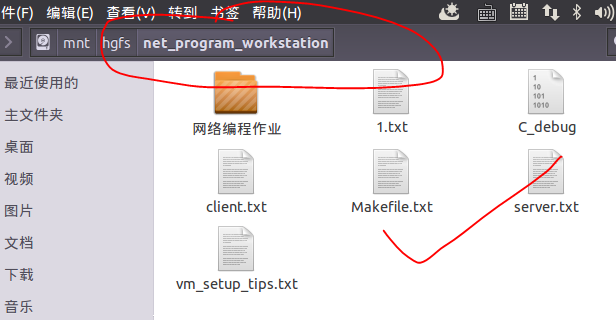
到了这里我都要感激涕零了,总算功夫不负有心人,搞了一下午的时间,还是让我误打误撞的解决了问题,实在是这个功能对我太重要了呀,我的作业要在上面完成,并且取出来呢,哈哈~~~心情大好之下,我知道这种机制是不长久的,因为每次开虚拟机的时候都要使用一下mount命令,最好的办法是在系统的启动文件中加入这一语句,这样我们就可以高枕无忧了!!!!!!使用sudo gedit /etc/init.d/rc.local,在其中加入,保存并退出。
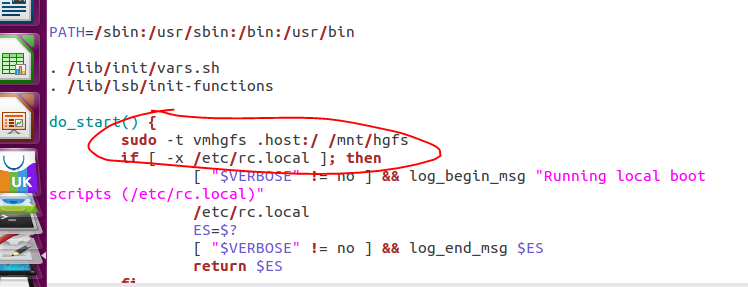
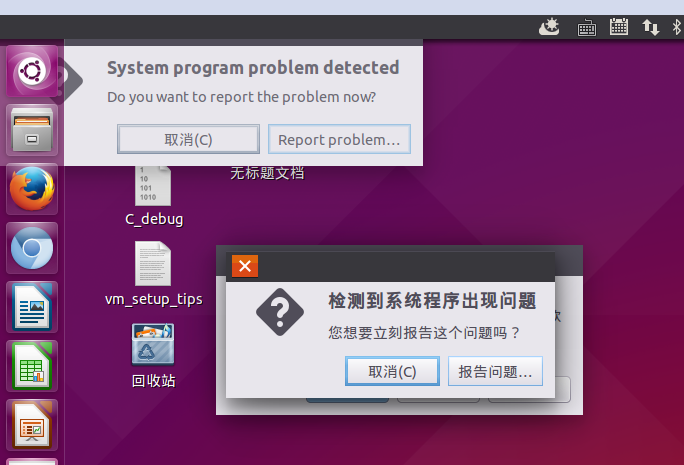
可是在我的电脑上这样做了之后,系统也出现了异常,打开之后发现并没有什么改变,还是没有加载进文件系统中,所以我又使用了在/etc/init.d/open-vm-tools末尾增加一行: sudo mount -t vmhgfs .host:/ /mnt/hgfs ,保存并重启系统还是不行,所以最好不要这样做。最好的办法就是在关闭虚拟机上面的该Linux系统的时候,将关闭命令使用suspend,这样虚拟机自动保存上次状态,即使关闭虚拟机状态也不会变,这样我们就不需要重复设置了!
二、总结
其实对于这种问题,我想两个操作系统应该将操作简化才对,不过考虑到两者的商业因素等原因,我们也只能多花一点时间去解决这些不兼容的问题了~~~


