资源清单
名称空间在kubernetes中主要的作用是做资源隔离,因此名称空间级别的资源只在当前名称空间下有效
K8s 中所有的内容都抽象为资源, 资源实例化之后,叫做对象
1、名称空间级别
(1)工作负载型资源( workload ):
Pod、ReplicaSet、Deployment、StatefulSet、DaemonSet、Job、 CronJob ( ReplicationController 在 v1.11 版本被废弃 )
(2)服务发现及负载均衡型资源( ServiceDiscovery LoadBalance ): Service、Ingress、
(3)配置与存储型资源: Volume( 存储卷 )、CSI( 容器存储接口,可以扩展各种各样的第三方存储卷 )
(4)特殊类型的存储卷:ConfigMap( 当配置中心来使用的资源类型 )、Secret(保存敏感数据)、 DownwardAPI(把外部环境中的信息输出给容器)
2、集群级资源:Namespace、Node、Role、ClusterRole、RoleBinding、ClusterRoleBinding
3、元数据型资源:HPA、PodTemplate、LimitRang
二、yaml文件讲解
在 k8s 中,一般使用 yaml 格式的文件来创建符合我们预期期望的 pod ,这样的 yaml 文件我们一般 称为资源清单
三、常见字段解释
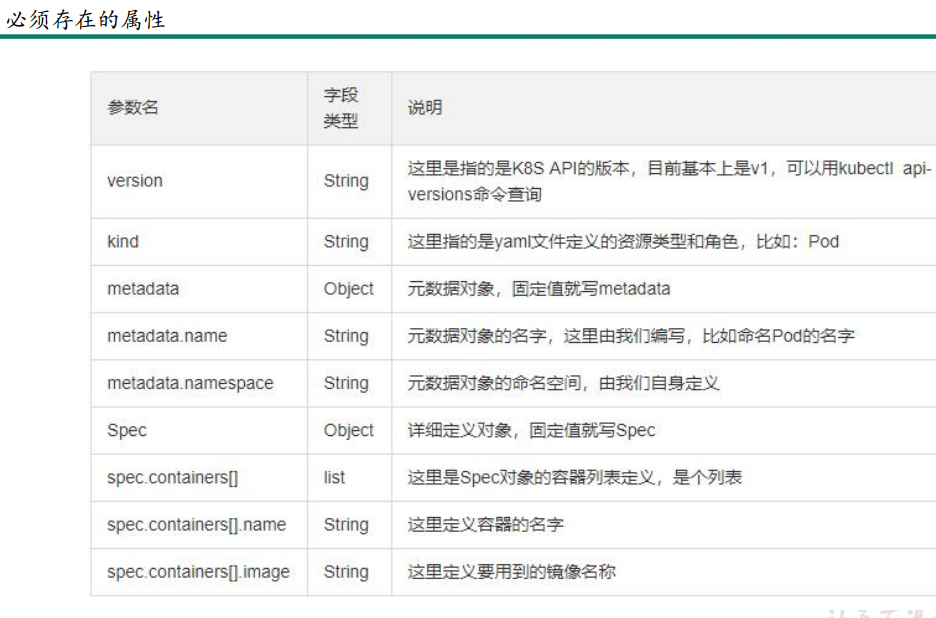
1、必须写的字段
2、可选字段
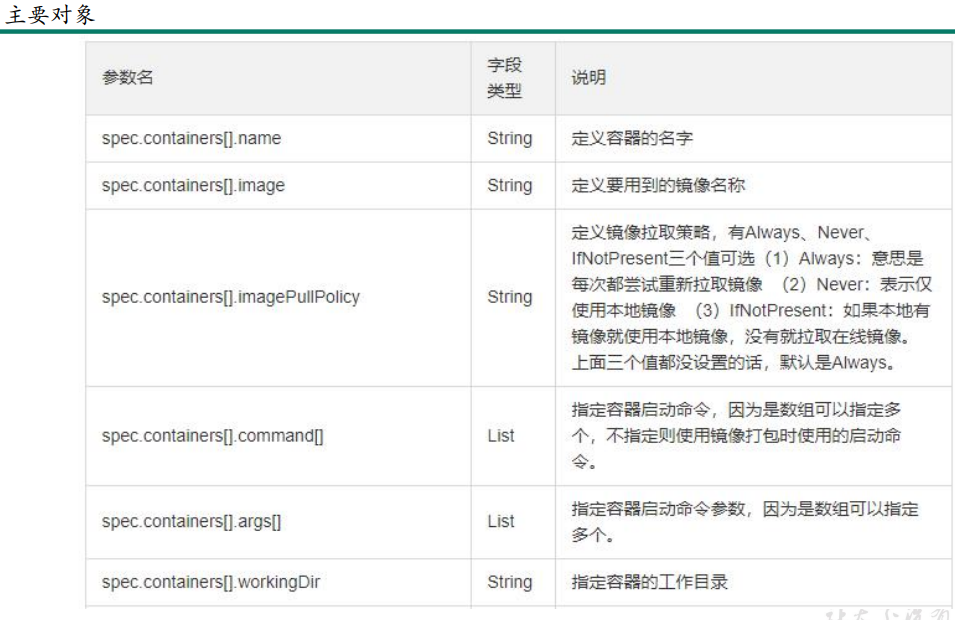
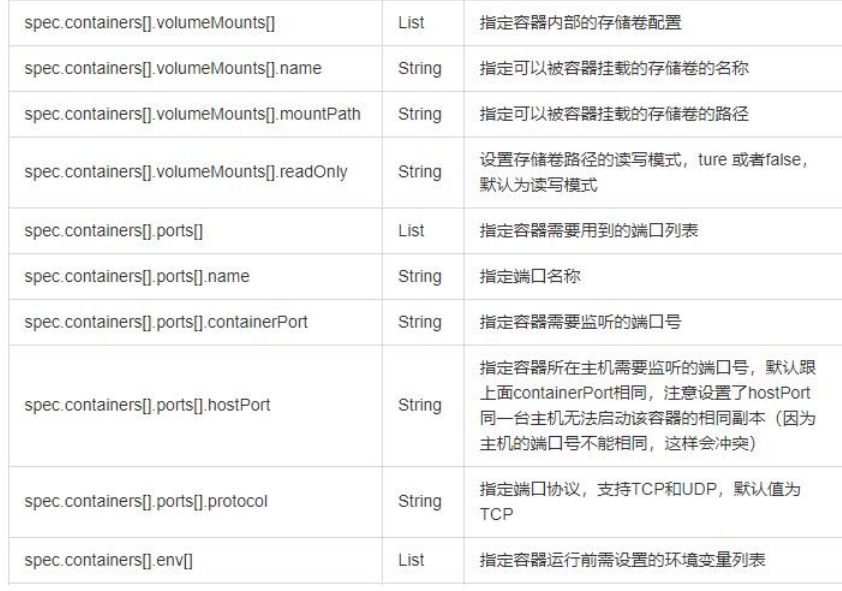
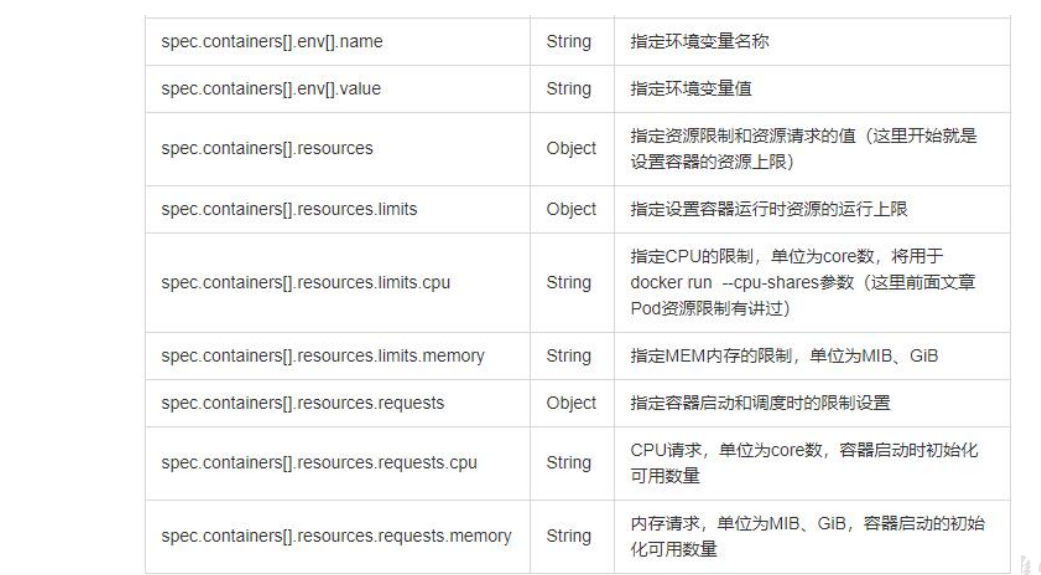
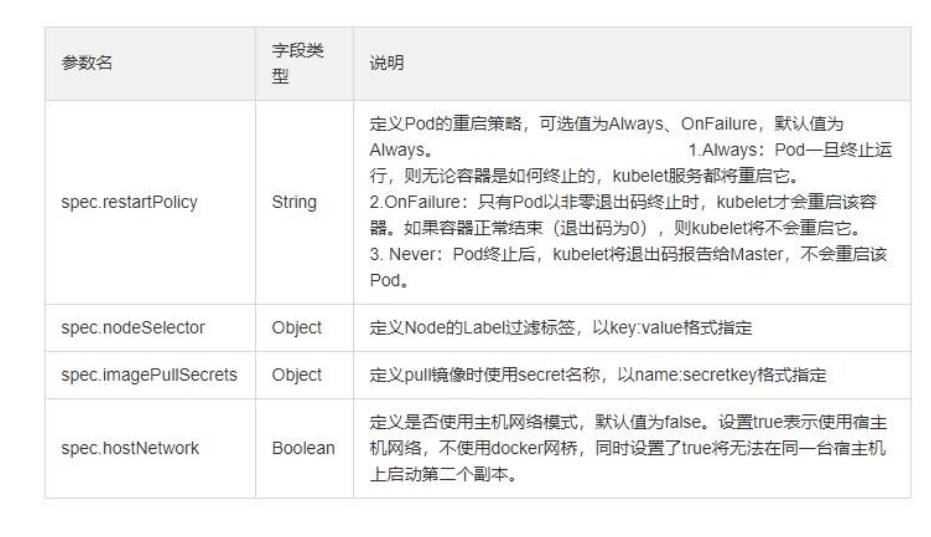
等等有很多
四、容器的生命周期
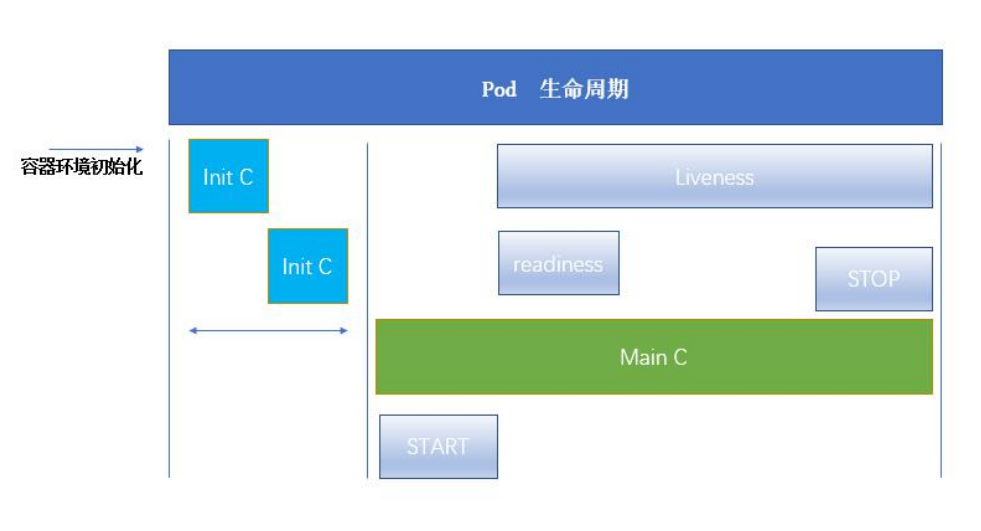
kubelet 使用 liveness probe(存活探针)来确定何时重启容器。例如,当应用程序处于运行状态但无法做进一步操作,liveness 探针将捕获到 deadlock,重启处于该状态下的容器,使应用程序在存在 bug 的情况下依然能够继续运行下去。
Kubelet 使用 readiness probe(就绪探针)来确定容器是否已经就绪可以接受流量。只有当 Pod 中的容器都处于就绪状态时 kubelet 才会认定该 Pod处于就绪状态。该信号的作用是控制哪些 Pod应该作为service的后端。如果 Pod 处于非就绪状态,那么它们将会被从 service 的 load balancer中移除
Pod 能够具有多个容器,应用运行在容器里面,但是它也可能有一个或多个先于应用容器启动的 Init 容器
Init 容器与普通的容器非常像,除了如下两点:
(1)Init 容器总是运行到成功完成为止
(2)每个 Init 容器都必须在下一个 Init 容器启动之前成功完成
如果 Pod 的 Init 容器失败,Kubernetes 会不断地重启该 Pod,直到 Init 容器成功为止。然而, 如果 Pod 对应的 restartPolicy 为 Never,它不会重新启动
因为 Init 容器具有与应用程序容器分离的单独镜像,所以它们的启动相关代码具有如下优势:
(1) 它们可以包含并运行实用工具,但是出于安全考虑,是不建议在应用程序容器镜像中包含这些实用工具的
(2)它们可以包含使用工具和定制化代码来安装,但是不能出现在应用程序镜像中。例如,创建镜像没必要 FROM 另一个镜像,只需要在安装过程中使用类似 sed、 awk、 python 或 dig 这样的工具。
(3)应用程序镜像可以分离出创建和部署的角色,而没有必要联合它们构建一个单独的镜像。
(4)Init 容器使用 Linux Namespace,所以相对应用程序容器来说具有不同的文件系统视图。因 此,它们能够具有访问 Secret 的权限,而应用程序容器则不能。
(比如mainc要访问一堆文件中的部分文件,但是mainc对这些文件没有权限,如果把这些文件的权限全部放开,会对mainc有安全隐患,这时我们就需要ininc作为中转,ininc去访问文件,访问完后后退出,mainc再去ininc中访问自己需要的文件!)
(4)它们必须在应用程序容器启动之前运行完成,而应用程序容器是并行运行的,所以 Init 容器能够提供了一种简单的阻塞或延迟应用容器的启动的方法,直到满足了一组先决条件
图解:
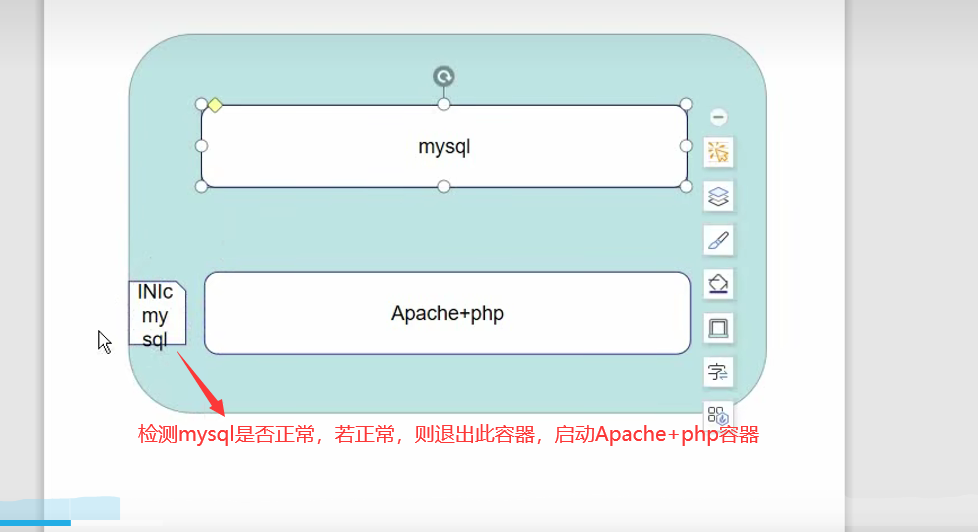
上机实战:
编辑一个init的yaml文件
[root@k8s-master01 ~]# vim init-pod.yaml
[root@k8s-master01 ~]# cat init-pod.yaml
apiVersion: v1
kind: Pod
metadata:
name: myapp-pod
labels:
app: myapp
spec:
containers:
- name: myapp-container
image: busybox
command: ['sh','-c','echo The app is running! && sleep 3600']
initContainers:
- name: init-myservice
image: busybox
command: ['sh','-c','until nslookup myservice; do echo waiting for myservice; sleep 2;done;']
- name: init-mydb
image: busybox
command: ['sh','-c','until nslookup mydb; do echo waiting for mydb; sleep 2; done;']
[root@k8s-master01 ~]#
创建init的pod
[root@k8s-master01 ~]# kubectl create -f init-pod.yaml
pod/myapp-pod created
[root@k8s-master01 ~]#
[root@k8s-master01 ~]# kubectl get pod
NAME READY STATUS RESTARTS AGE
myapp-pod 0/1 Init:0/2 0 2m51s
[root@k8s-master01 ~]#
(发现没有就绪)
[root@k8s-master01 ~]# kubectl describe pod myapp-pod(进入容器查看相关内容)
[root@k8s-master01 ~]# kubectl logs myapp-pod -c init-myservice(查看init-mysercice的日志)
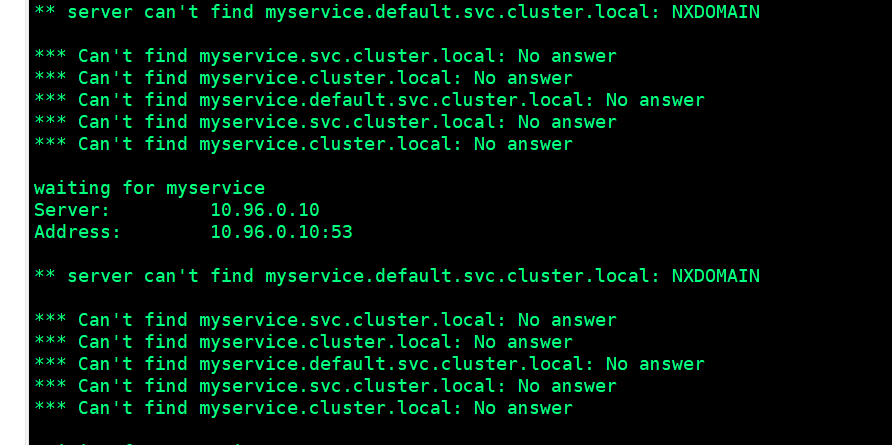
创建service的容器
[root@k8s-master01 ~]# vim myservice.yaml
[root@k8s-master01 ~]# cat myservice.yaml
kind: Service
apiVersion: v1
metadata:
name: myservice
spec:
ports:
- protocol: TCP
port: 80
targetPort: 9376
[root@k8s-master01 ~]#
[root@k8s-master01 ~]# kubectl create -f myservice.yaml
service/myservice created
[root@k8s-master01 ~]#
[root@k8s-master01 ~]# kubectl get pod(发现有一个init起来了)
NAME READY STATUS RESTARTS AGE
myapp-pod 0/1 Init:1/2 0 12m
[root@k8s-master01 ~]#
创建mydb的容器
[root@k8s-master01 ~]# vim mydb.yaml
[root@k8s-master01 ~]# cat mydb.yaml
kind: Service
apiVersion: v1
metadata:
name: mydb
spec:
ports:
- protocol: TCP
port: 80
targetPort: 9377
[root@k8s-master01 ~]# kubectl create -f mydb.yaml
service/mydb created
[root@k8s-master01 ~]#
[root@k8s-master01 ~]# kubectl get pod(这时发现init成功了)
NAME READY STATUS RESTARTS AGE
myapp-pod 1/1 Running 0 22m
[root@k8s-master01 ~]#
init容器特殊说明
(1)在 Pod 启动过程中,Init 容器会按顺序在网络和数据卷初始化之后启动。每个容器必须在下一个 容器启动之前成功退出
(网络和数据卷初始化是在pause容器中进行的,所以initc不是第一个启动的容器)
(2) 如果由于运行时或失败退出,将导致容器启动失败,它会根据 Pod 的 restartPolicy 指定的策略 进行重试。然而,如果 Pod 的 restartPolicy 设置为 Always,Init 容器失败时会使用 RestartPolicy 策略
(3)在所有的 Init 容器没有成功之前,Pod 将不会变成 Ready 状态。Init 容器的端口将不会在 Service 中进行聚集。 正在初始化中的 Pod 处于 Pending 状态,但应该会将 Initializing 状 态设置为 true
(4)如果 Pod 重启,所有 Init 容器必须重新执行
(5)对 Init 容器 spec 的修改被限制在容器 image 字段,修改其他字段都不会生效。更改 Init 容器的 image 字段,等价于重启该 Pod
如:使用kubectl edit pod myapp-pod这条命令,可以进入修改yaml文件,但是仅限于image字段
(6) Init 容器具有应用容器的所有字段。除了 readinessProbe,因为 Init 容器无法定义不同于完成 (completion)的就绪(readiness)之外的其他状态。这会在验证过程中强制执行
(因为readness就是检测容器是否完成就绪状态,所以不需要init容器中不需要readness字段)
(7)在 Pod 中的每个 app 和 Init 容器的名称必须唯一;与任何其它容器共享同一个名称,会在验证 时抛出错误
五、探针
探针是由 kubelet 对容器执行的定期诊断。要执行诊断,kubelet 调用由容器实现的 Handler。有三 种类型的处理程序:
(1)ExecAction:在容器内执行指定命令。如果命令退出时返回码为 0 则认为诊断成功。
(2)TCPSocketAction:对指定端口上的容器的 IP 地址进行 TCP 检查。如果端口打开,则诊断 被认为是成功的。
(3)HTTPGetAction:对指定的端口和路径上的容器的 IP 地址执行 HTTP Get 请求。如果响应的 状态码大于等于200 且小于 400,则诊断被认为是成功的
每次探测都将获得以下三种结果之一
(1)成功:容器通过了诊断。
(2)失败:容器未通过诊断。
(3)未知:诊断失败,因此不会采取任何行动
livenessProbe:指示容器是否正在运行。如果存活探测失败,则 kubelet 会杀死容器,并且容器将 受到其 重启策略 的影响。如果容器不提供存活探针,则默认状态为 Success
(liveness 存活探测,跟随着pod一直存在)
readinessProbe:指示容器是否准备好服务请求。如果就绪探测失败,端点控制器将从与 Pod 匹配的 所有 Service 的端点中删除该 Pod 的 IP 地址。初始延迟之前的就绪状态默认为 Failure。如果容 器不提供就绪探针,则默认状态为 Success
(readiness 就绪探测,如果readness检测成功,mainc才可以对外访问)
探针实战:
1、readness就绪探测容器实战理解
[root@k8s-master01 ~]# vim read.yaml
[root@k8s-master01 ~]# cat read.yaml
apiVersion: v1
kind: Pod
metadata:
name: readiness-httpget-pod
namespace: default
spec:
containers:
- name: readiness-httpget-container
image: busybox
imagePullPolicy: IfNotPresent
readinessProbe:
httpGet:
port: 80
path: /index1.html
initialDelaySeconds: 1
periodSeconds: 3
[root@k8s-master01 ~]# kubectl create -f read.yaml
pod/readiness-httpget-pod created
[root@k8s-master01 ~]#
解释:
初始化的延时:initialDelaySeconds: 1
重试的时间 (多少秒循环一次)periodSeconds: 3
[root@k8s-master01 ~]# kubectl get pod(我们发现虽然Running了,但是没有ready)
NAME READY STATUS RESTARTS AGE
myapp-pod 1/1 Running 1 (17h ago) 17h
readiness-httpget-pod 0/1 Running 0 69s
[root@k8s-master01 ~]#
[root@k8s-master01 ~]# kubectl describe pod readiness-httpget-pod

[root@k8s-master01 ~]# kubectl exec readiness-httpget-pod -it -- /bin/sh(进入容器内部)
# cd /usr/share/nginx
# ls
html
# echo "123" >> index1.html
# exit
[root@k8s-master01 ~]# kubectl get pod(查看ready状态)
NAME READY STATUS RESTARTS AGE
readiness-httpget-pod 0/1 Running 0 8m7s
(正常来说ready下面应该是1/1,我这里可能是镜像的问题)
我们故意写了一个有问题的yaml文件,所以启动的容器无法就绪,当我们进入容器后修改这个bug,之后就可以正常就绪了!
2、 livenessProbe-exec实战理解
[root@k8s-master01 ~]# vim live-exec.yaml
[root@k8s-master01 ~]# cat live-exec.yaml
apiVersion: v1
kind: Pod
metadata:
name: liveness-exec-pod
namespace: default
spec:
containers:
- name: liveness-exec-container
image: busybox
imagePullPolicy: IfNotPresent
command: ["/bin/sh","-c","touch /tmp/live ; sleep 60; rm -rf /tmp/live; sleep 3600"]
livenessProbe:
exec:
command: ["test","-e","/tmp/live"]
initialDelaySeconds: 1
periodSeconds: 3
[root@k8s-master01 ~]# kubectl create -f live-exec.yaml ^C
[root@k8s-master01 ~]#
root@k8s-master01 ~]# kubectl get pod
NAME READY STATUS RESTARTS AGE
liveness-exec-pod 1/1 Running 0 95s
[root@k8s-master01 ~]# kubectl get pod -w(-w 查看详细信息)
NAME READY STATUS RESTARTS AGE
liveness-exec-pod 1/1 Running 1 (8s ago) 107s
liveness-exec-pod 1/1 Running 2 (0s ago) 3m18s
liveness-exec-pod 1/1 Running 3 (1s ago) 4m58s
理解:当容器启动后,创建文件/tmp/live,liveness会检测到。60s后删除这个文件,这时liveness检测不到,就会重启,之后继续创建/tmp/live文件……
3、liveinessProbe-httpget实战理解
[root@k8s-master01 ~]# vim live-http.yaml
[root@k8s-master01 ~]# cat live-http.yaml
apiVersion: v1
kind: Pod
metadata:
name: liveness-httpget-pod
namespace: default
spec:
containers:
- name: liveness-httpget-container
image: nginx
imagePullPolicy: IfNotPresent
ports:
- name: http
containerPort: 80
livenessProbe:
httpGet:
port: http
path: /index.html
initialDelaySeconds: 1
periodSeconds: 3
timeoutSeconds: 10
(最大超时时间 timeoutSeconds: 10)
[root@k8s-master01 ~]# kubectl create -f live-http.yaml
pod/liveness-httpget-pod created
[root@k8s-master01 ~]# kubectl get pod
NAME READY STATUS RESTARTS AGE
liveness-httpget-pod 1/1 Running 0 9s
[root@k8s-master01 ~]#
[root@k8s-master01 ~]# kubectl get pod -o wide(查看详细信息)
NAME READY STATUS RESTARTS AGE IP NODE NOMINATED NODE READINESS GATES
liveness-httpget-pod 1/1 Running 0 60s 10.244.2.6 k8s-node02 <none> <none>
[root@k8s-master01 ~]# curl 10.244.2.6/index.html(发现可以访问到页面)
<!DOCTYPE html>
<html>
<head>
<title>Welcome to nginx!</title>
<style>
html { color-scheme: light dark; }
body { width: 35em; margin: 0 auto;
font-family: Tahoma, Verdana, Arial, sans-serif; }
</style>
</head>
<body>
<h1>Welcome to nginx!</h1>
<p>If you see this page, the nginx web server is successfully installed and
working. Further configuration is required.</p>
<p>For online documentation and support please refer to
<a href="http://nginx.org/">nginx.org</a>.<br/>
Commercial support is available at
<a href="http://nginx.com/">nginx.com</a>.</p>
<p><em>Thank you for using nginx.</em></p>
</body>
</html>
[root@k8s-master01 ~]#
[root@k8s-master01 ~]# kubectl exec liveness-httpget-pod -it -- /bin/sh(进入容器删除index.html文件)
# rm -rf /usr/share/nginx/html/index.html
# exit
[root@k8s-master01 ~]# curl 10.244.2.6/index.html
(之后这里是访问不到页面的,我这里也不知道为什么还能访问,可能是因为下载的nginx镜像吧)
[root@k8s-master01 ~]# kubectl get pod(之后我们就发现容器重启了)
NAME READY STATUS RESTARTS AGE
liveness-httpget-pod 1/1 Running 1 (40s ago) 5m22s
理解:容器启动后正常运行,当我们进入容器把index.html删除后,liveness就会检测到,执行不成功,之后就会干掉容器。因为我们pod默认的策略是always,所以容器会再次启动!
4、livenessProbe-tcp实战
[root@k8s-master01 ~]# vim live-tcp.yaml
[root@k8s-master01 ~]# cat live-tcp.yaml
apiVersion: v1
kind: Pod
metadata:
name: probe-tcp
spec:
containers:
- name: nginx
image: nginx
livenessProbe:
initialDelaySeconds: 5
timeoutSeconds: 1
tcpSocket:
port: 8080
periodSeconds: 3
[root@k8s-master01 ~]# kubectl create -f live-tcp.yaml
pod/probe-tcp created
[root@k8s-master01 ~]# kubectl get pod
NAME READY STATUS RESTARTS AGE
probe-tcp 0/1 ContainerCreating 0 7s
[root@k8s-master01 ~]# kubectl get pod -w
NAME READY STATUS RESTARTS AGE
probe-tcp 1/1 Running 1 (42s ago) 63s
probe-tcp 1/1 Running 2 (16s ago) 64s
理解:容器启动后,首先会等5s,然后发起连接8080端口,连接失败后,等待1s,之后就会干掉这个容器,然后继续容器重启!
5、liveness和readiness一起使用
[root@k8s-master01 ~]# vim live-http.yaml
[root@k8s-master01 ~]# cat live-http.yaml
apiVersion: v1
kind: Pod
metadata:
name: liveness-httpget-pod
namespace: default
spec:
containers:
- name: liveness-httpget-container
image: nginx
imagePullPolicy: IfNotPresent
ports:
- name: http
containerPort: 80
readinessProbe:
httpGet:
port: 80
path: /index1.html
initialDelaySeconds: 1
periodSeconds: 3
livenessProbe:
httpGet:
port: http
path: /index.html
initialDelaySeconds: 1
periodSeconds: 3
timeoutSeconds: 10
[root@k8s-master01 ~]# kubectl apply -f live-http.yaml
pod/liveness-httpget-pod created
root@k8s-master01 ~]# kubectl get pod
NAME READY STATUS RESTARTS AGE
liveness-httpget-pod 0/1 Running 0 11m
[root@k8s-master01 ~]# kubectl exec liveness-httpget-pod -it -- /bin/sh
# cd /usr/share/nginx/html
# ls
50x.html index.html
# echo "123" >> index1.html
# exit
[root@k8s-master01 ~]#
[root@k8s-master01 ~]# kubectl get pod(这时我们发现已经ready了)
NAME READY STATUS RESTARTS AGE
liveness-httpget-pod 1/1 Running 0 15m
[root@k8s-master01 ~]#
[root@k8s-master01 ~]# kubectl exec liveness-httpget-pod -it -- rm -rf /usr/share/nginx/html/index.html(删除index.html文件)
[root@k8s-master01 ~]# kubectl get pod
NAME READY STATUS RESTARTS AGE
liveness-httpget-pod 0/1 Running 1 (10s ago) 17m
[root@k8s-master01 ~]# kubectl get pod -w(这时我们发现容器重启了)
NAME READY STATUS RESTARTS AGE
liveness-httpget-pod 0/1 Running 1 (24s ago) 18m
理解:容器启动后1s后readiness进行就绪检测,检查index1.html是否存在,如果存在,进行ready状态,如果不存在,3s后再看一下;与此同时,容器启动1s后liveness进行存活检测,如果不存活就进行重启!
6、启动退出动作
[root@k8s-master01 ~]# vim post.yaml
[root@k8s-master01 ~]# cat post.yaml
apiVersion: v1
kind: Pod
metadata:
name: lifecycle-demo
spec:
containers:
- name: lifecycle-demo-container
image: nginx
lifecycle:
postStart:
exec:
command: ["/bin/sh", "-c", "echo Hello from the postStart handler > /usr/share/message"]
preStop:
exec:
command: ["/bin/sh", "-c", "echo Hello from the postStart handler > /usr/share/message"]
[root@k8s-master01 ~]# kubectl create -f post.yaml
pod/lifecycle-demo created
[root@k8s-master01 ~]# kubectl get pod
NAME READY STATUS RESTARTS AGE
lifecycle-demo 1/1 Running 0 22s
[root@k8s-master01 ~]# kubectl exec lifecycle-demo -it -- /bin/sh
# cat /usr/share/message
Hello from the postStart handler
# exit
[root@k8s-master01 ~]#
七、Pod hook:
Pod hook(钩子)是由 Kubernetes 管理的 kubelet 发起的,当容器中的进程启动前或者容器中的进 程终止之前运行,这是包含在容器的生命周期之中。可以同时为 Pod 中的所有容器都配置
hook Hook 的类型包括两种:
(1)exec:执行一段命令
(2)HTTP:发送HTTP请求
八、重启策略:
PodSpec 中有一个 restartPolicy 字段,可能的值为 Always、OnFailure 和 Never。默认为 Always。 restartPolicy 适用于 Pod 中的所有容器。restartPolicy 仅指通过同一节点上的 kubelet 重新启动容器。失败的容器由 kubelet 以五分钟为上限的指数退避延迟(10秒,20秒,40 秒...)重新启动,并在成功执行十分钟后重置。如 Pod 文档 中所述,一旦绑定到一个节点,Pod 将 永远不会重新绑定到另一个节点。
九、Pod phase(也就是pod的状态)
Pod 的 status 字段是一个 PodStatus 对象,PodStatus中有一个 phase 字段。
Pod 的相位(phase)是 Pod 在其生命周期中的简单宏观概述。该阶段并不是对容器或 Pod 的综合汇 总,也不是为了做为综合状态机
Pod 相位的数量和含义是严格指定的。除了本文档中列举的状态外,不应该再假定 Pod 有其他的 phase 值
Pod phase 可能存在的值
(1)挂起(Pending):Pod 已被 Kubernetes 系统接受,但有一个或者多个容器镜像尚未创建。等待时间 包括调度 Pod 的时间和通过网络下载镜像的时间,这可能需要花点时间
(2)运行中(Running):该 Pod 已经绑定到了一个节点上,Pod 中所有的容器都已被创建。至少有一个容 器正在运行,或者正处于启动或重启状态
(3)成功(Succeeded):Pod 中的所有容器都被成功终止,并且不会再重启
(4)失败(Failed):Pod 中的所有容器都已终止了,并且至少有一个容器是因为失败终止。也就是说,容 器以非 0 状态退出或者被系统终止
(5)未知(Unknown):因为某些原因无法取得 Pod 的状态,通常是因为与 Pod 所在主机通信失败


【推荐】国内首个AI IDE,深度理解中文开发场景,立即下载体验Trae
【推荐】编程新体验,更懂你的AI,立即体验豆包MarsCode编程助手
【推荐】抖音旗下AI助手豆包,你的智能百科全书,全免费不限次数
【推荐】轻量又高性能的 SSH 工具 IShell:AI 加持,快人一步
· 被坑几百块钱后,我竟然真的恢复了删除的微信聊天记录!
· 【自荐】一款简洁、开源的在线白板工具 Drawnix
· 没有Manus邀请码?试试免邀请码的MGX或者开源的OpenManus吧
· 园子的第一款AI主题卫衣上架——"HELLO! HOW CAN I ASSIST YOU TODAY
· 无需6万激活码!GitHub神秘组织3小时极速复刻Manus,手把手教你使用OpenManus搭建本