docker 部署环境基本流程
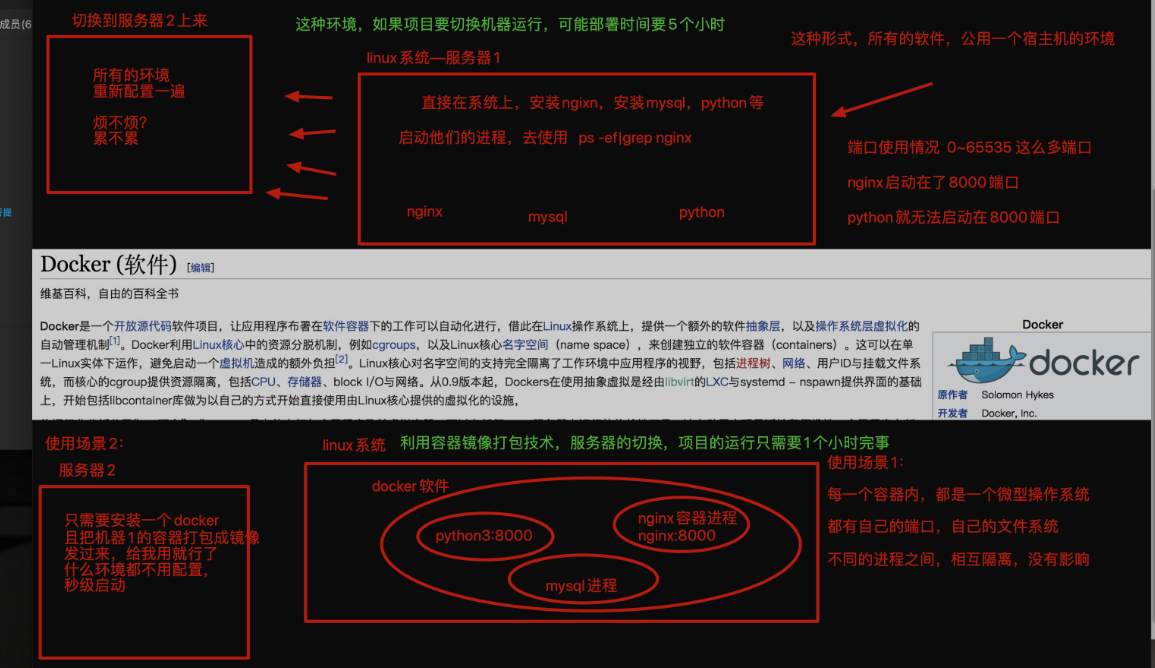
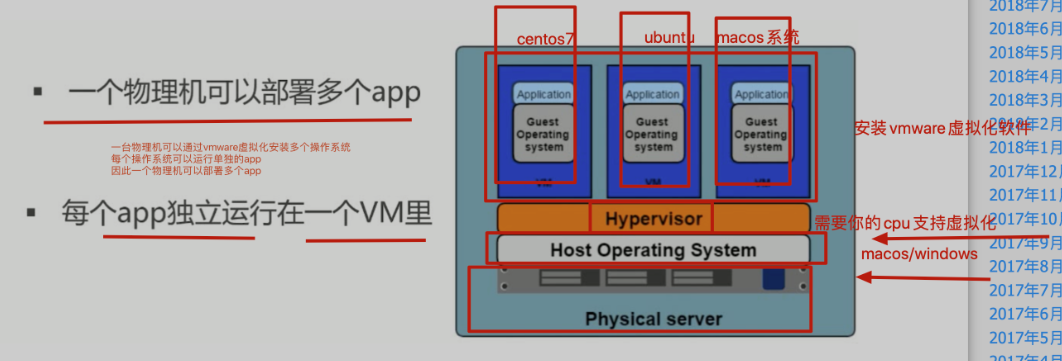
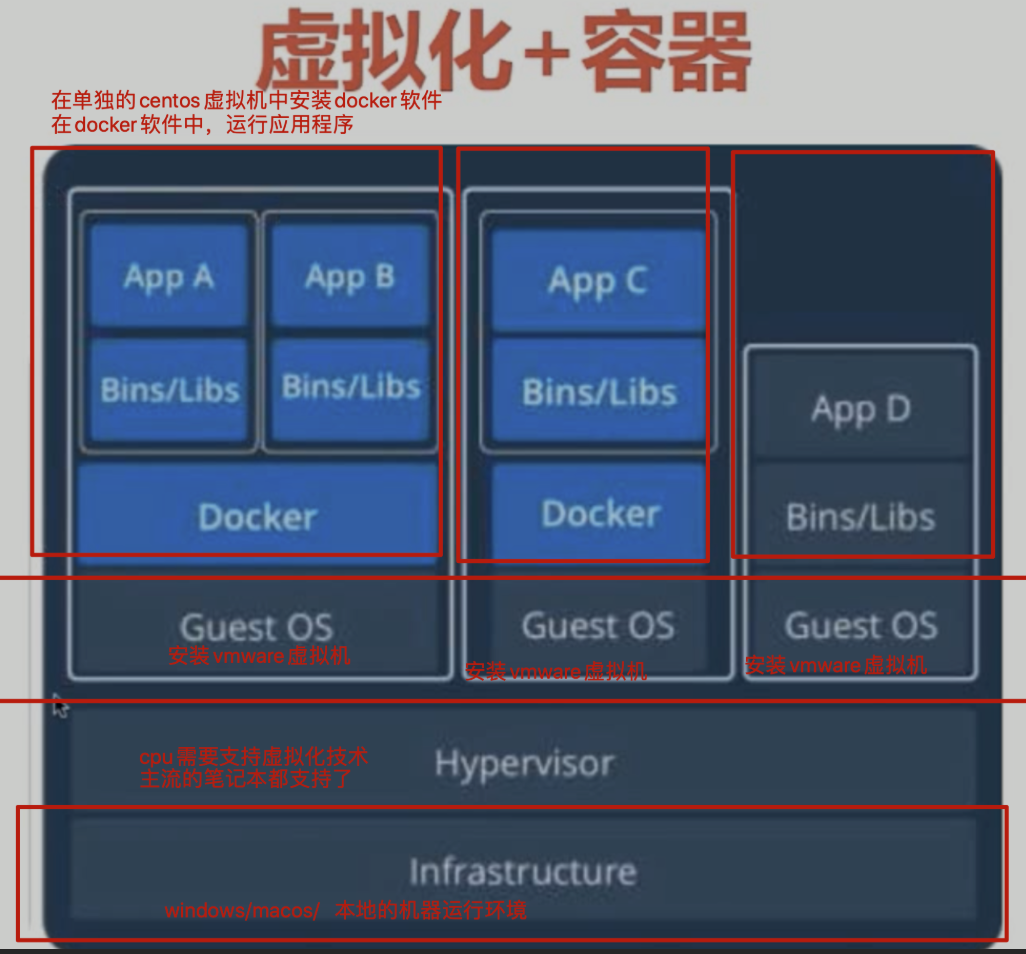
环境部署的问题,非常棘手,因此引入了容器技术
解决环境迁移的难题
1.利用虚拟机的模板克隆功能,将整个机器的环境复制一份,再丢给第二个机器去使用
2.最好是使用docker去部署环境
docker的生命周期概念
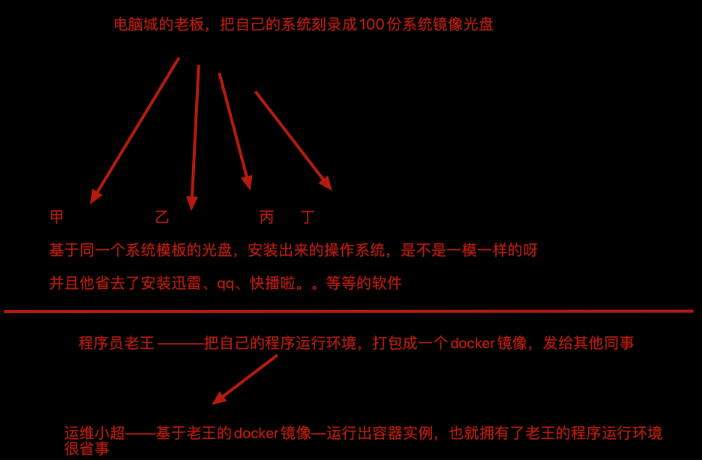
- 镜像,是一个系统的只读模板,例如一个微型的centos系统镜像
- 容器,容器进程,应用程序以后封装在容器中去运行,相互隔离
- 仓库,存储镜像的一个仓库地址,便于和他人共享镜像文件的一个地方
基于镜像运行处容器
基于一个镜像,可以运行处N多个容器实例

以python的面向对象去理解的话
docker的镜像---------理解为python的 class
docker的容器---------理解为class的实例化对象

class  Stu():
	 def __init__(self):
	 			self.age=18
	 			self.height=180
	 			self.weight=280
老王=Stu()
小李=Stu()
小张=Stu()
问,老王,小李,小张之间有什么相同性吗? 这3个对象,都有相同的Init里面的实例化属性

基于如上的概念理解,基于同一个镜像文件,运行出的容器实例,其容器内的环境,也是一模一样的
安装docker
1.安装docker软件
# 使用阿里云的yum源,可以直接安装docker软件,阿里云的docker软件版本可能较低,如果要下载新的,去docker官网找
[root@localhost ~]# yum install docker -y
2.配置docker的镜像加速器
加速系统镜像的下载,默认是去国外下载,比较慢
能够加速下载你所需要的各种镜像,来自于如下提供的3个镜像站点
比如你想快速的使用tornado模块去开发一些东西
- 编译安装python3
- 安装tornado模块及依赖关系
- 加上你的代码才能够运行
当你有了docker技术
docker search tornado # 直接搜索和tornado有关的镜像,是其他人制作好的镜像
docker pull tornado # 直接下载该镜像,和代码结合使用,docker解决了,省去了你配置环境的一些步骤
[root@localhost ~]# vim /etc/docker/daemon.json # 修改docker的配置文件,修改docker镜像的下载地址,在国内下载比较快
{
  "registry-mirrors": [
    "https://dockerhub.azk8s.cn",
    "https://hub-mirror.c.163.com",
    "https://pee6w651.mirror.aliyuncs.com"
  ]
}
3.重启docker,运行docker
[root@localhost ~]# systemctl restart docker
4.获取一个centos的基础镜像
docker的系统镜像,非常小,centos只有200M左右
[root@localhost ~]# docker pull centos
使用docker容器、镜像的增删改查命令
对于后端开发的程序员,只需要掌握Docker的容器,镜像,仓库的增删改查命令即可
增
# 1.从dockerhub 仓库中获取docker的镜像,从github获取代码一个道理
docker pull centos  # 去docker仓库中寻找centos系统镜像
docker pull ubuntu  # 获取ubuntu镜像

# 2.获取一个hello-world进程
[root@localhost ~]# docker pull hello-world

# 3.获取一个ubuntu镜像
[root@localhost ~]# docker pull ubuntu
[root@localhost ~]# docker images
REPOSITORY              TAG                 IMAGE ID            CREATED             SIZE
docker.io/hello-world   latest              9c7a54a9a43c        4 months ago        13.3 kB
docker.io/ubuntu        latest              ba6acccedd29        23 months ago       72.8 MB
docker.io/centos        latest              5d0da3dc9764        24 months ago       231 MB
[root@localhost ~]# docker run -it 9c7 /bin/bash
/usr/bin/docker-current: Error response from daemon: oci runtime error: container_linux.go:290: starting container process caused "exec: \"/bin/bash\": stat /bin/bash: no such file or directory".
[root@localhost ~]# docker run -it ba6 /bin/bash
root@afe83ed4db1b:/# cat /etc/os-release
NAME="Ubuntu"
VERSION="20.04.3 LTS (Focal Fossa)"
ID=ubuntu
ID_LIKE=debian
PRETTY_NAME="Ubuntu 20.04.3 LTS"
VERSION_ID="20.04"
HOME_URL="https://www.ubuntu.com/"
SUPPORT_URL="https://help.ubuntu.com/"
BUG_REPORT_URL="https://bugs.launchpad.net/ubuntu/"
PRIVACY_POLICY_URL="https://www.ubuntu.com/legal/terms-and-policies/privacy-policy"
VERSION_CODENAME=focal
UBUNTU_CODENAME=focal

# 4.搜索相关的镜像
[root@localhost ~]# docker search python3
INDEX       NAME                                                        DESCRIPTION                                     STARS     OFFICIAL   AUTOMATED
docker.io   docker.io/faucet/python3                                     Python3 docker image for amd64                 7
docker.io   docker.io/openwhisk/python3action                           Apache OpenWhisk runtime for Python 3 Actions   6
# 比如想用nginx,又不想修改宿主机的一个软件环境,直接用docker安装
[root@localhost ~]# docker search nginx
[root@localhost ~]# docker pull nginx
[root@localhost ~]# docker run nginx  # nginx服务器就能够运行在容器中,然后和宿主机有一个端口映射,就可以访问了
删
# 1.删除本地镜像文件
docker rmi 镜像id
[root@localhost ~]# docker rmi 要删除镜像id的前3位  # 删除镜像id的前3位即可,必须要先删除有相关依赖的容器进程记录

# 2.删除容器记录的命令
[root@localhost ~]# docker rm 容器id前3位

# 3.批量清空无用的docker容器记录,容器记录非常容易创建docker run
# 批量删除挂掉的容器记录
[root@localhost ~]# docker rm `docker ps -aq`  # 把docker容器记录的id号,保存在反引号中,丢给docker rm实现批量删除

# 4.批量删除镜像
[root@localhost ~]# docker rmi `docker iamges -aq`

# 5.批量停止容器
[root@localhost ~]# docker stop `docker ps -aq`
[root@localhost ~]# docker start 容器id  # 启动暂停的容器
[root@localhost ~]# docker stop 容器id  # 暂停一个容器
[root@localhost ~]# docker restart 容器id  # 重启容器
改
# 1.运行第一个docker的容器实例,运行镜像文件,产生容器进程
docker run 镜像文件的名字即可
[root@localhost ~]# docker run centos  # 运行centos基础镜像,如果docker容器中没有在后台运行的进程,容器会直接挂掉
# 如果你发现你的容器没有启动成功,说明容器内部出错了,程序没有运行

# 2.运行一个hello world容器进程
[root@localhost ~]# docker run hello-world

Hello from Docker!
This message shows that your installation appears to be working correctly.

To generate this message, Docker took the following steps:
 1. The Docker client contacted the Docker daemon.
 2. The Docker daemon pulled the "hello-world" image from the Docker Hub.
    (amd64)
 3. The Docker daemon created a new container from that image which runs the
    executable that produces the output you are currently reading.
 4. The Docker daemon streamed that output to the Docker client, which sent it
    to your terminal.

To try something more ambitious, you can run an Ubuntu container with:
 $ docker run -it ubuntu bash

Share images, automate workflows, and more with a free Docker ID:
 https://hub.docker.com/

For more examples and ideas, visit:
 https://docs.docker.com/get-started/


# 3.docker run指令还有一个功能是,当镜像不存在的时候,会自动去下载该进程
[root@localhost ~]# docker run hello-world   # 有2个功能,下载镜像,执行镜像

# 4.交互式的运行一个存活的docker容器,centos
# -it参数  -i 是交互式的命令操作   -t 是开启一个终端   /bin/bash 指定shell解释器
# 容器空间内,有自己的文件系统
# docker run -it centos /bin/bash  # 运行centos镜像,且进入容器内,容器空间内是以容器id命名的
[root@localhost ~]# docker run -it centos /bin/bash
[root@e7b96652ac88 /]# cat /etc/os-release
NAME="CentOS Linux"
VERSION="8"
ID="centos"
ID_LIKE="rhel fedora"
VERSION_ID="8"
PLATFORM_ID="platform:el8"
PRETTY_NAME="CentOS Linux 8"
ANSI_COLOR="0;31"
CPE_NAME="cpe:/o:centos:centos:8"
HOME_URL="https://centos.org/"
BUG_REPORT_URL="https://bugs.centos.org/"
CENTOS_MANTISBT_PROJECT="CentOS-8"
CENTOS_MANTISBT_PROJECT_VERSION="8"
[root@e7b96652ac88 /]# exit
exit

# 5.运行出一个活着的容器,在后台不断执行程序的容器
# docker run  运行镜像文件
# -d 是让容器后台运行
# -c 指定一段shell代码
# 运行centos镜像,生成容器实例,且有一段shell代码,在后台不断运行,死循环打印一句话,每秒钟打印一次
[root@localhost ~]# docker run -d centos /bin/sh -c "while true;do echo 辛苦学习linux; sleep 1;done"
ae3c01990d86f42f11775bbfbfaa384bb6b3428f0e2eef16b289e2f16dd69a5c
[root@localhost ~]# docker ps
CONTAINER ID        IMAGE               COMMAND                  CREATED             STATUS              PORTS               NAMES
ae3c01990d86        centos              "/bin/sh -c 'while..."   16 seconds ago      Up 15 seconds                           angry_wing

# 6.运行docker容器,且指定名字,便于管理
# docker run --name "指定容器的运行名字“ -d centos /bin/sh -c "while true;do echo 辛苦学习linux; sleep 1;done"
[root@localhost ~]# docker run --name "test" -d centos /bin/sh -c "while true;do echo 辛苦学习linux; sleep 1;done"
d0beb2b2340bcd14e578938812e9394065974d5cf2af787a66630bf2b76422e1
[root@localhost ~]# docker ps
CONTAINER ID        IMAGE               COMMAND                  CREATED             STATUS              PORTS               NAMES
d0beb2b2340b        centos              "/bin/sh -c 'while..."   26 seconds ago      Up 25 seconds                           test
e3db5a209d69        centos              "/bin/sh -c 'while..."   40 seconds ago      Up 39 seconds                           stoic_edison
ae3c01990d86        centos              "/bin/sh -c 'while..."   4 minutes ago       Up 4 minutes                            angry_wing

# 7.进入一个正在运行的容器空间,进入一个线上正在运行的容器程序,修改其内部的资料
# docker exec -it 容器id /bin/bash
[root@localhost ~]# docker ps
CONTAINER ID        IMAGE               COMMAND                  CREATED             STATUS              PORTS               NAMES
d0beb2b2340b        centos              "/bin/sh -c 'while..."   4 minutes ago       Up 4 minutes                            test
e3db5a209d69        centos              "/bin/sh -c 'while..."   5 minutes ago       Up 5 minutes                            stoic_edison
ae3c01990d86        centos              "/bin/sh -c 'while..."   8 minutes ago       Up 8 minutes                            angry_wing
[root@localhost ~]# docker exec -it ae3 /bin/bash
[root@localhost ~]# docker exec -it ae3 /bin/bash
[root@ae3c01990d86 /]# ps -ef
UID         PID   PPID  C STIME TTY          TIME CMD
root          1      0  0 07:26 ?        00:00:00 /bin/sh -c while true;do echo ????????????linux; sleep 1;done
root        595      0  0 07:35 ?        00:00:00 /bin/bash
root        627      1  0 07:36 ?        00:00:00 /usr/bin/coreutils --coreutils-prog-shebang=sleep /usr/bin/sleep 1
root        628    595  0 07:36 ?        00:00:00 ps -ef

# 8.如何进入容器空间内,修改容器内的环境,以及代码等内容,修改软件等操作,且提交镜像,发送给其他人
# --8.1 进入容器空间内,安装一个vim或是python3等步骤
[root@localhost ~]# docker run -it centos /bin/bash
[root@300d9440c4d1 /]# vi /etc/resolv.conf
# Generated by NetworkManager
search localdomain
nameserver 10.0.0.2
nameserver 223.5.5.5
nameserver 119.29.29.29
[root@300d9440c4d1 /]# yum install vim -y
# 报错参考下方地址
# https://blog.csdn.net/weixin_43252521/article/details/124409151

# --8.2  安装好vim后,退出容器空间
[root@localhost ~]# exit
exit

# --8.3 提交该容器,生成新的镜像文件
[root@localhost ~]# docker ps -a
CONTAINER ID        IMAGE               COMMAND                  CREATED              STATUS                          PORTS               NAMES
89efe007cff2        centos              "/bin/bash"              About a minute ago   Exited (127) 2 seconds ago                          modest_wright
[root@localhost ~]# docker commit 89efe007cff2 s25-centos-vim
sha256:c73dfef4b276d4fb84e8778f672e6280952e1907eb2d0f21e713f638f6d40896
[root@localhost ~]# docker images
REPOSITORY              TAG                 IMAGE ID            CREATED             SIZE
s25-centos-vim          latest              c73dfef4b276        29 seconds ago      231 MB
docker.io/hello-world   latest              9c7a54a9a43c        4 months ago        13.3 kB
docker.io/ubuntu        latest              ba6acccedd29        23 months ago       72.8 MB
docker.io/centos        latest              5d0da3dc9764        24 months ago       231 MB

# 9.导出你的docker镜像,可以发送给同事,或是其他人使用
# docker save  镜像id > 镜像的压缩文件
# 官方文档解释的是,docker save用的是tar命令压缩,应该是没有其他压缩格式的
[root@localhost ~]# docker save c73dfef4b276 > /opt/s25-centos-vim.tar.gz
[root@localhost ~]# ll -h /opt/
total 253M
drwxr-xr-x.  4 root root   68 Sep  4 22:57 mysite
drwxr-xr-x.  6 root root   56 Sep  4 21:06 python369
drwxr-xr-x. 18  501  501 4.0K Sep  4 21:05 Python-3.6.9
-rw-r--r--.  1 root root  22M Jul  3  2019 Python-3.6.9.tgz
drwxr-xr-x.  3 root root   18 Sep 10 14:11 redis
-rw-r--r--.  1 root root 228M Sep 11 16:35 s25-centos-vim.tar.gz
drwxrwxr-x. 14 root root 4.0K Sep  6 00:04 tengine-2.3.2
-rw-r--r--.  1 root root 2.8M Jul 21 16:33 tengine-2.3.2.tar.gz
drwxr-xr-x.  9 root root  141 Sep  5 11:06 tf_crm
drwxr-xr-x. 11 root root  151 Sep  6 00:14 tngx232
drwxr-xr-x.  4 root root   64 Sep  4 23:29 venv1
drwxr-xr-x.  3 root root   60 Sep  4 23:40 venv1_dj119
drwxr-xr-x.  4 root root   64 Sep  4 23:45 venv2
drwxr-xr-x.  3 root root   60 Sep  4 23:52 venv2_dj201
# 你可以删掉本地的镜像,然后重新导入该压缩文件,模拟发送给同事的操作
[root@localhost ~]# docker rmi c73
Untagged: s25-centos-vim:latest
Deleted: sha256:c73dfef4b276d4fb84e8778f672e6280952e1907eb2d0f21e713f638f6d40896
Deleted: sha256:45322746ea754e77d102f1a90fbbf061d7a71b432a14646dd3730923badad9e8

# 10.如何进行docker镜像导入
# 比如小李运维同志,他收到了该docker镜像压缩文件,在他的机器上导入该镜像
[root@localhost ~]# docker images
REPOSITORY              TAG                 IMAGE ID            CREATED             SIZE
docker.io/hello-world   latest              9c7a54a9a43c        4 months ago        13.3 kB
docker.io/ubuntu        latest              ba6acccedd29        23 months ago       72.8 MB
docker.io/centos        latest              5d0da3dc9764        24 months ago       231 MB
[root@localhost ~]# docker load < /opt/s25-centos-vim.tar.gz
390029cde3d2: Loading layer [==================================================>] 4.096 kB/4.096 kB
Loaded image ID: sha256:c73dfef4b276d4fb84e8778f672e6280952e1907eb2d0f21e713f638f6d40896
[root@localhost ~]# docker images
REPOSITORY              TAG                 IMAGE ID            CREATED             SIZE
<none>                  <none>              c73dfef4b276        5 minutes ago       231 MB
docker.io/hello-world   latest              9c7a54a9a43c        4 months ago        13.3 kB
docker.io/ubuntu        latest              ba6acccedd29        23 months ago       72.8 MB
docker.io/centos        latest              5d0da3dc9764        24 months ago       231 MB
# 首次导入该进项的时候,发现丢失了镜像tag标签,重新赋予一个即可
[root@localhost ~]# docker tag c73dfef4b276 s25-new-centos-vim
[root@localhost ~]# docker images
REPOSITORY              TAG                 IMAGE ID            CREATED             SIZE
s25-new-centos-vim      latest              c73dfef4b276        7 minutes ago       231 MB
docker.io/hello-world   latest              9c7a54a9a43c        4 months ago        13.3 kB
docker.io/ubuntu        latest              ba6acccedd29        23 months ago       72.8 MB
docker.io/centos        latest              5d0da3dc9764        24 months ago       231 MB

# 11.如何在docker内,运行一个python web的程序,需要用到端口映射知识
# -d 后台运行
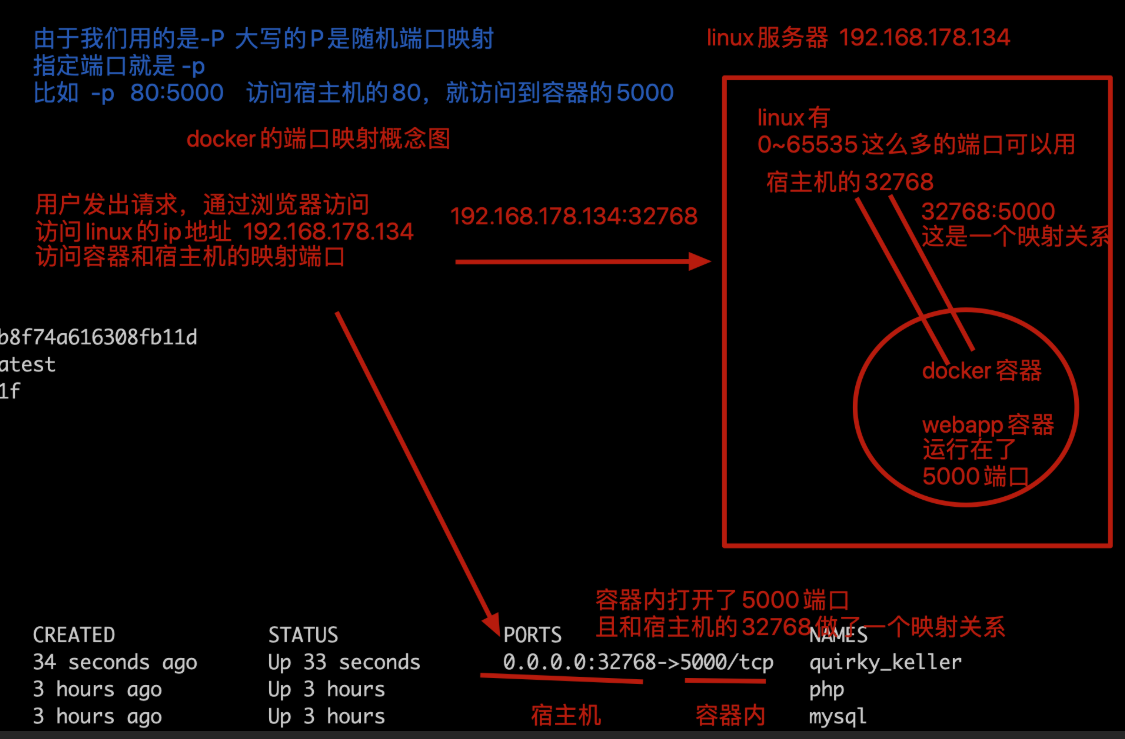
# -P  大写的P参数,作用是随机的端口映射
# training/webapp 是镜像的名字,默认没有会去在线下载
# python app.py   代表启动容器后,让容器执行的命令是它
# 因此这个命令作用是,启动一个webapp镜像,且在容器中执行 python app.py
# -p 6000:5000  访问宿主机的6000,就是访问容器的5000了
[root@localhost ~]# docker run --name "s25webdocker" -d -p 6000:5000 training/webapp python app.py
Unable to find image 'training/webapp:latest' locally
Trying to pull repository docker.io/training/webapp ...
latest: Pulling from docker.io/training/webapp
e190868d63f8: Downloading [==================================================>] 65.77 MB/65.77 MB
909cd34c6fd7: Downloading [==================================================>] 71.48 kB/71.48 kB
0b9bfabab7c1: Downloading [==================================================>]    682 B/682 B
a3ed95caeb02: Download complete
10bbbc0fc0ff: Download complete
fca59b508e9f: Download complete
e7ae2541b15b: Download complete
9dd97ef58ce9: Download complete
a4c1b0cb7af7: Download complete
latest: Pulling from docker.io/training/webapp
e190868d63f8: Pull complete
909cd34c6fd7: Pull complete
0b9bfabab7c1: Pull complete
a3ed95caeb02: Pull complete
10bbbc0fc0ff: Pull complete
fca59b508e9f: Pull complete
e7ae2541b15b: Pull complete
9dd97ef58ce9: Pull complete
a4c1b0cb7af7: Pull complete
Digest: sha256:06e9c1983bd6d5db5fba376ccd63bfa529e8d02f23d5079b8f74a616308fb11d
Status: Downloaded newer image for docker.io/training/webapp:latest
4a18674efa8e4b28639695bd0b144a07644e05fbe4f0e6725a02f311d18d034d
[root@localhost ~]# docker ps
CONTAINER ID        IMAGE               COMMAND             CREATED             STATUS              PORTS                    NAMES
4a18674efa8e        training/webapp     "python app.py"     38 seconds ago      Up 37 seconds       0.0.0.0:6000->5000/tcp   s25webdocker
[root@localhost ~]# docker port 4a1
5000/tcp -> 0.0.0.0:6000
[root@localhost ~]# curl 127.0.0.1:6000
Hello world![root@localhost ~]#

# 12.进入该webapp的容器,查看里面的内容
# docker exec -it 容器id /bin/bash  # 进入容器内,可以进行相应的修改操作
# docker restart 容器id  # 改动代码后需要重启该容器,重新读取代码,方可生效
[root@localhost ~]# docker exec -it 4a18674efa8e /bin/bash
root@4a18674efa8e:/opt/webapp# ls
Procfile  app.py  requirements.txt  tests.py
root@4a18674efa8e:/opt/webapp# cat requirements.txt
Flask
Jinja2
Werkzeug
distribute
wsgiref
root@4a18674efa8e:/opt/webapp# vi app.py
root@4a18674efa8e:/opt/webapp# exit
exit
[root@localhost ~]# curl 127.0.0.1:6000
Hello world![root@localhost ~]# docker restart 4a18674efa8e
4a18674efa8e
[root@localhost ~]# docker ps
CONTAINER ID        IMAGE               COMMAND             CREATED             STATUS              PORTS                    NAMES
4a18674efa8e        training/webapp     "python app.py"     17 minutes ago      Up 6 seconds        0.0.0.0:6000->5000/tcp   s25webdocker
[root@localhost ~]# curl 127.0.0.1:6000
Hello zylyehuo world![root@localhost ~]#
查
# 1.查看本地机器,所有的镜像文件内容
[root@localhost ~]# docker images
REPOSITORY          TAG                 IMAGE ID            CREATED             SIZE
docker.io/centos    latest              5d0da3dc9764        24 months ago       231 MB

# 2.查看docker正在运行的进程
[root@localhost ~]# docker ps
CONTAINER ID        IMAGE               COMMAND             CREATED             STATUS              PORTS               NAMES

# 3.查看所有运行,以及挂掉的容器进程
[root@localhost ~]# docker ps -a
CONTAINER ID        IMAGE               COMMAND             CREATED             STATUS                     PORTS               NAMES
494ae785d793        centos              "/bin/bash"         2 minutes ago       Exited (0) 2 minutes ago                       stoic_dubinsky

# 4.查看容器内的运行日志
# docker logs 容器id
# docker logs -f 容器id  # 实时刷新容器内的日志,例如检测nginx等日志信息
[root@localhost ~]# docker ps
CONTAINER ID        IMAGE               COMMAND                  CREATED             STATUS              PORTS               NAMES
d0beb2b2340b        centos              "/bin/sh -c 'while..."   26 seconds ago      Up 25 seconds                           test
e3db5a209d69        centos              "/bin/sh -c 'while..."   40 seconds ago      Up 39 seconds                           stoic_edison
ae3c01990d86        centos              "/bin/sh -c 'while..."   4 minutes ago       Up 4 minutes                            angry_wing
[root@localhost ~]# docker logs ae3
辛苦学习linux
辛苦学习linux
辛苦学习linux
辛苦学习linux
辛苦学习linux
辛苦学习linux
[root@localhost ~]# docker logs -f ae3
辛苦学习linux
辛苦学习linux

# 5.查看容器内的端口转发情况
docker port 容器id  # 查看容器的端口转发
[root@localhost ~]# docker port 4a1
5000/tcp -> 0.0.0.0:6000
dockerfile
手写一个dockerfile,运行出python的应用
dockerfile常用指令学习
FROM 指令表示,告诉该dockerfile以哪个镜像为基础
比如你的技术老大,要求你们程序运行在ubuntu中
# FROM  ubuntu
# FROM  centos
FROM scratch  # 制作base image 基础镜像,尽量使用官方的image作为base image
FROM centos  # 使用base image
FROM ubuntu:14.04  # 带有tag的base image
LABEL标签,定义变量,定义作者信息等
LABEL version=“1.0”  # 容器元信息,帮助信息,Metadata,类似于代码注释
LABEL maintainer=“yc_uuu@163.com"
RUN是一个完成指令,你可以用它在docker中执行任意的命令
RUN就是告诉容器要做哪些配置
用RUN指令告诉dockerfile他该去做什么事
RUN mkdir  /s25牛批
RUN cd  /s25牛批
RUN cd
RUN pwd  # 会输出什么? 因此在容器中会输出用户家目录
# 对于复杂的RUN命令,避免无用的分层,多条命令用反斜线换行,合成一条命令!
# 要修改centos基础镜像的环境问题
RUN yum update && yum install -y vim \
    Python-dev  # 反斜线换行
RUN /bin/bash -c "source $HOME/.bashrc;echo $HOME”
WORKDIR,相当于linux的cd命令
WORKDIR /root  # 相当于linux的cd命令,改变目录,尽量使用绝对路径,不要用RUN cd
WORKDIR /test  # 如果没有就自动创建
WORKDIR demo  # 再进入demo文件夹
RUN pwd  # 打印结果应该是/test/demo
# 案例
WORKDIR /s25很棒
WORKDIR  我们要说goodbay了
RUN  pwd  # 会输出什么? /s25很棒/我们要说goodbay了  此时进入了2层目录
ADD指令,用于添加宿主机的文件,放入到容器空间内
# 宿主机有自己的文件系统,文件夹,文件,目录等
# 容器内也有一套自己的文件系统,独立的文件信息
# 把宿主机的代码,拷贝到容器内
# ADD还有解压缩的功能,这是一个坑,需要注意
ADD hello.txt /opt  # 把宿主机的hello.txt拷贝到容器内的/opt目录下
ADD test.tar.gz /opt /opt/test
RUN tar -zxvf test.tar.gz  # 直接报错,文件不存在,因为上一步,ADD指令已经对tar.gz压缩包解压缩了
COPY
WORKDIR /root
ADD hello test/  # 进入/root/ 添加hello可执行命令到test目录下,也就是/root/test/hello 一个绝对路径
COPY hello test/  # 等同于上述ADD效果
# dockerfile,用于从宿主机拷贝文件到容器内有2个指令一个ADD,一个COPY,COPY仅仅就是拷贝,尽量用COPY
ADD与COPY
   - 优先使用COPY命令
    -ADD除了COPY功能还有解压功能

# 添加远程文件/目录使用curl或wget
ENV,设置环境变量
# ENV用于设置环境变量,使用ENV能够增加可维护性
ENV MYSQL_VERSION 8.0
RUN yum install -y mysql-server=“${MYSQL_VERSION}”
dockfile实战,写一个flask容器脚本
构建镜像的步骤
1.准备好一个flask代码,检查需要哪些依赖步骤
[root@localhost ~]# mkdir /s25docker
[root@localhost ~]# cd /s25docker/
[root@localhost s25docker]# vim s25_flask.py

from flask import Flask
app=Flask(__name__)
@app.route('/')
def hello():
    return "linux即将结束"
if __name__=="__main__":
    app.run(host='0.0.0.0',port=8080)
2.在宿主机环境检查如何能够运行该脚本
# 需要安装flask模块
pip3 install -i https://pypi.tuna.tsinghua.edu.cn/simple flask
# 检查运行
[root@localhost s25docker]# python3 s25_flask.py
 * Serving Flask app 's25_flask' (lazy loading)
 * Environment: production
   WARNING: This is a development server. Do not use it in a production deployment.
   Use a production WSGI server instead.
 * Debug mode: off
 * Running on all addresses.
   WARNING: This is a development server. Do not use it in a production deployment.
 * Running on http://10.0.0.129:8080/ (Press CTRL+C to quit)
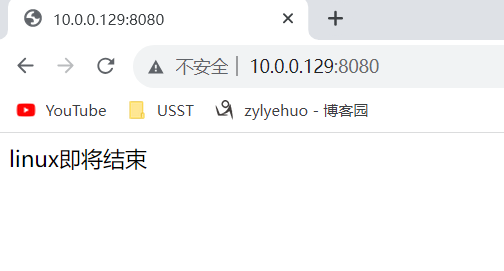
# 浏览器访问 10.0.0.129:8080
3.编写dockerfile脚本,注意名字必须是 大写Dockerfile
[root@localhost s25docker]# vim Dockerfile
# 写入如下的内容
注释版
FROM python  # 指定镜像,dockerhub提供好的python镜像,已经安装好了python3,很好用
RUN pip3 install -i https://pypi.douban.com/simple flask  # 在容器内安装flask模块
ADD s25_flask.py /opt  # 把宿主机的代码,拷贝到容器的/opt目录下
WORKDIR /opt  # 容器内进行目录切换
EXPOSE 8080  # 打开容器的8080端口,用于和宿主机进行映射
CMD ["python3","s25_flask.py"]  # 在容器启动后,内部自动执行的命令是什么
无注释版
FROM python
RUN pip3 install -i https://pypi.tuna.tsinghua.edu.cn/simple flask
ADD s25_flask.py /opt
WORKDIR /opt
EXPOSE 8080
CMD ["python3","s25_flask.py"]
4.检查准备的脚本代码,以及Dockerfile文件
[root@localhost s25docker]# ls
Dockerfile  s25_flask.py
5.构建该dockerfile,生成镜像
[root@localhost s25docker]# docker build .
...
Successfully built 0b8358ccc202
...
6.检查docker的镜像,是否生成docker images
[root@localhost s25docker]# docker images
REPOSITORY                  TAG                 IMAGE ID            CREATED             SIZE
<none>                      <none>              0b8358ccc202        59 seconds ago      928 MB
s25-new-centos-vim          latest              c73dfef4b276        About an hour ago   231 MB
docker.io/hello-world       latest              9c7a54a9a43c        4 months ago        13.3 kB
docker.io/python            latest              a5d7930b60cc        20 months ago       917 MB
docker.io/ubuntu            latest              ba6acccedd29        23 months ago       72.8 MB
docker.io/centos            latest              5d0da3dc9764        24 months ago       231 MB
docker.io/training/webapp   latest              6fae60ef3446        8 years ago         349 MB
# 可以修改一下镜像的标签
[root@localhost s25docker]# docker tag 0b8 s25-flask
[root@localhost s25docker]# docker images
REPOSITORY                  TAG                 IMAGE ID            CREATED             SIZE
s25-flask                   latest              0b8358ccc202        2 minutes ago       928 MB
s25-new-centos-vim          latest              c73dfef4b276        About an hour ago   231 MB
docker.io/hello-world       latest              9c7a54a9a43c        4 months ago        13.3 kB
docker.io/python            latest              a5d7930b60cc        20 months ago       917 MB
docker.io/ubuntu            latest              ba6acccedd29        23 months ago       72.8 MB
docker.io/centos            latest              5d0da3dc9764        24 months ago       231 MB
docker.io/training/webapp   latest              6fae60ef3446        8 years ago         349 MB
7.运行该镜像文件,查看是否能够运行容器内的flask
[root@localhost s25docker]# docker run -d -p 8000:8080 0b8
888a9aab9fd44544706846345a43cf37a10cfd42456d6d54f5dcb33bdaf6ba71
[root@localhost s25docker]# docker ps
CONTAINER ID        IMAGE               COMMAND                  CREATED             STATUS              PORTS                    NAMES
888a9aab9fd4        0b8                 "python3 s25_flask.py"   21 seconds ago      Up 21 seconds       0.0.0.0:8000->8080/tcp   condescending_boyd
4a18674efa8e        training/webapp     "python app.py"          About an hour ago   Up About an hour    0.0.0.0:6000->5000/tcp   s25webdocker
8.访问宿主机端口,查看容器内的应用
# 访问方式一
[root@localhost s25docker]# curl 127.0.0.1:8000
linux即将结束[root@localhost s25docker]#

# 访问方式二
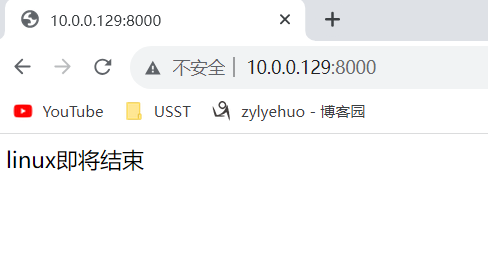
# 浏览器访问 10.0.0.129:8000
9.可以修改容器内的代码,重启容器
[root@localhost s25docker]# docker exec -it 888 /bin/bash
root@888a9aab9fd4:/opt#

# 修改容器内的代码
root@888a9aab9fd4:/opt# sed -i "s/linux即将结束/linux结束/" s25_flask.py
root@888a9aab9fd4:/opt# cat s25_flask.py
from flask import Flask
app=Flask(__name__)
@app.route('/')
def hello():
    return "linux结束"
if __name__=="__main__":
    app.run(host='0.0.0.0',port=8080)
10.重启容器
root@888a9aab9fd4:/opt# exit
exit
[root@localhost s25docker]# docker restart 888
11.再次访问容器内应用,查看更新的代码内容
# 访问方式一
[root@localhost s25docker]# curl 127.0.0.1:8000
linux结束[root@localhost s25docker]#

# 访问方式二
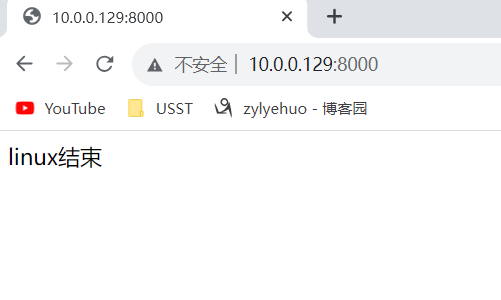
# 浏览器访问 10.0.0.129:8000
dockerhub仓库
dockerhub仓库就是和github一样的概念
github---托管程序员的代码
dockerhub----托管程序员编写的docker镜像
1.docker提供了一个类似于github的仓库dockerhub,
网址 https://hub.docker.com/ 需要注册使用

2.注册docker id后,在linux中登录dockerhub,会提示让你输入账号密码,正确登录之后,本台机器就和dockerhub绑定账号了,你的镜像推送就能够推送到该账户的dockerhub中
docker login

3.准备镜像推送
注意要保证image的tag是dockerhub账户名,如果镜像名字不对,需要改一下tag
docker tag 镜像id dockerhub的账号/centos-vim
语法是:   docker tag 仓库名 yuchao163/仓库名

4.推送docker image到dockerhub,好比你准备git push推送代码一样
docker push dockerhub账号/centos-vim

5.在dockerhub中检查镜像,查看个人账户中的镜像文件
https://hub.docker.com/

6.删除本地镜像,测试下载pull 镜像文件
docker pull yuchao163/centos-vim
yaml配置文件
不同的配置文件,遵循的语法也不一样
- json
- Conf-----nginx.conf ,my.cnf
- ini -----uwsgi.ini
- xml------xml格式的配置文件
- yaml-----新式配置文件,用在docker、salt、k8s等配置文件中,遵循python的缩进语法
yaml语法规则
    大小写敏感
    使用缩进表示层级关系
    缩进时禁止tab键,只能空格
    缩进的空格数不重要,相同层级的元素左侧对其即可
    # 表示注释行

yaml支持的数据结构
    对象: 键值对,也称作映射 mapping 哈希hashes  字典 dict    冒号表示 key: value   key冒号后必须有
    数组: 一组按次序排列的值,又称为序列sequence  列表list     短横线  - list1
    纯量: 单个不可再分的值
    对象:键值对
python的字典套字典,数据结构表示如下
{
	"s25":{
			"男同学":["宝元","太白","马jj"],
			"女同学":["景女神","alex"]
	}
}
用yaml表示上述数据结构
"s25":
  "男同学":
     - "宝元"
     - "太白"
     - "马jj"
  "女同学":
       - "景女神"
       - "alex"


