crm--纯后端部署
技术栈:supervisor + nginx + uwsgi + django + virtualenv + mariadb
基本流程
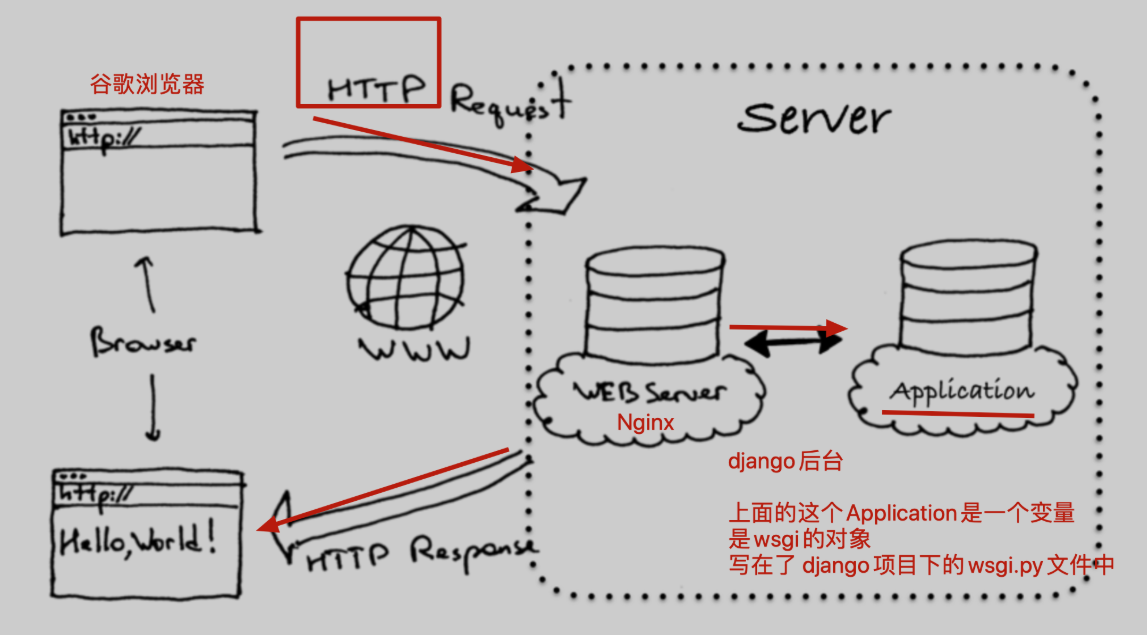
crm 纯后端部署是通过模板语言进行和前端通信的,前端代码写在后端中
<!--模板语言-->
{{static.el}}
配置后端,uwsgi+crm进行项目运行
环境变量
[root@localhost ~]# vim /etc/profile
PATH="/opt/tngx232/sbin:/opt/python369/bin:/usr/local/sbin:/usr/local/bin:/usr/sbin:/usr/bin:"
[root@localhost ~]# source /etc/profile
[root@localhost ~]# echo $PATH
/opt/tngx232/sbin:/opt/python369/bin:/usr/local/sbin:/usr/local/bin:/usr/sbin:/usr/bin:
1.先创建虚拟环境,用于运行crm
[root@localhost ~]# mkdir /s25crm
[root@localhost ~]# cd /s25crm/
[root@localhost s25crm]# ls
[root@localhost s25crm]# pwd
/s25crm
[root@localhost s25crm]# virtualenv --python=python3 s25_crm
created virtual environment CPython3.6.9.final.0-64 in 138ms
  creator CPython3Posix(dest=/s25crm/s25_crm, clear=False, no_vcs_ignore=False, global=False)
  seeder FromAppData(download=False, pip=bundle, setuptools=bundle, wheel=bundle, via=copy, app_data_dir=/root/.local/share/virtualenv)
    added seed packages: pip==21.3.1, setuptools==59.6.0, wheel==0.37.1
  activators BashActivator,CShellActivator,FishActivator,NushellActivator,PowerShellActivator,PythonActivator
[root@localhost s25crm]# ls
s25_crm
[root@localhost s25crm]# source s25_crm/bin/activate
(s25_crm) [root@localhost s25crm]#
2.上传代码到linux中,调试项目是否能够运行
(s25_crm) [root@localhost s25crm]# git clone https://github.com/zylyehuo/tf_crm.git
Cloning into 'tf_crm'...
remote: Enumerating objects: 153, done.
remote: Counting objects: 100% (153/153), done.
remote: Compressing objects: 100% (133/133), done.
remote: Total 153 (delta 20), reused 150 (delta 17), pack-reused 0
Receiving objects: 100% (153/153), 1.17 MiB | 0 bytes/s, done.
Resolving deltas: 100% (20/20), done.
(s25_crm) [root@localhost s25crm]# ls
s25_crm  tf_crm
(s25_crm) [root@localhost s25crm]# ls tf_crm/
app01  manage.py  static  templates  tf_crm
(s25_crm) [root@localhost s25crm]# cd tf_crm/
(s25_crm) [root@localhost tf_crm]#
(s25_crm) [root@localhost tf_crm]# pip3 install -i https://pypi.tuna.tsinghua.edu.cn/simple django==1.11.25
(s25_crm) [root@localhost tf_crm]# pip3 install -i https://pypi.tuna.tsinghua.edu.cn/simple pymysql
(s25_crm) [root@localhost tf_crm]# pip3 install -i https://pypi.tuna.tsinghua.edu.cn/simple django-multiselectfield
(s25_crm) [root@localhost tf_crm]# yum install mariadb-server  mariadb -y
(s25_crm) [root@localhost tf_crm]# systemctl start mariadb
(s25_crm) [root@localhost tf_crm]# netstat -tunlp | grep 3306
tcp        0      0 0.0.0.0:3306            0.0.0.0:*               LISTEN      106346/mysqld
(s25_crm) [root@localhost tf_crm]# python3 manage.py runserver
# 出现 ValueError: Incorrect timezone setting: Asia/shanghai
(s25_crm) [root@localhost tf_crm]# vim tf_crm/settings.py
#TIME_ZONE = 'Asia/shanghai'  # 注释掉,临时解决
(s25_crm) [root@localhost tf_crm]# python3 manage.py runserver
# 出现 django.db.utils.OperationalError: (1045, "Access denied for user 'root'@'localhost' (using password: YES)")
(s25_crm) [root@localhost tf_crm]# vim /s25crm/tf_crm/tf_crm/local_settings.py
# 修改以下内容
DATABASES = {
    'default':{
        'ENGINE': 'django.db.backends.mysql',
        'NAME': 'tf_crm',
        'HOST': '127.0.0.1',
        'POST': 3306,
        'USER': 'root',
        'PASSWORD': '',
    }
}
(s25_crm) [root@localhost tf_crm]# vim /opt/s25crm/tf_crm/tf_crm/settings.py
# 修改以下内容
ALLOWED_HOSTS = ["*"]
(s25_crm) [root@localhost tf_crm]# pwd
/s25crm/tf_crm
(s25_crm) [root@localhost tf_crm]# python3 manage.py runserver
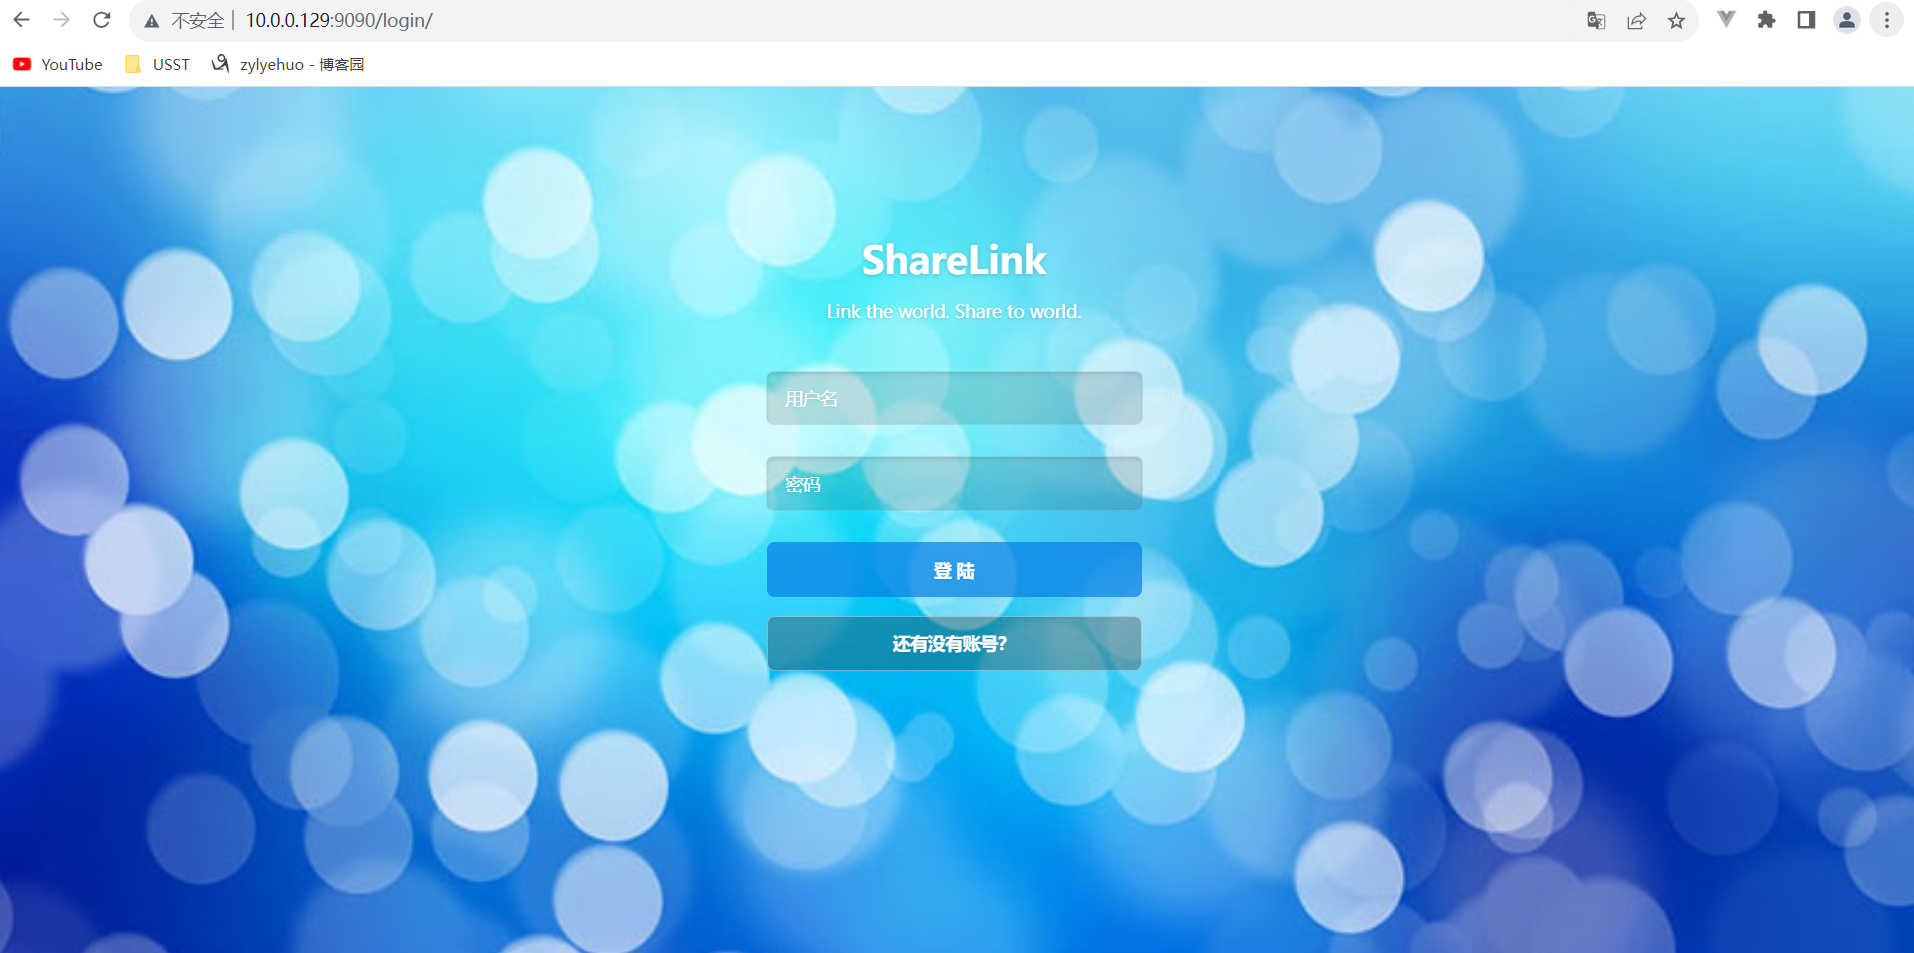
3.调试好crm的模块依赖,以及mariadb数据库的安装,以及数据导入之后,crm调试可以正确运行了
浏览器访问 10.0.0.129:9090/login/
4.在线上,是使用uwsgi结合uwsgi.ini配置文件,启动crm的,启动方式如下
安装uwsgi
pip3 install -i https://pypi.tuna.tsinghua.edu.cn/simple uwsgi
线上部署时,uwsgi.ini需要修改添加如下参数,关闭http参数
(s25_crm) [root@localhost tf_crm]# vim uwsgi.ini
注释版
[uwsgi]
# Django-related settings
# the base directory (full path)
# 填写crm项目的第一层绝对路径
chdir = /s25crm/tf_crm/
# Django's wsgi file
# 填写crm项目第二层的相对路径,找到第二层目录下的wsgi.py
# 这里填写的不是路径,是以上一个参数为相对,找到第二层项目目录下的wsgi.py文件
module = tf_crm.wsgi
# the virtualenv (full path)
# 填写虚拟环境解释器的第一层工作目录
home = /s25crm/s25_crm
# process-related settings
# master
master = true
# maximum number of worker processes
# 代表定义uwsgi运行的多进程数量,官网给出的优化建议是 2*cpu核数+1
# 如果是单进程,十万个请求,都丢给一个进程去处理
# 3个工作进程,十万个请求,就分给了3个进程去分摊处理
# 查看几核
# [root@localhost ~]# cat /proc/cpuinfo| grep "cpu cores"| uniq
# cpu cores : 4
processes = 9
# the socket (use the full path to be safe
# 使用此协议运行后台,就无法通过浏览器访问了,协议不一样
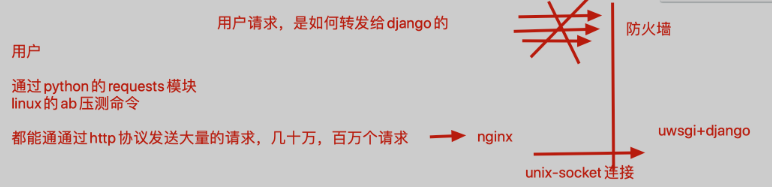
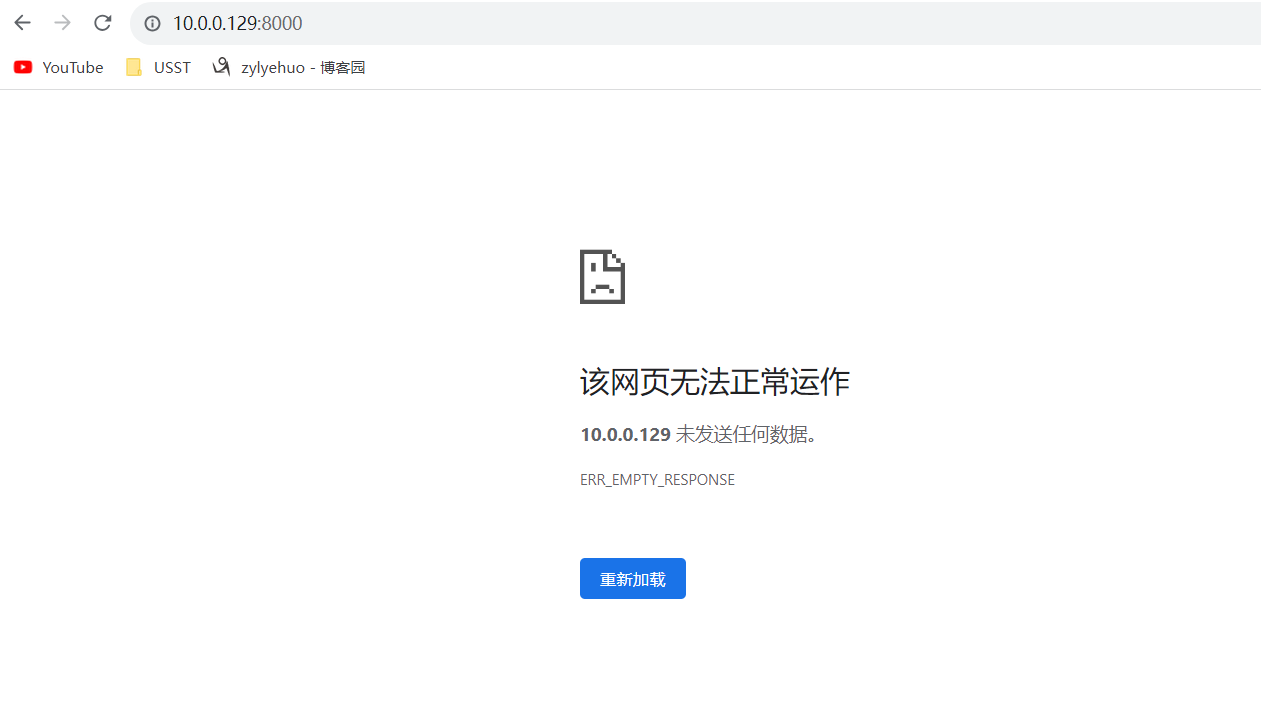
socket = 0.0.0.0:8000
# 线上不会用http参数,因为对后端是不安全的,使用socket参数是安全的连接,用nginx反向代理去访问
# 后端程序是运行在防火墙内部,外网是无法直接访问的
# 临时使用http参数,便于我们用浏览器调试访问
#http = 0.0.0.0:8000
# ... with appropriate permissions - may be needed
# chmod-socket = 664
# clear environment on exit
vacuum = true
无注释版
[uwsgi]
chdir           = /s25crm/tf_crm/
module          = tf_crm.wsgi
home            = /s25crm/s25_crm
master          = true
processes       = 9
socket          = 0.0.0.0:8000
vacuum          = true
配置supervisor启动uwsgi进程
5.使用supervisor启动uwsgi进程,需要修改supervisord.conf配置文件,看好文件的名字
(s25_crm) [root@localhost tf_crm]# which uwsgi
/s25crm/s25_crm/bin/uwsgi

(s25_crm) [root@localhost tf_crm]# ls
app01  manage.py  static  templates  tf_crm  uwsgi.ini
(s25_crm) [root@localhost tf_crm]# pwd
/s25crm/tf_crm
vim /etc/supervisord.conf #修改如下参数
注释版
[program:s25crm]
command=/s25crm/s25_crm/bin/uwsgi --ini /s25crm/tf_crm/uwsgi.ini
autostart=true       ; 在supervisord启动的时候也自动启动
startsecs=10         ; 启动10秒后没有异常退出,就表示进程正常启动了,默认为1秒
autorestart=true     ; 程序退出后自动重启,可选值:[unexpected,true,false],默认为unexpected,表示进程意外杀死后才重启
stopasgroup=true     ;默认为false,进程被杀死时,是否向这个进程组发送stop信号,包括子进程
killasgroup=true     ;默认为false,向进程组发送kill信号,包括子进程
无注释版
[program:s25crm]
command=/s25crm/s25_crm/bin/uwsgi --ini /s25crm/tf_crm/uwsgi.ini
autostart=true
startsecs=10
autorestart=true
stopasgroup=true
killasgroup=true
6.检查后台的状态,并启动supervisor
# 【supervisor无法正常启动,立即去检查 supervisord.conf里面定义的任务参数是否正确】
(s25_crm) [root@localhost tf_crm]# supervisord -c /etc/supervisord.conf
Unlinking stale socket /tmp/supervisor.sock
(s25_crm) [root@localhost tf_crm]# supervisorctl -c /etc/supervisord.conf
s25crm                           RUNNING   pid 107727, uptime 0:00:52
supervisor> status
s25crm                           RUNNING   pid 107727, uptime 0:01:16
此时浏览器访问 10.0.0.129:8000
由于协议不通,故出现如下页面
7.此时配置好nginx.conf就完事了,修改如下,配置nginx,请求转发给后台即可
(s25_crm) [root@localhost tf_crm]# vim /opt/tngx232/conf/nginx.conf
注释版
    server {
        listen       80;
        server_name  localhost;
        # 这是一个局部的变量,只对当前这个server{}代码块生效,编码设置为utf-8
        charset utf-8;
        error_page  404  /40x.html;
        # 这里的locaiton路径匹配,如果你写的是root参数,就是一个web站点功能
        # 基于uwsgi协议的一个高性能的反向代理转发,新的参数
        location / {
            # 当请求发送给  10.0.0.129:80的时候
            # 通过uwsgi_pass把请求转发给后端的uwsgi服务器
            uwsgi_pass   0.0.0.0:8000;
            # 这个参数,是固定的,是添加一些转发请求头内容
            include uwsgi_params;
        }
    }
无注释版
    server {
        listen       80;
        server_name  localhost;
        charset utf-8;
        error_page  404  /40x.html;
        location / {
            uwsgi_pass   0.0.0.0:8000;
            include uwsgi_params;
        }
    }
8.重启nginx
(s25_crm) [root@localhost tf_crm]# nginx -t
nginx: the configuration file /opt/tngx232//conf/nginx.conf syntax is ok
nginx: configuration file /opt/tngx232//conf/nginx.conf test is successful
(s25_crm) [root@localhost tf_crm]# nginx -s reload
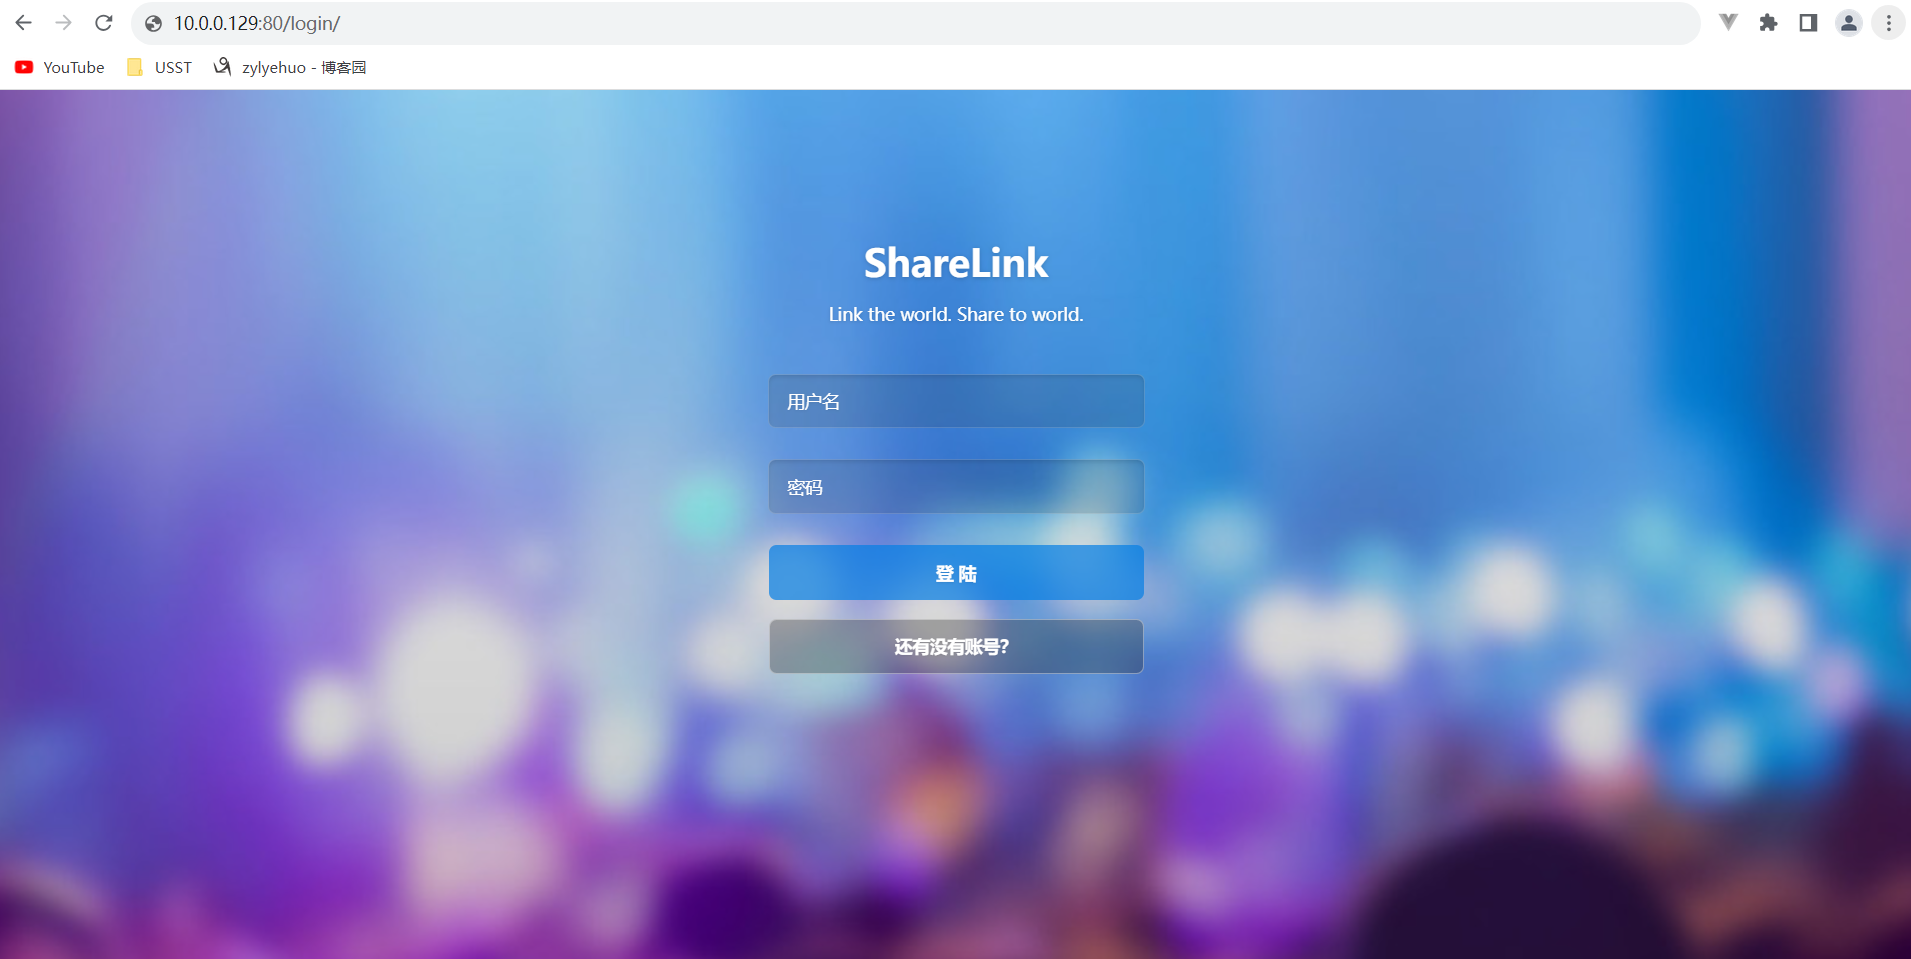
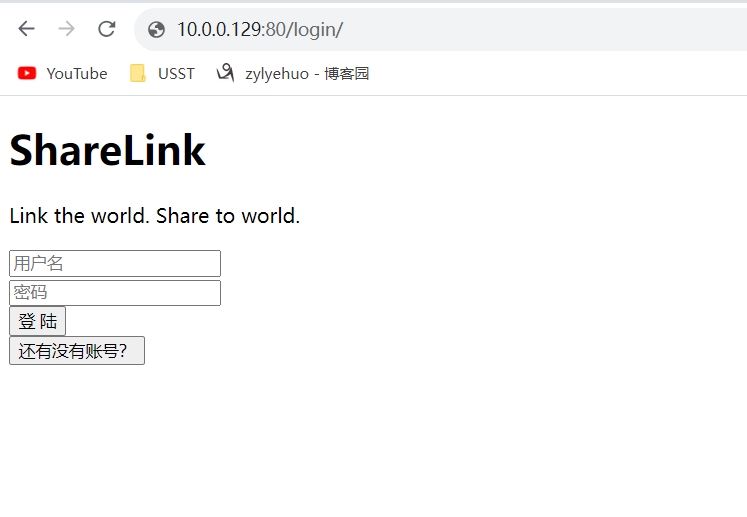
浏览器访问 10.0.0.129/login/
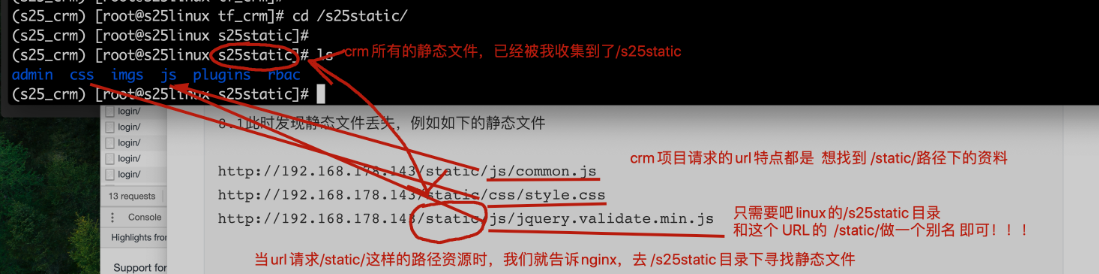
此时发现静态文件丢失,例如如下的静态文件
http://10.0.0.129/static/js/common.js
http://10.0.0.129/static/css/style.css
http://10.0.0.129/static/js/jquery.validate.min.js
配置静态文件
9.还得配置nginx接收所有的django静态文件,修改命令如下
第一步:修改django的配置文件,收集所有的静态文件,放入一个统一管理的目录
(s25_crm) [root@localhost tf_crm]# vim /s25crm/tf_crm/tf_crm/settings.py  # 添加如下内容

STATIC_ROOT='/s25static/'   # 作用是定义一个统一管理的目录,收集所有crm的静态文件
第二步:用命令收集静态文件
cd /s25crm/tf_crm
(s25_crm) [root@localhost tf_crm]# python3 manage.py collectstatic
(s25_crm) [root@localhost tf_crm]# cd /s25static/
(s25_crm) [root@localhost s25static]# ls
admin  css  imgs  js  plugins
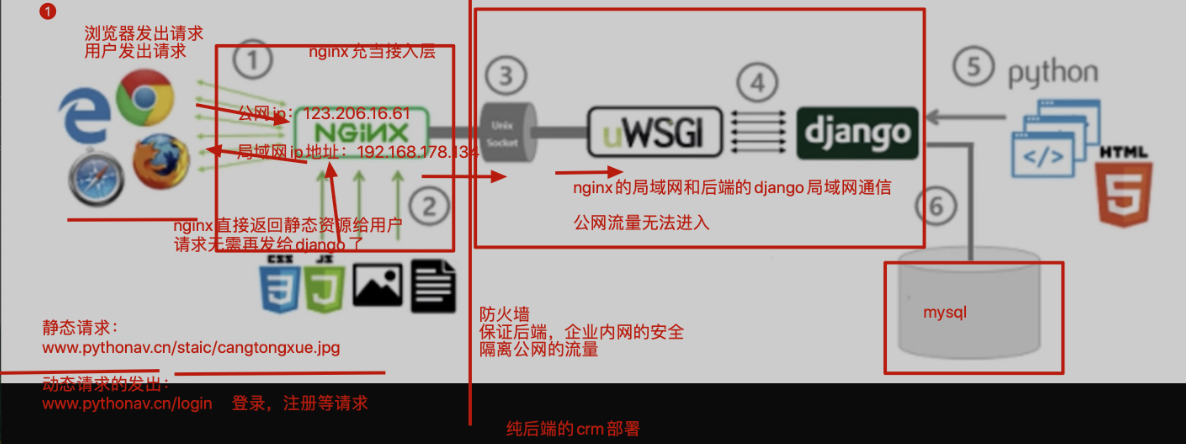
10.通过nginx去找到如下的静态文件即可
nginx找到crm的静态文件原理图

(s25_crm) [root@localhost s25static]# vim /opt/tngx232/conf/nginx.conf
注释版
    server {
        listen       80;
        server_name  localhost;
        # 这是一个局部的变量,只对当前这个server{}代码块生效,编码设置为utf-8
        charset utf-8;
        error_page  404  /40x.html;
        # 这里的locaiton路径匹配,如果你写的是root参数,就是一个web站点功能
        # 基于uwsgi协议的一个高性能的反向代理转发,新的参数
        location / {
            # 当请求发送给  10.0.0.129:80的时候
            # 通过uwsgi_pass把请求转发给后端的uwsgi服务器
            uwsgi_pass   0.0.0.0:8000;
            # 这个参数,是固定的,是添加一些转发请求头内容
            include uwsgi_params;
        }
        # nginx的location{}代码块用于匹配nginx的url,对于静态文件的匹配,可以按如下配置
        # 当请求url是 10.0.0.129:80/static/js
        #            10.0.0.129:80/static/css
        #            10.0.0.129:80/static/admin/admin.js
        #            ......
        #            如此之类以 /static 开头的url,都告诉nginx去Linux的 /s25static 目录下寻找资料,也就找到所有的 js、css了
        location /static {
            alias /s25static;
        }
    }
无注释版
    server {
        listen       80;
        server_name  localhost;
        charset utf-8;
        error_page  404  /40x.html;
        location / {
            uwsgi_pass   0.0.0.0:8000;
            include uwsgi_params;
        }
        location /static {
            alias /s25static;
        }
    }
11.重启nginx
(s25_crm) [root@localhost tf_crm]# nginx -t
nginx: the configuration file /opt/tngx232//conf/nginx.conf syntax is ok
nginx: configuration file /opt/tngx232//conf/nginx.conf test is successful
(s25_crm) [root@localhost tf_crm]# nginx -s reload
浏览器访问 10.0.0.129/login/