Spring Boot -- 启动流程分析之ApplicationContext 上
我们总经常听说Spring容器,那Spring容器到底是什么,在介绍创建Spring应用程序上下文之前,我们先来聊一聊Spring容器到底是什么。
一、容器简介
容器顾名思义就是用来装东西的,装的是什么?装的是Bean。
Bean是Spring的基本单位,在基于Spring的web应用中,所有的组件都被当做Bean处理、包括数据源、Hiberate的SessionFactory、事务管理器等。在Spring中,Bean是一个非常广义的概念,任何Java对象,Java组件都被当做Bean处理。
那容器仅仅是用来保存Bean这么简单么?不是。
当我们需要某个Bean时,容器会自动帮我们创建,并在适当时销毁。当某个 Bean 中需创建另一个 Bean 时,也就是 Bean 之间有依赖关系,这种依赖的 Bean 也是由容器自动创建。在外界有一个标准的名词,前者称呼为 IOC,也就是控制反转,后者称呼为 DI,也就是依赖注入。
1.1、IOC/DI
IOC (Inversion of Control) 控制反转:所谓控制反转,就是当我们需要某个 Bean 时,将 Bean 的名称告知容器,由容器去创建该 Bean,而不是我们手动 new 一个,这里 Bean 创建管理的控制权都交给了容器,所以这是一种控制权的反转。其通俗点讲就是需要什么东西让别人送过来,而不是自己去拿。
DI (Dependency Injection) 依赖注入:就是指当 A Bean 里面需创建 B Bean 时,会在创建 A Bean 的时候,自动将依赖的 B Bean 注入进去,其 B Bean 是被动接受注入而不是自己主动去找。换句话说就是指 A Bean 不是从容器中查找它依赖的 B Bean,而是在容器创建 A Bean 候主动将它依赖的 B Bean 注入给它。
IOC 和 DI 其实归根结底实现的功能是相同的,只是同样的功能站在不同的角度来阐述罢了。当然,在真实场景中,交由 Spring 容器创建的 Bean 泛指在应用程序中的表现层、业务层、持久层等各层对应的 Bean,如 Controller、Service 等;进行数据交互的模型,如 DTO、VO 等就不需交由 Spring 来创建。
所以,容器本质上可以也可以看作是 Bean 工厂,该工厂管理 Bean 的生命周期,以及 Bean 之间的依赖关系。外界也将 Spring 容器称为 IOC 容器。当然,这里容器仅仅是 Spring 的抽象概念,代码中将其具象化为 BeanFactory 或 ApplicationContext,容器功能也由具象化的类进行处理。
1.2、容器的结构
容器的实现类并不是唯一的,Spring 框架提供了多个容器的实现,这些容器分为两套体系:一套是早期的 BeanFactory 体系;还有一套是现在常用的 ApplicationContext,也可称为应用上下文,它继承了 BeanFactory,它除了有 BeanFactory 的功能外 ,还提供了其他服务,例如事务和 AOP 服务、国际化(il8n)的消息源以及应用程序事件处理等企业级的服务。
说到这,就不得不说 Spring 的两种配置方式,在早期都是 XML 配置文件的方式,而现在使用的是注解配置的方式。BeanFactory 体系的容器一般用来处理 XML 配置文件的方式,而 ApplicationContext 体系则都可以处理。
下表列出了BeanFactory 和 ApplicationContext 接口和实现所提供的功能:
| 功能/特点 | BeanFactory | ApplicationContext |
| Bean 实例化/装配 | 有 | 有 |
| BeanPostProcessor 自动注册 | 没有 | 有 |
| BeanFactoryPostProcessor 自动注册 | 没有 | 有 |
| MessageSource 便捷访问(针对i18n) | 没有 | 有 |
| ApplicationEvent 发布 | 没有 | 有 |
两者还有一个区别是:
- ApplicationContext 在容器启动时,一次性创建了所有的 Bean。
- BeanFactory 在容器启动时,并未创建 Bean,直到第一次访问某个 Bean 时才创建目标 Bean。
1.3、BeanFactory
BeanFactory 是容器最基础的类,它定义了容器的基本功能规范:
public interface BeanFactory {

    // 对 FactoryBean 的转义定义,因为如果使用 bean 的名字检索 FactoryBean 得到的对象是工厂生成的对象,
    // 如果需要得到工厂本身,需要转义(FactoryBean 在后续会详细介绍)
    String FACTORY_BEAN_PREFIX = "&";

    // 根据 bean 的名字,获取在容器中 bean 实例
    Object getBean(String name) throws BeansException;

    //根据 bean 的名字和 Class 类型来得到 bean 实例,增加了类型安全验证机制。
    <T> T getBean(String name, @Nullable Class<T> requiredType) throws BeansException;
    Object getBean(String name, Object... args) throws BeansException;
    <T> T getBean(Class<T> requiredType) throws BeansException;
    <T> T getBean(Class<T> requiredType, Object... args) throws BeansException;

    // 提供对 bean 的检索,看看是否在容器有这个名字的 bean
    boolean containsBean(String name);

    // 根据 bean 名字,判断这个 bean 是不是单例
    boolean isSingleton(String name) throws NoSuchBeanDefinitionException;

    // 根据 bean 名字,判断这个 bean 是不是原型
    boolean isPrototype(String name) throws NoSuchBeanDefinitionException;

    // 根据 bean 名字,判断是否与指定的类型匹配
    boolean isTypeMatch(String name, ResolvableType typeToMatch) throws NoSuchBeanDefinitionException;
    boolean isTypeMatch(String name, @Nullable Class<?> typeToMatch) throws NoSuchBeanDefinitionException;

    // 得到 bean 实例的 Class 类型
    Class<?> getType(String name) throws NoSuchBeanDefinitionException;

    // 得到bean 的别名,如果根据别名检索,那么其原名也会被检索出来
    String[] getAliases(String name);
}
在 BeanFactory 里只对容器的基本行为作了定义,其根本不关心你的 Bean 是如何定义怎样加载的。 正如我们只关心工厂里得到什么的产品对象,至于工厂是怎么生产这些对象的,这个基本的接口不关心。而要知道工厂是如何产生对象的,我们就需要看具体的容器了,也就是 BeanFactory 的子类。
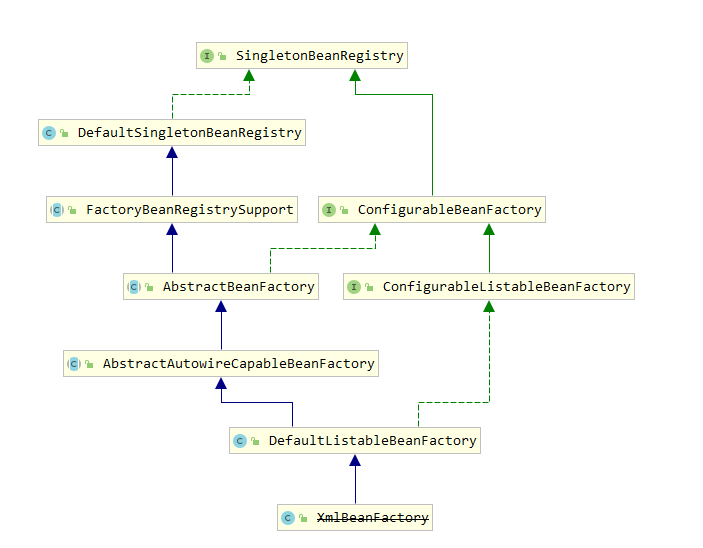
BeanFactory 大致的继承关系如下:

BeanFactory 体系中常用的实现类有:
- ListableBeanFactory:提供容器中 bean 迭代的功能。如返回所有 Bean 的名字、容器中 Bean 的数量等。
- HierarchicalBeanFactory:提供父容器的访问功能,可通过 ConfigurableBeanFactory 的 setParentBeanFactory 方法设置父容器。
- AutowireCapableBeanFactory:为 Spring 容器之外的 Bean ,也就是未交由 Spring 管理的 Bean ,提供依赖注入的功能。
以上三个是 BeanFactory 的直系亲属,这个三个直系亲属下面又派生了两个复杂的容器:
- ConfigurableBeanFactory:其继承了 HierarchicalBeanFactory 和 SingletonBeanRegistry 这两个接口,其提供了很多方法,如:定义类加载器、类型转化、属性编辑器、注册依赖 Bean 、销毁 bean 等,且该接口被大多数的容器继承、实现。
- ConfigurableListableBeanFactory:这个接口继承了 ListableBeanFactory、 AutowireCapableBeanFactory、ConfigurableBeanFactory,自身主要提供用于分析和修改 bean 定义以及预先实例化单例 Bean 的方法。
最后是核心容器:
DefaultListableBeanFactory:它实现了以上所有的接口,在 BeanFactory 体系中可以作为一个独立的容器使用。这个类特别重要,后面我们介绍到的Spring应用上下文启动都是围绕该类展开的,这个类中有几个字段我们后面会反复使用到:
public class DefaultListableBeanFactory extends AbstractAutowireCapableBeanFactory
        implements ConfigurableListableBeanFactory, BeanDefinitionRegistry, Serializable {
       ...

    /** Map from serialized id to factory instance. */
    private static final Map<String, Reference<DefaultListableBeanFactory>> serializableFactories =
            new ConcurrentHashMap<>(8);

    /** Optional id for this factory, for serialization purposes. */
    @Nullable
    private String serializationId;

    /** Whether to allow re-registration of a different definition with the same name. */
    private boolean allowBeanDefinitionOverriding = true;

    /** Whether to allow eager class loading even for lazy-init beans. */
    private boolean allowEagerClassLoading = true;

    /** Optional OrderComparator for dependency Lists and arrays. */
    @Nullable
    private Comparator<Object> dependencyComparator;

    /** Resolver to use for checking if a bean definition is an autowire candidate. */
    private AutowireCandidateResolver autowireCandidateResolver = new SimpleAutowireCandidateResolver();

    /** Map from dependency type to corresponding autowired value. */
    private final Map<Class<?>, Object> resolvableDependencies = new ConcurrentHashMap<>(16);

    /** Map of bean definition objects, keyed by bean name. */
    private final Map<String, BeanDefinition> beanDefinitionMap = new ConcurrentHashMap<>(256);

    /** Map of singleton and non-singleton bean names, keyed by dependency type. */
    private final Map<Class<?>, String[]> allBeanNamesByType = new ConcurrentHashMap<>(64);

    /** Map of singleton-only bean names, keyed by dependency type. */
    private final Map<Class<?>, String[]> singletonBeanNamesByType = new ConcurrentHashMap<>(64);

    /** List of bean definition names, in registration order. */
    private volatile List<String> beanDefinitionNames = new ArrayList<>(256);

    /** List of names of manually registered singletons, in registration order. */
    private volatile Set<String> manualSingletonNames = new LinkedHashSet<>(16);

    /** Cached array of bean definition names in case of frozen configuration. */
    @Nullable
    private volatile String[] frozenBeanDefinitionNames;

    /** Whether bean definition metadata may be cached for all beans. */
    private volatile boolean configurationFrozen = false;
       ...
}
此外还有继承自DefaultSingletonBeanRegistry的字段:
public class DefaultSingletonBeanRegistry extends SimpleAliasRegistry implements SingletonBeanRegistry {

    /** Cache of singleton objects: bean name to bean instance. */
    private final Map<String, Object> singletonObjects = new ConcurrentHashMap<>(256);

    /** Cache of singleton factories: bean name to ObjectFactory. */
    private final Map<String, ObjectFactory<?>> singletonFactories = new HashMap<>(16);

    /** Cache of early singleton objects: bean name to bean instance. */
    private final Map<String, Object> earlySingletonObjects = new HashMap<>(16);

    /** Set of registered singletons, containing the bean names in registration order. */
    private final Set<String> registeredSingletons = new LinkedHashSet<>(256);

    /** Names of beans that are currently in creation. */
    private final Set<String> singletonsCurrentlyInCreation =
            Collections.newSetFromMap(new ConcurrentHashMap<>(16));

    /** Names of beans currently excluded from in creation checks. */
    private final Set<String> inCreationCheckExclusions =
            Collections.newSetFromMap(new ConcurrentHashMap<>(16));

    /** List of suppressed Exceptions, available for associating related causes. */
    @Nullable
    private Set<Exception> suppressedExceptions;

    /** Flag that indicates whether we're currently within destroySingletons. */
    private boolean singletonsCurrentlyInDestruction = false;

    /** Disposable bean instances: bean name to disposable instance. */
    private final Map<String, Object> disposableBeans = new LinkedHashMap<>();

    /** Map between containing bean names: bean name to Set of bean names that the bean contains. */
    private final Map<String, Set<String>> containedBeanMap = new ConcurrentHashMap<>(16);

    /** Map between dependent bean names: bean name to Set of dependent bean names. */
    private final Map<String, Set<String>> dependentBeanMap = new ConcurrentHashMap<>(64);

    /** Map between depending bean names: bean name to Set of bean names for the bean's dependencies. */
    private final Map<String, Set<String>> dependenciesForBeanMap = new ConcurrentHashMap<>(64);
    ...
}
下面重点介绍一下ApplicationContext,主要是因为ApplicationContext 包含了 BeanFactory,实际中基本不单独使用 BeanFactory。
1.4、ApplicationContext
上面说过 ApplicationContext 是 BeanFactory 子类,它不仅包含 BeanFactory 所有功能,还对其进行了扩展,而我们喜欢将 ApplicationContext 称为应用上下文,因为容器只是它的基本功能。

public interface ApplicationContext extends EnvironmentCapable, ListableBeanFactory, HierarchicalBeanFactory,
        MessageSource, ApplicationEventPublisher, ResourcePatternResolver {

    // 返回此应用程序上下文的唯一ID
    @Nullable
    String getId();

    // 返回此上下文所属的应用程序名称
    String getApplicationName();

    // 返回应用上下文具像化的类名
    String getDisplayName();

    // 返回第一次加载此上下文时的时间戳
    long getStartupDate();

    // 获取父级应用上下文
    @Nullable
    ApplicationContext getParent();

    // 将 AutowireCapableBeanFactory 接口暴露给外部使用
    AutowireCapableBeanFactory getAutowireCapableBeanFactory() throws IllegalStateException;
}
ApplicationContext 自身提供的方法非常简单,但它继承了六个接口,来扩展自身功能:
- EnvironmentCapable:获取 Environment。
- ListableBeanFactory、HierarchicalBeanFactory:这是 BeanFactory 体系接口,分别提供 Bean 迭代和访问父容器的功能。
- MessageSource:支持国际化功能。
- ApplicationEventPublisher:应用事件发布器,封装事件发布功能的接口。
- ResourcePatternResolver:该接口继承至 ResourceLoader ,作用是加载多个 Resource。
ApplicationContext 同样提供了非常多的实现类,其又可细分为两大类, ConfigurableApplicationContext 和 WebApplicationContext。
1.5、ConfigurableApplicationContext
该接口是比较重要的一个接口,几乎所有的应用上下文都实现了该接口。该接口在ApplicationContext的基础上提供了配置应用上下文的能力,此外提供了生命周期的控制能力。
public

 interface ConfigurableApplicationContext extends ApplicationContext, Lifecycle, Closeable {

    // 应用上下文配置时,这些符号用于分割多个配置路径
    String CONFIG_LOCATION_DELIMITERS = ",; \t\n";

    // BeanFactory中,ConversionService类所对应的bean的名字。如果没有此类的实例的话吗,则使用默认的转换规则
    String CONVERSION_SERVICE_BEAN_NAME = "conversionService";

    //LoadTimeWaver类所对应的Bean在容器中的名字。如果提供了该实例,上下文会使用临时的 ClassLoader ,这样,LoadTimeWaver就可以使用bean确切的类型了
    String LOAD_TIME_WEAVER_BEAN_NAME = "loadTimeWeaver";

    // Environment 类在容器中实例的名字
    String ENVIRONMENT_BEAN_NAME = "environment";

    // System 系统变量在容器中对应的Bean的名字
    String SYSTEM_PROPERTIES_BEAN_NAME = "systemProperties";

    // System 环境变量在容器中对应的Bean的名字
    String SYSTEM_ENVIRONMENT_BEAN_NAME = "systemEnvironment";

    // 设置容器的唯一ID
    void setId(String id);

    // 设置此容器的父容器
    void setParent(@Nullable ApplicationContext parent);

    // 设置容器的 Environment 变量
    void setEnvironment(ConfigurableEnvironment environment);

    // 以 ConfigurableEnvironment 的形式返回此容器的环境变量。以使用户更好的进行配置
    @Override
    ConfigurableEnvironment getEnvironment();

    // 此方法一般在读取应用上下文配置的时候调用,用以向此容器中增加BeanFactoryPostProcessor。增加的Processor会在容器refresh的时候使用。
    void addBeanFactoryPostProcessor(BeanFactoryPostProcessor postProcessor);

    // 向容器增加一个 ApplicationListener,增加的 Listener 用于发布上下文事件,如 refresh 和 shutdown 等
    void addApplicationListener(ApplicationListener<?> listener);

    // 向容器中注入给定的 Protocol resolver
    void addProtocolResolver(ProtocolResolver resolver);

    // 这是初始化方法,因此如果调用此方法失败的情况下,要将其已经创建的 Bean 销毁。
    // 换句话说,调用此方法以后,要么所有的Bean都实例化好了,要么就一个都没有实例化
    void refresh() throws BeansException, IllegalStateException;

    // 向JVM注册一个回调函数,用以在JVM关闭时,销毁此应用上下文
    void registerShutdownHook();

    // 关闭此应用上下文,释放其所占有的所有资源和锁。并销毁其所有创建好的 singleton Beans
    @Override
    void close();

    // 检测此 FactoryBean 是否被启动过
    boolean isActive();

    // 返回此应用上下文的容器。
    // 千万不要使用此方法来对 BeanFactory 生成的 Bean 做后置处理,因为单例 Bean 在此之前已经生成。
    // 这种情况下应该使用 BeanFactoryPostProcessor 来在 Bean 生成之前对其进行处理
    ConfigurableListableBeanFactory getBeanFactory() throws IllegalStateException;
}
该接口下又有几个重要的实现类:
- AbstractApplicationContext:这是个抽象类,仅实现了公共的上下文特性。这个抽象类使用了模板方法设计模式,需要具体的实现类去实现这些抽象的方法。
- GenericApplicationContext:该类继承自 AbstractApplicationContext,是为通用目的设计的,它能加载各种配置文件,例如 xml,properties 等等。它的内部持有一个 DefaultListableBeanFactory 的实例,实现了 BeanDefinitionRegistry 接口,以便允许向其应用任何 bean 的定义的读取器。
- AnnotationConfigApplicationContext:该类继承自 GenericApplicationContext ,提供了注解配置(例如:@Configuration、@Component等)和类路径扫描(scan方法)的支持。
1.6、WebApplicationContext
该接口是专门为 Web 应用准备的,其允许从相对于 Web 根目录的路径中装载配置文件完成初始化。
public interface WebApplicationContext extends ApplicationContext {

    // 整个 Web 应用上下文是作为属性放置在 ServletContext 中的,该常量就是应用上下文在 ServletContext 属性列表中的 key
    String ROOT_WEB_APPLICATION_CONTEXT_ATTRIBUTE = WebApplicationContext.class.getName() + ".ROOT";

    // 定义了三个作用域的名称
    String SCOPE_REQUEST = "request";
    String SCOPE_SESSION = "session";
    String SCOPE_APPLICATION = "application";

    // 在工厂中的 bean 名称
    String SERVLET_CONTEXT_BEAN_NAME = "servletContext";

    // ServletContext 初始化参数名称
    String CONTEXT_PARAMETERS_BEAN_NAME = "contextParameters";

    // 在工厂中 ServletContext 属性值环境bean的名称
    String CONTEXT_ATTRIBUTES_BEAN_NAME = "contextAttributes";

    // 用来获取 ServletContext 对象
    @Nullable
    ServletContext getServletContext();
}
该接口的核心实现类有:
- ConfigurableWebApplicationContext:该接口同时继承了 WebApplicationContext 和 ConfigurableApplicationContext,提供了 Web 应用上下文的可配置的能力。
- GenericWebApplicationContext:该类继承自 GenericApplicationContext,实现了 ConfigurableWebApplicationContext。
- XmlWebApplicationContext:该上下文是使用 Xml 配置文件的方式,不过是在 Web 环境中使用的。
- AnnotationConfigServletWebServerApplicationContext:该类是被 SpringBoot 扩展而来的,SpringBoot 使用的就是该上下文。
二、创建Spring应用上下文(createApplicationContext)
我们接着上一篇博客继续分析SpringApplication run方法中的核心部分代码:应用上下文的创建。
public class SpringApplication {

    public static final String DEFAULT_CONTEXT_CLASS = "org.springframework.context."
            + "annotation.AnnotationConfigApplicationContext";

    public static final String DEFAULT_SERVLET_WEB_CONTEXT_CLASS = "org.springframework.boot."
            + "web.servlet.context.AnnotationConfigServletWebServerApplicationContext";

    public static final String DEFAULT_REACTIVE_WEB_CONTEXT_CLASS = "org.springframework."
            + "boot.web.reactive.context.AnnotationConfigReactiveWebServerApplicationContext";

    ...

    private WebApplicationType webApplicationType;

    ...

    public ConfigurableApplicationContext run(String... args) {
        ...

        ConfigurableApplicationContext context = null;

        try {
            ...
            // createApplicationContext 方法创建对应的 ApplicationContext 应用上下文
            context = createApplicationContext();

            exceptionReporters = getSpringFactoriesInstances(SpringBootExceptionReporter.class,
                    new Class[] { ConfigurableApplicationContext.class }, context);
            prepareContext(context, environment, listeners, applicationArguments, printedBanner);

            // 该方法实质是启动 Spring 应用上下文的,但 Spring Boot 嵌入式容器也在该过程中被启动,入参是上下文对象
            refreshContext(context);

            ...
        }
        ...
    }
    ...
}
2.1、创建ConfigurableApplicationContext
   protected ConfigurableApplicationContext createApplicationContext() {
        Class<?> contextClass = this.applicationContextClass;
        if (contextClass == null) {
            try {

                // 这里就是通过 webApplicationType 属性,判断应用类型,来创建不同的 ApplicationContext 应用上下文
                switch (this.webApplicationType) {
                case SERVLET:

                    // 返回的是 Servlet Web ,具体对象为 AnnotationConfigServletWebServerApplicationContext,
                    contextClass = Class.forName(DEFAULT_SERVLET_WEB_CONTEXT_CLASS);
                    break;
                case REACTIVE:

                    // 返回的是 Reactive Web,具体对象为 AnnotationConfigReactiveWebServerApplicationContext
                    contextClass = Class.forName(DEFAULT_REACTIVE_WEB_CONTEXT_CLASS);
                    break;
                default:

                    // 应用类型是非 Web 时,返回 AnnotationConfigApplicationContext
                    contextClass = Class.forName(DEFAULT_CONTEXT_CLASS);
                }
            }
            ...
        }
        return (ConfigurableApplicationContext) BeanUtils.instantiateClass(contextClass);
    }
这里也是通过 webApplicationType 属性来确定应用类型从而创建 String 上下文,上篇文章说到该属性值是在 Spring Boot 准备阶段推导出来的。这里我们的应用类型是 Servlet ,所以创建的是 AnnotationConfigServletWebServerApplicationContext 对象。

2.1、AnnotationConfigServletWebServerApplicationContext 构造函数
通过 BeanUtils.instantiateClass会调用AnnotationConfigServletWebServerApplicationContext 的无参构造函数,而在Java的继承中,会先调用父类的构造方法。所以会先调用AnnotationConfigServletWebServerApplicationContext 的父类GeniricApplicationContext的构造方法:
public class GenericApplicationContext extends AbstractApplicationContext implements BeanDefinitionRegistry {

    private final DefaultListableBeanFactory beanFactory;

    @Nullable
    private ResourceLoader resourceLoader;

    private boolean customClassLoader = false;

    private final AtomicBoolean refreshed = new AtomicBoolean();


    /**
     * Create a new GenericApplicationContext.
     * @see #registerBeanDefinition
     * @see #refresh
     */
    public GenericApplicationContext() {
        this.beanFactory = new DefaultListableBeanFactory();
    }
     ...
}
在父类中初始化beanFactory,即直接new了一个DefaultListableBeanFactory:
    /**
     * Create a new {@link AnnotationConfigServletWebServerApplicationContext} that needs
     * to be populated through {@link #register} calls and then manually
     * {@linkplain #refresh refreshed}.
     */
    public AnnotationConfigServletWebServerApplicationContext() {
        this.reader = new AnnotatedBeanDefinitionReader(this);
        this.scanner = new ClassPathBeanDefinitionScanner(this);
    }
在构造函数中通过new AnnotatedBeanDefinitionReader(this)实例化了一个Bean读取器:
    /**
     * Create a new {@code AnnotatedBeanDefinitionReader} for the given registry.
     * <p>If the registry is {@link EnvironmentCapable}, e.g. is an {@code ApplicationContext},
     * the {@link Environment} will be inherited, otherwise a new
     * {@link StandardEnvironment} will be created and used.
     * @param registry the {@code BeanFactory} to load bean definitions into,
     * in the form of a {@code BeanDefinitionRegistry}
     * @see #AnnotatedBeanDefinitionReader(BeanDefinitionRegistry, Environment)
     * @see #setEnvironment(Environment)
     */
    public AnnotatedBeanDefinitionReader(BeanDefinitionRegistry registry) {
        this(registry, getOrCreateEnvironment(registry));
    }

    /**
     * Create a new {@code AnnotatedBeanDefinitionReader} for the given registry,
     * using the given {@link Environment}.
     * @param registry the {@code BeanFactory} to load bean definitions into,
     * in the form of a {@code BeanDefinitionRegistry}
     * @param environment the {@code Environment} to use when evaluating bean definition
     * profiles.
     * @since 3.1
     */
    public AnnotatedBeanDefinitionReader(BeanDefinitionRegistry registry, Environment environment) {
        Assert.notNull(registry, "BeanDefinitionRegistry must not be null");
        Assert.notNull(environment, "Environment must not be null");
        this.registry = registry;
        this.conditionEvaluator = new ConditionEvaluator(registry, environment, null);
        AnnotationConfigUtils.registerAnnotationConfigProcessors(this.registry);
    }
最后会调用到AnnotationConfigUtils.registerAnnotationConfigProcessors(BeanDefinitionRegistry registry,Object source)方法:
    /**
     * Register all relevant annotation post processors in the given registry.
     * @param registry the registry to operate on
     * @param source the configuration source element (already extracted)
     * that this registration was triggered from. May be {@code null}.
     * @return a Set of BeanDefinitionHolders, containing all bean definitions
     * that have actually been registered by this call
     */
    public static Set<BeanDefinitionHolder> registerAnnotationConfigProcessors(
            BeanDefinitionRegistry registry, @Nullable Object source) {

        DefaultListableBeanFactory beanFactory = unwrapDefaultListableBeanFactory(registry);
        if (beanFactory != null) {
            if (!(beanFactory.getDependencyComparator() instanceof AnnotationAwareOrderComparator)) {
                beanFactory.setDependencyComparator(AnnotationAwareOrderComparator.INSTANCE);
            }
            if (!(beanFactory.getAutowireCandidateResolver() instanceof ContextAnnotationAutowireCandidateResolver)) {
                beanFactory.setAutowireCandidateResolver(new ContextAnnotationAutowireCandidateResolver());
            }
        }

        Set<BeanDefinitionHolder> beanDefs = new LinkedHashSet<>(8);

        if (!registry.containsBeanDefinition(CONFIGURATION_ANNOTATION_PROCESSOR_BEAN_NAME)) {
            RootBeanDefinition def = new RootBeanDefinition(ConfigurationClassPostProcessor.class);
            def.setSource(source);
            beanDefs.add(registerPostProcessor(registry, def, CONFIGURATION_ANNOTATION_PROCESSOR_BEAN_NAME));
        }

        if (!registry.containsBeanDefinition(AUTOWIRED_ANNOTATION_PROCESSOR_BEAN_NAME)) {
            RootBeanDefinition def = new RootBeanDefinition(AutowiredAnnotationBeanPostProcessor.class);
            def.setSource(source);
            beanDefs.add(registerPostProcessor(registry, def, AUTOWIRED_ANNOTATION_PROCESSOR_BEAN_NAME));
        }

        // Check for JSR-250 support, and if present add the CommonAnnotationBeanPostProcessor.
        if (jsr250Present && !registry.containsBeanDefinition(COMMON_ANNOTATION_PROCESSOR_BEAN_NAME)) {
            RootBeanDefinition def = new RootBeanDefinition(CommonAnnotationBeanPostProcessor.class);
            def.setSource(source);
            beanDefs.add(registerPostProcessor(registry, def, COMMON_ANNOTATION_PROCESSOR_BEAN_NAME));
        }

        // Check for JPA support, and if present add the PersistenceAnnotationBeanPostProcessor.
        if (jpaPresent && !registry.containsBeanDefinition(PERSISTENCE_ANNOTATION_PROCESSOR_BEAN_NAME)) {
            RootBeanDefinition def = new RootBeanDefinition();
            try {
                def.setBeanClass(ClassUtils.forName(PERSISTENCE_ANNOTATION_PROCESSOR_CLASS_NAME,
                        AnnotationConfigUtils.class.getClassLoader()));
            }
            catch (ClassNotFoundException ex) {
                throw new IllegalStateException(
                        "Cannot load optional framework class: " + PERSISTENCE_ANNOTATION_PROCESSOR_CLASS_NAME, ex);
            }
            def.setSource(source);
            beanDefs.add(registerPostProcessor(registry, def, PERSISTENCE_ANNOTATION_PROCESSOR_BEAN_NAME));
        }

        if (!registry.containsBeanDefinition(EVENT_LISTENER_PROCESSOR_BEAN_NAME)) {
            RootBeanDefinition def = new RootBeanDefinition(EventListenerMethodProcessor.class);
            def.setSource(source);
            beanDefs.add(registerPostProcessor(registry, def, EVENT_LISTENER_PROCESSOR_BEAN_NAME));
        }

        if (!registry.containsBeanDefinition(EVENT_LISTENER_FACTORY_BEAN_NAME)) {
            RootBeanDefinition def = new RootBeanDefinition(DefaultEventListenerFactory.class);
            def.setSource(source);
            beanDefs.add(registerPostProcessor(registry, def, EVENT_LISTENER_FACTORY_BEAN_NAME));
        }

        return beanDefs;
    }
这里通过调用registerPostProcessor向BeanDefinitionMap中注册了5个BeanDefinition,BeanDefinition保存 Bean 的相关信息,我们在后面会详细介绍。
    private static BeanDefinitionHolder registerPostProcessor(
            BeanDefinitionRegistry registry, RootBeanDefinition definition, String beanName) {

        definition.setRole(BeanDefinition.ROLE_INFRASTRUCTURE);
        registry.registerBeanDefinition(beanName, definition);
        return new BeanDefinitionHolder(definition, beanName);
    }
这里的register就是我们的应用上下文,这里调用的就是GenericApplicationContext的registerBeanDefinition:

/** Map of bean definition objects, keyed by bean name. */
    private final Map<String, BeanDefinition> beanDefinitionMap = new ConcurrentHashMap<>(256);
GenericApplicationContext 底层调用的是 DefaultListableBeanFactory(BeanFactory的实现类)中的实现方法:
    public void registerBeanDefinition(String beanName, BeanDefinition beanDefinition)
            throws BeanDefinitionStoreException {

        this.beanFactory.registerBeanDefinition(beanName, beanDefinition);
    }
这里注册的BeanDefinition分别为ConfigurationClassPostProcessor、DefaultEventListenerFactory、EventListenerMethodProcessor、AutowiredAnnotationBeanPostProcessor、CommonAnnotationBeanPostProcessor。

接着 调用this.scanner = new ClassPathBeanDefinitionScanner(this)来初始化一个扫描器,这个扫描器在后面扫描包的时候,并没有用到。
三、准备Spring应用上下文(prepareContext)
prepareContext(context, environment, listeners, applicationArguments, printedBanner);
创建完 Spring 应用上下文之后,执行 prepareContext 方法进入准备上下文阶段,我们来看看主要做了哪些操作。
    private void prepareContext(ConfigurableApplicationContext context, ConfigurableEnvironment environment,
            SpringApplicationRunListeners listeners, ApplicationArguments applicationArguments, Banner printedBanner) {
        context.setEnvironment(environment);
        postProcessApplicationContext(context);
        applyInitializers(context);
        listeners.contextPrepared(context);
        if (this.logStartupInfo) {
            logStartupInfo(context.getParent() == null);
            logStartupProfileInfo(context);
        }
        // Add boot specific singleton beans
        ConfigurableListableBeanFactory beanFactory = context.getBeanFactory();
        beanFactory.registerSingleton("springApplicationArguments", applicationArguments);
        if (printedBanner != null) {
            beanFactory.registerSingleton("springBootBanner", printedBanner);
        }
        if (beanFactory instanceof DefaultListableBeanFactory) {
            ((DefaultListableBeanFactory) beanFactory)
                    .setAllowBeanDefinitionOverriding(this.allowBeanDefinitionOverriding);
        }
        if (this.lazyInitialization) {
            context.addBeanFactoryPostProcessor(new LazyInitializationBeanFactoryPostProcessor());
        }
        // Load the sources
        Set<Object> sources = getAllSources();
        Assert.notEmpty(sources, "Sources must not be empty");
        load(context, sources.toArray(new Object[0]));
        listeners.contextLoaded(context);
    }
3.1、设置Spring 应用上下文的 environment

3.2、Spring 应用上下文后置处理(postProcessApplicationContext)
主要是覆盖当前 Spring 应用上下文默认所关联的 ResourceLoader 和 ClassLoader,以及初始化beanFactory的conversionService。

3.3、类型转换器
为了统一调用Converter进行类型转换,spring为我们提供了一个ConversionService接口。通过实现这个接口我们可以实现自己的Converter调用逻辑:
package org.springframework.core.convert;

import org.springframework.lang.Nullable;

/**
 * 类型转换服务
 */
public interface ConversionService {

    /**
     * 是否支持原类型到目标类型的转换
     */
    boolean canConvert(@Nullable Class<?> sourceType, Class<?> targetType);

    /**
     * 是否支持原类型到目标类型的转换
     */
    boolean canConvert(@Nullable TypeDescriptor sourceType, TypeDescriptor targetType);

    /**
     * 将source实例转成目标类型,如果转换过程出错,抛出 ConversionException,
     * 如果 targetType 为null,抛出 IllegalArgumentException
     */
    @Nullable
    <T> T convert(@Nullable Object source, Class<T> targetType);

    /**
     * 将source实例转成目标类型,如果转换过程出错,抛出 ConversionException,
     * 如果 targetType 为null,抛出 IllegalArgumentException
     */
    @Nullable
    Object convert(@Nullable Object source, @Nullable TypeDescriptor sourceType, TypeDescriptor targetType);

}
我们可以看到ConversionService接口里面定义了两个canConvert方法和两个convert方法,canConvert方法用于判断当前的ConversionService是否能够对原类型和目标类型进行转换,convert方法则是用于进行类型转换的。
比如我们想实现String类型到IBaseEnum类型的转换可以怎么办呢,我们可以自己实现一个类型转换器:
package com.goldwind.bigdataplat.core.config;

import com.goldwind.ngsp.auth.api.constant.enums.IBaseEnum;
import org.springframework.core.convert.converter.Converter;
import org.springframework.core.convert.converter.ConverterFactory;
import org.springframework.stereotype.Component;

import javax.validation.constraints.NotBlank;

/**
 * Author: zy
 * Description: String->IbaseEnum类型转换器
 * Date: 2020/5/21
 */
public class EnumConverterFactory implements ConverterFactory<String, IBaseEnum> {

    /**
     * @author: zy
     * @description: 获取String->targetType类型的转换器 用于支持自己IBaseEnum类型(Spring支持常规的枚举类型)
     * @date: 2020/5/21 10:17
     * @param targetType: 目标类型
     * @return Converter<String,T>:
     */
    @Override
    public <T extends IBaseEnum> Converter<String, T> getConverter(Class<T> targetType) {
        //获取给定类型对应的转换器
        return new StrToEnum(targetType);
    }

    /*
     * 整型字符串转换为T枚举类型的转换器
     */
    private class StrToEnum<T extends Enum<T> & IBaseEnum> implements Converter<String, T> {
        /*
         * 保存枚举类型
         */
        private final Class<T> enumType;

        /*
         * 构造函数
         */
        private StrToEnum(Class<T> enumType) {
            this.enumType = enumType;
        }


        /*
         * 将给定的字符串转换成对应的枚举类型
         */
        @Override
        public T convert(@NotBlank String source) {
            try{
                return (T)IBaseEnum.valueOf(this.enumType, Integer.parseInt(source));
            }catch(NumberFormatException e) {
                return (T)IBaseEnum.valueOf(this.enumType, source);
            }
        }
    }
}
其中IBaseEnum定义如下:


package com.goldwind.ngsp.auth.api.constant.enums;

/**
 * Author: zy
 * Description: 用户支持将http请求参数中传入的数字转换为对应的枚举值
 * Date: 2020/5/21
 */
public interface IBaseEnum{
    /*
     * 与数据库进行映射的值
     */
    int getValue();

    /*
     * 描述信息
     */
    String getDesc();

    /*
     * 将状态码装换为枚举类型
     */
    static <E extends IBaseEnum> IBaseEnum valueOf(Class<E> enumClass,int value){
        try {
            E[] enumConstants = enumClass.getEnumConstants();
            for (E e : enumConstants) {
                if (e.getValue() == value)
                    return e;
            }
            return null;
        } catch (Exception ex) {
            throw new IllegalArgumentException("Cannot convert " + value + " to " + enumClass.getSimpleName() + " by code value.", ex);
        }
    }

    /*
     * 将枚举字符串装换为枚举类型
     */
    static <E extends Enum<E>> IBaseEnum valueOf(Class<E> enumClass,String value) {
        return (IBaseEnum) Enum.valueOf(enumClass, value);
    }
}
然后,我们采用@Bean注解,将这个类型转换器注入到Spring容器中:
    /*
     * 注入自定义类型转换器ConversionService
     */
    @Bean
    public GenericConversionService getDefaultConversionService(@Autowired GenericConversionService conversionService) {
        conversionService.addConverterFactory(new EnumConverterFactory());
        return conversionService;
    }
可以看到这里是拿到了Spring容器中的GenericConversionService对象,然后调用addConverterFactory加入我们的类型转换器工厂。

顾名思义,ConverterRegistry接口就是用来注册各种转换器的:
/*
 * Copyright 2002-2016 the original author or authors.
 *
 * Licensed under the Apache License, Version 2.0 (the "License");
 * you may not use this file except in compliance with the License.
 * You may obtain a copy of the License at
 *
 *      https://www.apache.org/licenses/LICENSE-2.0
 *
 * Unless required by applicable law or agreed to in writing, software
 * distributed under the License is distributed on an "AS IS" BASIS,
 * WITHOUT WARRANTIES OR CONDITIONS OF ANY KIND, either express or implied.
 * See the License for the specific language governing permissions and
 * limitations under the License.
 */

package org.springframework.core.convert.converter;

/**
 * For registering converters with a type conversion system.
 *
 * @author Keith Donald
 * @author Juergen Hoeller
 * @since 3.0
 */
public interface ConverterRegistry {

    /**
     * Add a plain converter to this registry.
     * The convertible source/target type pair is derived from the Converter's parameterized types.
     * @throws IllegalArgumentException if the parameterized types could not be resolved
     */
    void addConverter(Converter<?, ?> converter);

    /**
     * Add a plain converter to this registry.
     * The convertible source/target type pair is specified explicitly.
     * <p>Allows for a Converter to be reused for multiple distinct pairs without
     * having to create a Converter class for each pair.
     * @since 3.1
     */
    <S, T> void addConverter(Class<S> sourceType, Class<T> targetType, Converter<? super S, ? extends T> converter);

    /**
     * Add a generic converter to this registry.
     */
    void addConverter(GenericConverter converter);

    /**
     * Add a ranged converter factory to this registry.
     * The convertible source/target type pair is derived from the ConverterFactory's parameterized types.
     * @throws IllegalArgumentException if the parameterized types could not be resolved
     */
    void addConverterFactory(ConverterFactory<?, ?> factory);

    /**
     * Remove any converters from {@code sourceType} to {@code targetType}.
     * @param sourceType the source type
     * @param targetType the target type
     */
    void removeConvertible(Class<?> sourceType, Class<?> targetType);

}
3.4、执行 Spring 的初始化器ApplicationContextInitializer
上篇文章说过在 Spring Boot 准备阶段初始化了一批在 spring.factories 文件中定义好的 ApplicationContextInitializer ,这里就是执行它们的 initialize 方法,同时向应用上下文beanFactoryPostProcessors列表添加两个对象:
protected void applyInitializers(ConfigurableApplicationContext context) {
        for (ApplicationContextInitializer initializer : getInitializers()) {
            Class<?> requiredType = GenericTypeResolver.resolveTypeArgument(initializer.getClass(),
                    ApplicationContextInitializer.class);
            Assert.isInstanceOf(requiredType, context, "Unable to call initializer.");
            initializer.initialize(context);
        }
    }
/** BeanFactoryPostProcessors to apply on refresh. */
    private final List<BeanFactoryPostProcessor> beanFactoryPostProcessors = new ArrayList<>();

3.5、触发ApplicationContextInitializedEvent事件
执行 SpringApplicationRunListeners 的 contextPrepared 阶段方法,表示 ApplicationContext 准备完成,同时向 Spring Boot 监听器发布 ApplicationContextInitializedEvent 事件 。
3.6、注册单例Bean实例
将 springApplicationArguments 和 springBootBanner注册为单例Bean实例,至于为什么注册为单例Bean、可以参考博客:Spring 为啥默认把bean设计成单例的?,Spring对象类型——单例和多例。
/** Cache of singleton objects: bean name to bean instance. */
    private final Map<String, Object> singletonObjects = new ConcurrentHashMap<>(256);

3.7、加载 Spring 应用上下文的配置源到BeanDefinitionMap
讲SpringApplication准备阶段获取的 primarySources注册到Spring容器 ,primarySources 来源于 SpringApplication 构造器参数;


3.8、触发ApplicationPreparedEvent事件
最后执行 SpringApplicationRunListeners 的 contextLoaded 阶段方法,表示 ApplicationContext 完成加载但还未启动,同时向 Spring Boot 监听器发布 ApplicationPreparedEvent 事件 。
四、刷新Spring应用上下文(refreshContext )
接下来就是真正启动阶段,执行的是 refreshContext 方法:
    private void refreshContext(ConfigurableApplicationContext context) {
        refresh(context);
        if (this.registerShutdownHook) {
            try {
                context.registerShutdownHook();
            }
            catch (AccessControlException ex) {
                // Not allowed in some environments.
            }
        }
    }
然后调用refresh方法:
protected void refresh(ApplicationContext applicationContext) {
        Assert.isInstanceOf(AbstractApplicationContext.class, applicationContext);

        // 最终调用了 所有应用上下文的统一抽象类 AbstractApplicationContext 中的 refresh 方法,进入
        ((AbstractApplicationContext) applicationContext).refresh();
    }
AbstractApplicationContext 的 refresh 方法如下:
public void refresh() throws BeansException, IllegalStateException {
    synchronized (this.startupShutdownMonitor) {
        // 1. 初始化 refresh 的上下文环境,就是记录下容器的启动时间、标记已启动状态、处理配置文件中的占位符
        prepareRefresh();

        // 2. 初始化 BeanFactory,加载并解析配置
        ConfigurableListableBeanFactory beanFactory = this.obtainFreshBeanFactory();

        /* ---至此,已经完成了简单容器的所有功能,下面开始对简单容器进行增强--- */

        // 3. 对 BeanFactory 进行功能增强,如设置BeanFactory的类加载器,添加几个 BeanPostProcessor,手动注册几个特殊的 bean
        prepareBeanFactory(beanFactory);

        try {
            // 4. 后置处理 beanFactory,添加后置处理器
            postProcessBeanFactory(beanFactory);

            // 5. 调用已注册的 BeanFactoryPostProcessor
            invokeBeanFactoryPostProcessors(beanFactory);

            // 6. 注册 BeanPostProcessor,仅仅是注册,调用在getBean的时候
            registerBeanPostProcessors(beanFactory);

            // 7. 初始化国际化资源
            initMessageSource();

            // 8. 初始化事件广播器
            initApplicationEventMulticaster();

            // 9. 留给子类实现的模板方法
            onRefresh();

            // 10. 注册事件监听器
            registerListeners();

            // 11. 实例化所有非延迟加载的单例
            finishBeanFactoryInitialization(beanFactory);

            // 12. 完成刷新过程,发布应用事件
            finishRefresh();

        } catch (BeansException ex) {
            if (logger.isWarnEnabled()) {
                logger.warn("Exception encountered during context initialization - cancelling refresh attempt: " + ex);
            }

            // 13.销毁已经初始化的 singleton 的 Beans,以免有些 bean 会一直占用资源
            this.destroyBeans();

            // Reset 'active' flag.
            this.cancelRefresh(ex);
            // Propagate exception to caller.
            throw ex;
        } finally {
            // Reset common introspection caches in Spring's core, since we
            // might not ever need metadata for singleton beans anymore...
            this.resetCommonCaches();
        }
    }
}
4.1、prepareRefresh
我们先从 refresh 中的 prepareRefresh 方法开始讨论:
public class AnnotationConfigServletWebServerApplicationContext
        extends ServletWebServerApplicationContext implements AnnotationConfigRegistry {

    ...

    @Override
    protected void prepareRefresh() {

        // 清除 Class 的元数据缓存。底层用 Map 保存元数据,执行 Map 的 clear 方法
           this.scanner.clearCache();

        // 调用父类,也就是 AbstractApplicationContext 的 prepareRefresh 方法
        super.prepareRefresh();
    }
    ...
}
这里调用父类的prepareRefresh方法:
public abstract class AbstractApplicationContext {

    ...

    private long startupDate;

    private final AtomicBoolean active = new AtomicBoolean();

    private final AtomicBoolean closed = new AtomicBoolean();

    private Set<ApplicationEvent> earlyApplicationEvents;

    ...

    protected void prepareRefresh() {

        // 记录此上下文开始时的系统时间(以毫秒为单位)
        this.startupDate = System.currentTimeMillis();

        // 记录此上下文是否已关闭,这里设置为未关闭
        this.closed.set(false);

        // 记录此上下文是否处于活动状态,这里设置为活动状态
        this.active.set(true);

        if (logger.isInfoEnabled()) {
            logger.info("Refreshing " + this);
        }

        // 这也是交由子类扩展的方法。具体子类为 GenericWebApplicationContext,主要是初始化属性源,
        // 将 ServletContext 和 ServletConfig 属性配置添加到 Environment 环境上下文中
        initPropertySources();

        // 校验 Environment 中那些必备的属性配置是否存在,不存在则抛异常。
        getEnvironment().validateRequiredProperties();

        // 创建 ApplicationEvent 事件集合
        this.earlyApplicationEvents = new LinkedHashSet<>();
    }

}
refresh 中的 prepareRefresh 方法执行结束,主要是记录容器的启动时间、活动状态、检查必备属性是否存在。
4.2、obtainFreshBeanFactory
接着进入 refresh 中的 obtainFreshBeanFactory 方法:
protected ConfigurableListableBeanFactory obtainFreshBeanFactory() {
        // 该方法也是由子类扩展,其子类有 AbstractRefreshableApplicationContext 和 GenericApplicationContext,
        // 因当前是 Servlet Web 应用,所以执行的是 GenericApplicationContext 中的 refreshBeanFactory 方法。
        // 该方法主要设置 BeanFactory 的 serializationId 属性值,也就是序列化id
        refreshBeanFactory();

        // 通过 getBeanFactory 返回 BeanFactory 对象。同样也是由子类扩展,调用的是 GenericApplicationContext 类中的 getBeanFactory 方法。
        // 返回的是 DefaultListableBeanFactory 。
        ConfigurableListableBeanFactory beanFactory = getBeanFactory();
        if (logger.isDebugEnabled()) {
            logger.debug("Bean factory for " + getDisplayName() + ": " + beanFactory);
        }
        return beanFactory;
    }
之后,该方法还返回了 BeanFactory 对象,从这也可以看出 ApplicationContext 底层是以 BeanFactory 为基础,逐步扩展 Spring 容器功能。
4.3、prepareBeanFactory
接着进入 refresh 中的 prepareBeanFactory 方法。prepareBeanFactory 方法主要是对 BeanFactory 做一些配置,包含各种类加载器、需要忽略的依赖以及后置处理器、解析器等:
protected void prepareBeanFactory(ConfigurableListableBeanFactory beanFactory) {
    // 设置类加载器
    beanFactory.setBeanClassLoader(getClassLoader());
    // 设置表达式解析器,主要用来解析 EL 表达式; Bean 初始化完成后填充属性时会用到
    beanFactory.setBeanExpressionResolver(new StandardBeanExpressionResolver(beanFactory.getBeanClassLoader()));
    // 设置属性注册解析器,主要用来解析 Bean 中的各种属性类型,如 String、int 等
    beanFactory.addPropertyEditorRegistrar(new ResourceEditorRegistrar(this, getEnvironment()));
    // 添加一个后置处理器:ApplicationContextAwareProcessor。
    // 该后置处理器用于向实现了 Aware 系列接口的 bean 设置相应属性。
    // (后置处理器和 Aware 接口也是比较核心的概念)
    beanFactory.addBeanPostProcessor(new ApplicationContextAwareProcessor(this));

    // 以下接口,在自动注入时会被忽略,其都是 Aware 系列接口
    beanFactory.ignoreDependencyInterface(EnvironmentAware.class);
    beanFactory.ignoreDependencyInterface(EmbeddedValueResolverAware.class);
    beanFactory.ignoreDependencyInterface(ResourceLoaderAware.class);
    beanFactory.ignoreDependencyInterface(ApplicationEventPublisherAware.class);
    beanFactory.ignoreDependencyInterface(MessageSourceAware.class);
    beanFactory.ignoreDependencyInterface(ApplicationContextAware.class);

    // 当以下特殊的 Bean 需自动注入时,指定其注入的类型 。
    // 如:注入 BeanFactory 时,注入的类型对象为 ConfigurableListableBeanFactory 。
    beanFactory.registerResolvableDependency(BeanFactory.class, beanFactory);
    beanFactory.registerResolvableDependency(ResourceLoader.class, this);
    beanFactory.registerResolvableDependency(ApplicationEventPublisher.class, this);
    beanFactory.registerResolvableDependency(ApplicationContext.class, this);

    // 添加 ApplicationListenerDetector 后置处理器。
    // 该后置处理器用来检测那些实现了 ApplicationListener 接口的 bean,并将其添加到应用上下文的事件广播器上。
    beanFactory.addBeanPostProcessor(new ApplicationListenerDetector(this));

    // 判断容器中是否存在 loadTimeWeaver Bean,如果存在则上下文使用临时的 ClassLoader 进行类型匹配。
    // 集成 AspectJ 时会用到 loadTimeWeaver 对象。
    if (beanFactory.containsBean(LOAD_TIME_WEAVER_BEAN_NAME)) {
        beanFactory.addBeanPostProcessor(new LoadTimeWeaverAwareProcessor(beanFactory));
        beanFactory.setTempClassLoader(new ContextTypeMatchClassLoader(beanFactory.getBeanClassLoader()));
    }

    // 注册和环境相关的 Bean,如 environment、systemProperties、systemEnvironment
    if (!beanFactory.containsLocalBean(ENVIRONMENT_BEAN_NAME)) {
        beanFactory.registerSingleton(ENVIRONMENT_BEAN_NAME, getEnvironment());
    }
    if (!beanFactory.containsLocalBean(SYSTEM_PROPERTIES_BEAN_NAME)) {
        beanFactory.registerSingleton(SYSTEM_PROPERTIES_BEAN_NAME, getEnvironment().getSystemProperties());
    }
    if (!beanFactory.containsLocalBean(SYSTEM_ENVIRONMENT_BEAN_NAME)) {
        beanFactory.registerSingleton(SYSTEM_ENVIRONMENT_BEAN_NAME, getEnvironment().getSystemEnvironment());
    }
}
在 prepareBeanFactory 方法中,主要对 BeanFactory 添加了一系列属性项,如添加忽略自动注入的接口、添加 BeanPostProcessor 后置处理器、手动注册部分特殊的 Bean及环境相关的 Bean,值得注意的是这些Bean都是单例的 ,因此直接保存单例Bean实例。
    /**
     * Dependency interfaces to ignore on dependency check and autowire, as Set of
     * Class objects. By default, only the BeanFactory interface is ignored.
     */
    private final Set<Class<?>> ignoredDependencyInterfaces = new HashSet<>();

    /** BeanPostProcessors to apply in createBean. */
    private final List<BeanPostProcessor> beanPostProcessors = new CopyOnWriteArrayList<>();

/** Cache of singleton objects: bean name to bean instance. */
    private final Map<String, Object> singletonObjects = new ConcurrentHashMap<>(256);

4.4、postProcessBeanFactory
postProcessBeanFactory 方法是上下文准备的最后一步,主要用来注册 Web 请求相关的处理器、Bean及配置。
public class AnnotationConfigServletWebServerApplicationContext
        extends ServletWebServerApplicationContext implements AnnotationConfigRegistry {

    private final AnnotatedBeanDefinitionReader reader;

    private final ClassPathBeanDefinitionScanner scanner;

    private final Set<Class<?>> annotatedClasses = new LinkedHashSet<>();

    private String[] basePackages;

    ...

    @Override
    protected void postProcessBeanFactory(ConfigurableListableBeanFactory beanFactory) {
        // 先执行父类 ServletWebServerApplicationContext 的 postProcessBeanFactory 方法。
        // 跳转到 1 查看父类实现
        super.postProcessBeanFactory(beanFactory);

        // basePackages 存储的是类路径。先判断是否为 null,不为 null 则通过 ClassPathBeanDefinitionScanner 的 scan 方法
        // 扫描该路径下符合条件的 Class,并将 Class 信息包装成 BeanDefinition 注册到容器中,
        // 当然,这里没有指定扫描路径,所以不会进入这个 if。
        // (BeanDefinition 概念会在后面章节详细讨论)
     if (this.basePackages != null && this.basePackages.length > 0) {
            this.scanner.scan(this.basePackages);
        }

        // annotatedClasses 存储的 Class 集合。先判断该集合是否为空,不为空则通过
        // AnnotatedBeanDefinitionReader 的 register 方法将 Class 信息包装成 BeanDefinition 注册到容器中,
        // 这里同样没有设置 Class 集合内容,所以不会进入这个 if。
         if (!this.annotatedClasses.isEmpty()) {
            this.reader.register(ClassUtils.toClassArray(this.annotatedClasses));
        }
    }
}

//1
public class ServletWebServerApplicationContext extends GenericWebApplicationContext
        implements ConfigurableWebServerApplicationContext {
    ...

    @Override
    protected void postProcessBeanFactory(ConfigurableListableBeanFactory beanFactory) {
        // 添加 BeanPostProcessor 后置处理器:WebApplicationContextServletContextAwareProcessor,
        // 该后置处理器主要是从 ConfigurableWebApplicationContext 上下文中获取 ServletContext 和 ServletConfig 对象
       beanFactory.addBeanPostProcessor(new WebApplicationContextServletContextAwareProcessor(this));
        // 添加一个 忽略自动注入的接口
 beanFactory.ignoreDependencyInterface(ServletContextAware.class);
    }
    ...
}
postProcessBeanFactory 方法执行的操作和前面类似,也是添加了后置处理器和忽略自动注入的接口。


五、BeanDefinition
原计划是对接下来的 invokeBeanFactoryPostProcessors 方法进行讨论,但该方法涉及 Spring 中一个非常重要的概念: BeanDefinition,其实上面我们也提到了,只是没有具体的介绍,所以,这里先对 BeanDefinition 进行讨论,这样也有利于完善 Spring 的知识体系。
现如今,我们一般获取对象的方式有两种:
- 一种是手动直接 new;
- 另一种是交给 Spring 管理,Spring 将管理的对象称之为 Bean,容器会先实例化 Bean,然后自动注入,实例化的过程就需要依赖 BeanDefinition。
BeanDefinition 用于保存 Bean 的相关信息,包括属性、构造方法参数、依赖的 Bean 名称及是否单例、延迟加载等,它是实例化 Bean 的原材料,Spring 就是根据 BeanDefinition 中的信息实例化 Bean。
BeanDefinition 是一个接口,它有多个实现类,这些实现类分别描述不同类型的 Bean。

5.1、BeanDefinition
一个 BeanDefinition 描述了一个 Bean 实例,实例包含属性值、构造方法参数值以及更多实现信息。该 BeanDefinition 只是是一个最小的接口,主要目的是允许修改属性值和其他 Bean 元数据,这里列出几个核心方法。
public interface BeanDefinition extends AttributeAccessor, BeanMetadataElement {

    // 单例、原型标识符
    String SCOPE_SINGLETON = ConfigurableBeanFactory.SCOPE_SINGLETON;
    String SCOPE_PROTOTYPE = ConfigurableBeanFactory.SCOPE_PROTOTYPE;

    // 标识 Bean 的类别,分别对应 用户定义的 Bean、来源于配置文件的 Bean、Spring 内部的 Bean
    int ROLE_APPLICATION = 0;
    int ROLE_SUPPORT = 1;
    int ROLE_INFRASTRUCTURE = 2;

    // 设置、返回 Bean 的父类名称
    void setParentName(@Nullable String parentName);
    String getParentName();

    // 设置、返回 Bean 的 className
    void setBeanClassName(@Nullable String beanClassName);
    String getBeanClassName();

    // 设置、返回 Bean 的作用域
    void setScope(@Nullable String scope);
    String getScope();

    // 设置、返回 Bean 是否懒加载
    void setLazyInit(boolean lazyInit);
    boolean isLazyInit();

    // 设置、返回当前 Bean 所依赖的其它 Bean 名称。
    void setDependsOn(@Nullable String... dependsOn);
    String[] getDependsOn();

    // 设置、返回 Bean 是否可以自动注入。只对 @Autowired 注解有效
    void setAutowireCandidate(boolean autowireCandidate);
    boolean isAutowireCandidate();

    // 设置、返回当前 Bean 是否为主要候选 Bean 。
    // 当同一个接口有多个实现类时,通过该属性来配置某个 Bean 为主候选 Bean。
    void setPrimary(boolean primary);
    boolean isPrimary();

    // 设置、返回创建该 Bean 的工厂类。
    void setFactoryBeanName(@Nullable String factoryBeanName);
    String getFactoryBeanName();

    // 设置、返回创建该 Bean 的工厂方法
    void setFactoryMethodName(@Nullable String factoryMethodName);
    String getFactoryMethodName();

    // 返回该 Bean 构造方法参数值、所有属性
    ConstructorArgumentValues getConstructorArgumentValues();
    MutablePropertyValues getPropertyValues();

    // 返回该 Bean 是否是单例、是否是非单例、是否是抽象的
    boolean isSingleton();
    boolean isPrototype();
    boolean isAbstract();

    // 返回 Bean 的类别。类别对应上面的三个属性值。
    int getRole();

    ...
}
可以看到 BeanDefinition 接口提供了一系列操作 Bean 元数据的set、get方法,这些操作为 Bean 的描述定义了一套模板,具体的实现则交由子类。
5.2、AnnotatedBeanDefinition
AnnotatedBeanDefinition 是 BeanDefinition 子接口之一,该接口扩展了 BeanDefinition 的功能,其用来操作注解元数据。一般情况下,通过注解方式得到的 Bean(@Component、@Bean),其 BeanDefinition 类型都是该接口的实现类。
public interface AnnotatedBeanDefinition extends BeanDefinition {

    // 获得当前 Bean 的注解元数据
    AnnotationMetadata getMetadata();

    // 获得当前 Bean 的工厂方法上的元数据
    MethodMetadata getFactoryMethodMetadata();
}
该接口可以返回两个元数据的类:
- AnnotationMetadata:主要对 Bean 的注解信息进行操作,如:获取当前 Bean 标注的所有注解、判断是否包含指定注解。
- MethodMetadata:方法的元数据类。提供获取方法名称、此方法所属类的全类名、是否是抽象方法、判断是否是静态方法、判断是否是final方法等 ;
5.3、AbstractBeanDefinition
AbstractBeanDefinition 是 BeanDefinition 的子抽象类,也是其他 BeanDefinition 类型的基类,其实现了接口中定义的一系列操作方法,并定义了一系列的常量属性,这些常量会直接影响到 Spring 实例化 Bean 时的策略。核心属性如下。
public abstract class AbstractBeanDefinition extends BeanMetadataAttributeAccessor
        implements BeanDefinition, Cloneable {

    // 默认的 SCOPE,默认是单例
    public static final String SCOPE_DEFAULT = "";

    // 不进行自动装配
    public static final int AUTOWIRE_NO = AutowireCapableBeanFactory.AUTOWIRE_NO;
    // 根据 Bean 的名字进行自动装配,byName
    public static final int AUTOWIRE_BY_NAME = AutowireCapableBeanFactory.AUTOWIRE_BY_NAME;
    // 根据 Bean 的类型进行自动装配,byType
    public static final int AUTOWIRE_BY_TYPE = AutowireCapableBeanFactory.AUTOWIRE_BY_TYPE;
    // 根据构造器进行自动装配
    public static final int AUTOWIRE_CONSTRUCTOR = AutowireCapableBeanFactory.AUTOWIRE_CONSTRUCTOR;
    // 首先尝试按构造器自动装配。如果失败,再尝试使用 byType 进行自动装配。(Spring 3.0 之后已废除)
    public static final int AUTOWIRE_AUTODETECT = AutowireCapableBeanFactory.AUTOWIRE_AUTODETECT;

    // 通过依赖检查来查看 Bean 的每个属性是否都设置完成
    // 以下常量分别对应:不检查、对依赖对象检查、对基本类型,字符串和集合进行检查、对全部属性进行检查
    public static final int DEPENDENCY_CHECK_NONE = 0;
    public static final int DEPENDENCY_CHECK_OBJECTS = 1;
    public static final int DEPENDENCY_CHECK_SIMPLE = 2;
    public static final int DEPENDENCY_CHECK_ALL = 3;

    // 关闭应用上下文时需调用的方法名称
    public static final String INFER_METHOD = "(inferred)";

    // 存放 Bean 的 Class 对象
    private volatile Object beanClass;

    // Bean 的作用范围
    private String scope = SCOPE_DEFAULT;

    // 非抽象
    private boolean abstractFlag = false;
    // 非延迟加载
    private boolean lazyInit = false;
    // 默认不自动装配
    private int autowireMode = AUTOWIRE_NO;
    // 默认不依赖检查
    private int dependencyCheck = DEPENDENCY_CHECK_NONE;

    // 依赖的 Bean 列表
    private String[] dependsOn;

    // 可以作为自动装配的候选者,意味着可以自动装配到其他 Bean 的某个属性中
    private boolean autowireCandidate = true;

    // 创建当前 Bean 实例工厂类名称
    private String factoryBeanName;
    // 创建当前 Bean 实例工厂类中方法名称
    private String factoryMethodName;

    // 存储构造方法的参数
    private ConstructorArgumentValues constructorArgumentValues;
    // 存储 Bean 属性名称以及对应的值
    private MutablePropertyValues propertyValues;
    // 存储被覆盖的方法信息
    private MethodOverrides methodOverrides;

    // init、destroy 方法名称
    private String initMethodName;
    private String destroyMethodName;

    // 是否执行 init 和 destroy 方法
    private boolean enforceInitMethod = true;
    private boolean enforceDestroyMethod = true;

    // Bean 是否是用户定义的而不是应用程序本身定义的
    private boolean synthetic = false;

    // Bean 的身份类别,默认是用户定义的 Bean
    private int role = BeanDefinition.ROLE_APPLICATION;

    // Bean 的描述信息
    private String description;

    // Bean 定义的资源
    private Resource resource;

    ...
}
以上是 AbstractBeanDefinition 中定义的一些常量和属性,该类中还有一部分是操作这些属性的 set 和 get 方法,这些方法都由子类来操作,且应用程序中真正使用的也是这些子类 BeanDefinition。 先来看 AbstractBeanDefinition 直接实现类:RootBeanDefinition、GenericBeanDefinition、ChildBeanDefinition。
5.4、RootBeanDefinition
该类继承自 AbstractBeanDefinition,它可以单独作为一个 BeanDefinition,也可以作为其他 BeanDefinition 的父类。 RootBeanDefinition 在 AbstractBeanDefinition 的基础上定义了更多属性。
public class RootBeanDefinition extends AbstractBeanDefinition {

    // BeanDefinitionHolder 存储 Bean 的名称、别名、BeanDefinition
    private BeanDefinitionHolder decoratedDefinition;

    // AnnotatedElement 是java反射包的接口,通过它可以查看 Bean 的注解信息
    private AnnotatedElement qualifiedElement;

    // 允许缓存
    boolean allowCaching = true;

    // 工厂方法是否唯一
    boolean isFactoryMethodUnique = false;

    // 封装了 java.lang.reflect.Type,提供了泛型相关的操作
    volatile ResolvableType targetType;

    // 缓存 Class,表示 RootBeanDefinition 存储哪个类的信息
    volatile Class<?> resolvedTargetType;

    // 缓存工厂方法的返回类型
    volatile ResolvableType factoryMethodReturnType;

    // 这是以下四个构造方法字段的通用锁
    final Object constructorArgumentLock = new Object();
    // 用于缓存已解析的构造方法或工厂方法
    Executable resolvedConstructorOrFactoryMethod;
    // 将构造方法参数标记为已解析
    boolean constructorArgumentsResolved = false;
    // 用于缓存完全解析的构造方法参数
    Object[] resolvedConstructorArguments;
    // 缓存待解析的构造方法参数
    Object[] preparedConstructorArguments;

    // 这是以下两个后处理字段的通用锁
    final Object postProcessingLock = new Object();
    // 表明是否被 MergedBeanDefinitionPostProcessor 处理过
    boolean postProcessed = false;
    // 在生成代理的时候会使用,表明是否已经生成代理
    volatile Boolean beforeInstantiationResolved;

    // 实际缓存的类型是 Constructor、Field、Method 类型
    private Set<Member> externallyManagedConfigMembers;

    // InitializingBean中 的 init 回调函数名 afterPropertiesSet 会在这里记录,以便进行生命周期回调
    private Set<String> externallyManagedInitMethods;

    // DisposableBean 的 destroy 回调函数名 destroy 会在这里记录,以便进生命周期回调
    private Set<String> externallyManagedDestroyMethods;

    ...
}
5.5、ChildBeanDefinition
该类继承自 AbstractBeanDefinition。其相当于一个子类,不可以单独存在,必须依赖一个父 BeanDetintion,构造 ChildBeanDefinition 时,通过构造方法传入父 BeanDetintion 的名称或通过 setParentName 设置父名称。它可以从父类继承方法参数、属性值,并可以重写父类的方法,同时也可以增加新的属性或者方法。若重新定义 init 方法,destroy 方法或者静态工厂方法,ChildBeanDefinition 会重写父类的设置。
从 Spring 2.5 开始,以编程方式注册 Bean 定义的首选方法是 GenericBeanDefinition,GenericBeanDefinition 可以有效替代 ChildBeanDefinition 的绝大分部使用场合。
5.6、GenericBeanDefinition
GenericBeanDefinition 是 Spring 2.5 以后新引入的 BeanDefinition,是 ChildBeanDefinition 更好的替代者,它同样可以通过 setParentName 方法设置父 BeanDefinition。
5.7、 ConfigurationClassBeanDefinition
该类继承自 RootBeanDefinition ,并实现了 AnnotatedBeanDefinition 接口。这个 BeanDefinition 用来描述在标注 @Configuration 注解的类中,通过 @Bean 注解实例化的 Bean。
其功能特点如下:
1、如果 @Bean 注解没有指定 Bean 的名字,默认会用方法的名字命名 Bean。
2、标注 @Configuration 注解的类会成为一个工厂类,而标注 @Bean 注解的方法会成为工厂方法,通过工厂方法实例化 Bean,而不是直接通过构造方法初始化。
3、标注 @Bean 注解的类会使用构造方法自动装配;
5.8、AnnotatedGenericBeanDefinition
该类继承自 GenericBeanDefinition ,并实现了 AnnotatedBeanDefinition 接口。这个 BeanDefinition 用来描述标注 @Configuration 注解的 Bean。
5.9、ScannedGenericBeanDefinition
该类继承自 GenericBeanDefinition ,并实现了 AnnotatedBeanDefinition 接口。 这个 BeanDefinition 用来描述标注 @Component 注解的 Bean,其派生注解如 @Service、@Controller 也同理。
最后,我们来做个总结。BeanDefinition 主要是用来描述 Bean,其存储了 Bean 的相关信息,Spring 实例化 Bean 时需读取该 Bean 对应的 BeanDefinition。BeanDefinition 整体可以分为两类,一类是描述通用的 Bean,还有一类是描述注解形式的 Bean。一般前者在 XML 时期定义 <bean> 标签以及在 Spring 内部使用较多,而现今我们大都使用后者,通过注解形式加载 Bean。
六、BeanDefinitionRegistry(注册BeanDefinition)
上面我们已经对 BeanDefinition 进行了讨论,BeanDefinition 是对 Bean 的定义,其保存了 Bean 的各种信息,如属性、构造方法参数、是否单例、是否延迟加载等。这里将会介绍如何将Bean定义成BeanDefinition,之后放入Spring容器中,我们常说的Spring容器其实就是我们上面介绍到的BeanFactory中的beanDefinitionMap,这是一个Map,key为Bean的名称,value是Bean的BeanDefinition。
/** Map of bean definition objects, keyed by bean name. */
private final Map<String, BeanDefinition> beanDefinitionMap = new ConcurrentHashMap<>(256);
我们已经知道应用上下文中的BeanFactory的实现类是DefaultListableBeanFactory,是一个具有注册功能的完整 Bean 工厂,注册 Bean 的方法是 registerBeanDefinition,DefaultListableBeanFactory 通过实现 BeanDefinitionRegistry 接口,重写该方法。
public class DefaultListableBeanFactory extends AbstractAutowireCapableBeanFactory
        implements ConfigurableListableBeanFactory, BeanDefinitionRegistry, Serializable {

    ...

    @Override
    public void registerBeanDefinition(String beanName, BeanDefinition beanDefinition)
            throws BeanDefinitionStoreException {
        ...
    }
    ...
}
讨论 registerBeanDefinition 方法之前,先来简单介绍 BeanDefinitionRegistry 接口。
6.1、BeanDefinitionRegistry
BeanDefinitionRegistry 是一个接口,它定义了关于 BeanDefinition 的注册、移除、查询等一系列的操作。
public interface BeanDefinitionRegistry extends AliasRegistry {

    // 注册 BeanDefinition
    void registerBeanDefinition(String beanName, BeanDefinition beanDefinition) throws BeanDefinitionStoreException;

    // 移除 BeanDefinition
    void removeBeanDefinition(String beanName) throws NoSuchBeanDefinitionException;

    // 获取 BeanDefinition
    BeanDefinition getBeanDefinition(String beanName) throws NoSuchBeanDefinitionException;

    // 根据 beanName 判断容器是否存在对应的 BeanDefinition
    boolean containsBeanDefinition(String beanName);

    // 获取所有的 BeanDefinition
    String[] getBeanDefinitionNames();

    // 获取 BeanDefinition 数量
    int getBeanDefinitionCount();

    // 判断 beanName 是否被占用
    boolean isBeanNameInUse(String beanName);
}
该接口有三个实现类:DefaultListableBeanFactory、GenericApplicationContext、SimpleBeanDefinitionRegistry,其中 GenericApplicationContext 底层调用的是 DefaultListableBeanFactory 中的实现方法,所以严格意义上来说,只有两个实现类。这里,我们主要讨论 DefaultListableBeanFactory 中的方法实现。
6.2、registerBeanDefinition 方法注册 Bean
前面说过 registerBeanDefinition 方法的主要实现类是 DefaultListableBeanFactory :
public class DefaultListableBeanFactory extends AbstractAutowireCapableBeanFactory implements ConfigurableListableBeanFactory, BeanDefinitionRegistry, Serializable {

    ...

    // 存储所有的 BeanDefinition ,key 是 Bean 的名称。我们一直称呼的容器,底层就是这个 Map
    private final Map<String, BeanDefinition> beanDefinitionMap = new ConcurrentHashMap<>(256);
    // 存储所有 Bean 名称
    private volatile List<String> beanDefinitionNames = new ArrayList<>(256);
    // 存储手动注册的单例 Bean 名称
    private volatile Set<String> manualSingletonNames = new LinkedHashSet<>(16);
    // 存储冻结的 BeanDefinition,留作后面缓存用
    private volatile String[] frozenBeanDefinitionNames;

    ...

    // 方法的入参为 Bean 名称和对应的 BeanDefinition
    @Override
    public void registerBeanDefinition(String beanName, BeanDefinition beanDefinition) throws BeanDefinitionStoreException {

        Assert.hasText(beanName, "Bean name must not be empty");
        Assert.notNull(beanDefinition, "BeanDefinition must not be null");

        // 如果 beanDefinition 的实例为 AbstractBeanDefinition,则进行验证
        if (beanDefinition instanceof AbstractBeanDefinition) {
            try {
                // 验证:
                //     如果有重写方法,但是是工厂方法,则抛出异常,因为重写方法需要代理,而工厂方法无法代理;
                //     通过方法名称,判断 Bean 中该名称方法存在的数量,0:方法不存在,报错;1:方法非重载,overloaded 属性设为 false;
                ((AbstractBeanDefinition) beanDefinition).validate();
            }
            catch (BeanDefinitionValidationException ex) {
                throw new BeanDefinitionStoreException(beanDefinition.getResourceDescription(), beanName,
                        "Validation of bean definition failed", ex);
            }
        }

        BeanDefinition oldBeanDefinition;
        // 先从 beanDefinitionMap 中尝试获取 beanName 对应 BeanDefinition
        oldBeanDefinition = this.beanDefinitionMap.get(beanName);

        // 不为 null,则 beanName 对应的 BeanDefinition 已经存在
        if (oldBeanDefinition != null) {

            // 是否应允许覆盖 BeanDefinition,不允许则抛异常
            if (!isAllowBeanDefinitionOverriding()) {
                throw new BeanDefinitionStoreException(beanDefinition.getResourceDescription(), beanName,
                        "Cannot register bean definition [" + beanDefinition + "] for bean '" + beanName +
                        "': There is already [" + oldBeanDefinition + "] bound.");
            }

            /***************************** 若允许覆盖 *****************************/

            // 判断 Bean 的角色大小:
            //      0:用户定义的 Bean、1:来源于配置文件的 Bean、2:Spring 内部的 Bean;
            // 当原 BeanDefinition 角色小于新的 BeanDefinition 角色时,输出一个 warn 日志,提示 BeanDefinition 被覆盖
            else if (oldBeanDefinition.getRole() < beanDefinition.getRole()) {
                // e.g. was ROLE_APPLICATION, now overriding with ROLE_SUPPORT or ROLE_INFRASTRUCTURE
                if (this.logger.isWarnEnabled()) {
                    this.logger.warn("Overriding user-defined bean definition for bean '" + beanName +
                            "' with a framework-generated bean definition: replacing [" +
                            oldBeanDefinition + "] with [" + beanDefinition + "]");
                }
            }
            // 当新 BeanDefinition 属性值不等于原 BeanDefinition 属性值时,输出 info 提示信息
            else if (!beanDefinition.equals(oldBeanDefinition)) {
                if (this.logger.isInfoEnabled()) {
                    this.logger.info("Overriding bean definition for bean '" + beanName +
                            "' with a different definition: replacing [" + oldBeanDefinition +
                            "] with [" + beanDefinition + "]");
                }
            }
            // 最后,输出 debug 日志信息:用等效的新 BeanDefinition 覆盖原 BeanDefinition
            else {
                if (this.logger.isDebugEnabled()) {
                    this.logger.debug("Overriding bean definition for bean '" + beanName +
                            "' with an equivalent definition: replacing [" + oldBeanDefinition +
                            "] with [" + beanDefinition + "]");
                }
            }
            // 添加至 BeanDefinition 集合,并覆盖原 BeanDefinition
            this.beanDefinitionMap.put(beanName, beanDefinition);
        }

        // Map 中无对应的 BeanDefinition,则直接注册
        else {
            // 已开始创建 Bean
            if (hasBeanCreationStarted()) {
                synchronized (this.beanDefinitionMap) {
                    // 将 Bean 对应的 BeanDefinition 放入 beanDefinitionMap 中
                    this.beanDefinitionMap.put(beanName, beanDefinition);

                    // 创建新的 beanNames 集合,并将已缓存的 beanName 和新的 beanName 加入该集合
                    List<String> updatedDefinitions = new ArrayList<>(this.beanDefinitionNames.size() + 1);
                    updatedDefinitions.addAll(this.beanDefinitionNames);
                    updatedDefinitions.add(beanName);
                    this.beanDefinitionNames = updatedDefinitions;

                    // 在手动注册 Bean 的集合中,如果存在同名的 beanName,则将集合中同名的 beanName 删除
                    if (this.manualSingletonNames.contains(beanName)) {
                        Set<String> updatedSingletons = new LinkedHashSet<>(this.manualSingletonNames);
                        updatedSingletons.remove(beanName);
                        this.manualSingletonNames = updatedSingletons;
                    }
                }
            }
            // 仍处于启动注册阶段
            else {
                // 将当前 Bean 对应的 BeanDefinition 放入 beanDefinitionMap 中
                this.beanDefinitionMap.put(beanName, beanDefinition);
                // 将当前 beanName 放入 beanDefinitionNames
                this.beanDefinitionNames.add(beanName);
                // 删除手动注册 Bean 集合中同名的 beanName
                this.manualSingletonNames.remove(beanName);
            }

            // 将存储冻结 BeanDefinition 的 Map 置为 null
            this.frozenBeanDefinitionNames = null;
        }

        // 当前注册的 BeanDefinition 已在 beanDefinitionMap 中存在,或者其实例已在存储单例 Bean 的 Map 中存在
        if (oldBeanDefinition != null || containsSingleton(beanName)) {

            // 重置 BeanDefinition,主要做一些清理工作
            resetBeanDefinition(beanName);
        }
    }
}
执行完 registerBeanDefinition 方法后,Bean 的名称和对应的 BeanDefinition 就被放入了容器中,后续获取 Bean 也是从这个容器中获取。
当然,DefaultListableBeanFactory 还实现了 BeanDefinitionRegistry 接口的其它方法,如对 BeanDefinition 进行移除、判断是否存在、获取数量等操作,其实都是围绕 beanDefinitionMap 这个 Map 进行的,这里就不详细介绍。
除了BeanDefinitionRegister的,Spring还提供了一个统一操作单例Bean的类SingletonBeanRegistry,通过该类可直接对单例 Bean 的实例进行存储、注册等操作。
七、SingletonBeanRegistry(注册单例Bean实例)
SingletonBeanRegistry 是一个接口,其定义了操作单例 Bean 实例的一些基础方法:
public interface SingletonBeanRegistry {

    // 注册单例 Bean。其实就是将该 Bean 保存到一个专门存储单例 Bean 实例的Map中,Key是 beanName,Value是对应的单例 Bean 实例
    void registerSingleton(String beanName, Object singletonObject);

    // 通过 beanName 获取该单例 Bean 实例
    Object getSingleton(String beanName);

    // 通过 beanName 判断该单例 Bean 实例是否存在
    boolean containsSingleton(String beanName);

    // 返回所有单例 Bean 的名称
    String[] getSingletonNames();

    // 返回已注册的单例 Bean 实例数量
    int getSingletonCount();

    // 返回当前使用的单例锁,主要提供给外部协作者使用
    Object getSingletonMutex();
}
这个接口的核心实现类是 DefaultSingletonBeanRegistry,该类不仅实现了这些基础方法,还针对单例 Bean 扩展了许多功能,如:存储 Bean 之间的依赖关系、存储 Bean 的包含关系(外部类包含内部类)、获取 Bean 所处的状态(正在创建、创建完毕等)、回调销毁 Bean 时触发的 destroy 方法等。
下面是 DefaultSingletonBeanRegistry 类中的核心属性和方法:
public class DefaultSingletonBeanRegistry extends SimpleAliasRegistry implements SingletonBeanRegistry {

    /********** 1、定义的一些 Map 属性,用来保存单例 Bean 实例、 Bean 的依赖关系 **********/

    // 缓存单例 Bean 实例,Key 是 beanName,Value 是单例 Bean 实例
    private final Map<String, Object> singletonObjects = new ConcurrentHashMap<>(256);

    // 缓存 Bean 对应的 ObjectFactory
    //      ObjectFactory 是获取 Bean 实例的工厂,只不过这里获取的 Bean 还未完全实例化,属于提早暴露的 Bean
    //      该属性在解决循环依赖时使用,后续会深入讨论
    private final Map<String, ObjectFactory<?>> singletonFactories = new HashMap<>(16);

    // 缓存 singletonFactories 属性中通过 ObjectFactory 创建的 Bean
    //      该属性也是在解决循环依赖时使用,后续会深入讨论
    private final Map<String, Object> earlySingletonObjects = new HashMap<>(16);

    // 保存已注册的单例 Bean 名称
    private final Set<String> registeredSingletons = new LinkedHashSet<>(256);

    // 保存当前正在创建的 Bean 的名称
    private final Set<String> singletonsCurrentlyInCreation = Collections.newSetFromMap(new ConcurrentHashMap<>(16));

    // 保存当前从创建检查中排除的 Bean 的名称
    private final Set<String> inCreationCheckExclusions = Collections.newSetFromMap(new ConcurrentHashMap<>(16));

    ...

    // 当前 Bean 是否处于销毁状态
    private boolean singletonsCurrentlyInDestruction = false;

    // 保存实现了 DisposableBean 接口的 Bean,在销毁 Bean 时,会回调该 Bean 中的 destory 方法
    private final Map<String, Object> disposableBeans = new LinkedHashMap<>();

    // 保存 Bean 的包含关系,key 是 Bean 的名称,value 是 Bean 里面包含的其它 Bean 名称集合
    private final Map<String, Set<String>> containedBeanMap = new ConcurrentHashMap<>(16);

    // 保存 Bean 的依赖关系:key 是 Bean 的名称,value 是依赖于该 Bean 的其它 Bean 名称集合
    private final Map<String, Set<String>> dependentBeanMap = new ConcurrentHashMap<>(64);

    // 保存 Bean 的依赖关系:key 是 Bean 的名称,value 是该 Bean 所依赖的其它 Bean 名称集合
    private final Map<String, Set<String>> dependenciesForBeanMap = new ConcurrentHashMap<>(64);

    /******************************** 2、注册单例 Bean 实例及对应的实例工厂 ********************************/

    // 注册单例 Bean 实例
    @Override
    public void registerSingleton(String beanName, Object singletonObject) throws IllegalStateException {
        Assert.notNull(beanName, "Bean name must not be null");
        Assert.notNull(singletonObject, "Singleton object must not be null");

        synchronized (this.singletonObjects) {
            // 通过 beanName 获取 Map 中对应的单例 Bean 实例
            Object oldObject = this.singletonObjects.get(beanName);

            //  如果不为空,则抛出异常,因为单例已经存在,无法再次注册
            if (oldObject != null) {
                throw new IllegalStateException("Could not register object [" + singletonObject +
                        "] under bean name '" + beanName + "': there is already object [" + oldObject + "] bound");
            }

            // 为空,则进入 addSingleton 方法
            addSingleton(beanName, singletonObject);
        }
    }

    // 缓存单例 Bean 实例
    protected void addSingleton(String beanName, Object singletonObject) {
        synchronized (this.singletonObjects) {
            // 将单例 Bean 实例存放至 singletonObjects 集合
            this.singletonObjects.put(beanName, singletonObject);

            // 当 beanName 对应的 Bean 实例已被存放至 singletonObjects 集合时,singletonFactories
            // 和 earlySingletonObjects 集合则不能再持有 beanName 对应的 ObjectFactory 和实例
            // 其中原因会在后续循环依赖的文章深入讨论
            this.singletonFactories.remove(beanName);
            this.earlySingletonObjects.remove(beanName);

            // 存储 Bean 名称
            this.registeredSingletons.add(beanName);
        }
    }

    // 缓存 Bean 对应的 ObjectFactory
    protected void addSingletonFactory(String beanName, ObjectFactory<?> singletonFactory) {
        Assert.notNull(singletonFactory, "Singleton factory must not be null");
        synchronized (this.singletonObjects) {
            if (!this.singletonObjects.containsKey(beanName)) {
                this.singletonFactories.put(beanName, singletonFactory);
                this.earlySingletonObjects.remove(beanName);
                this.registeredSingletons.add(beanName);
            }
        }
    }

    /********************************* 3、获取单例 Bean 实例 *********************************/

    @Override
    public Object getSingleton(String beanName) {

        // 该方法较为复杂,在后续结合循环依赖的场景讨论

    }

    ...

    /***************************** 4、对单例 Bean 实例的基础操作 *****************************/

    // 删除单例 Bean 实例
    protected void removeSingleton(String beanName) {
        synchronized (this.singletonObjects) {
            this.singletonObjects.remove(beanName);
            this.singletonFactories.remove(beanName);
            this.earlySingletonObjects.remove(beanName);
            this.registeredSingletons.remove(beanName);
        }
    }

    // 判断 beanName 对应的单例 Bean 实例时候存在
    @Override
    public boolean containsSingleton(String beanName) {
        return this.singletonObjects.containsKey(beanName);
    }

    // 返回所有单例 Bean 的 beanName
    @Override
    public String[] getSingletonNames() {
        synchronized (this.singletonObjects) {
            return StringUtils.toStringArray(this.registeredSingletons);
        }
    }

    // 返回单例 Bean 实例数量
    @Override
    public int getSingletonCount() {
        synchronized (this.singletonObjects) {
            return this.registeredSingletons.size();
        }
    }

    ...

    /*************************************** 5、 Bean 的状态 **************************************/

    // beanName 对应的 Bean 是否处于实例化阶段
    public boolean isCurrentlyInCreation(String beanName) {
        Assert.notNull(beanName, "Bean name must not be null");
        return (!this.inCreationCheckExclusions.contains(beanName) && isActuallyInCreation(beanName));
    }
    protected boolean isActuallyInCreation(String beanName) {
        return isSingletonCurrentlyInCreation(beanName);
    }
    public boolean isSingletonCurrentlyInCreation(String beanName) {
        return this.singletonsCurrentlyInCreation.contains(beanName);
    }

    // 单例 Bean 实例化前执行,将正要创建的 Bean 加入 singletonsCurrentlyInCreation 集合
    protected void beforeSingletonCreation(String beanName) {
        if (!this.inCreationCheckExclusions.contains(beanName) && !this.singletonsCurrentlyInCreation.add(beanName)) {
            throw new BeanCurrentlyInCreationException(beanName);
        }
    }

    // 单例 Bean 实例化后执行,从 singletonsCurrentlyInCreation 集合中移除已创建的 Bean
    protected void afterSingletonCreation(String beanName) {
        if (!this.inCreationCheckExclusions.contains(beanName) && !this.singletonsCurrentlyInCreation.remove(beanName)) {
            throw new IllegalStateException("Singleton '" + beanName + "' isn't currently in creation");
        }
    }

    ...

    /********************* 6、 存储 Bean 之间的关系、判断 Bean 之间的关系 *********************/

    // 保存具有包含关系的 Bean(内部类与外部类)
    public void registerContainedBean(String containedBeanName, String containingBeanName) {
        synchronized (this.containedBeanMap) {
            Set<String> containedBeans =
                    this.containedBeanMap.computeIfAbsent(containingBeanName, k -> new LinkedHashSet<>(8));
            if (!containedBeans.add(containedBeanName)) {
                return;
            }
        }
        registerDependentBean(containedBeanName, containingBeanName);
    }

    // 保存具有依赖关系的 Bean
    public void registerDependentBean(String beanName, String dependentBeanName) {
        String canonicalName = canonicalName(beanName);

        synchronized (this.dependentBeanMap) {
            Set<String> dependentBeans =
                    this.dependentBeanMap.computeIfAbsent(canonicalName, k -> new LinkedHashSet<>(8));
            if (!dependentBeans.add(dependentBeanName)) {
                return;
            }
        }

        synchronized (this.dependenciesForBeanMap) {
            Set<String> dependenciesForBean =
                    this.dependenciesForBeanMap.computeIfAbsent(dependentBeanName, k -> new LinkedHashSet<>(8));
            dependenciesForBean.add(canonicalName);
        }
    }

    ...

    /***************************** 7、 销毁 Bean 的方法 *****************************/

    ...
}
DefaultSingletonBeanRegistry 类中的属性及方法虽然很多,但也有规律可循的,大致分为对单例 Bean 实例的操作、管理 Bean 之间关系、针对Bean的不同状态进行操作及销毁 Bean 的操作。 该类中的核心还是那些 Map,类中的所有方法都是对这些 Map 进行操作,而这些 Map 中存储的是不同场景下的单例 Bean 。
参考文章:
[1]Spring(二)核心容器 - 简介 、BeanFactory、ApplicationContext(转载)
[2]Spring(三)核心容器 - ApplicationContext 上下文启动准备(转载)
[3]Spring(四)核心容器 - BeanDefinition 解析(转载)
[4]Spring(五)核心容器 - 注册 Bean、BeanDefinitionRegistry简介(转载)
[5]Spring(六)核心容器 - 注册单例 Bean 实例、SingletonBeanRegistry 简介(转载)

 浙公网安备 33010602011771号