Ansible的Playbook的编写
在Ansible中,将各个模块组合起来成为一个YAML格式的配置文件,这个配置文件叫做Playbook,
Playbook和模块的关系类似于shell脚本和Linux命令之间的关系。
Playbook的定义
一个Playbook可以包含多个Play,一个Play必须包含:
- hosts 定义在哪些服务器上执行
- tasks 定义执行列表,task的语法:module: options
当options较长时可以采用缩进子块的形式。
一个Playbook可以使用导入其它的Playbook
---

   - inclued: db.yml

   - include: web.yml
使用ansible-playbook执行Playbook
ansible的命令行参数:
- -T TIMEOUT, --timeout=TIMEOUT 建立SSH的超时时间
- --private-key=PRIVATE_KEY_FILE SSH的私钥文件
- -i INVENTORY, --inventory=INVENTORY 指定inventoey文件
- -f FORKS, --forks=FORKS 并发的进程数,默认是5
- --list-hosts 匹配到的服务器列表
- --list-tasks task列表
- --step 每执行一个tasks暂停,等待用户确认
- --syntax-check 检查palybook的语法
- -C, --check 检查是否会修改远程服务器,相当于预测执行结果
Playbook定义变量
Ansible有多种定义变量的方法,对于playbook,最简单的就是定义在Playbook的vars项中;
- hosts
  vars:
    mysql_port: 80
当变量多时,可以保存在一个独立的文件中
---
- hosts: all
 vars:
   mysql_prot: 80
 vars_file:
   - /vars/external_vars.yml
变量文件的格式:
---
process: 2000
username: scott
注册变量
通过register获取上条命令的执行结果。并在下一个task中引用该变量
- hosts: webservers
  tasks:
     - shell: /usr/bin/foo
       register: foo_result
       ignore_errors: True

     - shell: /usr/bin/bar
       when: foo_result.rc == 5
Facts变量:
在Ansible中有些变量不需要进行任何设置就能直接使用,这些变量叫做Facts变量。
这些变量是Ansible从远程服务器上获取的系统信息。
可以通过setup模块查看。
ansible webservers -m setup
在Playbook中默认是收集远程机器信息的,可以设置为no,提高Ansible的执行效率。
-- hosts: dbservers
gather_facts: no
循环:
---
- name: Install Mysql package
  yum: name={{ item }} state=installed
  with_items:
    - mysql-server
    - Mysql-python
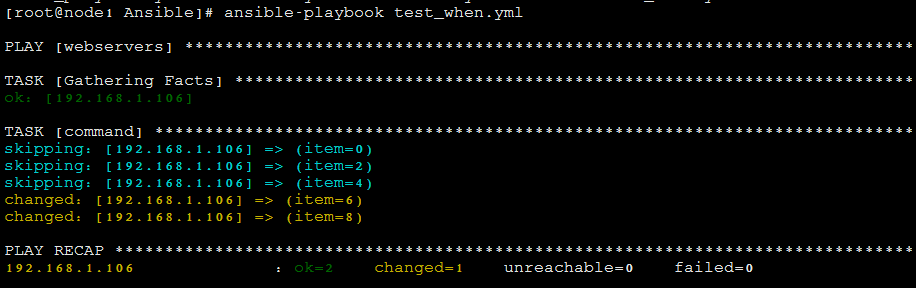
条件:
---
- hosts: webservers
  tasks:
    - command: echo {{ item }}
      with_items: [ 0,2,4,6,8]
      when: item > 5
执行结果;
实例:
使用Playbook部署nginx
---
- hosts: webservers
  become: yes
  become_method: sudo
  vars:
    worker_connections: 1024
    worker_processes: 4
    max_open_files: 65506

  tasks:
    - name: install nginx
      yum: name=nginx update_cache=yes state=present

    - name: copy nginx config file
      template: src=/root/study/Ansible/nginx.conf.j2 dest=/etc/nginx/nginx.conf
      notify: restart nginx

    - name: copy index.html
      template:
        src: /root/study/Ansible/index.html.j2
        dest: /usr/share/nginx/www/index.html
        mode: 0644
      notify: restart nginx

  handlers:
    - name: restart nginx
      service: name=nginx state=restarted
jinjia2模板文件:
nginx.conf.j2
worker_processes  {{ worker_processes }};
worker_rlimit_nofile {{ max_open_files }};

events {
    worker_connections {{ worker_connections }};
}


http {
    server {
            listen 80 default_server;
            listen [::]:80 default_server ipv6only=on;

            listen 443 ssl;

            root /usr/share/nginx/html;
            index index.html index.htm;

            server_name localhost;

            location / {
                    try_files $uri $uri/ =404;
            }
    }
}
index.html.j2
<html>
  <head>
    <title>Welcome to ansible</title>
  </head>
  <body>
  <h1>nginx, configured by Ansible</h1>
  <p>If you can see this, Ansible successfully installed nginx.</p>

  <p>{{ ansible_hostname }}</p>
  </body>
</html>
部署MongoDB
---
- hosts: dbservers
  become: yes
  become_method: sudo
  vars:
    mongodb_datadir_prefix: /data
    mongod_port: 27018

  tasks:
    - name: Create the mongodb user
      user: name=mongodb comment="MongoDB"

    - name: Create the data directory for the namenode metadata
      file: path={{ mongodb_datadir_prefix }} owner=mongodb group=mongodb state=directory

    - name: Install the mongodb package
      apt: name={{ item }} state=installed
      with_items:
        - mongodb-server
        - mongodb-clients
        - rsyslog-mongodb

    - name: create data directory for mongodb
      file:
        path: "{{ mongodb_datadir_prefix }}/mongo-{{ ansible_hostname }}"
        state: directory
        owner: mongodb
        group: mongodb

    - name: create log directory for mongodb
      file: path=/var/log/mongo state=directory owner=mongodb group=mongodb

    - name: Create the mongodb startup file
      template: src=mongod.j2 dest=/etc/init.d/mongod-{{ ansible_hostname }} mode=0655

    - name: Create the mongodb configuration file
      template: src=mongod.conf.j2 dest=/etc/mongod-{{ ansible_hostname }}.conf

    - name: Copy the keyfile for authentication
      copy: src=secret dest={{ mongodb_datadir_prefix }}/secret owner=mongodb group=mongodb mode=0400

    - name: Start the mongodb service
      command: creates=/var/lock/subsys/mongod-{{ ansible_hostname }} /etc/init.d/mongod-{{ ansible_hostname }} start
配置文件:mongod.conf.j2
# mongo.conf
smallfiles=true

#where to log
logpath=/var/log/mongo/mongod-{{ ansible_hostname }}.log

logappend=true

# fork and run in background
fork = true

port = {{ mongod_port }}

dbpath={{ mongodb_datadir_prefix }}mongo-{{ ansible_hostname }}
keyFile={{ mongodb_datadir_prefix }}/secret

# location of pidfile
pidfilepath=/var/run/mongod-{{ ansible_hostname }}.pid
另外还可以将Playbook抽象成role。
可以参考https://galaxy.ansible.com,下载别人写好的role
初始化role
ansible-galaxy init /etc/ansible/roles/websrvs
安装别人写好的role
ansible-galaxy install -p /etc/ansible/roles bennojoy.mysql

 浙公网安备 33010602011771号