Python处理命令行参数
1. 将命令行参数保存在列表中,注意argv[0]是程序本身的名字:
argv.py
import sys
print(sys.argv)
print(sys.argv[1])
运行得到

2. 使用sys.stdin和fileinput读取标准输入,并打印在终端类似shell中的管道
import sys
for line in sys.stdin:
  print(line,end="")
可以像shell脚本一样,通过标准输入给程序输入内容
python read_stdin.py </etc/passwd
python read_stdin.py -
cat /etc/passwd |python read_stdin.py
将标准输入保存在一个列表中
import sys
def get_content():
     return sys.stdin.readlines()
print(get_content())
python readlines_stdin.py <test/1.txt
['hello\n', 'world\n']
3. 利用fileinput读取标准输入
#/usr/bin/env python
#coding=utf-8
import fileinput
for line in fileinput.input():
     print(line,end="")
python file_input1.py /etc/passwd
python file_input1.py </etc/passwd
python file_input1.py /etc/passwd /etc/my.cnf
fileinput常用于从文件中读取内容
import fileinput

for line in fileinput.input():
    meta = [fileinput.filename(), fileinput.fileno(), fileinput.filelineno(),
            fileinput.isfirstline(), fileinput.isstdin()]
    print(*meta, end="")
    print()
    print(line, end="")

4. 使用getpass读取密码:
import getpass

user=getpass.getuser()
passwd=getpass.getpass('you password: ')
print(user,passwd)
可以避免输入密码被看见

5.使用argparse解析命令行参数
agrparse能够根据从sys.arg中解析参数,并自动生成帮助信息
from __future__ import print_function
import argparse

def _argparse():
        parser = argparse.ArgumentParser(description="This is description")
        parser.add_argument('--host', action='store',
                                dest='server',default="localhost", help='connect to host')
        parser.add_argument('-t', action='store_true',
                                    default=False, dest='boolean_switch', help='Set a switch to true')
        return parser.parse_args()

def main():
       parser = _argparse()
       print(parser)
       print('host =', parser.server)
       print('boolean_switch=', parser.boolean_switch)

if __name__ == '__main__':
    main()
格式:rgumentParser.add_argument(name or flags...[, action][, nargs][, const][, default][, type][, choices][, required][, help][, metavar][, dest])
name:参数的名字
action: 遇到参数时的动作,默认为store,store_xx,表示将参数转换为xx
nargs:参数的个数
dest:解析后的参数的名字
type:参数的类型

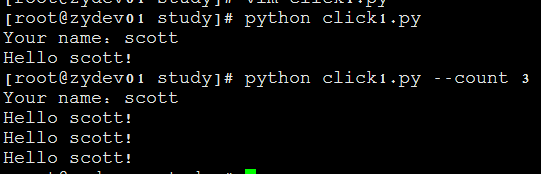
6. 使用Click创建命令行解析
Click比较argparse更加的快速和简单,不过需要安装一个非标准库click
pip install click
import click

@click.command()
@click.option('--count', default=1, help='Number of greetings.')
@click.option('--name', prompt='Your name',
              help='The person to greet.')
def hello(count, name):
    """Simple program that greets NAME for a total of COUNT times."""
    for x in range(count):
        click.echo('Hello %s!' % name)

if __name__ == '__main__':
    hello()
commond让函数成为命令行接口
option:增加命令行选项
echo:输出结果
prompt:如果没有指定name这个参数时,会进入交互模式下输入
也可以像Linux中的fc一样进入默认编辑器
import click
message = click.edit()
print(message,end="")
7. 使用prompt_toolkit打造交互式命令行工具
pip install prompt_toolkit
from prompt_toolkit import prompt

while True:
    user_input = prompt('>')
    print(user_input)
Linux下的快捷键都可以使用,输入时退格键,也不会出现乱码
加入历史输入功能
from __future__ import unicode_literals
from prompt_toolkit import prompt
from prompt_toolkit.history import FileHistory

while True:
    user_input = prompt('>',
         history=FileHistory('history.txt'),
       )
    print(user_input)
加入自动提示功能
from __future__ import unicode_literals
from prompt_toolkit import prompt
from prompt_toolkit.history import FileHistory
from prompt_toolkit.auto_suggest import AutoSuggestFromHistory

while True:
    user_input = prompt('>',
                        history=FileHistory('history.txt'),
                        auto_suggest=AutoSuggestFromHistory(),
                       )
    print(user_input)
会以按字体进行提示

加入自动补全功能:
from __future__ import unicode_literals
from prompt_toolkit import prompt
from prompt_toolkit.history import FileHistory
from prompt_toolkit.auto_suggest import AutoSuggestFromHistory
from prompt_toolkit.contrib.completers import WordCompleter

SQLCompleter = WordCompleter(['select', 'from', 'insert', 'update', 'delete', 'drop'],
                             ignore_case=True)

while True:
    user_input = prompt('SQL>',
                        history=FileHistory('history.txt'),
                        auto_suggest=AutoSuggestFromHistory(),
                        completer=SQLCompleter,
                        )
    print(user_input)
按tab键就可以自动补全


 浙公网安备 33010602011771号