Android 服务组件
Android 服务组件
定义
服务是Android中实现程序后台运行的解决方案,不和用户交互而且要求长期运行的任务。
多线程编程
1.线程基本用法
// 继承Thread类
class MyThread extends Thread{

    @Override
    public void run() {
        // 处理逻辑
    }
}
// 启动
new MyThread().start();

//实现Runnable接口
class MyThread implements Runnable{

    @Override
    public void run() {
        // 处理逻辑
    }
}
// 启动
MyThread myThread = new MyThread();
new Thread(myThread).start();

//常用写法
new Thread(new Runnable(){
    @Override
    public void run() {
        //处理逻辑
    }
}).start();
//缩写为
new Thread(() -> {
    //处理逻辑
}).start();
2.子线程中更新UI
因为活动的UI是在主线程中,通过子线程直接去修改UI的话,程序会报错,因此这里在子线程中调用下主线程的Handler对象中的handleMessage()来处理下
public class MainActivity extends AppCompatActivity {
    private static final int UPDATE_TEXT = 1;
    private TextView text;

    @SuppressLint("MissingInflatedId")
    @Override
    protected void onCreate(Bundle savedInstanceState) {
        super.onCreate(savedInstanceState);
        setContentView(R.layout.activity_main);
        text = findViewById(R.id.text_view);
        findViewById(R.id.button).setOnClickListener(v -> {
            new Thread(() -> {
                //处理发送信息逻辑
                handler.sendEmptyMessage(UPDATE_TEXT);
            }).start();

        });

    }

    //不带参数的函数已经弃用,建议传入Looper
    private Handler handler = new Handler(Looper.getMainLooper()) {
        @Override
        public void handleMessage(@NonNull Message msg) {
            switch (msg.what) {
                case UPDATE_TEXT:
                    text.setText("Nice to meet you!");
                    break;
                default:
                    break;
            }
        }
    };

}
3.异步消息处理机制
3.1 Message
线程之间传递的消息,内部可携带少量信息,用于不同线程之间交换数据
字段包含:what,arg1,arg2,Object
3.2 Handler
处理者
sendMessage() 发送消息
handleMessage() 处理消息
3.3 MessageQueue
消息队列
存储Handler发送的消息
每个线程只有一个MessageQueue
3.4 Looper
Looper 是每个线程中MessageQueue的管家
调用Looper 的loop()方法后,会进入一个无限循环中
发现一个消息,就取出交给Handler的handleMessage()方法处理,每个线程只有一个Looper对象。
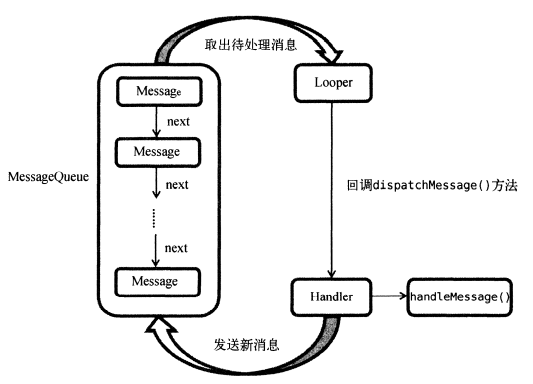
一条消息经过上面的流程后,子流程进入主流程中,从不能更新UI到可以更新,整个异步消息处理的核心思想就是如此。
之前我们有使用到runOnUiThread()方法,其实也是一个异步消息处理机制的接口封装,背后的原理和上图是一样的。
4.使用AsyncTask
AsyncTask背后的原理还是基于异步消息处理的,只是Android帮我们做了很好的封装,让我们可以十分简单的从子线程切换到主线程。

基本用法:
它是一个抽象类,想使用它,得去继承它,继承的时候, 有三个泛型参数
params 是执行AsyncTask时需要传入的参数,用于后台任务中使用
Progress 当前进度
Result 当前任务执行完毕后结果返回
class DownloadTask extends AsyncTask<Void,Integer,Boolean>{
    ....
}
//这三个泛型的参数和上面的一一对应
public class MainActivity extends AppCompatActivity {
    private static final int UPDATE_TEXT = 1;
    private TextView text;

    @Override
    protected void onCreate(Bundle savedInstanceState) {
        DownloadTask task = new DownloadTask();
        task.execute();
    }

    class DownloadTask extends AsyncTask<Void, Integer, Boolean> {

        private ProgressDialog progressDialog = new ProgressDialog(MainActivity.this);

        private int downloadPercent = 0;

        @Override
        protected Boolean doInBackground(Void... voids) {
            try {
                while (true) {
                    downloadPercent = doDownload();
                    publishProgress(downloadPercent);
                    if (downloadPercent >= 100) {
                        break;
                    }
                }

            } catch (Exception e) {
                return false;
            }

            return true;
        }

        private int doDownload() {
            try {
                Thread.sleep(1000);
            } catch (InterruptedException e) {
                e.printStackTrace();
            }
            return downloadPercent + 10;
        }

        @Override
        protected void onPreExecute() {
            progressDialog.show();
        }

        @Override
        protected void onPostExecute(Boolean result) {
            progressDialog.dismiss();//关闭对话框
            //提示下载结果
            if (result) {
                Toast.makeText(progressDialog.getContext(), "Download succeeded", Toast.LENGTH_SHORT).show();
            } else {
                Toast.makeText(progressDialog.getContext(), "Download failed", Toast.LENGTH_SHORT).show();
            }
        }

        @Override
        protected void onProgressUpdate(Integer... values) {
            progressDialog.setMessage("Downloaded " + values[0] + "%");
        }


    }


}
服务的基本用法
1.定义一个服务
public class MyService extends Service {
    public MyService() {
    }


// 这里重写下onCreate,onStartCommand,onDestroy三个方法
    @Override
    public void onCreate() {
        super.onCreate();
        Log.d("MyService","onCreate executed");
    }

    @Override
    public int onStartCommand(Intent intent, int flags, int startId) {
        Log.d("MyService","onStartCommand executed");
        return super.onStartCommand(intent, flags, startId);
    }

    @Override
    public void onDestroy() {
        Log.d("MyService","onDestroy executed");
        super.onDestroy();
    }

    @Override
    public IBinder onBind(Intent intent) {
        // TODO: Return the communication channel to the service.
        throw new UnsupportedOperationException("Not yet implemented");
    }
}
在AndroidManifest.xml中自动生成了以下配置
<service
    android:name=".MyService"
    android:enabled="true"
    android:exported="true"></service>
2.启动和停止服务
findViewById(R.id.start_service).setOnClickListener(v -> {
    Intent startIntent = new Intent(this, MyService.class);
    startService(startIntent);
});

findViewById(R.id.stop_service).setOnClickListener(v -> {
    Intent stopIntent = new Intent(this, MyService.class);
    stopService(stopIntent);
});
3.活动和服务进行通信
private DownloadBinder mBinder = new DownloadBinder();

    @Override
    public IBinder onBind(Intent intent) {
        return mBinder;
    }

    class DownloadBinder extends Binder{
        public void startDownload(){
            Log.d("MyService","startDownload executed");
        }

        public int getProgress(){
            Log.d("MyService","getProgress executed");
            return 0;
        }

    }
服务的绑定和解绑
private MyService.DownloadBinder downloadBinder;

private ServiceConnection connection = new ServiceConnection() {
    @Override
    public void onServiceConnected(ComponentName name, IBinder service) {
        downloadBinder = (MyService.DownloadBinder) service;
        downloadBinder.startDownload();
        downloadBinder.getProgress();
    }

    @Override
    public void onServiceDisconnected(ComponentName name) {

    }
};
// 进行服务绑定
findViewById(R.id.bind_service).setOnClickListener(v -> {
    Intent bindIntent = new Intent(this, MyService.class);
    bindService(bindIntent, connection , BIND_AUTO_CREATE);
});
// 解除服务绑定
findViewById(R.id.unbind_service).setOnClickListener(v -> {
    Intent bindIntent = new Intent(this, MyService.class);
    unbindService(connection);
});
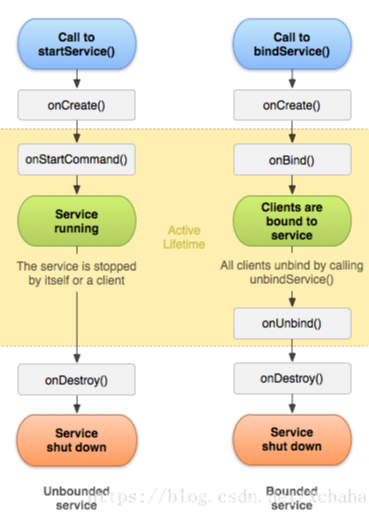
服务的生命周期
1.项目的任何位置调用Context的startService()方法,服务都可以启动起来,并回调onStartCommand()方法
2.服务之前没有创建过时,会先调用onCreate()方法
3.可调用Context的bindService()获取一个服务的持久连接,这时会回调服务中的onBind()方法。类似的,服务没有被创建的时候,onCreate()方法会在onBind()方法之前执行,调用onBind()的方法可获得IBinder对象实例
4.调用stopService()或stopSelf(),可终止服务运行状态,onDestory()执行销毁
更多服务技巧
1.使用前台服务
Intent intent = new Intent(this,MainActivity.class);
PendingIntent pi = PendingIntent.getActivity(this, 0, intent, 0);
// new NotificationCompat.Builder(context) 过时
//取代方法new NotificationCompat.Builder(context,channelId)
Notification notification = new NotificationCompat.Builder(this, "001")
    .setContentTitle("This is content title")
    .setContentText("This is content text").setWhen(System.currentTimeMillis())
    .setSmallIcon(R.mipmap.ic_launcher)
    .setLargeIcon(BitmapFactory.decodeResource(getResources(), R.mipmap.ic_launcher))
    .setContentIntent(pi)
    .build();
startForeground(1,notification);
本文来自博客园,作者:阿寳同學Zybao,转载请注明原文链接:https://www.cnblogs.com/zybao/p/16902186.html

 浙公网安备 33010602011771号